Protocols web: Difference between revisions
| Line 207: | Line 207: | ||
<br/> | <br/> | ||
To see all your observations belonging to a Waterbird Census protocol, go to Menu > Taking part > All my protocol and from the protocol you want to visualise, select | To see all your observations belonging to a Waterbird Census protocol, go to Menu > Taking part > All my protocol and from the protocol you want to visualise, select the year (see image below). You can only see your own records, unless you are a protocol administrator. To know more about administrators, see wiki section...<br/> | ||
<br/> | <br/> | ||
Revision as of 13:41, 31 March 2023
Protocols are standardised ways of collecting data linked to a geometry (points, transects or polygons). The methodology to follow depends on the study's goal. A country administrator will grant you access if you meet certain criteria. Not all protocols are available in all countries. See which protocols are available in which country at.... and see which criteria at....
Too access your list of protocols, go to Menu > Take part > All my protocol. It lists all protocols you have access to in this local portal (see image below).
.png)
If you have access to protocols, you have access to it by Submit button or by the menu Take part, Transmit my sightings or Menu Take part All my protocols
Waterbird Protocol (web)
Access your protocol from Menu > Take part > All my protocol and search for the protocol you want to work at. You will be able to download the map to survey, enter data or edit the protocol.
Download map
.png)
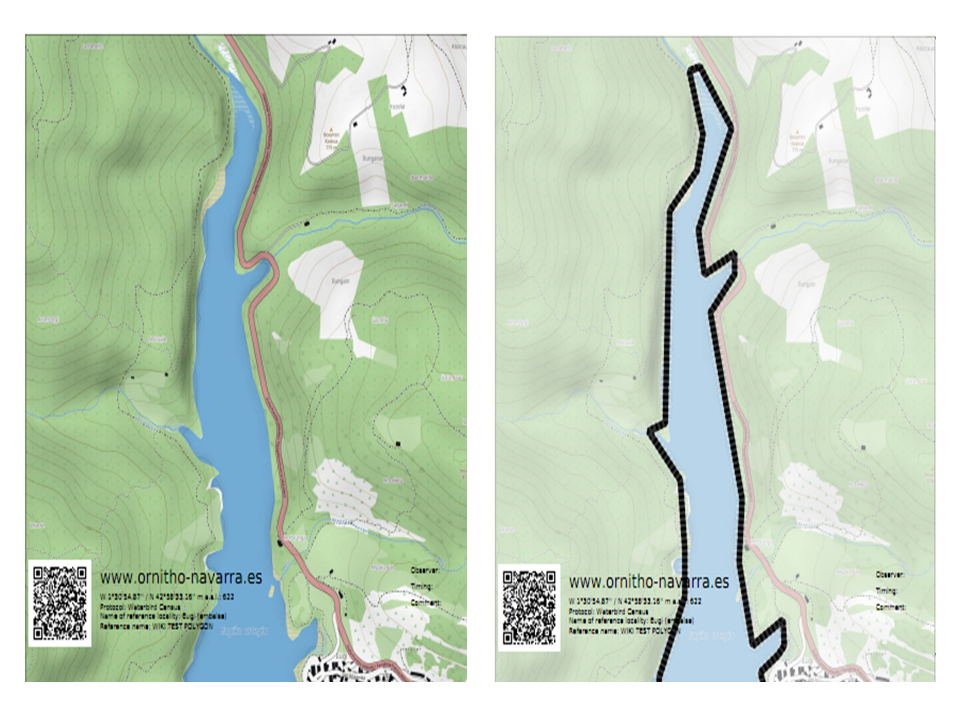
1. Check to print the map with 50% of transparency (see image Map compare: left normal, right 50% transparency as an example).
2. Check to print the map in black and white.
3.
4. Choose from the expandable menu the map layer you would like to print.
5. Click on pdf icon to download the map as a pdf.
Click on the magnifying icon (encircled) to display the polygon on a map on the screen (see example).
Add observations
Click on add observations (see image below) in the protocol you need to enter data.

Starting the protocol
A new panel will require you to enter general parameters regarding the protocol (see image below). Field marked with an asterisk are mandatory.

- 1. Enter date
Choose from the expandable menu the date the survey took place.
- 2. Enter starting time
Enter the time the census started.
- 3. Ending time
Enter the time the census ended.
- 4. Enter comments
Choose from the tabs and type. Note the number of tabs and the information required may differ from country to country:
- Comment: if the comment will refer to a general observation,
- Additional observer: if you name other observer/s participating in the census, or
- Important changes: to note important changes from your previous visit, like noise, pollution or construction work.
- Comment: if the comment will refer to a general observation,
- 5. Hide all records from the public
Check if you do not want other users to see your records.
- 6. Parameters
Enter parameters required for your polygon. Note fields and the order in which they appear may differ from country to country. You may not encounter all possible fields described underneath.
- Comment: You may enter a comment if you find it appropiate.
- Comment: You may enter a comment if you find it appropiate.
- Important changes: Indicate if there have been major changes since your last visit.
- Important changes: Indicate if there have been major changes since your last visit.
- Additional observer: Indicate if you are accompanied by someone whose observations are also recorded.
- Additional observer: Indicate if you are accompanied by someone whose observations are also recorded.
- Ice: Indicate the percentatge of water surface that is frozen.
- Ice: Indicate the percentatge of water surface that is frozen.
- Snow coverage: Indicate the proportion of snow cover.
- Snow coverage: Indicate the proportion of snow cover.
- Count type: Tick roost count if you are counting roosting birds, or during day otherwise.
- Count type: Tick roost count if you are counting roosting birds, or during day otherwise.
- Count method: Indicate if you are surveying from the ground, the air, the water, a different way, or if it is unknown.
- Count method: Indicate if you are surveying from the ground, the air, the water, a different way, or if it is unknown.
- Optical equipment: Indicate which equipment you are using for the survey, if any. Note you can only choose one option.
- Optical equipment: Indicate which equipment you are using for the survey, if any. Note you can only choose one option.
- Coverage: Indicate how much of the designated polygon is covered in the survey.
- Coverage: Indicate how much of the designated polygon is covered in the survey.
- Water level: Indicate the water level.
- Water level: Indicate the water level.
- Visibility: Indicate the approximate distance within which it is possible to identify species.
- Visibility: Indicate the approximate distance within which it is possible to identify species.
- Waves: Indicate how are the waves.
- Waves: Indicate how are the waves.
- Conditions in general: Choose how are surveying conditions overall regarding weather and disturbances, and indicate on next section the reason if surveying conditions are not good.
- Conditions in general: Choose how are surveying conditions overall regarding weather and disturbances, and indicate on next section the reason if surveying conditions are not good.
- Reason(s) for moderate / bad conditions: If general conditions indicated above are noot good, open the expandable menu and choose the reason (see image below). Only one option is possible: choose the one that better adjusts to reality.
- Reason(s) for moderate / bad conditions: If general conditions indicated above are noot good, open the expandable menu and choose the reason (see image below). Only one option is possible: choose the one that better adjusts to reality.

- Count payed: Indicate if the count is payed for or not.
- Count payed: Indicate if the count is payed for or not.
- Number of persons on shore: Enter number.
- Number of persons on shore: Enter number.
- Number of rowing boats: Enter number.
- Number of rowing boats: Enter number.
- Number of motor boats: Enter number
- Number of motor boats: Enter number
- Number of sailing boats: Enter number
- Number of sailing boats: Enter number
- Number of canoes/kayaks: Enter number.
- Number of canoes/kayaks: Enter number.
- Number of fishing boats: Enter number.
- Number of fishing boats: Enter number.
- Number of sports divers: Enter number.
- Number of sports divers: Enter number.
- Number of surfers: Enter number.
- Number of surfers: Enter number.

- 7. No species were seen
Check if your survey did not provide any data. Surveys with no species are also important results! It will mean you followed the established methodology, and therefore your survey is valid, but no birds were present. They can indicate major population changes and are of extreme importance for conservation purposes.
- 8. Continue with the basic list
Select to record only the species strictly related to the protocol (ie. ducks). Which species belong to a basic list is determined by each local portal and may differ from one to another.
- 9. Continue with the extended list
Select to enter the species strictly related to the protocol (ie. ducks) along with other related ones (ie. egrets). Species included in a basic list and an extended list are determined by each local portal and may differ from country to country.
|
Surveys with no species are also important results! Please submit them. It will mean you followed the established methodology but no birds were present. It can be due to methodology, disturbance, pollution or other major population changes and may be of extreme importance for conservation purposes. |
Entering observations
Enter observations as if entering a list. See wiki section Web interface > Submitting records > Step 3/3: Transmit my sighting > If accessed from a list> List section if further information is needed.
Ending the protocol

When all species are recorded, indicate
- 1. I recorded all species of the programme if you identified and recorded all species seen or heard that are of interest to the Waterbird Census protocol, or
- 2. I recorded all species (=full observation lis) if besides all species of interest to the protocol, you also identified and recorded all other species seen or heard. Note you can onlly record in this list species identified wihtin the designated polygon. Any species recorded outside of the polygon should be submitted as an individual record.
You will be taken to set parameters to start a new protocol.
Browse observations
To see all your observations belonging to a Waterbird Census protocol, go to Menu > Taking part > All my protocol and from the protocol you want to visualise, select the year (see image below). You can only see your own records, unless you are a protocol administrator. To know more about administrators, see wiki section...

1. Select site.
2. Select year.
A new window will show all your records on the selected site. A grey section on top contains general information about this particular count (see image below), while the bottom part refer to the observations.

BACK: Go to previous screen.
- 1. Date
Date and time of the survey. Notice the bar representing the extent of the day, and the yellow indicating in which part of the day the survey took place (see image Time of survey.
- 2. Site
Site of the survey.

8. Click on the site name to open a new window with more information about the site, and a map.
9. Altitude.
10. Click on icon to access the Search engine for the site. See wiki section ... for more information.
- 3. Author
Name of the observer. If you are an administrator, click on name to access their personal card.
- 4. General comment
Comment about the survey.
- 5. Protocol

- 11. Click on the + sign to expand the panel (encircled on image below). It summarises protocol parameters for this visit (see image below).
- 11. Click on the + sign to expand the panel (encircled on image below). It summarises protocol parameters for this visit (see image below).

- 12. Click on the + sign to expand the panel (encircled on image below). It summarises all visits to this site (see image below).
- 12. Click on the + sign to expand the panel (encircled on image below). It summarises all visits to this site (see image below).

- 6. Export maps of all visits
- 7. Export
Edit protocol
To edit data belonging to a protocol, or general parameters of the protocol, go to Menu > Taking part > All my protocol and selct the edit icon from the selected protocol (see image below).
