Additional information
Expand the table below to see icon correspondence on the Additional information panel. Yellow icons indicate the section has some information in (species or number in the list below). White icons indicate the section does not contain any information yet.
Click on the name to access more information on the selected section.
| Additional information icons | ||||||||||
|---|---|---|---|---|---|---|---|---|---|---|
| Name | Description | |||||||||
|
|
Atlas code Add a code to indicate breeding stage. |
|||||||||
 |
Colony | |||||||||
 |
Comments Add a comment about the observation, and hide or show it to the public. |
|||||||||
 |
Detail Indicate the age and sex of individuals observed. |
|||||||||
 |
Direction Indicate flight direction of individuals recorded. |
|||||||||
|
|
Extra protocol Add information about nests. |
|||||||||
 |
Hidden record Choose to hide or show your observation to the public. It is independent from the comment: you can hide the comment and still show the observation. |
|||||||||
|
|
Map See the observation's location. |
|||||||||
 |
Media Attach an image or a sound to your record. |
|||||||||
|
|
More details | |||||||||
 |
Mortality Add information about injuries or deaths. |
|||||||||
 |
Number of individuals Enter or modify the number of individuals and the count precision |
|||||||||
 |
Offspring | |||||||||
|
|
Ring |
|||||||||
|
|
Species Change species name. |
|||||||||
 |
Species list Change general information about the list the record belongs to. Click on the clock to change starting and/or ending time, enter/modify the comment, and/or check All species were recorded if all species were recorded. |
|||||||||
 |
Study code Select study code if your observation belong to any of the listed studies. |
|||||||||
 |
Time Change time by clicking on the given time. Check Do not enter to hide record's time. |
|||||||||
|
|
|
|||||||||
Comments

Additional information. Comments.
Leave a comment in the top section if you want it to be public and associated to your record. Any registered user will see it. Use the lower section if you want to keep your comment private.
Note administrators will still see it. To learn more about administrators, go to wiki section Local portals > Administration.
Click Validate when done.

Adding comments.
|
To validate your record you will have to Save later. |
[Top to Comments]
[Top to Additional information]
[Back to Enter independent observations]
Details (Age and sex)

According to the taxonomic group you are entering, fields for details differ, see image Examples for non avian groups. Examples and explanations just below apply only to birds.
Enter number of individuals per sex and age class. Type number or use +1 -1 quick keys to quickly change the number. Key Max will count all individuals entered for this species. As data is entered, a list will appear at the bottom. Scroll up and down from the right hand bar to see all entries, or click on cross to delete any entry if necessary (see image below). When done, click Add to enter a new class or finish to end.


Examples of Details for non-avian taxonomic groups. Orchids (left), Odonata (right).
[Top to Details]
[Top to Additional information]
[Back to Enter independent observations]
Atlas code

Additional information. Atlas code.
Select an atlas code, or no code. Available atlas codes will depend on the country you chose in Preferences and for your information it is displayed at the bottom of the screen (see image below).
|
|
Go to Menu > Preferences > Atlas code to change the code you use.

[Top to Atlas code]
[Top to Additional information]
[Back to Enter independent observations]
Hidden record

Additional information. Hidden record.
Select/unselect as needed.
A yellow key indicates the record will be hidden to other users, except administrators.
Default option depends on your ‘’’Preferences’’’. Go to Menu > Preferences > Hide record to change it.
Note some records are automatically hidden depending on the country or region your observation takes place in. Observations in countries not covered by any local partner are never automatically hidden. However, any user can hide records if they consider doing so will help protect the individuals, species or habitat.
To see which records will automatically be hidden locally, go to Web interface > Local portals > Species partially hidden.
To learn more about administrators, go to Web interface > Local portals > Administration.
[Top to Hidden record]
[Top to Additional information]
[Back to Enter independent observations]
Map

Additional information. Map.
Click to see your observation's position.
Click
- Next to Continue, or
- "aim icon" to see your position (see image below).
Visit wiki section Mobile Interface > Navigating the map to interpret the map if necessary.

Map
1. Continue
2. Show your position
[Top to Map]
[Top to Additional information]
[Back to Enter independent observations]
Media
Attach an image or a sound to your observation, either before or after entering a sighting, from:
- the Additional information panel, or
- the main screen.
To use the Additional information menu, enter the observation first, and
1. choose Media on the additional information panel (see image below)

Attaching media from the Additional information panel.
It displays all images already attached to this record (see image as an example).
2. choose between
- Upload a file, if you have already taken them and they are stored on your phone's gallery. Pictures must be taken with your phone or inserted afterwards through a local portal. If no local portal exist, it is not currently possible to add a picture through data.biolovision.net.
- Add a photo then. If you do, do not forget to accept to upload it.
- Record a sound at the moment.

Media. Select file.
1. Upload a file: Click to upload a file already in your phone.
2. Add a photo: Click to take the picture to attach.
3. Record a sound: Click on the the three dots and on Record a sound to record the sound to attach.
To use quick access keys, take the picture or record the sound before entering the observation (see image below).

Media. Quick access.
2. Add a photo: Click to take the picture to attach.
3. Record a sound: Click on the the three dots and on Record a sound to record the sound to attach.
It is not possible to upload a file before entering an observation.
- Upload a file
- Upload a file
Direct access to the gallery in your phone. Choose the image or sound to attach to the observation the same way you would select any other file to attach to any platform (e-mail, whatsapp...). Some considerations must be taken into account:
- The date of the observation must match the date the file was created. Some internal adjustments correct for differences in time zone.
- Pictures are automatically resized to 3072 pixels oon the longest side before being uploaded.
- Sound files must be maximum 16 MB to upload.
NOTE:
- The date of the observation must match the date the file was created.
- Pictures will be automatically resized to a maximum size of 3072 pixels before being sent.
- Sound files should be maximum 16 MB to upload.
- Add a photo
- Add a photo
Direct access to the camera in your device. Take a picture normally and select:
- Retry to repeat it, or
- OK to upload.

Taking a picture to upload.
1. Retry: Repeat the photo.
2. OK Upload the photo.
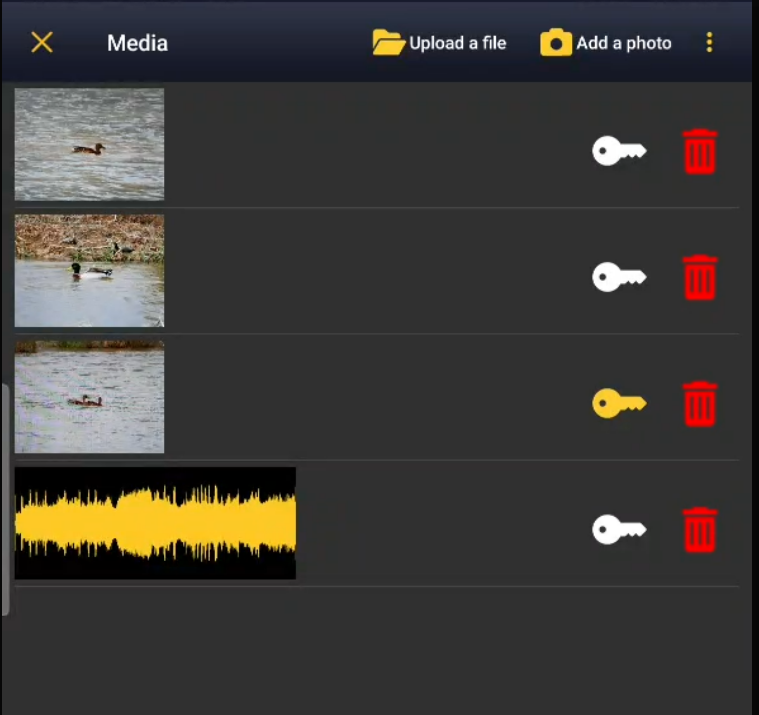
See the images as they are attached.
Hide/show the picture only, not the data, to other users by clicking on the corresponding key or delete by clicking on the bin (see image below). You will also be able to edit it at a later stage. When done, add another picture or close "Media" to access other sections or entering the observation.

Hiding a picture.
1. Hide/Show
2. Delete
- Use the key icon to hide the image while keeping the record visible.
- If you hide the record, the image is automatically hidden.
- Record a sound
- Record a sound
Press the microphone icon to start recording the sound. It will start recording immediately and the waveform is shown in real time.
.png)
Recording in real time.
1. Stop recording.
Press stop to stop recording, and:
- Crop the waveform, if necessary, after stooping the recording (it is only possible to crop the time axis), or
- Validate to access other sections or to enter the observation.

Validate recording.
1. Crop: Use arrows to cut along the time axis.
2. Play: Play recording.
3. Validate: Upload recording.
It is not currently possible to playback.
[Top to Media]
[Top to Additional information]
[Back to Enter independent observations]
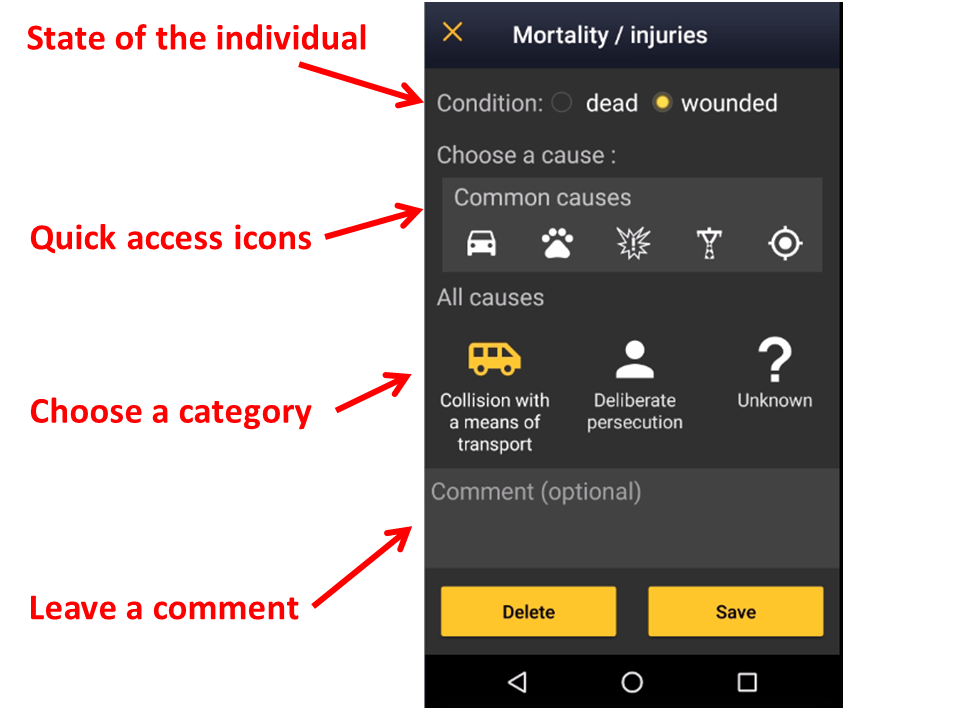
Mortality / injuries

Additional information. Mortality / injuries.
Indicate if your observation corresponds to an injured or dead individual, and select the cause if known. Scroll down All causes to see all options (see image Selecting cause of injury 1). Click on the category to open a panel with all possible causes and enter details (see bottom image Selecting cause of injury 2). When done, click Validate. For quick selection, the icons of the most common causes are on top (see image Selecting cause of injury 1). When you finish entering the cause of death or injury click Save or if necessary, Delete. The entry can be modified later.


Selecting cause of injury 2.
[Top to Mortality / injuries]
[Top to Additional information]
[Back to Enter independent observations]
Number of individuals
[Top to Number of individuals]
[Top to Additional information]
[Back to Enter independent observations]
Direction

Additional information. Direction.
Click on the compass to indicate flight direction (in the example below, the user clicked on SE).

Additional information. Selecting direction.
[Top to Direction]
[Top to Additional information]
[Back to Enter independent observations]
Ring

Additional information. Ring.
- 1. Select the type of marking by checking the corresponding cell, and
- 2. type the inscription on the ring.

Additional information. Recording ring.
[Top to Ring]
[Top to Additional information]
[Back to Enter independent observations]
Extra protocol

Additional information. Extra protocol.
Introduce required information about nests (see image below as an example). This section will only appear if you are entering data into a protocol that requieres nest information. Information required may vary depending on the protocol, and may include:
- Intact nests: Type number of intact nests.
- Nest location: Click on the yellow band to see options (see image Nest location) and choose the most appropriate.
- Number of nests occupied by other species: Type number of nests occupied by other species.
- Occupied nests: Type number of occupied nests.
- Potencial breeding pairs: Type number of pairs that may be breeding.
- Suspected nests: Type number of suspected nests.
Remember fields marked with an asterisk are mandatory.
.png)
Extra protocol. Example.
1. Intact nests
2. Occupied nests
[Top to Extra protocol]
[Top to Additional information]
[Back to Enter independent observations]
Entering additional information quick access
Some protocols may give you the option to enter additional information with icons when entering species and number of species (see image below).
![]()
Entering additional information with icons. Example.
White background icons = Atlas codes
Blue background icons = Any other additional information fields
Atlas codes
 |
Singing, drumming or displaying male present in breeding season in possible nesting habitat. |
 |
Unidentified individual in breeding season in possible nesting habitat. |
 |
Male in breeding season in possible nesting habitat. |
 |
Female in breeding season in possible nesting habitat. |
 |
Pair observed in suitable nesting habitat in breeding season. |
 |
Agitated behaviour or anxiety calls from adults, indicating a nest or young nearby. |
 |
Recently fledged young (nidicolous species) or downy young (nidifugous species) observed. |
 |
Nest-building or excavating of nest-hole observed. |
 |
Adult carrying faecal sac or food. |
 |
Nest containing eggs or young. |
 |
No atlas code. |
Flight direction
 |
Flying direction. Press, hold and drag to indicate flying direction. If the individual is moving around without a clear direction, press icon but do not indicate flight direction. It will be represented with concentric circles (ie. single male in image below).This information can be combined with others in the list (see example below), but should be introduced first. |

Example of information on flight direction.
Relationship between individuals
When two similar individuals are recorded nearby (ie. two singing males of the same species), click on both records to open relationship options (see image below).

Relationship between individuals. Example.
|
|
Both sightings correspond to the same individual. It is probably the same territory. It is reflected as a green line in the map. |
|
|
It is unknown if both records correspond to the same individual/s. It is reflected as an orange line in the map. |
|
|
Both records correspond to different individuals. It may define two different territories. It is reflected as a blue line in the map. |
Click
- Save to save and continue entering data, or
- X to close panel and continue entering data without indicating relationship.
- Save to save and continue entering data, or
To see how it will show in the web site, visit Web interface > Local portals > Protocols > Private territory mapping > Census results > Observations section.
Comments
|
|
Comment.Type a comment, or a hidden comment in the corresponding fields and click Save. Visit wiki subsection Mobile interface > Submitting records > Directly in the field > Additional information > Comments for more information. |