Geometry editor: Difference between revisions
No edit summary |
No edit summary |
||
| Line 12: | Line 12: | ||
'''2.''' Edit <br/> | '''2.''' Edit <br/> | ||
'''3.''' Locality the study area will belong to <br/> | '''3.''' Locality the study area will belong to <br/> | ||
<br/> | </p><br/> | ||
=Drawing a polygon= | =Drawing a polygon= | ||
| Line 47: | Line 47: | ||
<br/> | <br/> | ||
To draw: | To draw a polygon:<br/> | ||
<br/> | |||
1. Display the whole area to include in the polygon within the map area. To know how to navigate the map area, visit wiki section Web interface > [[Navigating the map]]. <br/> | 1. Display the whole area to include in the polygon within the map area. To know how to navigate the map area, visit wiki section Web interface > [[Navigating the map]]. <br/> | ||
| Line 68: | Line 69: | ||
'''1.''' Draw <br/> | '''1.''' Draw <br/> | ||
'''2.''' Edit <br/> | '''2.''' Edit <br/> | ||
'''3.''' Locality the study area will belong to | '''3.''' Locality the study area will belong to <br/> | ||
</p><br/> | |||
=Editing a polygon= | |||
<br/> | <br/> | ||
Editing a polygon that has just been created allows to follow the perimeter of the study area with more precision. Administrators may want to edit polygons as part of the creation of new study sites. <br/> | |||
<br/> | |||
Both users and administrators can edit already existig polygons.<br/> | |||
<br/> | |||
To edit a polygon:<br/> | |||
<br/> | |||
1. Zoom in to see the limits of the study site even if the whole polygon does not fit within the map area. <br/> | |||
<br/> | |||
[[File:Edit polygon.png|700px|thumb|center|Edit polygon.]] | |||
<p style="margin-right:220px;margin-left:220px"> | |||
'''1.''' Draw <br/> | |||
'''2. Edit''' <br/> | |||
</p><br/> | |||
2. Click on the Edit icon at the top of the map area (number 2 in image [[Media:Edit polygon.png|Edit polygon]] above). <br/> | |||
<br/> | |||
3. Click on the polygon area. It becomes dark blue, indicating it is possible to edit it. Corners are highlighted in darker orange and intermediate points are lighter orange. <br/> | |||
<br/> | |||
[[File:Editing polygon, editable area.png|700px|thumb|center|Editing polygon. Editable area.]] | |||
<p style="margin-right:220px;margin-left:220px"> | |||
'''1.''' Draw <br/> | |||
'''2. Edit''' <br/> | |||
</p><br/> | |||
4. Left click on any orange dot you would like to modify. Hold the click and drag the dot to its new position. Note when moving dots, new ones will appear allowing you be as precise as necessary. Move the map to access a different part of the polygon, until the whole polygon is edited. To know how to move the map visit wiki section Web interface > [[Navigating the map]].<br/> | |||
<br/> | |||
[[File:Edited polygon.png|700px|thumb|center|Adjusting polygon to area.]] | |||
<p style="margin-right:220px;margin-left:220px"> | |||
'''1.''' Draw <br/> | |||
'''2.''' Edit <br/> | |||
</p><br/> | |||
5. When the polygon follows exactly the limits you are interested at, click anywhere outside the polygon area. The finished polygon becomes orange. <br/> | |||
<br/> | <br/> | ||
Revision as of 21:24, 3 July 2023
Some studies require defining a study area, be it a polygon, a transect or a point (for example, in projects and protocols). Only obbservations within a polygon, or from a transect or point will be considered for data analysis. All other observations that occur during the same session but outside our study area, will be considered outside the study.
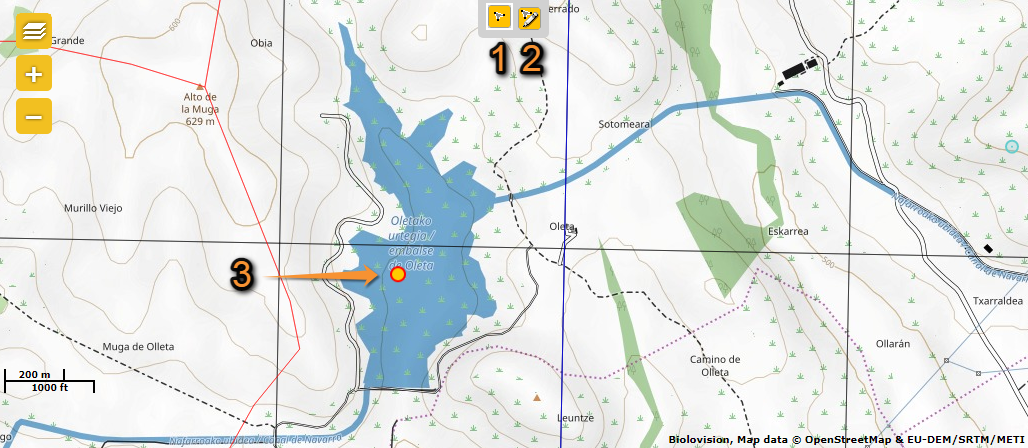
Whenever a screen like the one in the picture below appears, a user or administrator can draw or edit the study area.

1. Draw
2. Edit
3. Locality the study area will belong to
Drawing a polygon
Only administrators can draw polygons to create new study sites.
|
1. Display area to draw at on the map area 2. Select drawing icon 3. Left click to start drawing 4. Click to follow the perimeter 5. Double click to close polygon |
To draw a polygon:
1. Display the whole area to include in the polygon within the map area. To know how to navigate the map area, visit wiki section Web interface > Navigating the map.
2. Select the drawing icon by clicking on the left icon at the top of the map area (see number 1 in image Geometry editor tool above). A hollow light blue dot will appear at your pointer.
3. Use the left button on your mouse to click on any point of the perimeter to start drawing the polygon. Although you can click anywhere, it is easier to do so on a corner. Try to be as precise as possible, it will save you time later. However, there is no need to be exact as the polygon can be edited later.
4. Continue clicking on different points of the polygon perimeter to slowly delimit the area. Note the light blue colour indicating the area that is currently considered for the study (see image Drawing polygon). It is easier if you click the angles of the polygon to draw. Try to be as precise as possible, but the polygon can be modified later for precision.
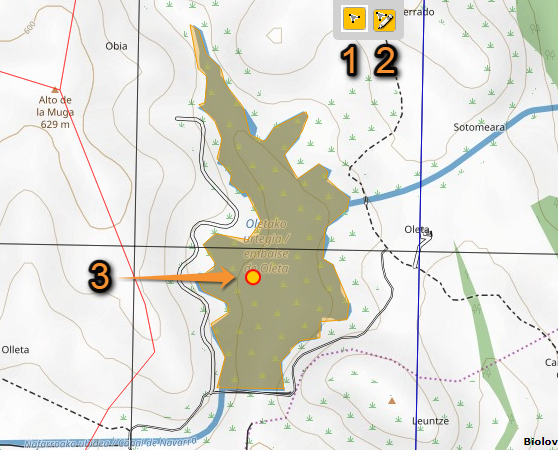
5. When the whole perimeter is drawn, double click with the left button to close the polygon and end drawing. It can be done from any point but it is recomended to do so from the last corner before the one we started from. The finished polygon becomes orange.

1. Draw
2. Edit
3. Locality the study area will belong to
Editing a polygon
Editing a polygon that has just been created allows to follow the perimeter of the study area with more precision. Administrators may want to edit polygons as part of the creation of new study sites.
Both users and administrators can edit already existig polygons.
To edit a polygon:
1. Zoom in to see the limits of the study site even if the whole polygon does not fit within the map area.

1. Draw
2. Edit
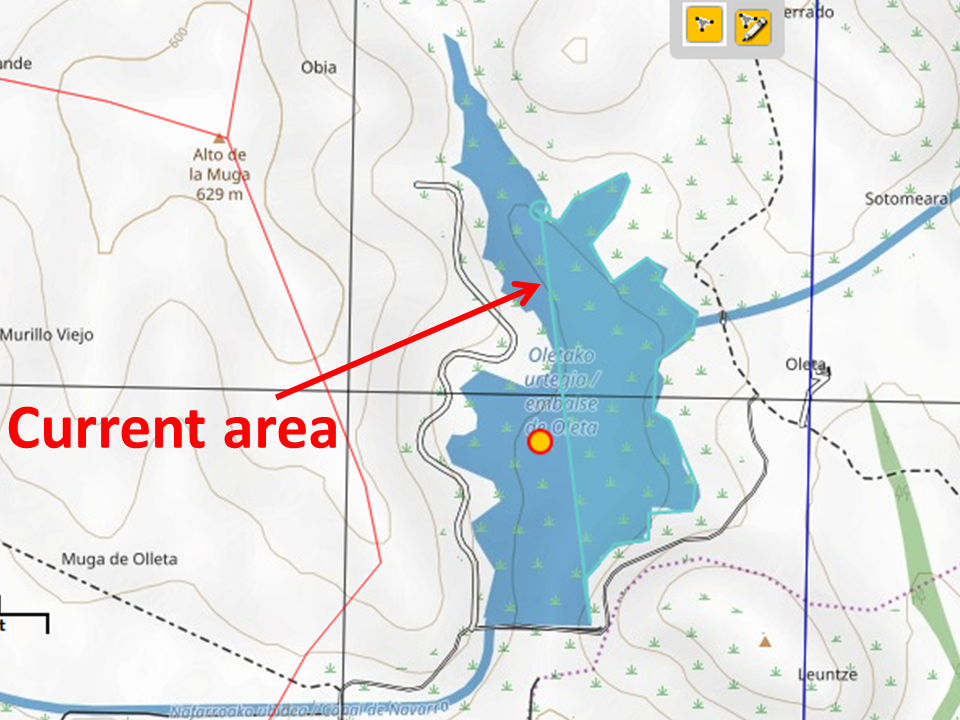
2. Click on the Edit icon at the top of the map area (number 2 in image Edit polygon above).
3. Click on the polygon area. It becomes dark blue, indicating it is possible to edit it. Corners are highlighted in darker orange and intermediate points are lighter orange.

1. Draw
2. Edit
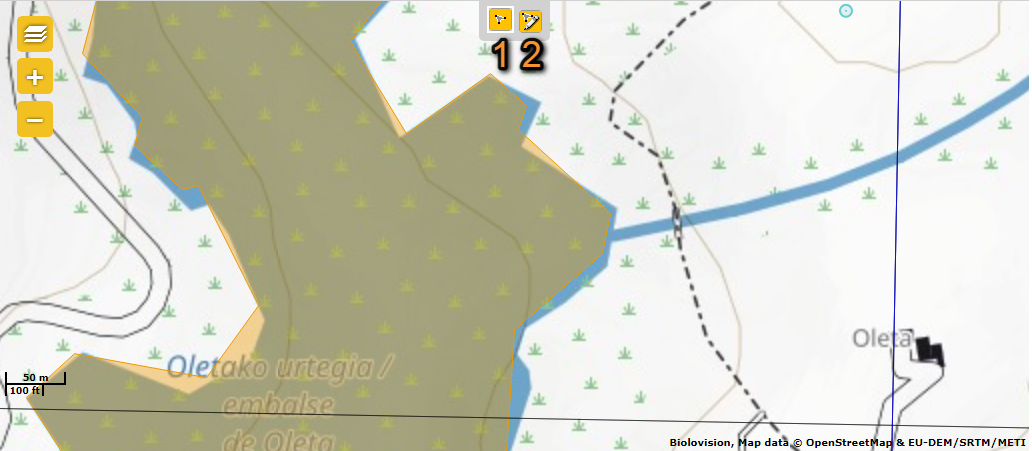
4. Left click on any orange dot you would like to modify. Hold the click and drag the dot to its new position. Note when moving dots, new ones will appear allowing you be as precise as necessary. Move the map to access a different part of the polygon, until the whole polygon is edited. To know how to move the map visit wiki section Web interface > Navigating the map.

1. Draw
2. Edit
5. When the polygon follows exactly the limits you are interested at, click anywhere outside the polygon area. The finished polygon becomes orange.