Protocols: Difference between revisions
| Line 51: | Line 51: | ||
:'''Important changes''' <br /> | :'''Important changes''' <br /> | ||
<br /> | Indicate if there have been major changes since your last visit.<br/> | ||
<br /> | <br /> | ||
| Line 76: | Line 76: | ||
:'''Coverage''' <br /> | :'''Coverage''' <br /> | ||
Indicate how much of the designated polygon is covered in the survey.<br/> | |||
<br /> | <br /> | ||
| Line 85: | Line 86: | ||
:'''Visibility''' <br /> | :'''Visibility''' <br /> | ||
Indicate the approximate | Indicate the approximate distance within which it is possible to identify the species. <br /> | ||
<br /> | <br /> | ||
:'''Waves''' <br /> | :'''Waves''' <br /> | ||
Indicate how is the water regarding waves.<br/> | |||
<br /> | <br /> | ||
Revision as of 14:50, 11 January 2023
Protocols are standardised ways of collecting data. The methodology to follow depends on the study's goal. A country administrator will grant you access if you meet certain criteria. Not all protocols are available in all countries. See which protocols are available in which country at.... and see which criteria at....
If you have access to protocols, protocol settings will appear at Preferences (see image Protocols as an example), and you will access the protocol through the "Submitting data" menu (see image Protocols. Main menu as an example).
Protocol settings
This section will only appear if you have access to country-specific protocols (see image Protocols).

Territory mapping
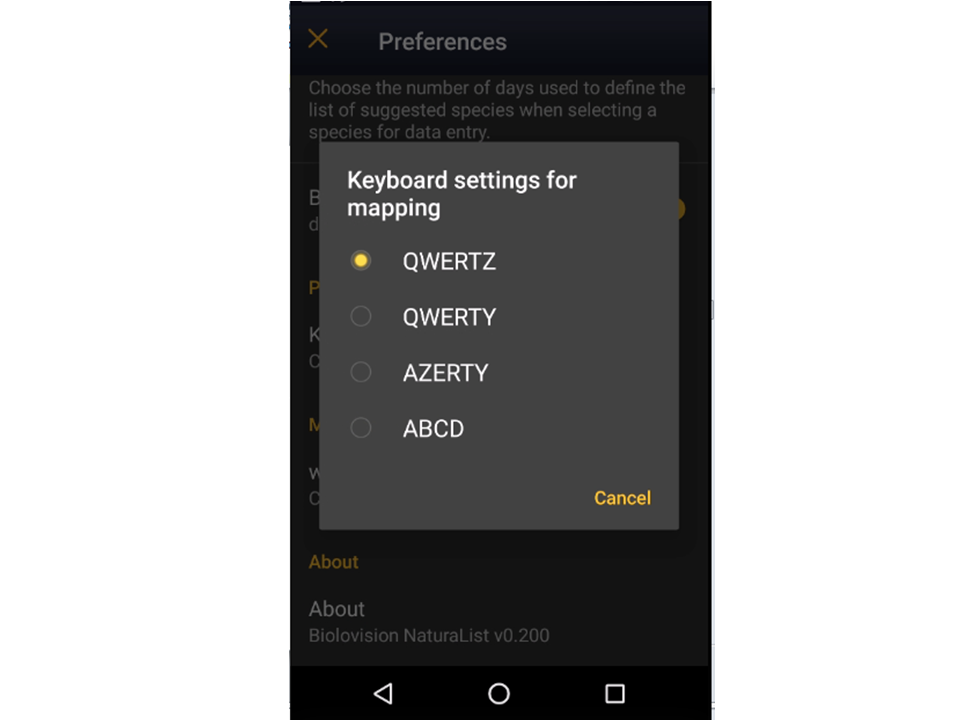
Keyboard settings for mapping
Choose one of the options to select the configuration of your keyboard (see image Keyboard configuration for mapping).

Waterbird census
Open the menu as for Submitting records and choose Waterbird census (see image below).

Start of list
Enter general information before starting the count (see image). Fields marked with an asterisk are mandatory.

- Comment
You may enter a comment if you find it appropiate.
- Important changes
Indicate if there have been major changes since your last visit.
- Additional observer
Indicate if you are accompanied by someone whose observations are also recorded.
- Count type
Tick roost count if you are counting roosting birds, or during day otherwise.
- Count method
Indicate if you are surveying from the ground, the air, the water, a different way, or if it is unknown.
- Optical equipment
Indicate which equipment you are using for the survey, if any. Note you can only choose one option.
- Coverage
Indicate how much of the designated polygon is covered in the survey.
- Water level
Indicate the water level.
- Visibility
Indicate the approximate distance within which it is possible to identify the species.
- Waves
Indicate how is the water regarding waves.
- Conditions in general
Choose how are surveying conditions overall regarding weather and disturbances, and indicate on next section the reason if surveying conditions are not good.
- Reason(s) for moderate / bad conditions
If general conditions indicated above are noot good, click the yellow field to open and expandable menu and choose the reason (see image below). Only one option is possible: choose the one that better adjust to reality.

- Additional observers
Indicate if other oservers participated in the data collection.
- Important changes since last count?
Indicate if there has been any major change since your previous count.
- Record the trace
Check if you want NaturaList to record your track.
- Hide all records from the public
Check if you want to keep your records privately. This will not prevent administrators to see them and contact you if necessary, but other users of NaturaList will not see your records.
- No species were seen
Check if your survey did not provide any data. Surveys with no species are also important results! It will mean you followed the established methodology, and therefore your survey is valid, but no birds were present. They can indicate major population changes and are of extreme importance for conservation purposes.
|
Surveys with no species are also important results! Please submit them. It will mean you followed the established methodology but no birds were present. It can be due to methodology, disturbance, pollution or other major population changes and may be of extreme importance for conservation purposes. |
Click Validate when done.
Place
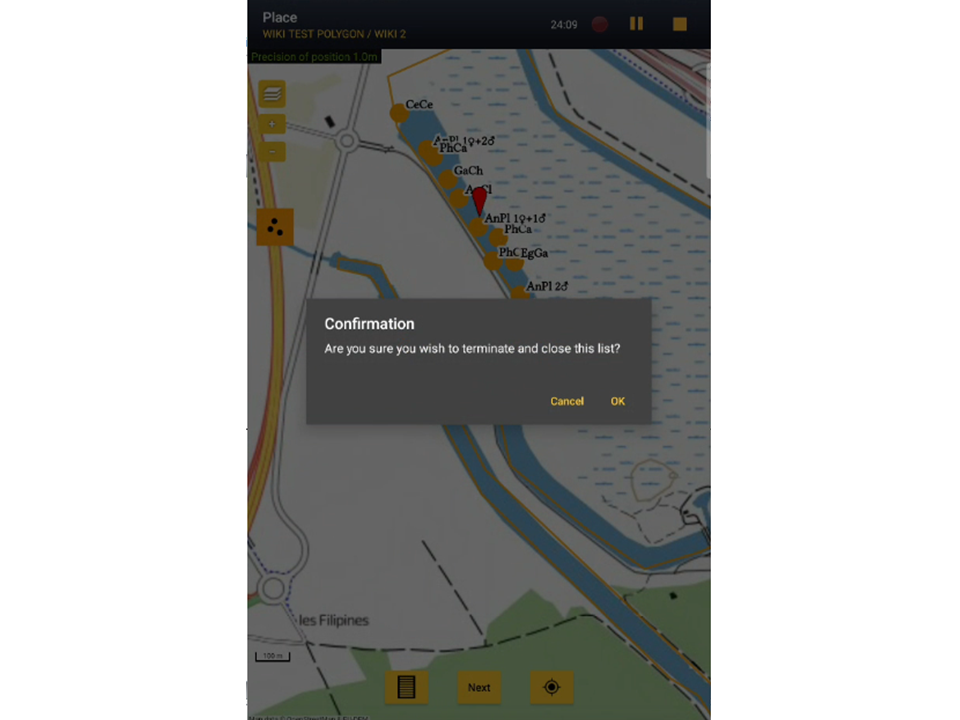
It opens a map with your polygon to survey (see image below). Place the red marker where the individual, or group of individuals, are observed. Note only observations within the delimited polygon can be recorded. If you have other observations that you would like to report, pause the ongoing list (pause icon on top bar, see image) and enter normally as explained in with list in the field.

After entering the first record, activate/deactivate (active when orange, inactive when yellow) the summary icon to see species name and atlas code from already entered records (see image below). Click on the notebook icon at the bottom to see a list of all records on the ongoing list.

To see how to navigate the map, see wiki section Navigating the map.
|
|
Click Next when done.
Species
You may choose the taxonomic group and/ or start typing the species name. Choose the correct species from the list appearing underneath (see image below). The list can only contain one taxa. It will be determined by the taxa the fist species you enter unless you indicate the taxa beforehand from the top bar.

Number of individuals
Enter the number of individuals observed for the entered species, and indicate if it is an exact count, approximate, minimum number of individuals, or if they were not counted (see image below). Alternatively, choose to start a counter (see image Start a counter). To see how to use the counter, go to wiki section Mobile interface > Entering records > Directly in the field > Number of individual.

|
|
Plus
To enter additional information, choose the corresponding field from the menu (see image below, left). Sections with data appear in yellow (see image below, right).

Comments

Enter a comment of necessary. You can make it public or keep it privately (see image below).

Click ‘’’Validate’’’ when done.
Detail

Enter the number of individuals for each age and sex group. Type first the number and then choose age and sex (see image below). Use the +1 or -1 buttons to help adjust the number. Click on Max to include all individuals recorded on that entry in the same age/sex group. You can enter several groups for each species by clicking Add after each group. When done, click Finish.

Atlas code

A list will open with all atlas codes used in the country you are surveying, and their definition. The coding system displayed depends on the country the survey takes place and is indicated at the bottom of the image (see image below). If an atlas code is not applicable, for example, in wintering grounds, or is unknown, choose No atlas code at the top of the list to continue entering your data.

Hidden record

Tick/untick as needed. If the key icon is yellow, your record will not be visible to other users. When it is white, your record will be displayed along your observations in NaturaList and on the corresponding local portal. Note that administrators can always access your name and contact details even when they are hidden to other users, and could contact you regarding confusing records.
Picture

Click on the Picture icon to open a menu with options (see image below).

Choose from gallery: choose a picture you have already taken and is stored in your phone. If you want to attach a picture after synchronizing the list, or if you took your picture with a camera, you need to upload it later from the corresponding local portal. Use the same credentials you used in NaturaList to enter any of the ornitho portals.
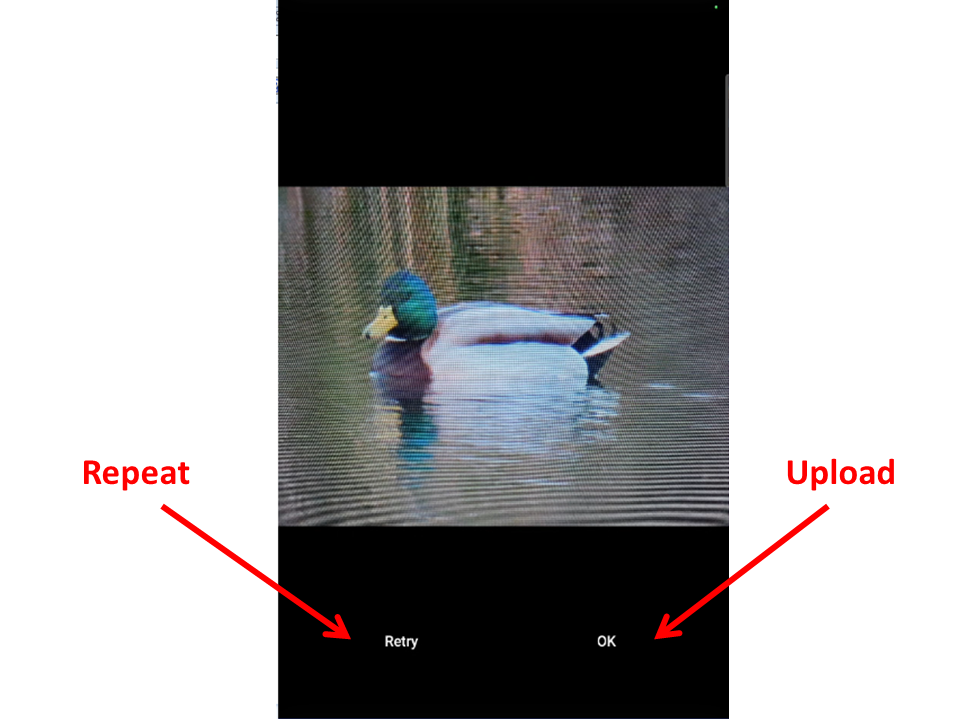
Take a picture: take a picture with your phone at that moment. Click Retry if you need to repeat the shot or Ok to upload it (see image Waterbird survey. Picture: take a picture below). When the picture is uploaded, a list appears with all pictures uploaded for this record (see image Waterbird survey. Picture: edit a picture below). Click on the key to hide the picture from other users, or the cross to delete the picture. A yellow key indicates the picture is hidden, a white one, registered users will see the picture associated to your record.


Click Validate when done.
Mortality/injuries

Fill in when the individual is not in a healthy condition.

Condition: indicate if the individual is dead or injured by checking the corresponding cell.
Choose the cause of death or injury: At the top Common causes there is a summary of the most common causes for quick access. If you need to report a different cause, choose the general reason from the bottom section All causes to open a new screen (see image below as an example). Choose the most accurate cause of injury or dead. The selected option will appear at the bottom of the mortality/injury screen (see image on top).

Comment: enter other details if necessary.
When done, click Save. It will take you to the Place screen to continue entering observations.
Ending the list
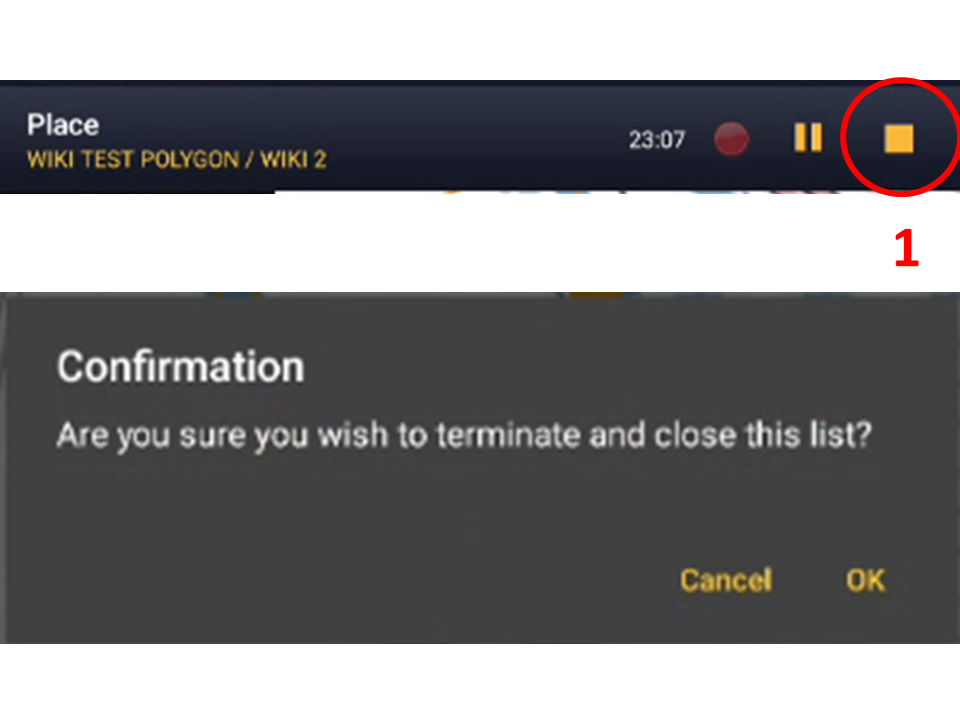
To finish the survey, click the stop icon at the top right corner of the Place screen (see image End the list). You will be prompted to confirm (see image Ending the list. Confirmation).


Adjust time, if necessary, and add or modify a comment. Finally, indicate which type of list you recorded (see image below).

Time: Adjust starting or ending time by clicking on the time button. See wiki section Mobile interface > Submitting records > Later > Date/Time to know how to modify the clock.
Comment: Add or modify a comment if necessary.
Which species list did you count?:
- Restricted list:
- Extended list:
- All species where reported (=complete list):
If the list took more than 30 minutes, you may be prompted to confirm before the list can be saved.