Protocols web: Difference between revisions
No edit summary |
No edit summary |
||
| Line 1: | Line 1: | ||
Protocols are standardised ways of collecting data | Protocols are standardised ways of collecting data linked to a geometry (points, transects or polygons). The methodology to follow depends on the study's goal. A country administrator will grant you access if you meet certain criteria. Not all protocols are available in all countries. See which protocols are available in which country at.... and see which criteria at.... | ||
Too access your list of protocols, go to Menu > Take part > All my protocol. It lists all protocols you have access to in this local portal (see image below).<br/> | |||
<br/> | |||
[[File:Accessing protocols on the web (1).png|700px|thumb|center|Accessing protocols.]]<br/> | |||
<br/> | |||
If you have access to protocols, you have access to it by Submit button or by the menu Take part, Transmit my sightings or Menu Take part All my protocols | If you have access to protocols, you have access to it by Submit button or by the menu Take part, Transmit my sightings or Menu Take part All my protocols | ||
| Line 6: | Line 12: | ||
<br/> | <br/> | ||
Access your protocol from Menu > Take part > All my protocol. | Access your protocol from Menu > Take part > All my protocol and search for the protocol you want to work at. You will be able to download the map to survey, enter data or edit the protocol.<br/> | ||
<br/> | |||
==Download map== | |||
<br/> | |||
[[File:Printable map (1).png|700px|thumb|center|Print WBC map.]]<br/> | |||
<p style="margin-left: 220px; font-size:13px"> | |||
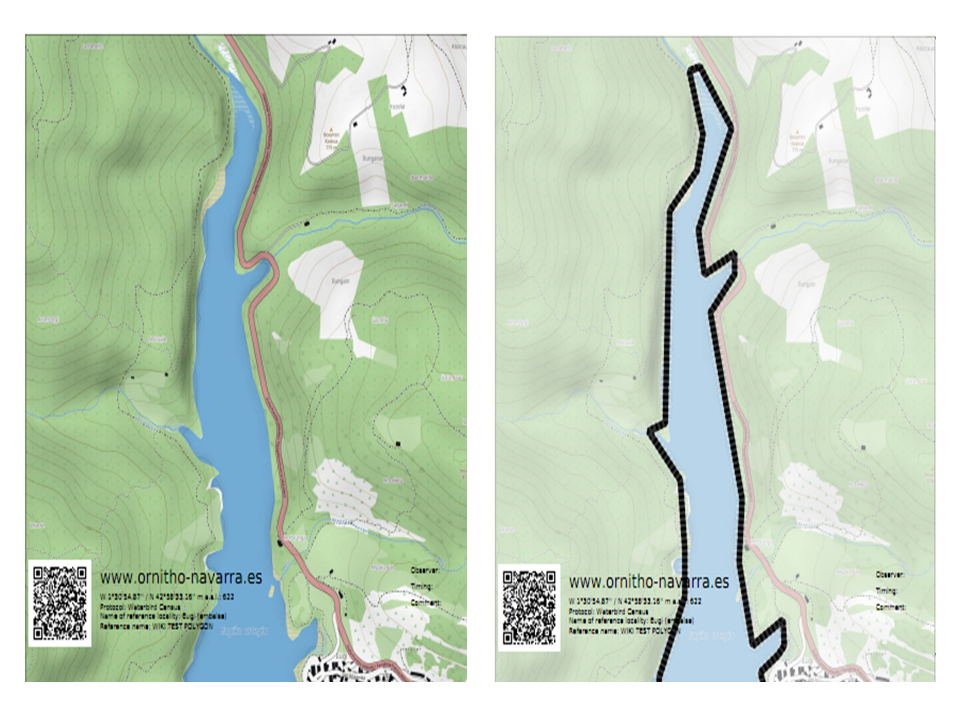
'''1.''' Check to print the map with 50% of transparency (see image [[Media:50% transparency.png|Map compare: left normal, right 50% transparency]] as an example). <br/> | |||
'''2.''' Check to print the map in black and white. <br/> | |||
'''3.''' <br/> | |||
'''4.''' Choose from the expandable menu the map layer you would like to print. <br/> | |||
'''5.''' Click on pdf icon to download the map as a pdf.<br/> | |||
Click on the magnifying icon (encircled) to display the polygon on a map on the screen (see [[Media:Display polygon on map.png|example]]).</p> | |||
<br/> | |||
<br/> | |||
==Add observations== | |||
<br/> | |||
Click on add observations (see image below) in the protocol you need to enter data.<br/> | |||
<br/> | |||
[[File:Capture 2023-03-15 WBC enter data.png|700px|thumb|center|Add observations to protocol.]]<br/> | |||
<br/> | <br/> | ||
[[File:2023-03-14 All my protocols.png|700px|thumb|center|Entering observations to a Waterbird census protocol.]]<br/> | [[File:2023-03-14 All my protocols.png|700px|thumb|center|Entering observations to a Waterbird census protocol.]]<br/> | ||
<br/> | |||
A new panel will require you to enter general parameters regarding the protocol (see image below). Field marked with an asterisk are mandatory.<br/> | |||
<br/> | |||
[[File:WBC protocol parameters.png|700px|thumb|center|Waterbird census protocol parameters.]]<br/> | |||
<p style="margin-left: 210px; font-size:13px"> | |||
'''1. Enter date:''' Choose from teh expandable menu the date the survey took place.<br/> | |||
'''2. EEnter starting time:''' Enter the time the census started.<br/> | |||
'''3. Ending time:''' Enter the time the census ended.<br/> | |||
'''4. Enter comments:''' Choose from the tabs and type:<br/> | |||
:::*'''Comment:''' if the comment will refer to a general observation, <br/> | |||
:::*'''Additional observer:''' if you name other observer/s participating in the census, or<br/> | |||
:::*'''Important changes:''' to note important changes from your previous visit, like noise, pollution or construction work.<br/> | |||
'''5. Hide all records from the public:''' check if you do not want other users to see your records.<br/> | |||
'''6. Parameters:''' Enter parameters required for your polygon. Note fields and the order in which they appear may differ from country to country. You may not encounter all possible fields described underneath.<br/> | |||
==Edit protocol== | |||
<br/> | <br/> | ||
Revision as of 18:16, 15 March 2023
Protocols are standardised ways of collecting data linked to a geometry (points, transects or polygons). The methodology to follow depends on the study's goal. A country administrator will grant you access if you meet certain criteria. Not all protocols are available in all countries. See which protocols are available in which country at.... and see which criteria at....
Too access your list of protocols, go to Menu > Take part > All my protocol. It lists all protocols you have access to in this local portal (see image below).
.png)
If you have access to protocols, you have access to it by Submit button or by the menu Take part, Transmit my sightings or Menu Take part All my protocols
Waterbird Protocol (web)
Access your protocol from Menu > Take part > All my protocol and search for the protocol you want to work at. You will be able to download the map to survey, enter data or edit the protocol.
Download map
.png)
1. Check to print the map with 50% of transparency (see image Map compare: left normal, right 50% transparency as an example).
2. Check to print the map in black and white.
3.
4. Choose from the expandable menu the map layer you would like to print.
5. Click on pdf icon to download the map as a pdf.
Click on the magnifying icon (encircled) to display the polygon on a map on the screen (see example).
Add observations
Click on add observations (see image below) in the protocol you need to enter data.


A new panel will require you to enter general parameters regarding the protocol (see image below). Field marked with an asterisk are mandatory.

1. Enter date: Choose from teh expandable menu the date the survey took place.
2. EEnter starting time: Enter the time the census started.
3. Ending time: Enter the time the census ended.
4. Enter comments: Choose from the tabs and type:
- Comment: if the comment will refer to a general observation,
- Additional observer: if you name other observer/s participating in the census, or
- Important changes: to note important changes from your previous visit, like noise, pollution or construction work.
- Comment: if the comment will refer to a general observation,
5. Hide all records from the public: check if you do not want other users to see your records.
6. Parameters: Enter parameters required for your polygon. Note fields and the order in which they appear may differ from country to country. You may not encounter all possible fields described underneath.
Edit protocol