If accessed from a list (fill a daily form)
Select location as in Step 1/3: Approximate choice of site and in Step 2/3: Precise site choice select Fill a daily form. Location will be pre-selected in next step.
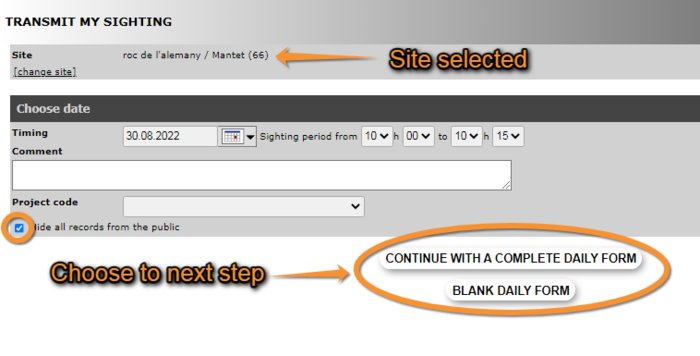
Date and time section (see image 17)
Enter date and time as accurate as possible. It is recommended to not exceed 30 minutes. If your observations extend from that time, you can start a new list were you left off.
Change altitude if necessary.
Choose from an expandable menu if the observations you are submitting are part of a bigger study. Leave blank if your list is not part of an established project.
Here one can also add any comment and decide if records will be public. If the option is ticked, records will not be displayed on the website but will still be seen by administrators and used for data analyses.
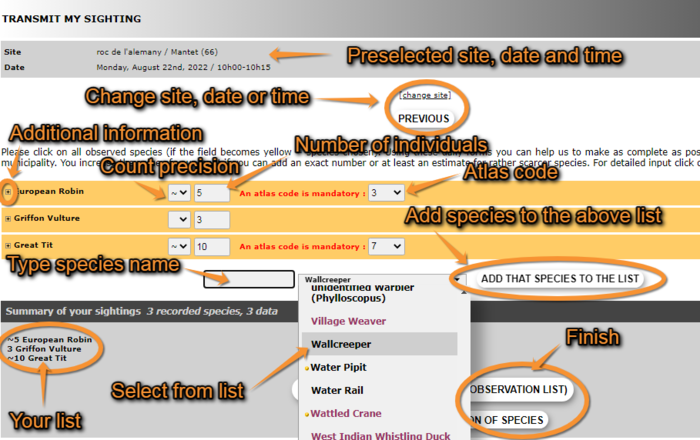
List section (image 18)
At the top you will see the site, date and time you selected. Click “Change site”, for site, or “previous”, for date and time, if you need to make any changes.
Now you can enter your records. Choose a species from the list or start typing the name on the left field and choose from the expandable list. To move through the list use the arrows on your keyboard, the wheel on the mouse, or move the right with your mouse. To change the order in which you see the species, and the language of the species, see section 2. Getting started > “Customise website”.
Then “add that species to the list”. The new species will show on top of the species selection fields.
Enter the number of individuals and count precision in the field right from the species name (see image 18). If you enter an exact count, do not choose count precision. Finally enter an atlas code, if required. If unknown, you can choose “none” on the atlas code field. When the record is correctly entered, the name appears in yellow. Enter a new species and repeat the process.
Additional information
By clicking on the plus sign (+) at the left of the species name (see image 18), a new form will open.
Site
Choose a more precise site by clicking on the “Map” tab (see image 19). Click on the exact position and adjust the altitude if necessary. To see how to navigate the map, see section 3. Submitting records > “Step 1/3: approximate choice of site” > “By clicking on the map”. At the top there are quick functions: choose as appropriate. When the position you select if too far from the previously selected site, a warning sign will appear and you will not be able to perform the action. This record should be entered under a different site.
Duplicate the species
A new entry for the same species will be added to the list (below the additional information form). It is useful when you need two different atlas codes for different individuals of the same species.
Comments
Your comments can be public or private. To make them private click on the corresponding tab and a yellow key will appear on the left of the field (see image 15, 19).
Time
Select a precise time from the menu.
Number of individuals per age/sex/activity
Select how many individuals you recorded of each category, if known. To add a new line, click on “add some more individuals”. You can delete any entry by clicking on the right hand cross of the record (see image 19).
Others
Indicate by ticking the corresponding field if you want to hide additional information from the public or if the individual/s is dead or wounded.
When you have added all the additional information you have, you can hide the form by clicking on the minus sign (-) next to the species name (see image 19).
Ending the list When all records are entered, indicate if you recorded all individuals detected (complete list) o only part of them. You will then be taken to the start of a new list (section “If accessed from a list (fill a daily form)” > “Date and time section” (see image 17).


