Importing your data
Import your data in .xls or .xlsx formats.
Only users with the right to import data will be able to do so. Contact your local administrator if you think you should have this right. Note it is different from the administration right.
If you are granted the right, go to Take part > Import a file (see image below).
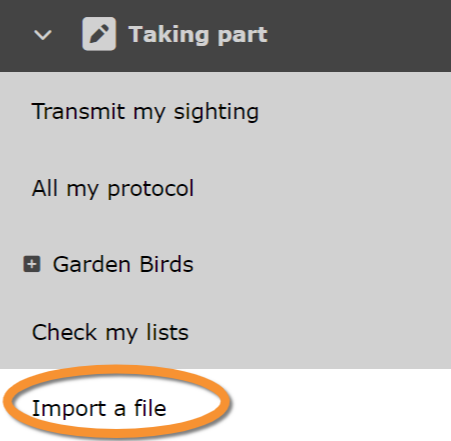
Import a file.
You can either,
· import your own data.
· import someone else's data.
Starting the import

Importing file selection.
1. The file to be imported
2. Taxonomic group
3. Protocol
4. Profile
5. Start upload
Account only appears to users with rights to import someone else's data.
1. The file to be imported
Select Choose a file to select the file to import. The system is designed to import .xlsx files but can also read .xls ones.
Account
If you are importing someone else's data (see box below), select the account to import from. If you are only allowed to import your own observations, you are not given this choice.
Importing someone else's data
NOTE
The system uses two different accounts: one for observers and one to import data.
If you are importing your own data, both accounts are the same. You do not need to do anything else.
If you are importing someone else's data, contact Support to obtain the importing account.
To import someone else's data, you will need an additional account. Contact Support to create it. To ease the process we will create folders so you can submit data that does not belong to you. It will appear on the website as:
2 Tudus merula [Bernard ...] when the observer and the reporter are the same person.
2 Turdus merula [Bernard ... by Folder LPO] when Bernard observed the individuals, but LPO submitted the observation.
2 Turdus merula [Folder LPO] when the observer is unknown and LPO submitted the observation.
2. Taxonomic group
Select a taxonomic group for the data you are importing, if necessary.
Not selecting a group allows to import basic information for all groups. Selecting a taxonomic group allows to import additional details but only for the selected taxa.
3. Protocol
Select to which protocol your data belongs to, if any. Leave blank if your data is not linked to a protocol.
4. Profile
Select a profile if necessary. Leave blank otherwise. It will be necessary if importing data from other websites like eBird. See wiki section Importing observations from eBirds below for details.
To create a profile, set parameters as described in wiki section 2. Column matching below, check the cell Save these settings in a profile and name the new profile. All available profiles will be shown in this section for future imports.
Click on Manage profiles to edit profile names.
5. Start upload
When all is ready, click on Start upload to start the process.
The import takes place in two stages:
1. File validation, and
2. import itself
If an error is detected during validation, the file is not imported. The next wiki section Data description describes how to format your data to avoid errors.
[Top to Starting the import]
[Back to Importing your data]
Data description
Before properly importing your data, the system runs a process of validation. If an error is detected during validation, the file is not imported. Your data needs to follow certain criteria to pass the validation process.
1. File sample
Visualise the first 5 lines of your file. Note the file has to contain column titles on the first line, and only on one line (see example below).
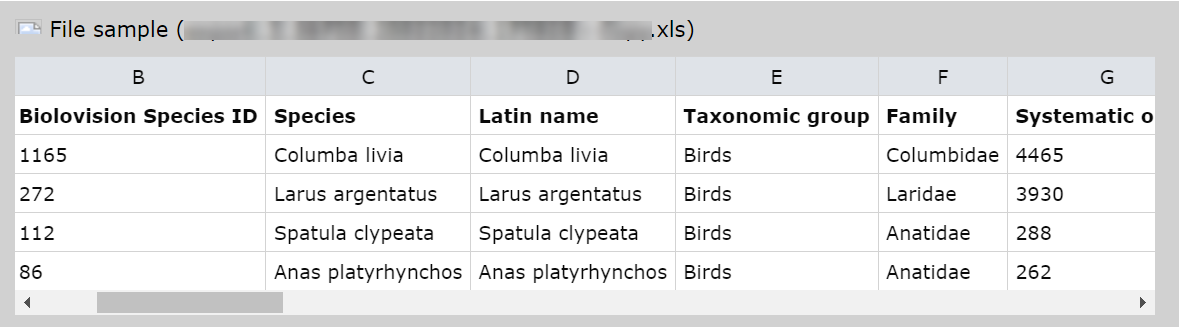
File sample. Example.
2. Column matching
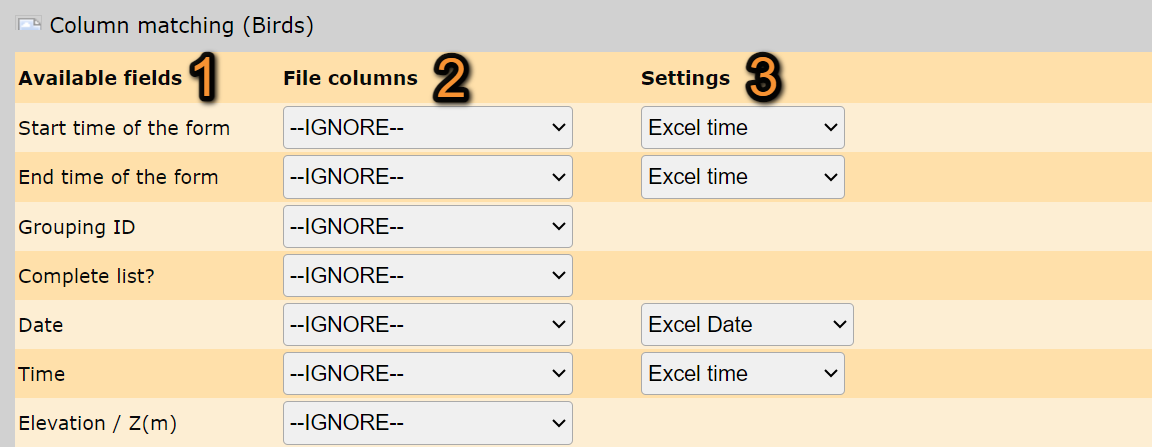
Column_matching.
1. Available fields: List of all possible fields to import.
2. File columns: Choose from the expandable menu which of your columns contains the information required.
3. Settings: Choose from the expandable menu the format for the corresponding field.
Match your file information with the information required to import.
A table below summarizes all possible fields in the imported file. They may be different for different local portals. Expand the table to see notes and available formatting options for each field. Use arrows under column titles to alternate between ascending and descending alphabetical order.
| Available fields | Description | Settings | ||||||||
|---|---|---|---|---|---|---|---|---|---|---|
| Start time of the form | Starting time of list, if appropriate. | Excel time Time (HH:mm) Time (hh:mm AA) |
||||||||
| End time of the form | Ending time of list, if appropriate. | Excel time Time (HH:mm) Time (hh:mm AA) |
||||||||
| Grouping ID | Criteria to group entries. | N/A | ||||||||
| Complete list? | Indicates if the entry belong to a complete list or otherwise. | N/A | ||||||||
| Date | Date of observation. Excel date is good in most cases. Try to change date format on the excel cell (Right click > Format cell > Date), if it is allowed Date Excel will work. Otherwise, choose a different format. Importing data from a website (ie. eBirds) or from a non-excel file may need any but Excel Date. | Excel Date date (dd.mm.yyy) date (mm.dd.yyyy) date (yyyy.mm.dd) date (yyyy.dd.mm) Timestamp |
||||||||
| Time | Time of observation. Excel time is good in most cases. Try to change time format on the excel cell (Right click > Format cell > Time), if it is allowed Excel will work. Otherwise, choose a different format. Importing data from a website (ie. eBirds) or from a non-excel file may need any but Excel time. | Excel time Time (HH:mm) Time (hh:mm AA) |
||||||||
| Elevation / Z(m) | Elevation at which the observation takes place. It is not compulsory to introduce it. However, when not provided the process slows down as the system works to assign an altitude to the observation. | N/A | ||||||||
| Locality code | Code of locality. | Locality code of the former base Locality code of this site |
||||||||
| Name of locality | Locality name. | N/A | ||||||||
| Municipality | Municipality name. | INSEE code Name of the municipality |
||||||||
| Department | Name (or code) of department or province. | Province Province code |
||||||||
| Longitude / X(m) | Coordinates. It is important longitud and latitude are precise. Indicate the coordinates system the data follows. | WGS84 géographique [D.d] WGS84 géographique [DMS] WGS84 planes - UTM (GRS80) [m]> RGF93 planes - Lambert 93 [m] NTF planes - Lambert II étendu [m] NTF planes - Lambert I Nord [m] NTF planes - Lambert II Centre [m] NTF planes - Lambert III Sud [m] NTF géographique (Paris) [Grades] NTF planes - Lambert IV Corse [m] CH 1903 [m] |
||||||||
| Latitude / Y(m) | Coordinates. It is important longitud and latitude are precise. Indicate the coordinates system the data follows. | WGS84 géographique [D.d] WGS84 géographique [DMS] WGS84 planes - UTM (GRS80) [m]> RGF93 planes - Lambert 93 [m] NTF planes - Lambert II étendu [m] NTF planes - Lambert I Nord [m] NTF planes - Lambert II Centre [m] NTF planes - Lambert III Sud [m] NTF géographique (Paris) [Grades] NTF planes - Lambert IV Corse [m] CH 1903 [m] |
||||||||
| UTM zone | Coordinates. When introducing the coordinate, remember to indicate the letter along with the number (ie. U32 instead of 32). | N/A | ||||||||
| Species | Species name. Indicate if you use Biolovision's species code or a species name in any of the languages offered by your local portal. | Biolovision code Scientific name Local languages |
||||||||
| Estimate | Precision count for number of individuals in each observation. | N/A | ||||||||
| Number | Number of individuals in each observation. | N/A | ||||||||
| Comment nb1 | Click on the + sign to duplicate the field. | N/A | ||||||||
| Hidden comment n°1 | Click on the + sign to duplicate the field. | N/A | ||||||||
| Age and sex n°1 | Click on the + sign to duplicate the field. Only visible if you chose a taxonomic group at the start. |
Several combinations of age and sex | ||||||||
| Hidden record | Type 1 to hide a record and 0 to keep it public. | N/A | ||||||||
| Observer nb1 | Click on the + sign to duplicate the field. | Put in hidden remark for reallocation Id Family name First name |
||||||||
| Atlas code | Only available for birds. If you selected a different taxonomic group or none, this field will not be available. Indicate which coding system you are using. Number of options depend on the system. |
eBird list | ||||||||
| Project code Study code |
Code of project the observation belongs to. It should contain a code already existing in your system. | N/A | ||||||||
| Exported | N/A | |||||||||
| Export date | date of export. | Excel Date date (dd.mm.yyy) date (mm.dd.yyyy) date (yyyy.mm.dd) date (yyyy.dd.mm) Timestamp |
||||||||
| Behaviour | Observation's behaviour according to its taxonomic group. Only one behaviour is accepted per cell. | Various according to taxonomic group. See section below. | ||||||||
- Behaviour
- Behaviour
Choose a behaviour from the list below according to your taxonomic group. Note only one behaviour per cell is accepted. Please choose the one that best describes the observed behaviour in the field. The text in the excel cell must match exactly as indicated in the table below.
| Taxonomic group | BIRDS | MAMMALS | DRAGONFLIES | GRASSHOPPERS | BUTTERFLIES | AMPHIBIANS | REPTILES |
|---|---|---|---|---|---|---|---|
| Available options | Active migration Feeding Roost Predated |
Mating Moves Feeding Predated Marking territory Displaying Under a plaque |
Territorial Tandem Mating Pond Emergence Migration Predated |
Mating Pond Predated |
Territorial Mating Pond Migration Feeding Predated |
Mating Pond Predated Heliothermia Under a plaque |
Mating Pond Predated Heliothermia Under a plaque |
Importing Lists
Either if they are complete or not, they require a time to start and end, and an id number in a different column.
[Top to Column matching]
[Top to Data description]
[Back to Importing your data]
3. Complementary treatment information

Complementary information.
1. Precise location type
2. Hiding all observations
3. Automatic validation
4. Only perform data validation (no insert)
5. Insert several times duplicate records
- 1. Precise location type
To minimize the number of incorrect coordinates, there are three types of positions. Note only one is allowed per file. If you need to import observations recorded with different precision, use separate files for each of them.
- Precise: It requires coordinates X and Y.
- Locality: The coordinates are associated to the closest Locality (there is no red marker indicating the position). There is no need to introduce coordinates, but the name of the Locality (either the current code or that on the old database). If coordinates are introduced, the system will associate them to the closest Locality.
- Municipality: The coordinates are associated to the commune, independently on how you enter them. This is highly inaccurate and we do not recommend its use.
- Precise: It requires coordinates X and Y.
- 2. Hiding all observations
It is possible to hide all observations. This option will replace the Hide record one in the previous step.
- 3. Automatic validation
It is possible to ask the system to conduct an automatic validation. It is important that there are no filters in your data. Although they can be useful to check the data, the import will stop if the system detects any filter.
- 4. Only perform data validation (no insert)
There is the possibility to run a verification without importing. It allows to check the configuration of a selection of data.
- 5. Insert several times duplicate records
Check if you want to import records that may occur more than once in your file. If you do not check the cell, the file will be validated but data not imported until such observations are grouped.
[Top to Complementary treatment information]
[Top to Data description]
[Back to Importing your data]
Import
During the import, the system shows the progress and the errors encountered (see image below). It stops validating when it encounters 15. Repair the errors manually on your computer and upload the file again until all data are validated and correct. Then the import itself starts automatically if you did not requested otherwise. The configuration in saved so there is no need to reset it every time you correct mistakes.
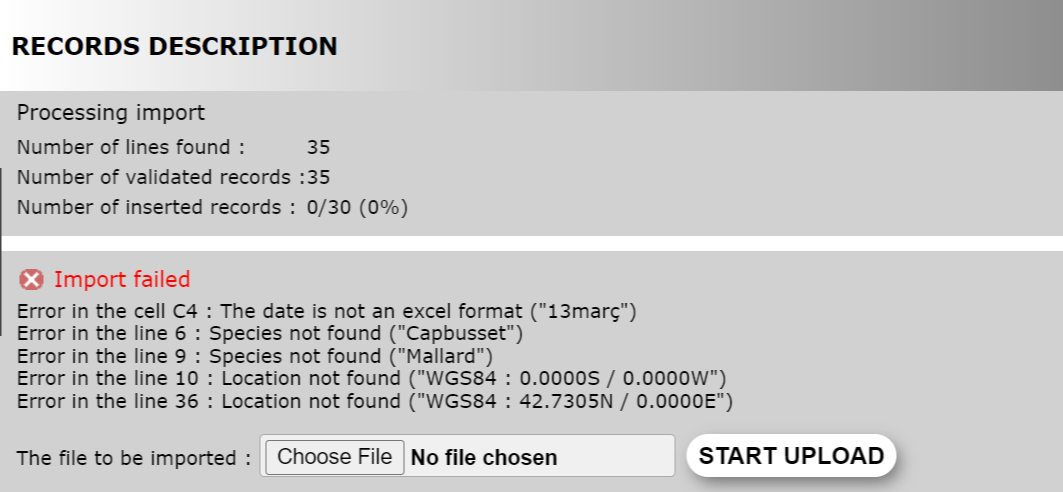
Importing your data. Example of errors during validation process.
There is no size limit to your file, but the larger the file, the longer to import. It takes about 1000 observations per minute to import, but can take longer if altitude or commune are missing. The system will have to assign them. Therefore, we strongly encourage you to double check your data before importing because corrections are burdensome. We recommend to import small files so mistakes can be easier to correct.
IMPORTANT NOTE:
Please double check your data before importing it, and import small files.
There is no need to wait until the importing process is done. Once it starts, you can turn off your computer.
[Top to Import]
[Top to Data description]
[Back to Importing your data]
Importing observations from eBird
To import data from eBirds, choose:
· Taxonomic group: Birds
· Profile: ebird
· Use in profile: Column name
When choosing the eBird profile, a checkbox with the option "Rebuild eBird form" appears. This option allows the form to be reconstructed from the information transmitted (date, location, observation duration). It is necessary to have the "Protocol", "Location ID" and "Duration (Min)" columns present in the eBird export. Only observations with the "eBird - Traveling Count" or "eBird - Stationary Count" protocol will be imported as forms.
If the cell is not marked, all data from ebird is imported as casual data.
Consulting your imports
It is possible to check the result of your imports afterwards in Taking part > Import section (see image below as an example).

Import history. Example.
Imports are coloured coded:
- Blue : Settings are underway, or import has been stool at the Settings phase.
- Red : Import failed. Click on the + symbol to see the reason.
- Green : The file has been imported successfully.
- Yellow : Either the validation or the import are in course. A rotating symbol indicates either the validation or the importing itself are currently taking place. If converts to a green tick (see image below as an example), your file passed the validation but has not been imported. The change does not take place automatically, you will need to refresh the page.
Click on the + symbol on the left to see more information, including possible errors during the validation and/or importing process (see images below).
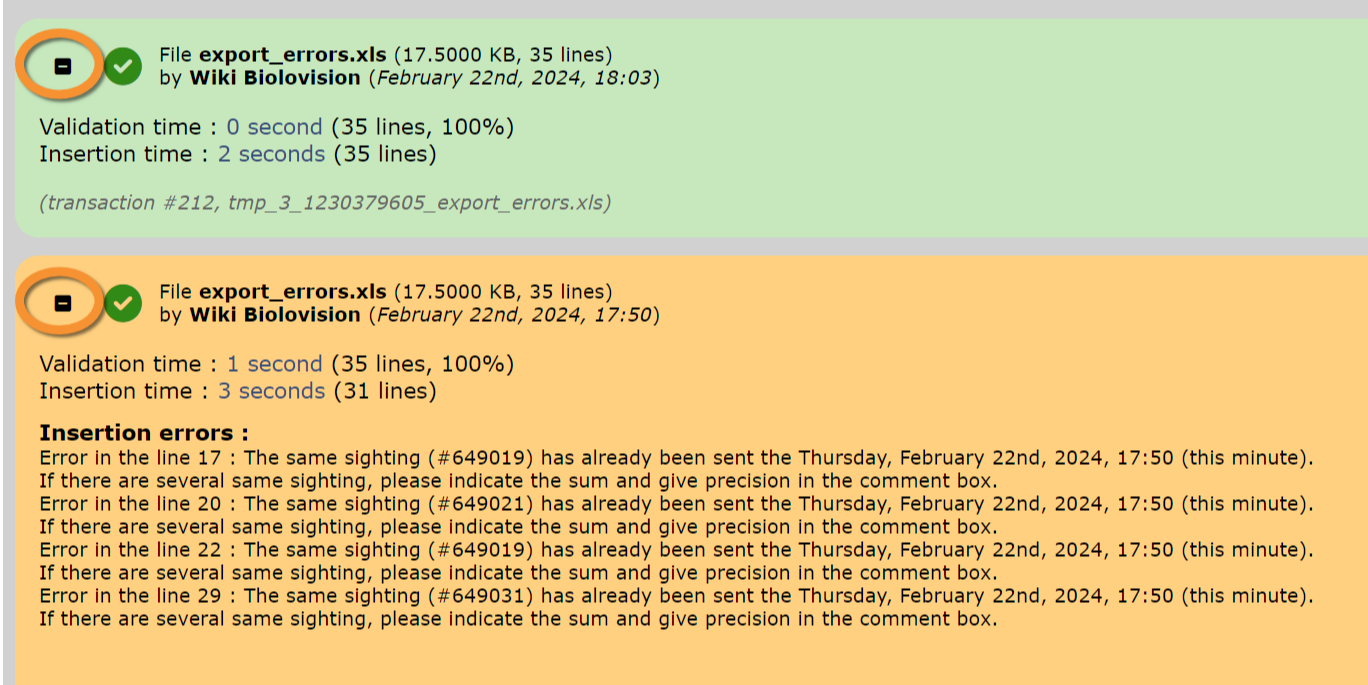
Import history expanded. Example.

Import history. Description of errors.
1. File name, size and number of lines.
2. User who inserted the file, and date and hour of insertion.
3. Time invested to validate the file, and progress of validation in percentage.
4. Time invested for the insertion.
5. Link to the last entry inserted, if any. Access last record by clicking the link. To continue importing records delete all entries on top of this one, independently of their date.
6. Error number. This number is used for developers.