User administration
See all personal information about users registered in the system and modify it if necessary.
Grant or revoque rights to specific users.
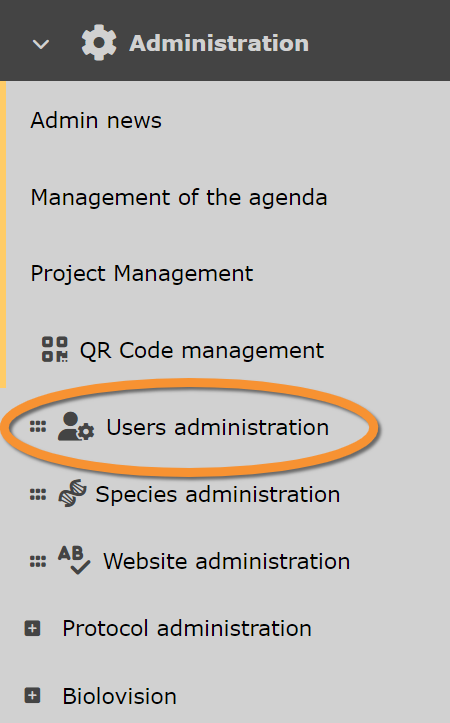
Users administration.
Admin users
Main Menu > Administration > Users administration > Admin users.

Admin users.
Observers
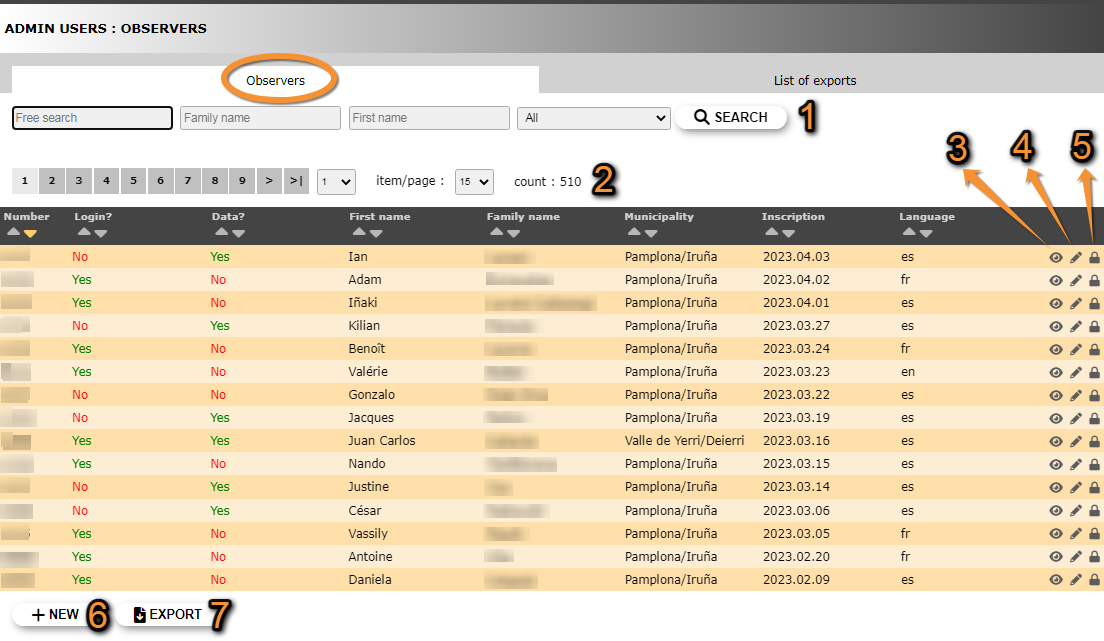
List of all users ever registered in that web site and/or logged in. Use arrows under titles to alternate between ascending and descending order (see image as an example).
Users admin. Observers.
1. Search
2. Page and items
3. Details
4. Edit
5. Admin user rights
6. NEW
7. EXPORT
Number: register number.
Log in: has the member ever logged in?.
Data: has the member ever transmitted observations? Can send observations via NaturaList and never log into the web.
First name: observer's given name/s.
Family name: observer's family name/s.
Municipality: the observer will receive maps and news around this location.
Inscription: date the observer registered or first logged in.
Language: observer's default language of the site.
- 1. Search
Reduce list by typing one of the selecting criteri, or part of it, and click SEACH. NOTE it is possible to apply more than one filter (ie. Select all observers registerred as Mary that have submitted at least one record). When any filter is applied, click on DISPLAY ALL to see the whole list. Use arrows on columns to alternate between ascending and descending order (see image as an example).

Searching observers.
1a. Type any word, or part of it, to conduct a free search.
1b. Type a family name, or part of it, to select observers registered with this family name.
1c. Type a firt name, or part of it, to select observers registered with this name.
1d. Select from the expandable menu one of the available criteria:
with any right: observers that have been granted at least one right.
with access to archives: observers that have been granted access to archives.
without access to archives: observers that are not granted access to archives.
with records: observers that have submitted at least one observation.
without records: observers that have never submitted observations.
- 2. Page and items
Select page number and/or number of items per page.
- 3. Details
See data associated to this user. Access the same details by clicking on the observer's name. Details include personal information as entered in the registration form, as well as data on registration data and last log in. See image below as an example.

Admin users. Observer details.
BACK: Go back to previous screen.
4. EDIT: Edit details.
5. ADMIN USER RIGHT: Rights granted to this user.
Addtional information:

Additional information.
8.
9. Some portals require users to submit a minimum number of observations before they can access certain functions.
- 4. Edit
Modify user's personal data, including email address and password. When done, click MODIFY to save changes.

Modifying user's personal data.
BACK: Go to previous screen without saving.
MODIFY: Click to save changes.
- 5. Admin user rights
Invisible users
Some registered users are not visible and administrators cannot grant them rights.
This happens when:
1. The administrator have rights on a local mirror site and the user's address is not within the territory covered by this site, or
2. The user has not submitted any data yet.
Solve it by:
1. asking the user to submit any data on this mirror website, or
2. changing the municipality the user is registered at in the mirror website
List of rights granted to this user, and any possible restrictions to the right:
· Restrictions related to geography: The right applies only at one, or few, geographical places like sites, municipalities, or cantons. In the image below, the user can only export data of the species Paratettix meridionalis in the municipality of Pamplona/Iruña. It is represented by a blue line.
Users with no geographical restriction is marked with a globe icon ![]() .
.
· Restrictions related to taxonomic groups: The right applies only for one, or few taxonomic groups or species. In the image below, the user can only export data of the species Paratettix meridionalis, and can ask for verification details only for birds. It is represented by a green line.
· Restrictions related to protocols: The right applies only to one or few protocols, projects or to the rarity committee. In the image below, the user has administration rights only for the Waterbird census protocol, and no other protocol. It is represented by an orange line.
· Unrestricted right: Some users may not have any restriction to a right. It is marked by a warning symbol ![]() .
.

- 10. Edit
- 10. Edit
- Change restrictions for this user to this right.

Finish editing.
1. BACK: Go to previous screen without saving.
2. MODIFY: Click to save changes.
- 12. NEW
- 12. NEW
- Grant a new right to this user. Choose right from the expandable menu. If the selected right accepts restrictions, they will open underneath. Select specific options to which the user will have rights to (see examples in the image below). Do not select anythig to grant unrstricted rights. This will be indicated by a warning mark on the main list (see image Admin users rights and restrictions).
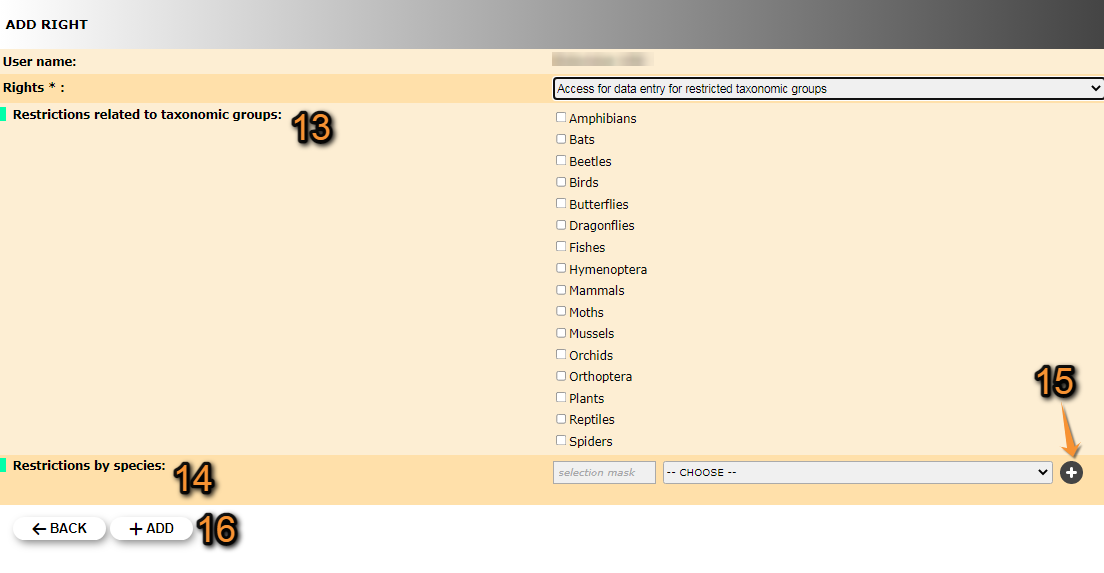
Granting rights to users. Example.
13. Tick those taxonomic groups the user will have right to.
14. Start typing the name on the left field, and select from the expandable panel on the right. The user will have rights only on the selected species. When done, click + (number 15), and repeat the process to add other species.
15. Adds a restriction.
16. +ADD: Click Add to save, or BACK to go to previous screen without saving.
Underneath the list of users, some statistics are displayed.

Statistics.
[Top to Observers]
[Top to Admin users]
[Back to User administration]
List of exports
[Top to Observers]
[Top to Admin users]
[Back to User administration]
Admin users rights
Main Menu > Administration > Users administration > Admin users rights.

Admin users rights.
List of all possible rights. Use arrows under titles to alternate between ascending and descending order (see image as an example).
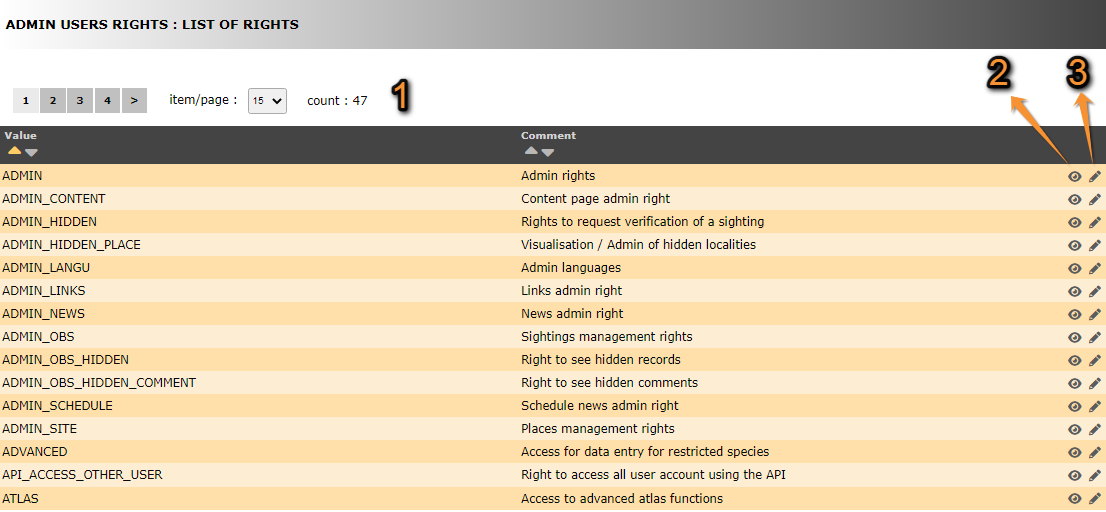
- 1. Search
Select page number and/or number of items per page.
- 2. Details
Click to see details of selected right.
User's rights. Details.
1. BACK: Go to previous page without saving.
2. EDIT: Modify details. See next sub section Edit for more information.
- 3. Edit
Click to modify user's rights.

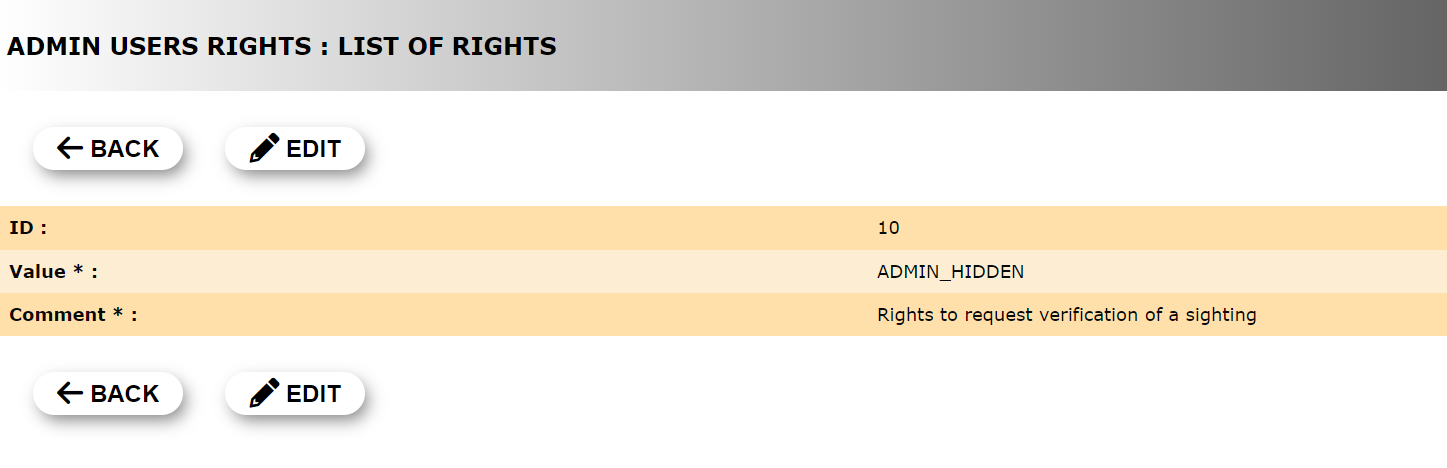
User's rights. Edit.
1. BACK: Go to previous page without saving.
2. MODIFY: Save changes.
[Top to Admin users rights]
[Back to User administration]
List of rights
Summary table users' rights
| Theme | Code | Name | Restriction1,2 |
|---|---|---|---|
| Backoffice | ADMIN | Admin rights | · Mirror site · Taxa |
| Places | ADMIN_CONFIG_SITE | Access to site configuration | n/a |
| Backoffice | ADMIN_CONTENT | Content page admin rights | · Mirror site |
| Sightings | ADMIN_HIDDEN | Rights to request verification of a sighting | · Taxa |
| Places | ADMIN_HIDDEN_PLACE | Visualisation / Admin of hidden localities | n/a |
| Backoffice | ADMIN_LANGU | Admin languages | n/a |
| Backoffice | ADMIN_LINKS | Links admin rights | · Mirror site |
| Backoffice | ADMIN_NEWS | News admin rights | · Mirror site · Taxa |
| Backoffice | ADMIN_NEWSLETTER | Newsletter Right | n/a |
| Protocol/Project/Rarities committee | ADMIN_NO | NocMig admin access | n/a |
| Sightings | ADMIN_OBS | Sightings management rights | · Location · Taxa |
| Sightings | ADMIN_OBS_HIDDEN | Right to see hidden records | · Location · Taxa |
| Sightings | ADMIN_OBS_HIDDEN_COMMENT | Right to see hidden comments | n/a |
| Backoffice | ADMIN_SCHEDULE | Schedule news admin right | · Mirror site |
| Places | ADMIN_SITE | Places management rights | n/a |
| Backoffice | ADMIN_USER | Users administration | · Taxa |
| Sightings | ADVANCED | Access for data entry for restricted species | · Taxa |
| Tools | API_ACCESS_OTHER_USER | Right to access all user account using the API | n/a |
| Tools | ATLAS | Access to advanced atlas functions | · Taxa |
| Tools | ATLAS_ADMIN | Atlas administrator | n/a |
| Tools | ATLAS_API_FILE_UPLOAD | Upload atlas documents with API | n/a |
| BODENSEE | ? | n/a | |
| Sightings | CONFIRM_OBS | Confirmation rights | · Taxa |
| COR | ? | n/a | |
| Tests | DELETE_PUBLIC_VALIDATION | Remove the right to community validation | n/a |
| Tests | DISPLAY_LAST_STOC_FORM | Access to protocol features under development | n/a |
| Sightings | EXPORT | Export rights | · Location · Taxa |
| Sightings | EXPORT_ENTITY | Right to export for entity | n/a |
| Tools | FREE_AREAS | Access to the free site management tool | n/a |
| Sightings | FULL_SEARCH | Right to use the search engine, despite the quota | n/a |
| Tests | FULL_STAT | Access to the complete stats | n/a |
| Places | FUSION_SITE | Right to lump several localities | n/a |
| Tools | GUID | Access to GUID/UUID | n/a |
| Sightings | IMPORT | Import rights | n/a |
| Tools | LAST_PUBLIC_PHOTO_RIGHT | Access to API photo | n/a |
| Tools | MERGE_LIST | Access to the list merge tool | n/a |
| Sightings | OBSERVATION_SELECTION | Access to the “Like” module for observations | n/a |
| Backoffice | OBSERVER | Basic rights for registered users | n/a |
| Sightings | OBSERVER_IMPORT | Right to import self records (Excel) | n/a |
| Sightings | PEOPLE_SEARCH | Right to filter by user | n/a |
| Tools | POLYGON_DATA_DRAW | Right to draw polygons for the asynchron cache | n/a |
| Tools | POLYGON_DISPLAY_EXCLUDED_SPECIES | Right to see excluded species from summary maps | n/a |
| Places | PRIVATE PLACE | Right to see private places | n/a |
| Protocol/Project/Rarities committee | PROJECT | Access to projects | · Project |
| Protocol/Project/Rarities committee | PROJECT_ADMIN4 | Project administrators4 | · Project |
| Protocol/Project/Rarities committee | PROTO | Access to protocols | · Protocol |
| Protocol/Project/Rarities committee | PROTO_ADMIN4 | Protocol administrator4 | · Location · Taxa |
| Protocol/Project/Rarities committee | PROTO_MANAGE4 | Protocol manager4 | · Location · Protocol |
| Tools | QRCODE | QR code administrator | n/a |
| Protocol/Project/Rarities committee | RARITIES_COMMITTEE | Rarity committee member | · Committee3 |
| Protocol/Project/Rarities committee | RARITIES_COMMITTEE_ADMIN4 | Rarity committee secretary4 | · Committee3 |
| Protocol/Project/Rarities committee | SKIP_RANDOM_SELECTION | Allow to skip random square selection | n/a |
| Tools | TELEMETRIC_OBS | Access to telemetry data entry | n/a |
| Tests | TEMP_PAGES | Access to pages in construction | n/a |
| Sightings | USER_WITH | Access for data entry for restricted taxonomic groups | · Taxa |
| Places | USER_WITH_ADD_SITE | Right to add new places | n/a |
| Places | USER_WITH_ADD_SITE_OBJECT | Create a new object | · Taxa |
| Sightings | USER_WITH_ASK_DEAD | Access to the mortality module | n/a |
| Tests | USER_WITH_ASK_SAMPLE | Access to sample | n/a |
| Tests | USER_WITH_CAN_TRY_RESPONSIVE | Right to access the responsive interface | n/a |
| Sightings | USER_WITH_CHANGE_SPECIE_OTHER_TAXO | Right to change the species out of the taxonomic group | n/a |
| Sightings | USER_WITH_COMPARE_USERS | Autorise species lists comparison by observer | n/a |
| Other | USER_WITH_GOOGLE_MAP | Allow the use of GoogleMap layers | n/a |
| Protocol/Project/Rarities committee | USER_WITH_RARITIES_COMMITTEE_REPORT | Test user for rarity committee | n/a |
| Tests | USER_WITH_RESPONSIVE | Access to the responsive interface | n/a |
1Some local portals may not apply the restriction.
2The level of restriction depends on the local portal.
3Homologation committee.
4This right interacts with other rights. See detailed description below.
Admin rights
· Allows all rights. Grant with moderation.
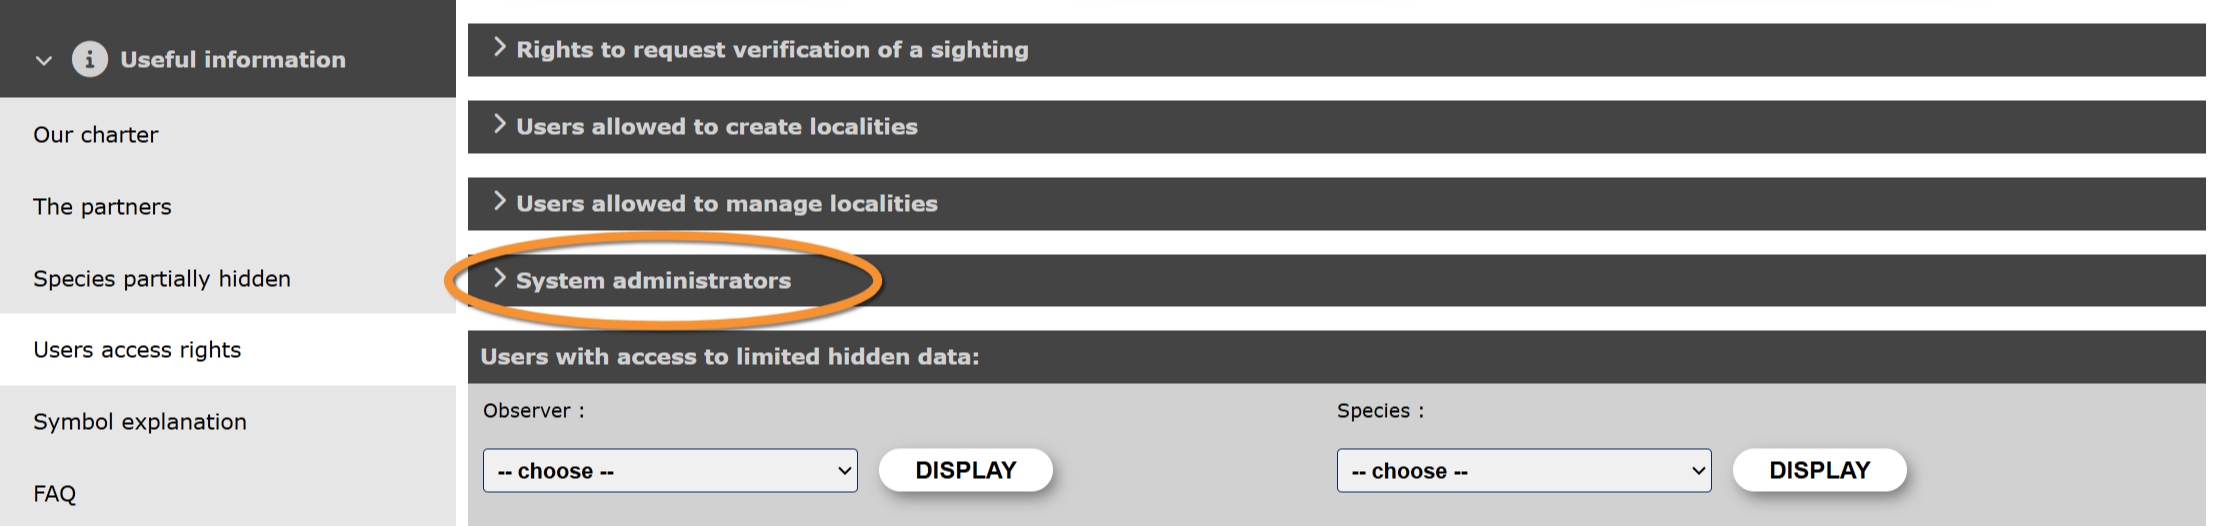
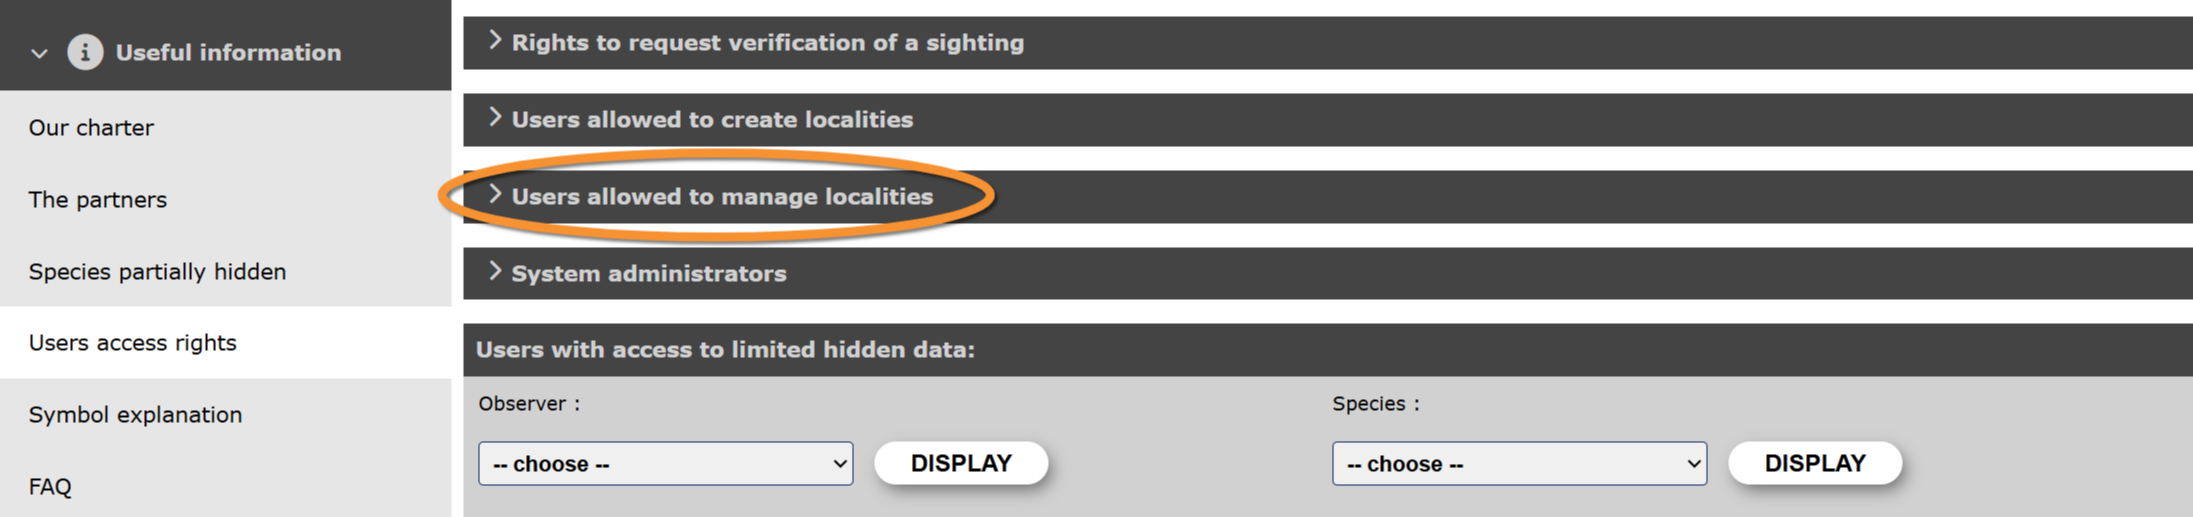
· The beneficiary automatically appears at 'System administrator' on Useful information > Users access rights > System administrators.
Access to site configuration
·
Content page admin rights
· Allows creating a page on the site.
· It gives access to sections Admin page content and Content categories *.
· When done, select if you want it visible or not (See wiki section Administration > Website administration > Admin page content > Edit). It may be useful if it is not created at once and / or partners need to review it before publication.
· Seeing a page that is not yet visible requires Access to pages in construction.
· * In ornitho.de, ornitho.at and ornitho.it Content page admin right does not give access to Content categories. It requires Access to pages in construction.
Right to request verification of a sighting
· Grants the right to mark an observation requiring more information and to add comments to the observation.
· When available, gives access to the Validity level.
· The right does not allow modifying the observation.
· The beneficiary automatically appears at 'Rights to request verification of a sighting' on Useful information > Users access rights > Rights to request verification of a sighting.
Visualisation / Admin of hidden localities
· Allows to activate/deactivate a locality.
· A deactivated locality does not accept observations; it needs to be activated beforehand.
· This right requires the right Places management rights beforehand to work.
Admin languages
· Allows changing the texts on the site.
· The right gives access to Admin text.
· It is independent on the languages of the site.
Links admin rights
·
News admin rights
· Allows posting notes on the newsboard.
·
Newsletter management
·
NocMig admin access
·
Sightings management rights
· Allows modifying, deleting and / or exporting other's observations.
· It does not include seeing hidden data.
· Seeing hidden data requires Right to see hidden records.
It also allows you to access the precise location of observations and modify the CHR/CHN status. It also adds the ability to search CHR/CHN data in the "Other Restrictions" tab of the search.
This right also allows, when forms are installed on your site, access to sorting by form in the multi-criteria search (box: "Limit to data transmitted by forms" (the box on the right allows you to enter the form number if you know it). In the near future, Gaëtan will also allow reviewers to have this option.
This right also allows you to search data associated with a project (for all active projects on the platform).
Right to see hidden records
· Allows to see hidden observations.
·
Right to see hidden comments
· Allows seeing hidden comments.
·
Schedule news admin right
·
Places management rights
· Allows to modify a place: change name, change elevation and move place.
· The beneficiary automatically appears at 'Users allowed to manage localities' on Useful information > Users access rights > Users allowed to manage localities.
Users administration
·
Access for data entry for restricted species
· Allows summiting observations of restricted species.
·
Right to access all user account using the API
·
Access to advanced atlas functions
·
Atlas administration
·
Upload atlas documents with API
·
Bodensee?
·
Confirmation rights
· Gives right to mark a verification as correct, without passing through a Rarity Committee.
· It is often used for non-bird species.
Cor?
·
Remove the right to community validation
·
Access to protocol features under development
·
Export rights
· Allows exporting all data, independently of observer.
·
Right to export for entity
·
Access to free site management tool
· Opens access to the Free area tool to users.
·
Right to use the search engine, despite the quota
· Allows full access to the search engine, independently of the number of submitted records.
·
Access to the complete stats
· Allows seeing the first 80 entries of observers' list instead of the first 5.
·
Right to lump several localities
·
Access to GUID/UUID
·
Import rights
·
Access to API photo
·
Access to the list merge tool
·
Access to the “Like” module for observations
·
Basic rights for registered users
·
Right to import self records (Excel)
·
Right to filter by user
·
Right to draw polygons for the asynchron cache
·
Right to see excluded species from summary maps
·
Right to see private places
·
Access to projects
· Allows entering observations to a specific project.
· Only grants rights to the project assigned.
· If a user is granted Project adminisration rights gets automatically granted the right to access projects.
Project administrators
· Allows setting parameters to projects.
· Only grants rights to the project assigned.
· A user with this right gets automatically also Access to projects.
Access to protocols
· Allows entering data to a specific protocol.
· Protocol administrators and protocol managers automatically receive the right to access protocols.
Protocol administrator
· Gives rights to assign users to protocols and to define protocol parameters.
· Gives access to Protocols > Settings.
· Only grants rights to the protocols assigned.
· A protocol administrator automatically receives the right to Access the protocol and manage the protocol.
Protocol manager
· Gives rights to assign users to protocols.
· It does not allow setting protocol parameters.
· Only grants rights to the protocols assigned.
· A protocol administrator automatically receives the right to Access the protocol.
QR code administrator
·
Rarity committee member
·
· If a user is granted the Rarities committee administration right they are automatically granted the Rarity committee member right.
Rarity committee secretary
·
· A user with the Rarity committee secretary right is automatically granted the [[user administration#Rarities committee|Rarity committee member right.
Allow to skip random square selection
· In STOC protocols, the administrator can assign a specific square to a user, without randomisation or the possibility of choosing between two squares.
Access to telemetry data entry
·
Access to pages in construction
· Allows seeing pages not visible to other users.
· It may be useful when several partners need to review the page before it is published.
· Creating content requires Content page admin rights.
· In ornitho.de, ornitho.at and onrnitho.it it gives access to Content categories. All other portals get access to Content categories with Content page admin rights.
Access for data entry for restricted taxonomic groups
· Allows user to enter data for one or more taxonomic groups when they are restricted.
· Requires a right for each taxonomic group.
Right to add new places
· Allows creating new places.
· It does not allow to modify or merge places.
· Modifying a place requires Places management rights.
· Merging places requires Fusion site/Right to lump several localities.
Create a new object
·
Access to mortality module
· The user have access to the [[Modules#Mortality_Module|Mortality module to report injured and/or dead individuals.
Access to sample
·
Right to access responsive interface
·
Right to change the species out of the taxonomic group
·
Authorise species lists comparison by observer
·
Allow the use of GoogleMap layers
·
Test user for rarity committee
·
Access to the responsive interface
·
[Top to Admin users rights]
[Top to List of rights]
[Back to User administration]
Who's online?
Main Menu > Administration > Users administration > Who's online?.

Who's online?
List of all opened sessions. Gives information on users and conection details.

- 1. User's details
User name and prefered language.

Information on online users.
3. Click on icon to access observer details. See image Admin users. Observer details as an example. Edit if necessay as explained in wiki section Administration > User's administration > Admin users > Observers > 3. Details.
4. Access the list of observations submitted by the user.
- 2. Connection details
Numbers under the name (blured in the image), indicate the internet provider and IP address for the current session.
[Top to Who's online?]
[Back to User administration]
Admin of committees
Main Menu > Administration > Users administration > Admin of committees.

Admin of committees.
Committees list
List of existing committees associated to this local portal. Use arrows under titles to alternate between ascending and descending order (see image as an example).

List of committees.
1. Page and items
2. Page and items
3. Edit
4. Delete
5. NEW
Committee name: Name given to the committee in the selected language.
Position: In which position the committee will show on the list.
Visible: Indicates if the committee will be visible or not.
- 1. Page and items
Select page number and/or number of items per page.
- 2. Details
Click to see details of the selected committee, including its name the different languages.

Committee details.
BACK: Go to previous screen.
EDIT: See edit subsection below.
DELETE: Delete the selected committee. You will be asked to confirm.
- 3. Edit
Modify details of committee, or add name in a new language.
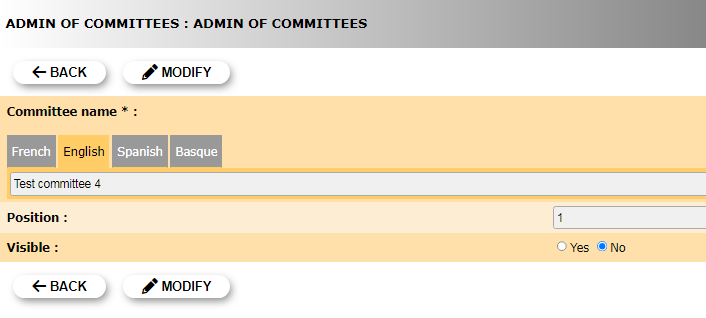
Edit committee.
Committee name: Select the tab language and add / modify committee name in the selected language.
Position: Type the position in which this committee will appear in the public list.
Visible: Indicate if the committee will be visible or not.
BACK: Go to previous screen without saving.
MODIFY: Save changes.
- 4. Delete
Delete the selected committee. You will be asked to confirm.
- 5. NEW
Create a new committee.

Creating a new committee.
6. Language: Select language in which you want to name the committee. You may choose more than one language.
7. Name: Type a name for the new committee in the selected language. If you need to add a new languege repeat step 6.
8. Position: Type the position in which the new committee will show in the list.
9. Visible?: Indicate if the committee will be visible to users.
BACK: Go back without saving.
ADD: Save the new committee.
[Top to Committees list]
[Top to Admin of committees]
[Back to User administration]
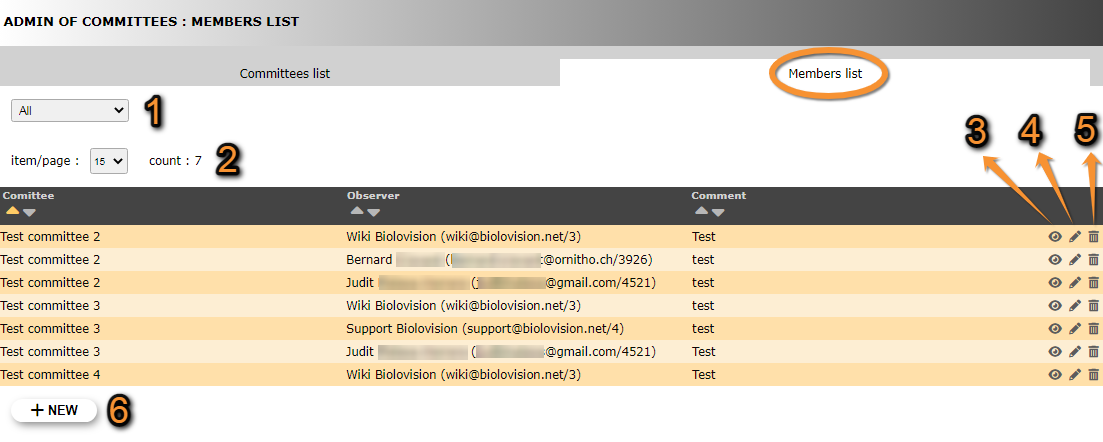
Members list
List of all members belong to any committee. Use arrows under titles to alternate between ascending and descending order (see image as an example).
- 1. Search
Reduce list by selecting a committee from the expandable menu, and clicking SEACH. When a filter is applied, click on DISPLAY ALL to see the full list.
- 2. Page and items
Select page number and/or number of items per page.
- 3. Details
See details of observers and their assigned committee, as well as some comment if available.
- 4. Edit
Modify the user assigned to a committee, or the committee a ser belongs to. Add or edit a comment if necessary.
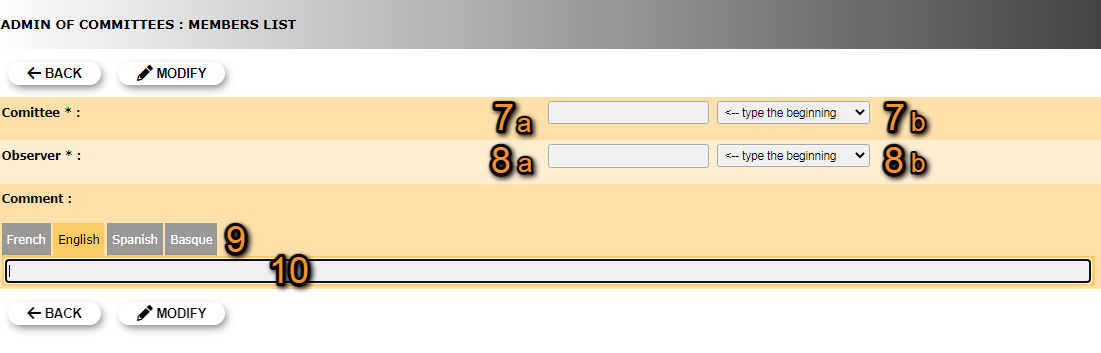
Editing Committee's members list.
7. Modify committee: Start typing the name of the committee (a) and select from the expandable menu (b).
8. Modify observer: Start typing the name of the obsever (a) and select from the expandable menu (b).
9. Select language: Select a language to leave a comment. The comment will only be visible if the page language is that of the comment. You can leave a comment in different languages.
10. Leave comment: Type comment if necessary. If needed, repeat from 9 to leave a comment in multiple languages.
BACK: Go to previous screen without saving changes.
MODIFY: Save changes.
- 5. Delete
Delete the user assigned to a committee. You will be asked to confirm.
- 6. NEW
Assign a new user to an existing committee.
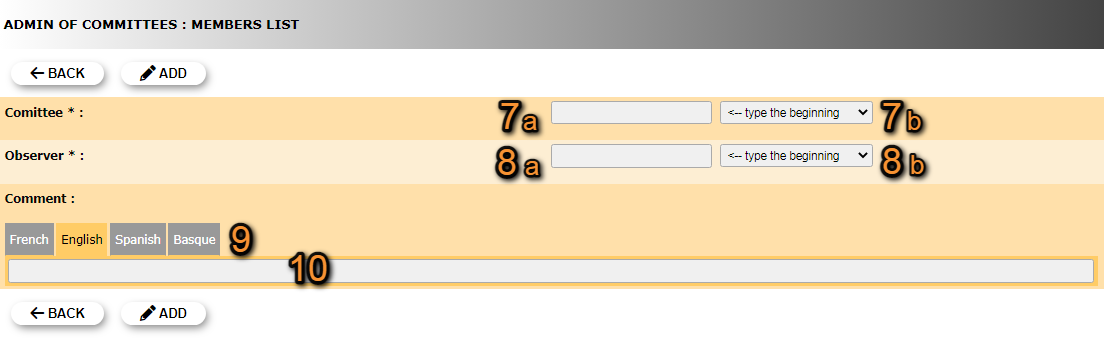
Committee's members list. New.
7. Select committee: Start typing the name of an existing committee (a) and select from the expandable menu (b).
8. Select observer: Start typing the name of the obsever (a) and select from the expandable menu (b).
9. Select language: Select a language to leave a comment. The comment will only be visible if the page language is that of the comment. You can leave a comment in different languages.
10. Leave comment: Type comment if necessary. If needed, repeat from 9 to leave a comment in multiple languages.
BACK: Go to previous screen without saving.
MODIFY: Save changes.
[Top to Members list]
[Top to Admin of committees]
[Back to User administration]