Exporting your data: Difference between revisions
| Line 286: | Line 286: | ||
====New template from an existing one==== | ====New template from an existing one==== | ||
To | To create a template starting from scratch, <br/> | ||
:1. click on the templates wheel (see image [[Media:2023-09-03 templates.png|Templates]], b).<br/> | |||
:2. select the protocol you want to work from and click on Details (see image [[Media:2023-09-01 templates panel.png|Exporting data. Templates list]], 3) from the .<br/> | |||
:3. click <b>CREATE A NEW EXPORT MODEL FROM THE CURRENT ONE</b> at the bottom of the page (see image [[Media:2023-09-03 Details template.png|Details of a template]]). <br/> | |||
<br/> | <br/> | ||
Revision as of 14:30, 4 September 2023
|
|
From different places of the Local Website you can browse your data, and/or export your own in different formats:
| Name | Description | |
|---|---|---|
|
|
Tab separated plain text(.txt) | Data stored as a text, with columns separated by spaces. It can be opened with Microsoft Notepad, WordPad and TextEdit. |
|
|
MS Excel file (.xlsx) | Spreadsheets. It can be opened with Microsoft Excel. |
|
|
MS Excel file 97-2003(.xls) | Spreadsheets. It can be opened with any version of Microsoft Excel. |
|
|
Google Earth (.KML) | Geo-referenced information that can be displayed in maps. It can be opened with GoogleEarth, but also with other GIS software. |
|
|
eXtensible Markup Language (.XML) | Data encrypted to be transferred between two computers through the web. It is used for the API. |
|
|
JavaScript Object Notation (.JSON) | Data encrypted to be transferred between two computers through the web. It is used for the API. |
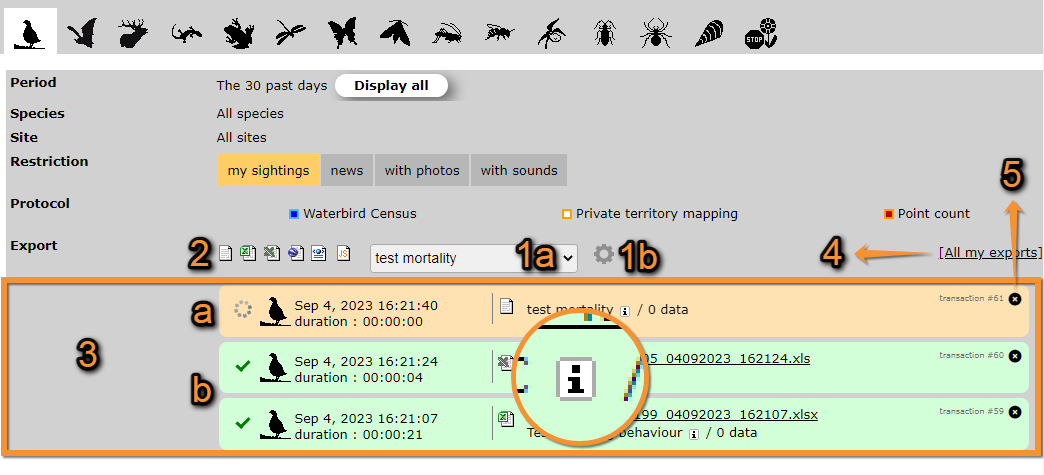
We take the example below from Explore> All my observations, the past 30 days (see image Exporting your data). Select a template (for example, BASIC) and click on the format (for example, Excel). Place the mouse pointer on the format icons to see which extension corresponds to each icon. Once you click on the format, the file is automatically generated in the format you selected. Create your own templates using the wheel next to the template expandable list. See your exports in All my exports (see image Exporting your data, creating files).

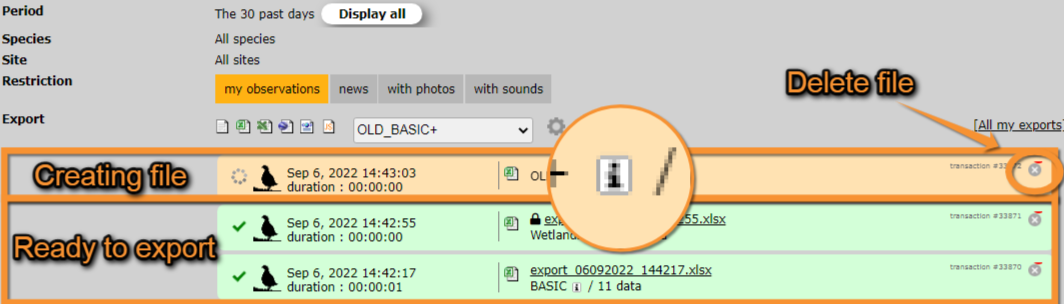
The file shows in orange while being created and turns green when it is ready to be downloaded. To download, click on the file name. Place the mouse pointer on the "i" icon when the file is ready in order to see the characteristics for each format type. To delete any file click on the X on the top right corner of the file area (see image Exporting your data, files ready to export).

Available formats
Data is available to download in different formats. See in the table below the differences between the different formats.
| Name | Description | |
|---|---|---|
|
|
Tab separated plain text(.txt) | Data stored as a text, with columns separated by spaces. It can be opened with Microsoft Notepad, WordPad and TextEdit. |
|
|
MS Excel file (.xlsx) | Spreadsheets. It can be opened with Microsoft Excel. |
|
|
MS Excel file 97-2003(.xls) | Spreadsheets. It can be opened with any version of Microsoft Excel. |
|
|
Google Earth (.KML) | Geo-referenced information that can be displayed in maps. It can be opened with GoogleEarth, but also with other GIS software. |
|
|
eXtensible Markup Language (.XML) | Data encrypted to be transferred between two computers through the web. It is used for the API. |
|
|
JavaScript Object Notation (.JSON) | Data encrypted to be transferred between two computers through the web. It is used for the API. |
Templates
Clicking on the expandable menu, choose an already made template (a) or create a new one (b) -See image below.

a Choose an existing template.
b Create a new template.
Available templates differ from country to country, are created by local administrators and can be modified by users with rights. The following templates exist in all sites and cannot be modified. Note some templates are only available for certain users, like administrators, and registered users without special rights will not see them in their menus.
| Name | Distribution | Description | Example |
|---|---|---|---|
| BASIC | Public | It does not include persnal information, like observers' names and e-mail addresses. | |
| BASIC+ | Administrators | It includes observers' names and e-mail addresses. Only available for administrators. | |
| OLD_BASIC+ | Public | Template on the old website. | |
| Wetlands+ | Private | Special template only for Wetlands programme. |
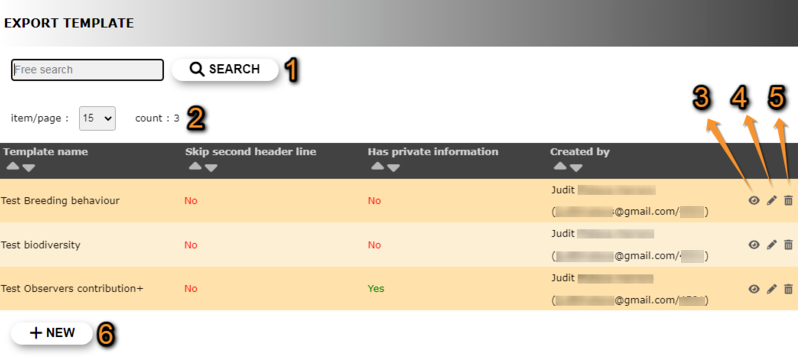
To choose form a Template you have previously created, click on the templates wheel and choose from the list (see image below). Use arrows under titles to alternate between ascending and descending order (see this image as an example).

Template name: Name given to the template.
Skip second header line:
Has private information: Indicates if it includes information about observers, like names, ID or e-mail addresses.
Created by: Name and email address of the creator.
- 1. Search
Reduce list by selecting a committtee from the expandable menu, and clicking SEACH. When a filter is applied, click on DISPLAY ALL to see the full list.
- 2. Search
Select page number and/or number of items per page.
- 3. Details
Click to see details of selected protocol.

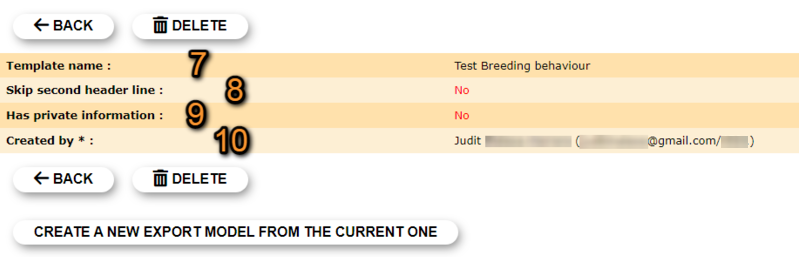
BACK: Return to previous page.
DELETE: Delete the selected template.
CREATE A NEW EXPORT MODEL FROM THE CURRENT ONE: Modify the template to create a new one. See section below for more information.
7. Template name: Name given to the selected template.
8. Skip second header line:
9. Has private information: Indicates if the template contains name, email address or observer's ID.
10. Created by: Name and email address of creator.
- 4. Edit
Modify details of selected template.

7. Template name: Modify template name if necessary by typing on it.
8. Skip second header line: Check to skip second header line.
11. Modify template fields: Left-click and drag field from one column to another (11a All available fields; 11b Current field in the tempplate.
At the bottom of the page,
- click CANCEL to go to previous screen without modifying the template, or
- click SAVE to save changes.
- click CANCEL to go to previous screen without modifying the template, or
- 5. Delete
Click on the bin to delete the template. Note it will be deleted immediately and irreversibly without asking for confirmation.
- 6. NEW
Create a new template. See sub-section for details.
Create a new template
It is possible to crate a new template. This will allow you to download only the data you are interested in. To create a new template, start from scratch or modify an existing one.
New template from an existing one
To create a template starting from scratch,
- 1. click on the templates wheel (see image Templates, b).
- 2. select the protocol you want to work from and click on Details (see image Exporting data. Templates list, 3) from the .
- 3. click CREATE A NEW EXPORT MODEL FROM THE CURRENT ONE at the bottom of the page (see image Details of a template).
New template from scratch
To create a template starting from scratch,
- 1. click on the templates wheel (see image Templates, b).
- 2. click NEW (see image Exporting data. Templates list, 6).

- 1. Template name
Type a name for the template.
- 2. Skip second header line
Check to skip second header line.
- 3. All columns
List of all fields available. Click a field you would like to have in your protocol and drag it from the left-hand column to the right-hand column.
- 4. Selected columns
List of columns in the current template. To remove any, click on the field and drag it back to the left-hand column.
When done, click SAVE to create the protocol. Click CANCEL to stop creating it without saving any progress.