Entering records: Difference between revisions
(→Later) |
|||
| Line 307: | Line 307: | ||
<br/> | <br/> | ||
==Date / Time== | ===Date / Time=== | ||
<br/> | <br/> | ||
| Line 349: | Line 349: | ||
<br/> | <br/> | ||
==Place== | ===Place=== | ||
<br/> | <br/> | ||
Set red marker at the location where the observation took place (as described in wiki section [[Entering_records#Place| Mobile interface > Submitting records > Directly in the field > Place]]). <br/> | Set red marker at the location where the observation took place (as described in wiki section [[Entering_records#Place| Mobile interface > Submitting records > Directly in the field > Place]]). <br/> | ||
| Line 375: | Line 375: | ||
<br /> | <br /> | ||
==Species== | ===Species=== | ||
<br/> | <br/> | ||
Enter species as described in wiki section [[Entering_records#Species | Mobile interface > Submitting records > Directly in the field > Species]].<br/> | Enter species as described in wiki section [[Entering_records#Species | Mobile interface > Submitting records > Directly in the field > Species]].<br/> | ||
<br/> | <br/> | ||
==Number of individuals== | ===Number of individuals=== | ||
<br/> | <br/> | ||
Enter the number of individuals as described in wiki section [[Entering_records#Number_of_individuals | Mobile interface > Submitting records > Directly in the field > Number of individuals]]. Note in this option one cannot '''Start a count''' as in other options. <br/> | Enter the number of individuals as described in wiki section [[Entering_records#Number_of_individuals | Mobile interface > Submitting records > Directly in the field > Number of individuals]]. Note in this option one cannot '''Start a count''' as in other options. <br/> | ||
<br/> | <br/> | ||
==Additional information== | ===Additional information=== | ||
<br/> | <br/> | ||
Enter any other additional information as described in wiki section [[Entering_records#Additional_information | Mobile interface > Submitting records > Directly in the field > Additional information]].<br/> | Enter any other additional information as described in wiki section [[Entering_records#Additional_information | Mobile interface > Submitting records > Directly in the field > Additional information]].<br/> | ||
Revision as of 12:07, 25 November 2022
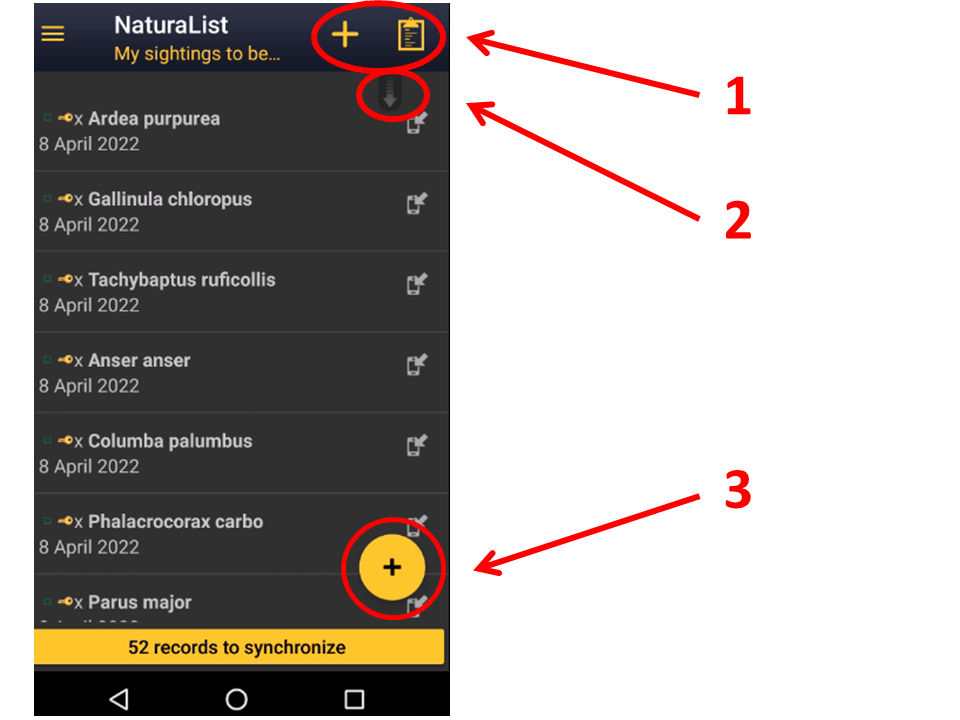
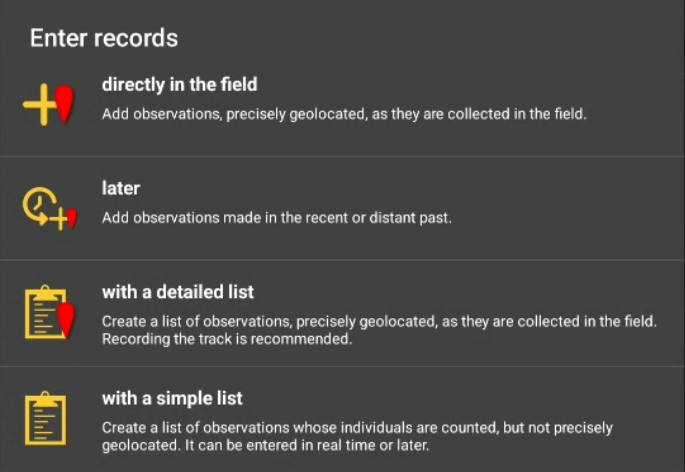
To share your observations, click on the + sign at the bottom left corner (see image Submitting records). A menu will open with all possible options to enter your records (see image Different options to submit records). Use the shortcuts on the top right corner for a direct access to directly in the field and with list in the field. Scroll down the refresh arrow to refresh records. It is especially useful when browsing records near me.


|
If you are not yet familiarised with the application, enter records as directly in the field. This is the easier option. As you familiarise with the application, move to other options. Lists are the more useful way to enter data for conservation purposes. |
Directly in the field (+)
Use this option to enter casual observations in real time. You can access it from the main menu or from the shortcut the top right corner of the screen (see image Directly in the field).

Place
|
Smiley = Observer's position Red marker = Data position |
Indicate the position of the observed individual by moving the map to match the red marker. To know how to navigate the map, see wiki section Mobile interface > Navigating the map. Use tha "aim" icon to activate the GPS and wait for the yellow smiley before continuing. When done, click on Next.
Use the "list" icon on the left to see a list of all your previous records (see image below).

Species
There are two different ways to enter the species according to your preferences. Set your preferences by going to Menu > Preferences > Personalisation > Display of species (see image Display of species).
- Choose by search: Choose the taxonomic group from the top horizontal panel and start typing the species name. A list will appear underneath from which to choose the correct species. See image Display of species by species.
- Choose by group, family, species: Start by selecting the taxonomic group, then the family and finally the species. See image Display of species by group, family, species.
Note the species' names will show in the language you selected in Preferences. To change it, go to Menu> Preferences > Species > Language of the species.
Number of individuals
Enter the number of individuals first and choose the accuracy of the count. Choose between Not counted, approximate number, exact number or minimum number (see image Entering number of individuals). If you did not count the individuals, for example for very common species, there is no need to introduce any number.

|
|
If you need to add new individuals as you count them, click on Start a counter and keep adding or subtracting individuals (see image Start a counter) until all are counted or you need to move to another species. Click Close to end the count and continue entering the observation.

|
|
Additional information
Add more information about this record. Icons will appear in yellow when they contain any information or are activated.

Comments

Leave a comment in the top section if you want it to be public and associated to your record. Any registered user will see it. Use the lower section if you want to keep your comment private. Note administrators will still see it. To learn more about administrators, go to wiki section Local portals > Administration. Click Validate when done.

|
To validate your record you will have to Save later. |
Details (Age and sex)

According the taxonomic group you are entering, fields for details differ. Examples and explanation below apply only to birds.
Enter number of individuals per each sex and age class. Type number or use +1 -1 quick keys to quickly change the number. Key Max will count all individuals entered for this species. As you enter, a list will show at the bottom. Scroll up and down from the right hand bar to see all entries, or click on cross to delete any entry if necessary (see image below). When done, click Add to enter a new class or finish to end.


Atlas code

Select an atlas code, or no code. Available atlas codes will depend on the country you chose on Preferences and for your information it is displayed at the bottom of the screen (see image below).
|
|
Go to Menu > Preferences > Atlas code to change the code you use.

Hidden record

Select/unselect as needed. A yellow key indicates the record will be hidden. Default option depends on your ‘’’Preferences’’’. Go to Menu > Preferences > Hide record to change it. Note some records are automatically hidden depending on the country or region your observation takes place. Observations in countries not covered by any local partner are never automatically hidden. However, any user can hide records if they consider doing so will help protect the individuals, species or habitat. Hidden records will be hidden from other users, but administrators will still see them. To see which records will automatically be hidden, go to Web interface > Local portals > Species partially hidden. To learn more about administrators, go to Web interface > Local portals > Administration.
Picture

Add a picture associated to your record. When accessing, it displays all images already attached to this record. To add a new picture, click on the top right hand corner + sign. If no pictures are already attached, you are taken directly to the menu (see image below).

Choose between
- Enter pictures from gallery, if you have already taken them and they are stored on your phone's gallery. Pictures must be taken with your phone or inserted afterward through a local portal. If no local portal exist, it is not currently possible to add a picture through data.biolovision.net.
- Take a picture then. If you do, do not forget to accept to upload it (see image below).

You can see the images as they are attached. Hide/unhide by clicking on the corresponding key or delete by clicking on the cross (see image below). You will also be able to edit at a later stage. When done, add another picture or Validate to move to other sections.

|
|
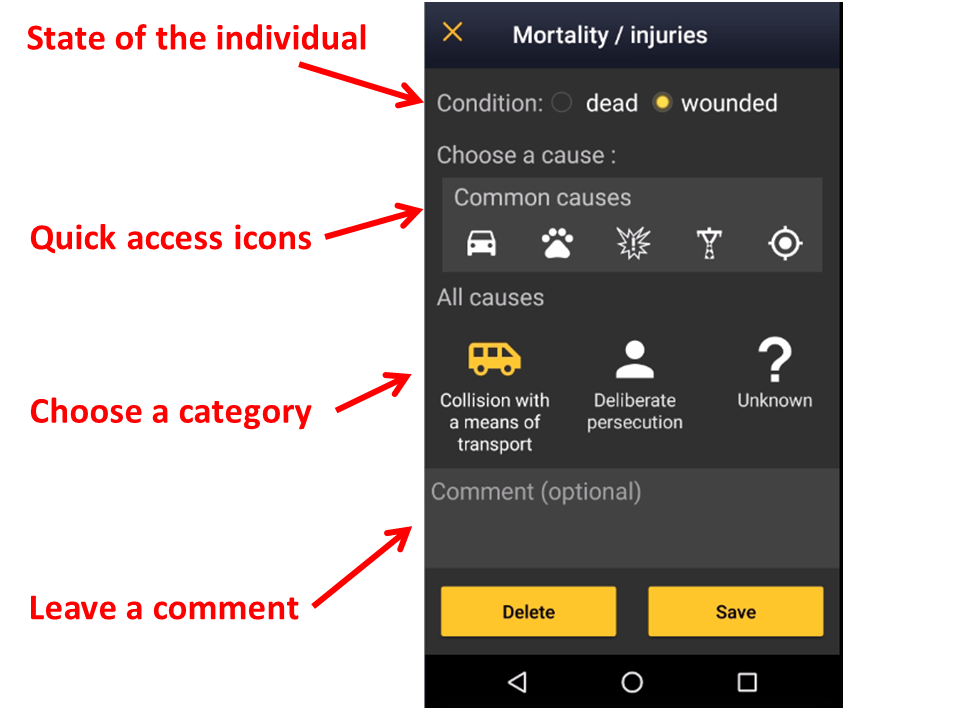
Mortality / injuries

Indicate if your observation corresponds to an injured or dead individual, and select the cause if known. Scroll down All causes to see all options (see image Selecting cause of injury 1). Click on the category to open a panel with all possible causes and enter details (see bottom image Selecting cause of injury 2). When done, click Validate. For quick selection, there are the icons for the most common causes on top (see image Selecting cause of injury 1). When you finish entering the cause of death or injury click Save or if necessary, Delete. The entry can be modified later.


Ending the record
When you finish entering an observation, click Save and you will be taken to your list of observations pending synchronisation. Click on any of the records to see details and/or edit (see edit records LINK). A green line shows on top to prove data is saved, then automatically disappears (see image below).

Later
Enter casual observations after they occur.

Date / Time
|
|
Since you may be entering your observation after it occurred, entering a time is optional. Check Enter time to enter the time or leave it uncheck if you do not want to enter a time. Click on the date button to modify date and when date and time (optional) are correct, click Save to move to next step.

Enter date: Click on the default (current) date button to open a clickable calendar and choose the appropriate day.
Enter time:
- Tick Enter time.
- Click on the default (current) time to open a clickable clock (see image Entering date and time).
- Select first the hour, then the minutes, and finally the seconds. Or click on the corresponding part of the digital clock on top to indicate if you are adjusting hour, minutes or seconds. The parameter you are adjusting at the time shows in bold in the digital clock (see image below). Exact seconds may be important for some taxa, for protocols, or in lists.
- Click OK to save and continue.
- Tick Enter time.

Place
Set red marker at the location where the observation took place (as described in wiki section Mobile interface > Submitting records > Directly in the field > Place).
|
To learn how to navigate the map, see wiki section Mobile interface > Navigating the map. |
Species
Enter species as described in wiki section Mobile interface > Submitting records > Directly in the field > Species.
Number of individuals
Enter the number of individuals as described in wiki section Mobile interface > Submitting records > Directly in the field > Number of individuals. Note in this option one cannot Start a count as in other options.
Additional information
Enter any other additional information as described in wiki section Mobile interface > Submitting records > Directly in the field > Additional information.
|
Entering observations directly in the field is faster as date and time are already selected for you. Selecting a location is also faster if using the aim icon: you are already into position! Entering observations later is useful when observations are taken in other support, like a paper notebook, especially on rainy days, when phone’s battery is low, or for any other reason you prefer not to use your device inn the field. |
With list in the field
Select this option to create a list in the field in real time. You can access it from the menu or from the quick key at the top right corner of the screen (see image below).

Starting a list
Select Record the trace if you want to record your tack. As reminded when selecting, this function requires your phone's GPS at high precision. Go to Main menu > Preferences > GPS mode > Continuous (high reactivity) to set the right GPS mode (see wiki sectio Mobile interface > Getting started > Preferences > Location > GPS Mode on how to do it).
Select Hide all records from the public if you want it to be the default option while creating this list. If in my preferences you chose to hide records, all lists are hidden automatically (see image Hide record). You can change it later for individual observations. Administrators will still have access to your records once submitted.
Leave a comment about this list if appropriate and click Next to continue. You can still comment individually for each record.

Note from that moment an intermittent red dot will appear at the top of your screen indicating the list is running. All records you enter are considered to be part of this list. The taxonomic group of the first record you enter will determine the taxonomic group of the list. If you enter a new taxonomic group, you will be warned and it will still be recorded though not as part of the list. You can see for how long the list is running along with the red dot. Use the keys on the right of the screen to pause or stop the list (see image below). Pause the list to enter other records alongside it, either from the same or different taxa. For example, you may want to enter other species while following a protocolled survey for owls.

|
STOP: End the list. The time will stop running. |
Place
PLace red marker at the observation's position by moving the map. By clicking on the aim icon (see image), the marker will automatically position at your GPS location and center it. Note, "with list in the field" requires you to indicate the exact position of the observation. Therefore, usig the "aim" icon is useful to know where you are and for observations that are on your same spot, for example plants or some insects. Click Next when done.
To know how to naviate the map, go to wiki section How to navigate the map.

Species
Enter species as described in wiki section Mobile interface > Submitting records > Directly in the field > Species.
Additional information
Enter any other additional information as described in wiki section Mobile interface > Submitting records > Directly in the field > Additional information.
Ending the list
Click the stop button on the top to end the list and confirm (see image).

Adjust starting time and ending time if necessary, for example if you forgot to stop the list when you finished recording. Otherwise, since it is a real time list, starting and ending time will be automatically detected by starting and ending the list Add any comment if necessary, and indicate if it a complete list (all present species were recorded) or a partial list (not all present species were recorded) (see image below).

With list later
Allows creating lists that took place in the past.

Date / Time
By default the app shows the current date and time, which can be used as such to record a real time list. If your observations happened in the past, click on the date to modify it by selecting from the expandable calendar, as in…. Click on the time to select the starting time of the list. Select from the expandable clock as in Mobile interface > Submitting records > Later > Date / Time.
Add a comment if necessary and indicate if you want to hide the records from the public. Administrators will still see them once they are synchronised. When done, click Next.
Place
Select the position as in Mobile interface > Submitting records > Later > Date / Time and click Next.
|
|
Species
Enter species as described in wiki section Mobile interface > Submitting records > Directly in the field > Species.
Additional information
You will not be prompted to enter additional information. However, you can add it after entering a record in the list or after finishing the list (see edit records to edit when the list is finished).
While creating the list, click on a species name after each record (see image below) to modify the number if necessary and the precision count. When a precision count is selected, you access the additional information menu. See wiki section Mobile interface > Submitting records > Directly in the field > Additional information to navigate all sections in the menu.
Use the cross on the left of the species name to delete the record.

Ending the list
When all records are entered, click on the "stop" icon at the top right corner to finish the list, and confirm (see image).

Click on the time button to open an expandable clock and introduce ending time as in Mobile interface > Submitting records > With list in the field > Ending the list. Adjust starting time if necessary. Finally, indicate if you recorded all individual present or only part of them (see image).

|
With list in the field pre selects date and time for you but requires you enter the position for each record. If the position of the observation is your current position, use the aim icon to be faster. It also allows entering additional information for each record within each entry. With list later can also be used in the field. In this case, you need to select date as well as starting and ending time. However, you will not be prompted to enter the position for each observation and the additional information menu will not be automatically displayed for each record. This saves time and reduces the chances of missing some individuals. Use "With list later" also in the field in real time if you do not need to get exact positions for each individual or add detailed information (as age, sex, pictures or atlas codes) for most of them. |
Synchronisation
Once your finish entering your records and add or amend any information, consider synchronizing them. When synchronising, your records become public to other users and available to administrators for verification and planning conservation. If you selected to hide your records from the public, those won’t be visible to other users, but administrators will still see them, verify them and use them for conservation purposes.
To synchronise, click on the reminder at the bottom of the screen, both in your list of observations and on the starting screen and confirm (see image below). Once your records are synchronised, you can no longer modify them in NaturaList, but you can do so from your local portal. See a list of local portals at wiki setion Various > Local portals and partners. Go to wiki section Web interface > Editing records for more information on how to edit records on the web site.

|
|