Navigating the map
Maps are especially useful when submitting observations and browsing observations.
The option is by default activated. If you do not want the map anymore, go to wiki section Web interface > Getting started > My account > Website customisation > Cartography.
Uncheck the option zoomable map and validate your choice. The map will disappear from your mask for entering data.
.png)
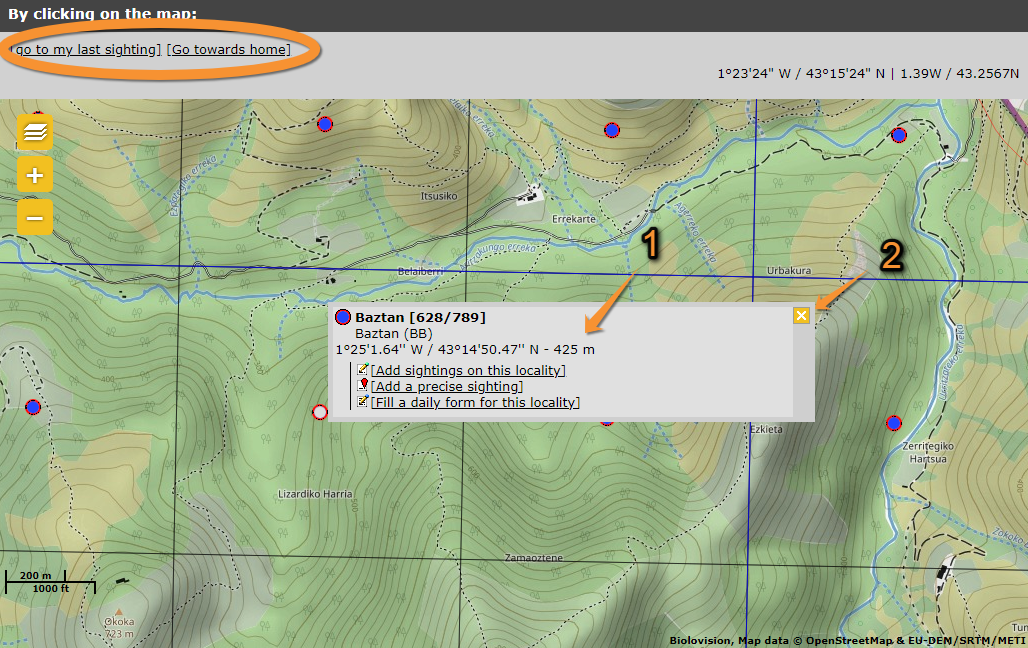
Navigating the map.
1. Altitude
2. Map settings
3. Zoom
4. Current coordinates
5. Increase/Decrease map screen
6. Quick access keys
7. Red pointer
8. Link to location
9. Location type
- 3. Zoom
Zoom in by clicking on the plus sign (+) on the left, or rolling the mouse wheel forwards. Zoom out by clicking on the minus sign (-) on the left, or rolling the mouse wheel backwards.
Double click on any part of the map will zoom in and centre at the same time.
- Move:
Left click, hold and drag to see other areas of the map. Hold SHIFT, left click and drag to select an area to enlarge.
Double click on any part of the map will zoom in and centre at the same time.
When available, you can centre on your last location by clicking on go to my last sighting at the top left corner; or centre at your location by going to go towards home (see image Choose location by clicking on the map, encircled). You can change you location at website customisation (see wiki section Web interface > Getting started > My account > Website customisation).
- 2. Map settings
Click to open a panel with available layers (see image below). Layers are country dependent and may change from one to another.

Available layers.
10. Base layers
11. Other layers
- 10. Base layers
- 10. Base layers
- Change the base layer of the map. We recommend to use Openstreetmap Live option or your national map layer.
- Select the layer you want to see by default as described in wiki section Web interface > Getting started > My account > Website customisation > Cartography.
- 11. Other layers
- 11. Other layers
- Hide/show other available layers by cheking/unchecking the appropriate cell. Layers are country dependent and not always available. Among others, you may:
- See/Hide points of predetermined locations by checking/unchecking "sites" (it requires to zoom in enough)
- See/Hide your track, if you opted to Record your trace, by checking/unchecking "Trace"
- See/Hide survey areas like polygons, transects or points, when you have access to protocols
- See/Hide administrative boundaries
- 4. Current coordinate
Coordinates associated to your current observation. It will be those linked to the pre-determined site, or the exact coordinates of your observation if you are using the red marker.
- 5. Increase / Decrease map screen
When available, click the arrow at the bottom to reduce or increase the proportion of the screen dedicated to the map.
- 6. Quick access keys
Depending in which stage of the process you are at, options in this section will differ.
- Change site: allows to change the site of your observation. In practice, you will be taken back to Step 1/3: Approximate choice of a site.
- Center map on the pointer: available when using a red marker, it centers the map on the pointer.
- Go to my last sighting: takes you to the area of your last observation. Itt is a fast way to find your locations when you move in a limited area.
- Go towards home: takes you to the area you are registered in the website. To change you home area go to My account > Personal data > Country and Municipality.
- Change site: allows to change the site of your observation. In practice, you will be taken back to Step 1/3: Approximate choice of a site.
- 7. Red pointer
Exact position of an observation. Place the red marker by clicking on the map.
- 8. Link to Location
When a red marker indicates the exact position of an observation, a yellow line links the observation to a pre-established location. Usually it will be the closest existing location to the observation, but an observation can be linked to a different location by holding CTRL and left clicking on the new location. The location the observation is associated to is shown above the map, along with its altitude (number 1 in image Navigating the map above).
- 9. Location type
The colour of a point indicates its meaning. Visit wiki section Various > Symbols cheatsheet to see their meaning.
Note: images and examples are drawn from the French portal Faune-France. The design and position of some tools may vary slightly from portal to portal. To see a list of portals go to wiki section Local portals and partners. |