Sound recorder: Difference between revisions
No edit summary |
No edit summary |
||
| (37 intermediate revisions by 2 users not shown) | |||
| Line 2: | Line 2: | ||
<translate> | <translate> | ||
<!--T:1--> | <!--T:1--> | ||
Record sound directly in the field with your NaturaList application. As it happens with images, the sound will be linked to an observation and its details. | Record sound directly in the field with your NaturaList application. As it happens with images, the sound will be linked to an observation and its details.<br/> | ||
As | <!--T:9--> | ||
<br /> | As a call and/or song may be unpredictable, there is a quick access to camera and microphone that allows you to record sound before entering place and species. It is still possible to do it the [[Entering records#Media|standard way]] as you enter the observation. <br /> | ||
<br/> | |||
<!--T:2--> | <!--T:2--> | ||
Sound can be recorded at two different stages: <br/> | Sound can be recorded at two different stages: <br/> | ||
<span style="color: #000000; margin-left: 25px;"><b>· </b> as additional information after entering the observation (see wiki section Mobile interface > Enter independent observations > Plus > [[Entering records#Media|Media]] for details.<br/> | |||
<span style="color: #000000; margin-left: 25px;"><b>· </b> before entering the observation (see below for details). <br/> | |||
<br/> | <br/> | ||
| Line 19: | Line 20: | ||
<!--T:4--> | <!--T:4--> | ||
To record sound before entering your observation: <br/> | To record sound before entering your observation: <br/> | ||
1. Open NaturaList as usual. <br/> | |||
2. Use quick key | <!--T:10--> | ||
<br/> | 1. Open NaturaList as usual. <br /> | ||
<br/> | 2. Use quick key [[File:sound icon.png|frameless|20px|link=https://help.biolovision.net/images/c/c6/Sound_icon.png]] to open the sound recorder. <br /> | ||
<br /> | |||
<br /> | |||
<!--T:5--> | <!--T:5--> | ||
<center> | <center> | ||
<div class="toc" style="border-radius:5px;background-color:#ffffff;padding-left:8px;padding-right:8px;padding-bottom:8px;width:400px;"> | <div class="toc" style="border-radius:5px;background-color:#ffffff;padding-left:8px;padding-right:8px;padding-bottom:8px;width:400px;"> | ||
[[File: | [[File:Sound_recorder_quick_access.png|400px|link=https://help.biolovision.net/images/c/c9/Sound_recorder_quick_access.png]] | ||
<div class="toc" style="border-radius:5px;padding-left:15px;text-align:left; font-size:12px;width:385px;"> | <div class="toc" style="border-radius:5px;padding-left:15px;text-align:left; font-size:12px;width:385px;"> | ||
'''Media. Quick access.''' | '''Media. Quick access.''' | ||
</div> | </div> | ||
<p style="color:black;font-size:12px;padding-left:5px;text-align:left;column-count:1;padding-right:5px;"> | <p style="color:black;font-size:12px;padding-left:5px;text-align:left;column-count:1;padding-right:5px;"> | ||
'''1. Record a sound:''' Click to open the sound recorder. <br/> | |||
'''2. Add a photo:''' Click to open the camera. <br/> | '''2. Add a photo:''' Click to open the camera. <br/> | ||
<br/> | <br/> | ||
<i>It is not possible to upload a file | <i>It is not possible to upload a file from your document: please add it to an observation with the detail panel [[Media:Select file.png|"Media"]]. </i> | ||
</p> | </p> | ||
</div> | </div> | ||
</center> | </center> | ||
<br /> | <br /> | ||
3. Once recording module | |||
3. Once in the recording module, press [[File:Yellow micro.png|20px|frameless|link=https://help.biolovision.net/images/0/02/Yellow_micro.png]] to start recording. <br/> | |||
4. Stop the record at any point with the stop button [[File:Stop icon.png|20px|frameless|link=https://help.biolovision.net/images/1/18/Stop_icon.png]]. <br/> | |||
5. Adjust the part of the recording to keep with [[File:Adjust icon.png|20px|frameless|link=https://help.biolovision.net/images/9/95/Adjust_icon.png]], minimum size for recording is 3 seconds. It is only possible to listen the recording at this stage. <br/> | |||
<br/> | |||
<center> | <center> | ||
<div class="toc" style="border-radius:5px;background-color:#ffffff;padding-left:8px;padding-right:8px;padding-bottom:8px;width: | |||
[[File: | <div class="toc" style="border-radius: 5px; padding: 25px; text-align: left; font-family: sans-serif; color: black; width: 98%; background-color: white"> | ||
<div class="toc" style="border-radius:5px;padding-left:15px;text-align:left; font-size:12px;width: | |||
''' | {| style="text-align:left; border:0px solid black; vertical-align:top;"| | ||
|- | |||
|style="padding: 10px"| | |||
<div class="toc" style="border-radius:5px;background-color:#ffffff;padding-left:8px;padding-right:8px;padding-bottom:8px;width:350px;"> | |||
[[File:Sound record step 1.png|350px|link=https://help.biolovision.net/images/5/5e/Sound_record_step_1.png]] | |||
<div class="toc" style="border-radius:5px;padding-left:15px;text-align:left; font-size:12px;width:325px;"> | |||
'''Sound recorder. Step 1.''' | |||
</div> | |||
</div> | |||
|style="padding: 10px"| | |||
<div class="toc" style="border-radius:5px;background-color:#ffffff;padding-left:8px;padding-right:8px;padding-bottom:8px;width:350px;"> | |||
[[File:Sound record step 2.png|350px|link=https://help.biolovision.net/images/4/4e/Sound_record_step_2.png]] | |||
<div class="toc" style="border-radius:5px;width:325px;padding-left:15px;text-align:left; font-size:12px"> | |||
'''Sound recorder. Step 2: Recording in progress.''' | |||
</div> | </div> | ||
</div> | </div> | ||
|style="padding: 10px"| | |||
<div class="toc" style="border-radius:5px;background-color:#ffffff;padding-left:8px;padding-right:8px;padding-bottom:8px;width: | <div class="toc" style="border-radius:5px;background-color:#ffffff;padding-left:8px;padding-right:8px;padding-bottom:8px;width:350px;"> | ||
[[File: | [[File:Sound record step 3.png|350px|link=https://help.biolovision.net/images/8/87/Sound_record_step_3.png]] | ||
<div class="toc" style="border-radius:5px;padding-left:15px;text-align:left; font-size:12px | <div class="toc" style="border-radius:5px;width:325px;padding-left:15px;text-align:left; font-size:12px"> | ||
''' | '''Sound recorder. Step 3: Recording adjustement.''' | ||
</div> | </div> | ||
</div> | </div> | ||
|} | |||
<center> | <center> | ||
< | <table class="wikitable" style="border:0px solid black; width:75%; background-color: white;" > | ||
[[File: | |||
< | <span id="Close"></span> | ||
''' | <tr style="padding: 25px; text-align: center; font-size: 16px; font-family: sans serif; "> | ||
<td style="text-align: left">'''1. Close:'''</td> | |||
<td style="text-align: center"> [[File: Close icon.png|25px|link=https://help.biolovision.net/images/d/d1/Close_icon.png]] | |||
<td style="text-align:left">Click to exit the sound recorder tool. No sound is recorded, return to home screen.</td> | |||
</tr> | |||
<span id="Start"></span> | |||
<tr style="padding: 25px; text-align: center; font-size: 16px; font-family: sans serif; "> | |||
<td style="text-align: left">'''2. Start:'''</td> | |||
<td style="text-align: center"> [[File: Yellow micro.png|25px|link=https://help.biolovision.net/images/0/02/Yellow_micro.png]] | |||
<td style="text-align:left">Click to start recording. A live spectrogram is shown while the recorder is working.</td> | |||
</tr> | |||
<span id="Stop"></span> | |||
<tr style="padding: 25px; text-align: center; font-size: 16px; font-family: sans serif; "> | |||
<td style="text-align: left">'''3. Stop:'''</td> | |||
<td style="text-align: center"> [[File: Stop icon.png|25px|link=https://help.biolovision.net/images/1/18/Stop_icon.png]] | |||
<td style="text-align:left">Click to stop recording. The minimum time of recording is 3 seconds.</td> | |||
</tr> | |||
<span id="Time"></span> | |||
<tr style="padding: 25px; text-align: center; font-size: 16px; font-family: sans serif; "> | |||
<td style="text-align: left">'''4. Time:'''</td> | |||
<td style="text-align: center"> | |||
<td style="text-align:left">Indicates the time of the recording in progress.</td> | |||
</tr> | |||
<span id="Spectrogram"></span> | |||
<tr style="padding: 25px; text-align: center; font-size: 16px; font-family: sans serif; "> | |||
<td style="text-align: left">'''5. Live spectrogram:'''</td> | |||
<td style="text-align: center"> | |||
<td style="text-align:left">Spectrogram being recorded in real time.</td> | |||
</tr> | |||
<span id="Play"></span> | |||
<tr style="padding: 25px; text-align: center; font-size: 16px; font-family: sans serif; "> | |||
<td style="text-align: left">'''6. Play:'''</td> | |||
<td style="text-align: center"> [[File: Play icon.png|25px|link=https://help.biolovision.net/images/6/67/Play_icon.png]] | |||
<td style="text-align:left">Click to hear the recording. </td> | |||
</tr> | |||
<span id="Adjust"></span> | |||
<tr style="padding: 25px; text-align: center; font-size: 16px; font-family: sans serif; "> | |||
<td style="text-align: left">'''7. Adjust:''' </td> | |||
<td style="text-align: center"> [[File: Adjust icon.png|25px|link=https://help.biolovision.net/images/9/95/Adjust_icon.png]] | |||
<td style="text-align:left">Resize the recording (minimum size required is 3 seconds). </td> | |||
</tr> | |||
<span id="Full spectrogram"></span> | |||
<tr style="padding: 25px; text-align: center; font-size: 16px; font-family: sans serif; "> | |||
<td style="text-align: left">'''8. Full spectrogram:''' </td> | |||
<td style="text-align: center"> | |||
<td style="text-align:left">Spectrogram of the full recording. </td> | |||
</tr> | |||
<span id="Move"></span> | |||
<tr style="padding: 25px; text-align: center; font-size: 16px; font-family: sans serif; "> | |||
<td style="text-align: left">'''9. Move:''' </td> | |||
<td style="text-align: center"> | |||
<td style="text-align:left"> Navigate through the recording to be at the right time where the interesting part is. </td> | |||
</tr> | |||
</table> | |||
</div> | </div> | ||
< | </center> | ||
</center> | |||
</ | <br/> | ||
<br/> | |||
< | <!--T:13--> | ||
6. Validate. Confirms the sound selection and open the map to enter the data linked to that sound. Do not forget now step 7 to '''enter your observation as usual (Place, Species, Details...), otherwise your sound is not saved and you will loose it!''' <br/> | |||
<br/> | |||
''' | |||
< | <!--T:14--> | ||
< | <center> | ||
<div class="toc" style="border-radius:5px;background-color:#ffffff;padding-left:8px;padding-right:8px;padding-bottom:8px;width:200px;"> | |||
[[File:Validate.png|200px|link=https://help.biolovision.net/images/f/fd/Validate.png]] | |||
</ | <div class="toc" style="border-radius:5px;padding-left:15px;text-align:left; font-size:12px;width:185px;"> | ||
'''Validate.''' | |||
</div> | |||
</div> | </div> | ||
</center> | </center> | ||
7. Enter the observation as usual (you are taken directly to the "Place" screen described in wiki section Mobile interface > Submitting records > | <br/> | ||
<br/> | |||
<!--T:15--> | |||
7. Enter the observation as usual (you are taken directly to the "Place" screen described in wiki section Mobile interface > Submitting records > Enter independent observations > [[Entering_records#Step_1:_Place|Place]]. <br /> | |||
<br /> | <br /> | ||
| Line 124: | Line 185: | ||
<p> | <p> | ||
NOTE<br /> | NOTE<br /> | ||
The sound recording always needs to be associated to an observation. Otherwise, the recording will be deleted. | The sound recording always needs to be associated to an observation. Otherwise, the recording will be automatically deleted. | ||
<br /> | <br /> | ||
</p> | </p> | ||
| Line 133: | Line 194: | ||
<br /> | <br /> | ||
<br /> | <br /> | ||
[[#top|[Back to Sound recorder]]] <br/> | |||
<br/> | |||
</translate> | </translate> | ||
Latest revision as of 15:39, 16 January 2026
Record sound directly in the field with your NaturaList application. As it happens with images, the sound will be linked to an observation and its details.
As a call and/or song may be unpredictable, there is a quick access to camera and microphone that allows you to record sound before entering place and species. It is still possible to do it the standard way as you enter the observation.
Sound can be recorded at two different stages:
· as additional information after entering the observation (see wiki section Mobile interface > Enter independent observations > Plus > Media for details.
· before entering the observation (see below for details).
Except for some protocols (requires special rights to access them), it is currently not possible to do playback from NaturaList.
To record sound before entering your observation:
1. Open NaturaList as usual.
2. Use quick key ![]() to open the sound recorder.
to open the sound recorder.
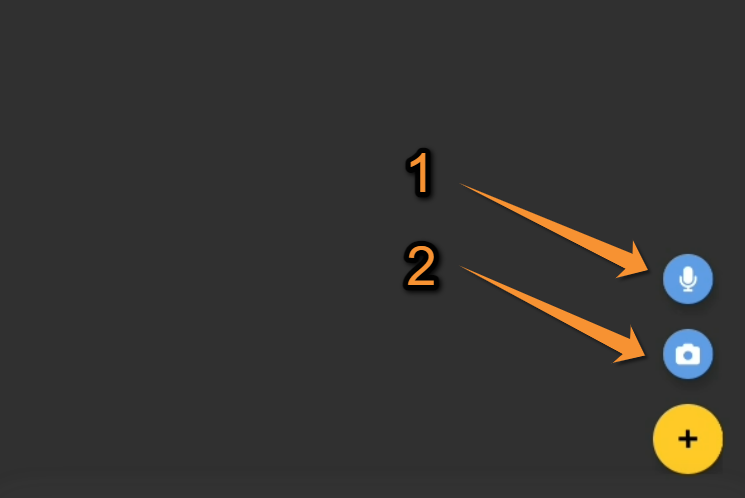
Media. Quick access.
1. Record a sound: Click to open the sound recorder.
2. Add a photo: Click to open the camera.
It is not possible to upload a file from your document: please add it to an observation with the detail panel "Media".
3. Once in the recording module, press ![]() to start recording.
to start recording.
4. Stop the record at any point with the stop button ![]() .
.
5. Adjust the part of the recording to keep with ![]() , minimum size for recording is 3 seconds. It is only possible to listen the recording at this stage.
, minimum size for recording is 3 seconds. It is only possible to listen the recording at this stage.
|
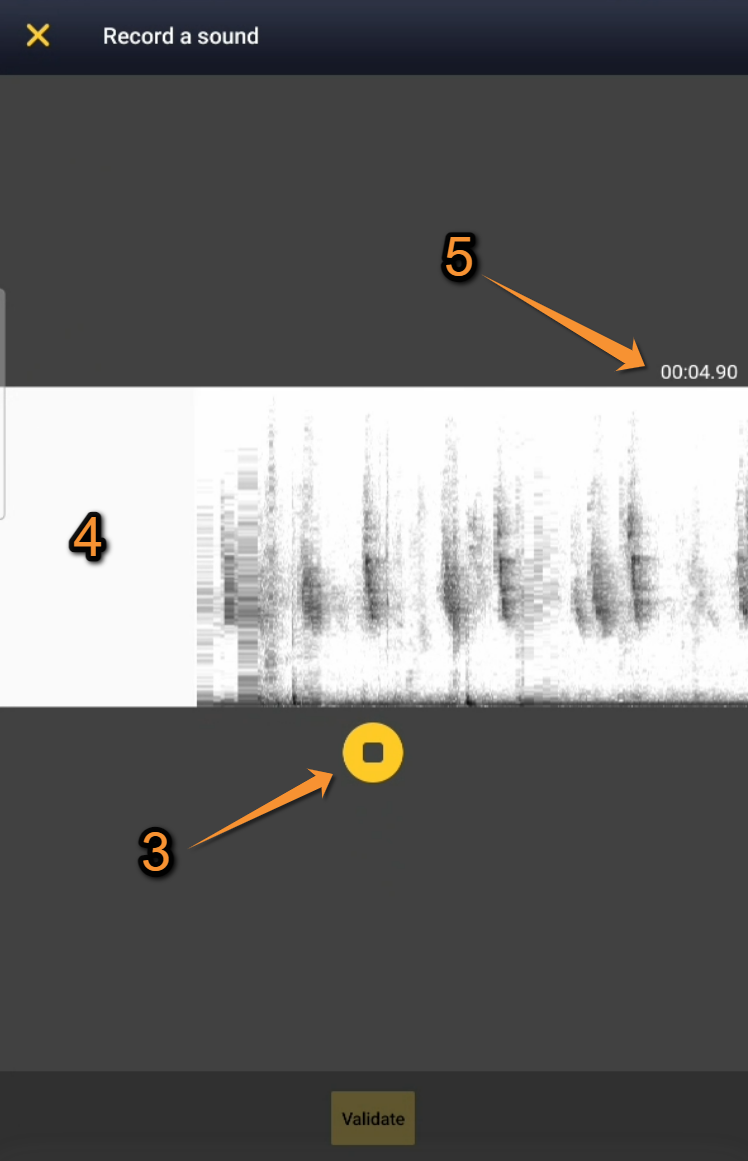
Sound recorder. Step 1. |
Sound recorder. Step 2: Recording in progress. |
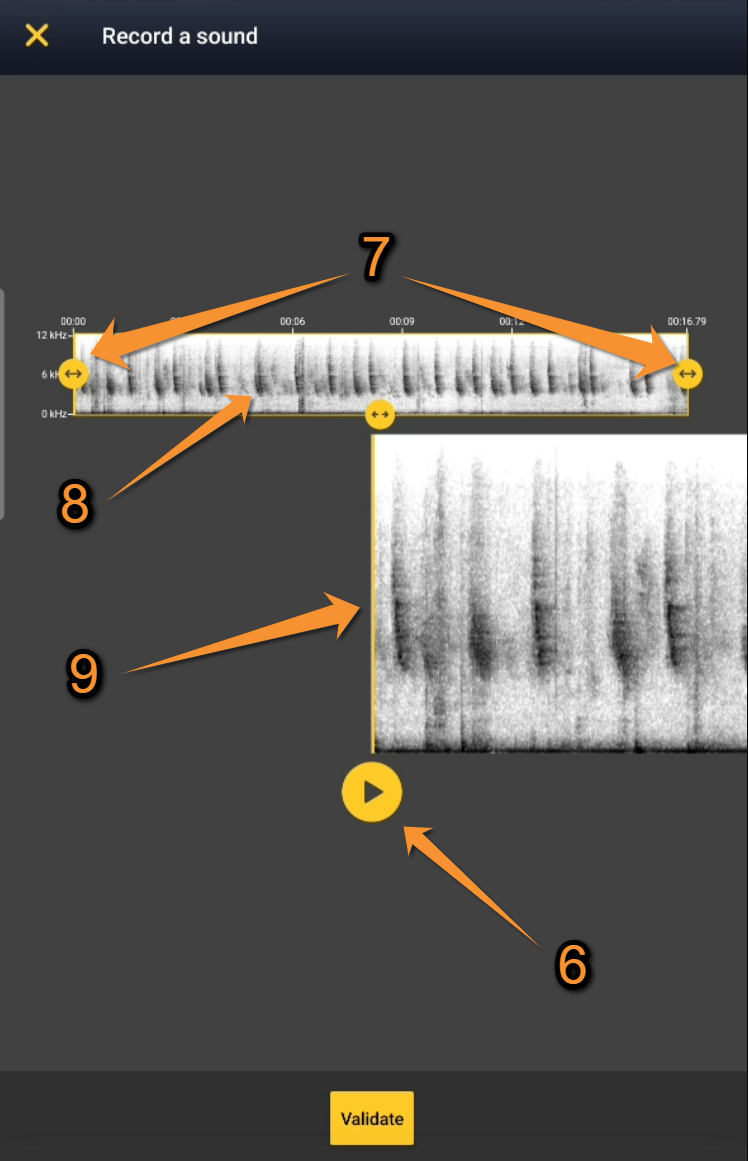
Sound recorder. Step 3: Recording adjustement. |

| 1. Close: | | Click to exit the sound recorder tool. No sound is recorded, return to home screen. |
| 2. Start: | | Click to start recording. A live spectrogram is shown while the recorder is working. |
| 3. Stop: | | Click to stop recording. The minimum time of recording is 3 seconds. |
| 4. Time: | Indicates the time of the recording in progress. | |
| 5. Live spectrogram: | Spectrogram being recorded in real time. | |
| 6. Play: | | Click to hear the recording. |
| 7. Adjust: | | Resize the recording (minimum size required is 3 seconds). |
| 8. Full spectrogram: | Spectrogram of the full recording. | |
| 9. Move: | Navigate through the recording to be at the right time where the interesting part is. |
6. Validate. Confirms the sound selection and open the map to enter the data linked to that sound. Do not forget now step 7 to enter your observation as usual (Place, Species, Details...), otherwise your sound is not saved and you will loose it!

Validate.
7. Enter the observation as usual (you are taken directly to the "Place" screen described in wiki section Mobile interface > Submitting records > Enter independent observations > Place.
NOTE
The sound recording always needs to be associated to an observation. Otherwise, the recording will be automatically deleted.