Species administration: Difference between revisions
| Line 445: | Line 445: | ||
Set filters for the selected species. <br/> | Set filters for the selected species. <br/> | ||
<br/> | <br/> | ||
<center> | <center> | ||
| Line 480: | Line 482: | ||
Type species name, or part of it, on the left hand field and select from the expandable menu on the right field. <br/> | Type species name, or part of it, on the left hand field and select from the expandable menu on the right field. <br/> | ||
<br/> | <br/> | ||
<center> | |||
<div class="toc" style="border-radius: 5px; padding: 25px; text-align: left; font-family: sans-serif; color: black; width: 600px; background-color: hsl(157, 74%, 80%)"> | |||
<!-- GREEN BOX (Tips): hsl(157, 74%, 80%) | |||
YELLOW BOX (Summaries): #ffffdb" | |||
BLUE BOX (Information): hsl(201, 100%, 89%) | |||
RED BOX (Warnings): hsl(0, 77%, 78%) --> | |||
<p> | |||
If a species is selected but no parameters are defined, any time an observer introduces a record on the selected species a message is triggered: <i>This species is normally absent</i> <br/> | |||
Use to automatically indicate unusual records. <br/> | |||
<br/> | |||
To eliminate all filters for a species, delete the entry for the species. See subsection [[Species administration#Delete 3|5. Delete]]. <br/> | |||
</p> | |||
</div> | |||
</center> | |||
<br /> | |||
<span id="Biogeographical zone"></span> | <span id="Biogeographical zone"></span> | ||
Revision as of 14:31, 13 March 2026

Species administration.
Species sheets
Menu > Administration > Species administration > Species sheets

Species sheets.
[Top to Species sheet]
[Back to Species administration]
Species list
Menu > Administration > Species administration > Species list

Admin species list.
1. Choose a taxonomic group (see image below, 1) and,
2. type of list to work on (see image below, 2):
- Species: List of all species in the system.
- Hidden species: List of species automatically hidden at least part of the year.
- Automatic filter: Send a validation warning when a record falls outside pre-defined parameters.
- Rarities Committee (RC):
- Species for RC:
- Exception to RC:
- Colonial species: List of all colonial species in the active list for the country the site represents.
- Managing synonyms:
- Managing species groups:
- Regionalisation rarity level:

Species
Create a country specific list. The NaturaList application will be synchronised to this list, depending on the taxonomic group or the country observations take place at. Use arrows under titles to alternate between ascending and descending order (see image as an example).

Species list.
1. Search
2. Page and items
3. Details
4. Edit
5. EXPORT
Number: Entry number.
Sys:
Latin / Family name: Name of species or group of species.
Available: Indicates if this species/group will be part of the list for this territory for all users.
Change the list you are using in NaturaList by going to Menu > Preferences > Species list
Advanced: Indicates if this species will be part of the list for this territory for users with special access rights.
Category:
Rarity: Indicates the rarity level for this species in this territory.
- 1. Search
Reduce list by typing the name of a site, or part of it, and click SEACH. When a filter is applied, click on
DISPLAY ALL.
- 2. Page and items
Select page number and/or number of items per page.
- 3. Details
Click to see details of selected species. These include the species name in different languages and rarity level. See also the start and end date of automatic atlas code when available.

Details admin species list.
BACK: Go to previous screen without saving.
EDIT: Edit details. See edit subsection below.
- 4. Edit
Modify / complete any species detail.

Editing admin species list.
BACK: Go to previous screen without saving.
MODIFY: Save changes.
For questions or additions please contact Biolovision HelpDesk.
- 5. EXPORT
Download list as a .txt file.
[Top to Species]
[Top to Species list]
[Back to Species administration]
Hidden species
List of species automatically hidden at least part of the year. Use arrows under titles to alternate between ascending and descending order (see image as an example).

Admin hidden species.
1. Search
2. Page and items
3. Details
4. Edit
5. Details
6. NEW
7. EXPORT
Species: Name of hidden species.
Season: Starting date from which the species will be hidden.
End: Ending date from which the species will be hidden.
Minimum atlas code: Minimum atlas code to hide the species.
- 1. Search
Reduce list by typing the name of a site, or part of it, and click SEACH. When a filter is applied, click on
DISPLAY ALL.
- 2. Page and items
Select page number and/or number of items per page.
- 3. Details
Click to see details of selected species, including comments when available.

Details admin hidden species.
BACK: Go to previous screen.
EDIT: Edit details. See subsection Edit below.
DELETE: Make the species always visible.
- 4. Edit
Modify species to hide, dates to hide it or atlas requirements for hiding it.

Edit Admin hidden species
Species: Modify species by typing the name, or part of it, on the left field (8a) and selecting from the expandable menu on the right (8b).
Season: Select from the expandable menu the starting day (left) and month (right) to hide the species.
End: Select from the expandable menu the ending day (left) and month (right) to hide the species.
Minimum atlas code: Atlas code from which the species will be hidden.
Comment: Add / modify a comment if necessary.
BACK: Go to previous screen without saving.
MODIFY: Save changes.
- 5. Delete
Delete the selected species from the list. This species will no longer be hidden.
- 6. NEW
Hide a species from the public during certain dates and/or under certain breeding status.

Hiding a species from the public.
Species: Type the name of the species to hide, or part of it, on the left field (8a) and select from the expandable menu on the right (8b).
Season: Select from the expandable menu the starting day (left) and month (right) to hide the species.
End: Select from the expandable menu the ending day (left) and month (right) to hide the species.
Minimum atlas code: Select from the expandable menu the atlas code from which the species will be hidden.
Comment: Add a comment if necessary.
BACK: Go to previous screen with saving.
ADD: Add the species to the list.
- 7.EXPORT
Download the list as a .txt file.
[Top to Hidden species]
[Top to Species list]
[Back to Species administration]
Automatic filter
Automatically marks an observation for verification, as a validator would do.
By default, filters are empty and do not affect data collection.
If filter parameters are defined, an observer is automatically requested to provide additional information when the data just entered exceeds the limit of the parameter.
· If the observer correct the observation and the new data falls within the parameters defined by the filter, the observation is not marked and the observer can continue entering data.
· If the observer confirms the observation, a mark is shown on the record and validators receive an e-mail. They must then manually review the observation.
Marks are not automatically removed. It is the validators who remove them manually.
To parameter a filter, see subsection 6. NEW below.
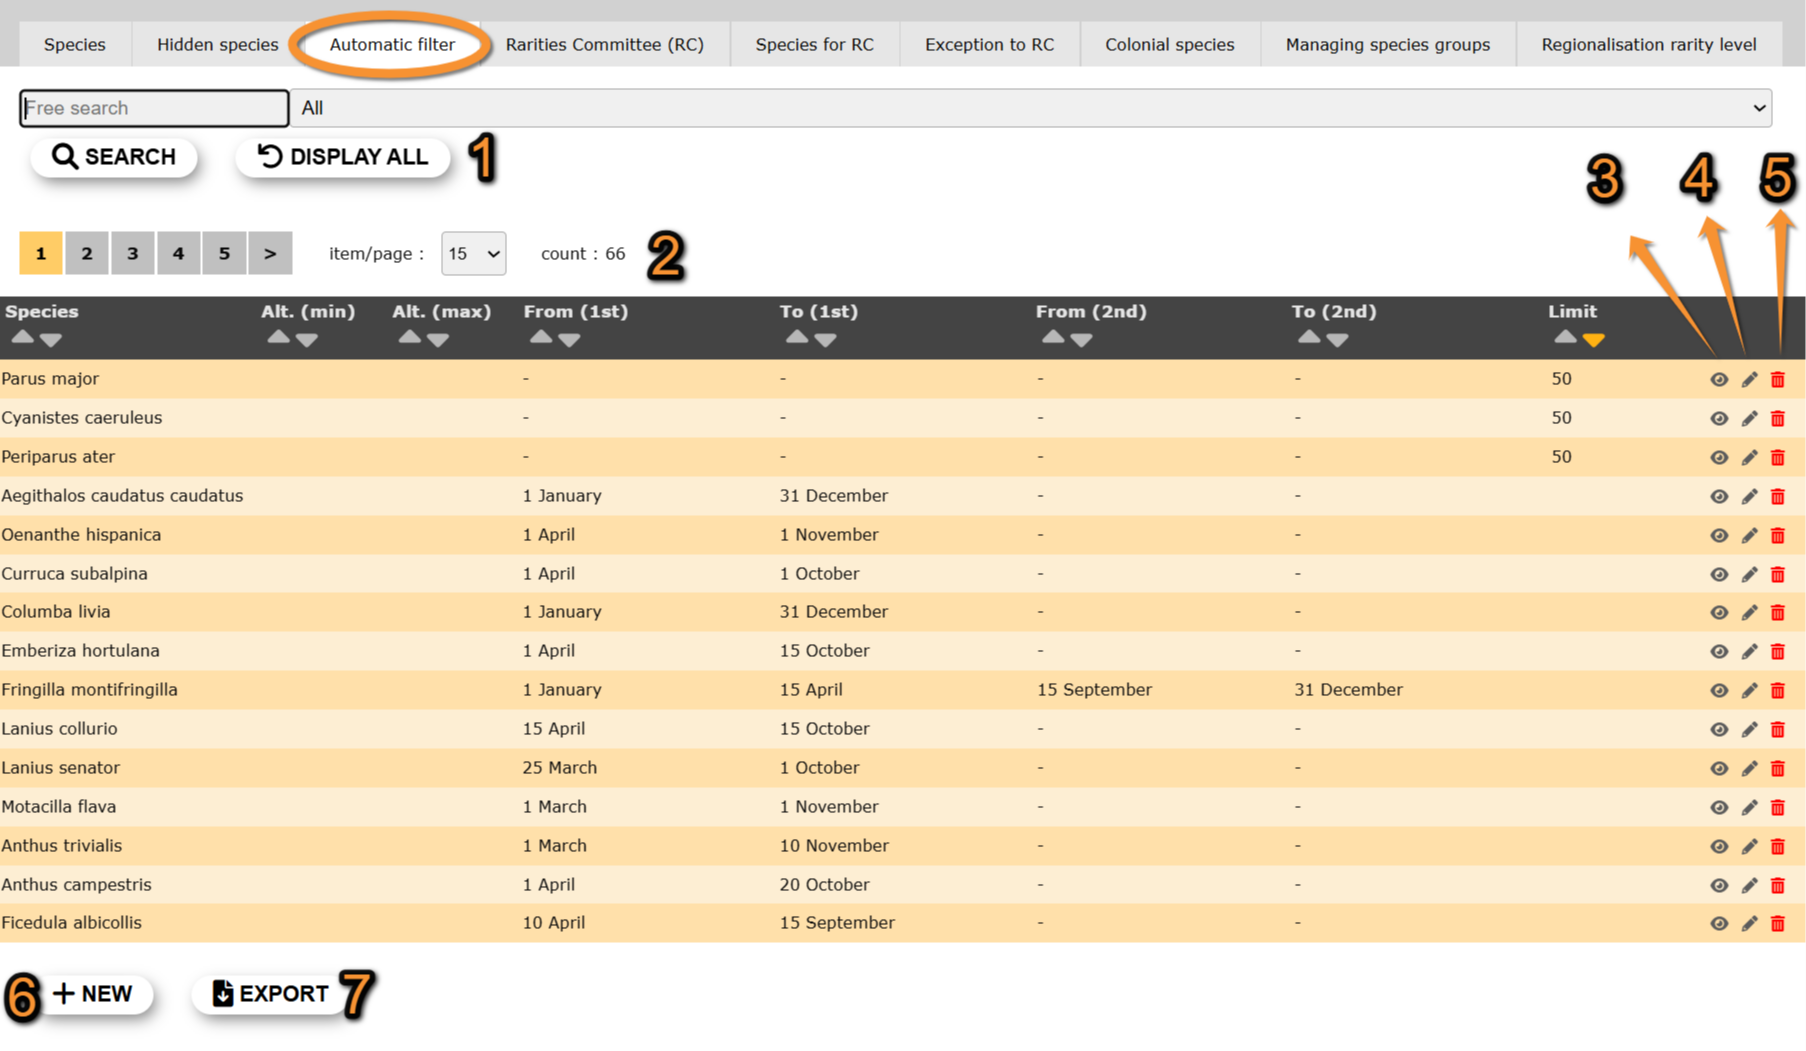
Automatic filter.
1. Search
2. Page and items
3. Details
4. Edit
5. Details
6. NEW
7. EXPORT
Species: Name of hidden species.
Alt. (min): Indicate the lower altitude the species is normally recorded.
Alt. (max): Indicate the maximum altitude the species is normally recorded.
From (1st) / To (1st): From/To dates in which the species is typically seen.
From (2nd) / To (2nd): From/To dates in which the species is typically seen.
Limite Maximum number of individuals accepted by the system.
- 1. Search
Reduce list by typing the name of a site, or part of it, and click SEACH. When a filter is applied, click on
DISPLAY ALL.
- 2. Page and items
Select page number and/or number of items per page.
- 3. Details
Click to see details of selected species.
See NEW for correspondence of fields.
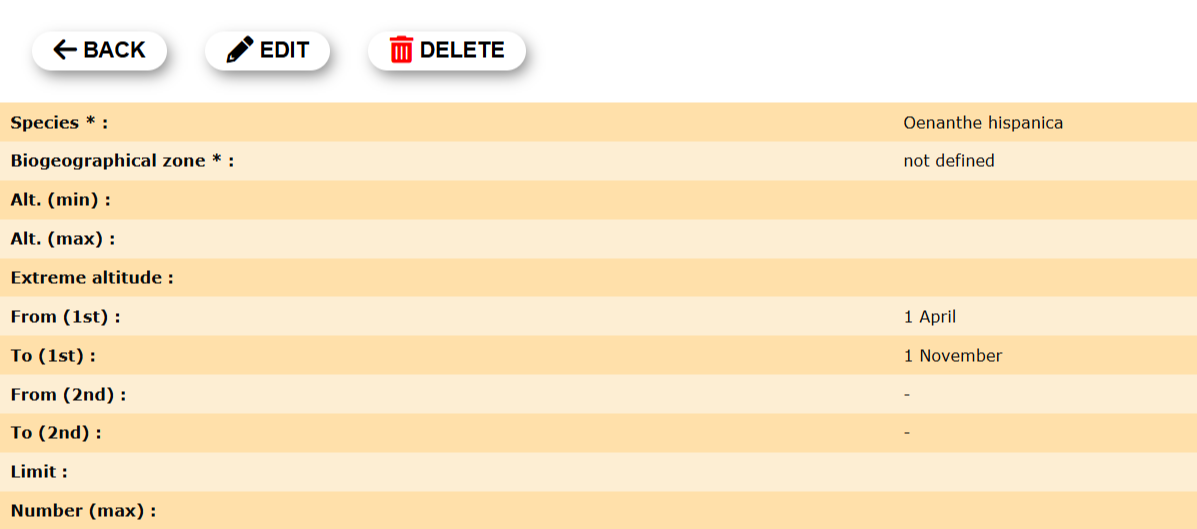
Details automatic filter.
BACK: Go to previous screen.
EDIT: Edit details. See subsection Edit below.
DELETE: Make the species always visible.
See NEW for correspondence of fields.
- 4. Edit
Modify filter for the selected species.
Type of select for the appropriate filters. See NEW for correspondence of fields.
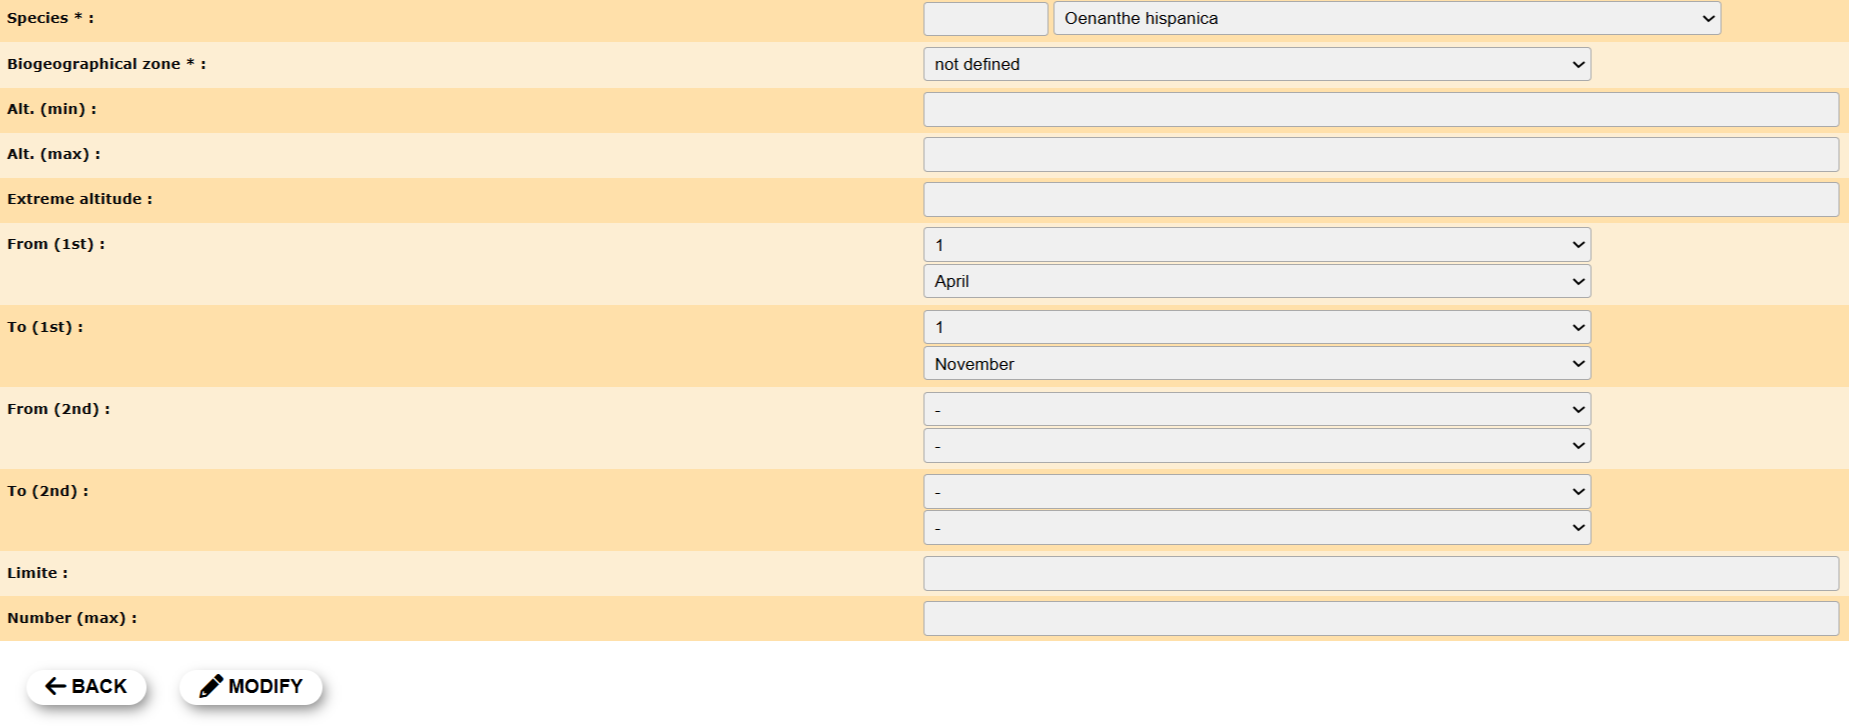
Edit automatic filters
BACK: Go to previous screen without saving.
MODIFY: Save changes.
See NEW for correspondence of fields.
- 5. Delete
Delete the selected species from the list. This species will no longer be hidden.
Use ![]() to delete all filters.
to delete all filters.
Leaving all fields blank does not delete the filters and will trigger a message for any value recorded in any field.
- 6. NEW
Set filters for the selected species.
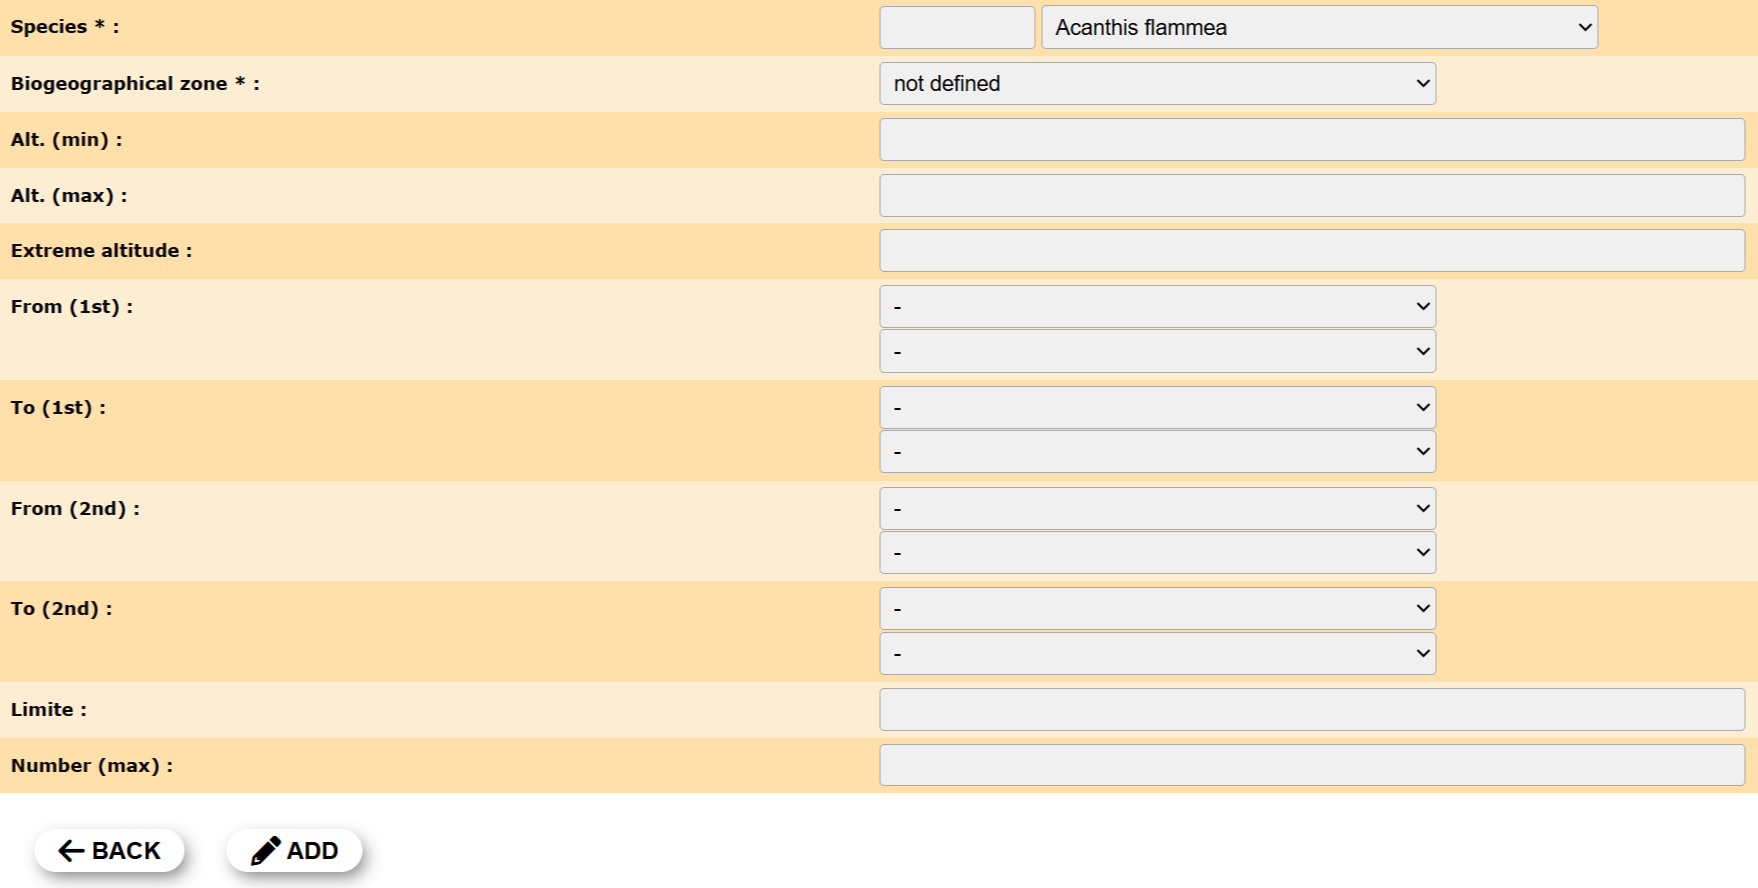
New automatic filter.
1. Species
2. Biographical zone
3. Alt. (min)
4. Alt. (max)
5. Extreme altitude
6. From (1st)
7. To (1st)
8. From (2nd)
9. To (2nd)
10. Limite
11. Number (max)
BACK: Go to previous screen with saving.
ADD: Add the species to the list.
- 1. Species
Select the species to which filters will apply.
Type species name, or part of it, on the left hand field and select from the expandable menu on the right field.
If a species is selected but no parameters are defined, any time an observer introduces a record on the selected species a message is triggered: This species is normally absent
Use to automatically indicate unusual records.
To eliminate all filters for a species, delete the entry for the species. See subsection 5. Delete.
- 2. Biogeographical zone
Indicate the biographical zone to which the filter will apply for the selected species.
This option is not always available. When empty, or not available, filters will apply to records collected in the whole territory the local portal covers.
Select from expandable menu.
- 3. Alt. (min)
Type the lower altitude the selected species is normally recorded.
- 4. Alt. (max)
Type the higher altitude the selected species is normally recorded.
- 5. Extreme altitude
Type the maximum altitude the selected species was ever recorded.
If the recorded altitude is higher than the Extreme altitude defined, a blue mark will attach to the observation.
If the recorded altitude falls outside the minimum and maximum altitudes defined, a yellow mark will attach to the observation.
Visit wiki section Various > Data validation > Automatic validation for more information on markings.
- 6. From (1st)
Indicate the dates in which the selected species normally occurs.
Select the first date the selected species normally occurs.
Use he expandable menu on top to select the day number, and the expandable menu on the bottom to select the month.
- 7. To (1st)
Indicate the dates in which the selected species normally occurs.
Select the last date the selected species normally occurs.
Use he expandable menu on top to select the day number, and the expandable menu on the bottom to select the month.
- 8. From (2nd)
If the selected species presents two clear periods of occurrence, indicate the dates of this second period.
Select the first date the selected species normally occurs on the second period.
Use he expandable menu on top to select the day number, and the expandable menu on the bottom to select the month.
- 9. To (2nd)
If the selected species presents two clear period of occurrence, indicate the dates of this second period.
Select the last date the selected species normally occurs on the second period.
Use he expandable menu on top to select the day number, and the expandable menu on the bottom to select the month.
- 10. Limite
Type the maximum number of individuals usually occurring in a flock of the selected species.
Any number higher than indicated will be questioned and a yellow marking will attach to the record.
- 11. Number (max)
Type the maximum number of individuals of the selected species ever recorded.
Any number higher than indicated will trigger a blue marking.
If the recorded number of individuals is higher than the Number maximum of individuals defined, a blue mark will attach to the observation.
If the recorded number of individuals is higher then the limit defined, a yellow mark will attach to the observation.
Visit wiki section Various > Data validation > Automatic validation for more information on markings.
- 7.EXPORT
Download the list as a .txt file.
[Top to Automatic filter]
[Top to Species list]
[Back to Species administration]
Rarities Committee (RC)
[Top to Species list]
[Back to Species administration]
Species for RC
[Top to Species list]
[Back to Species administration]
Exception to RC
[Top to Species list]
[Back to Species administration]
Colonial species
List of all colonial species in the active list for the country the site represents. Use arrows under titles to alternate between ascending and descending order (see image as an example).
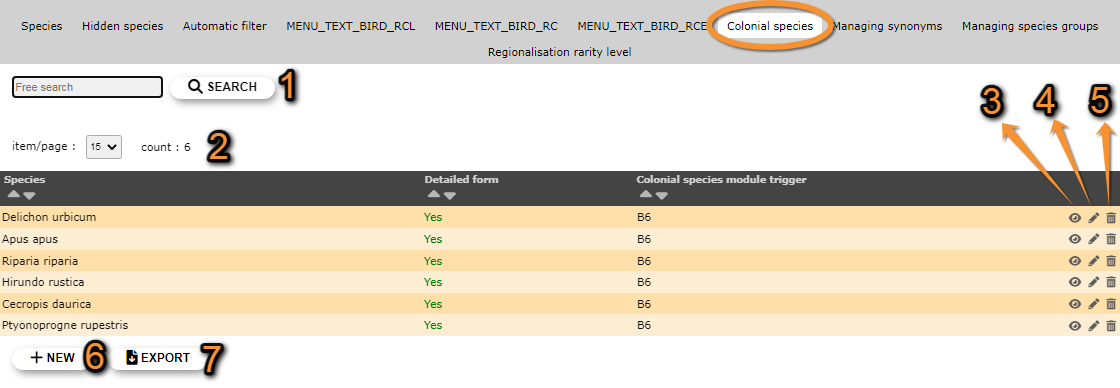
- 1. Search
Reduce list by typing the name of a site, or part of it, and click SEACH. When a filter is applied, click on
DISPLAY ALL.
- 2. Page and items
Select page number and/or number of items per page.
- 3. Details
Click to see details of selected species.

Admin colonial species details.
BACK: Go to previous screen without saving.
EDIT: Edit details. See edit subsection below.
DELETE: Remove selected species from the list.
- 4. Edit
Modify / complete any species detail.

Editing colonial species list.
8. Species: Change the species by typing its name, or part of it, in the left field (a) and select from the expandable menu in the right field (b).
9. Detailed form: Indicate if it will be necessary to open a detailed form for these species.
10. Colonial species module trigger:
BACK: Go to previous screen without saving.
MODIFY: Save changes.
- 5. Delete
Delete the selected species from the list. You will be asked to confirm.
- 6. NEW
Include a new species as a colonial breeding species.
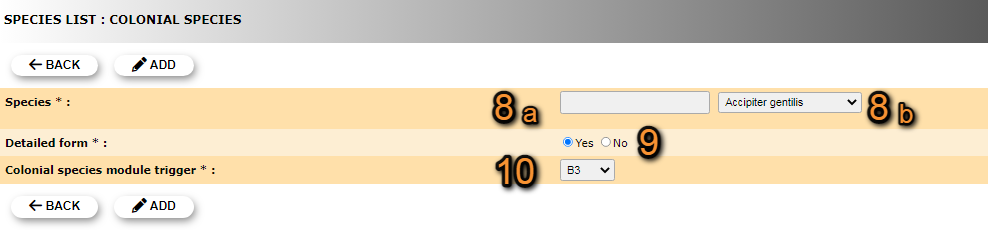
Admin New colonial species.
8. Species: Type the new species name, or part of it, in the left field (a) and select from the expandable menu in the right field (b).
9. Detailed form: Indicate if it will be necessary to open a detailed form for these species.
10. Colonial species module trigger:
BACK: Go to previous screen without saving.
ADD: Save new species to the list.
- 7. EXPORT
Download list as a .txt file.
[Top to Colonial species]
[Top to Species list]
[Back to Species administration]
Managing synonyms
[Top to Managing synonyms]
[Top to Species list]
[Back to Species administration]
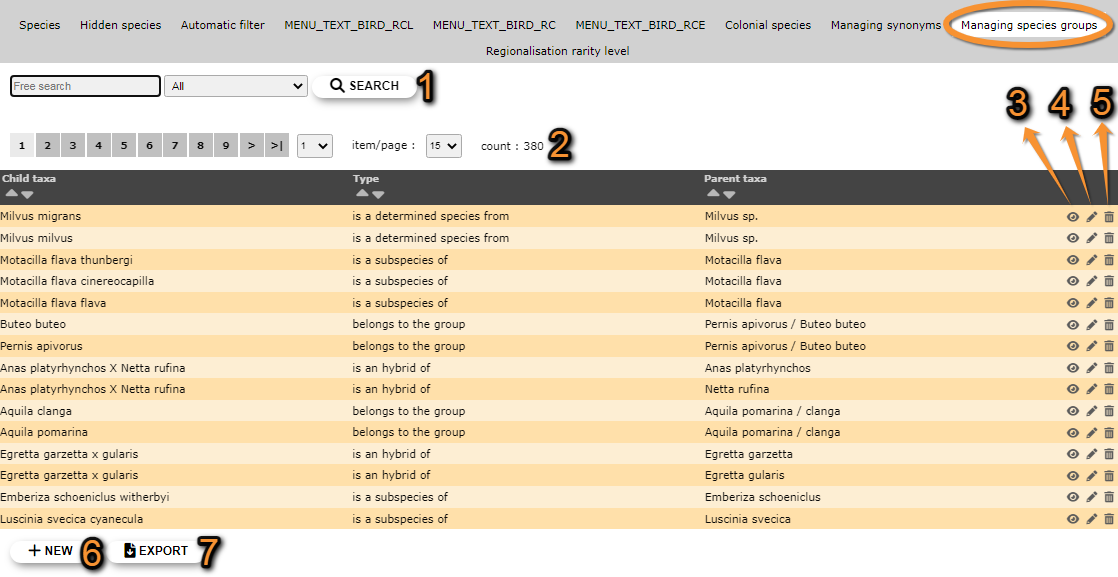
Managing species groups
Indicates under which group to consider hybrids, subespecies and difficult to identify species. Use arrows under titles to alternate between ascending and descending order (see image as an example).
- 1. Search
Reduce list by typing the name of a site, or part of it, and click SEACH. When a filter is applied, click on
DISPLAY ALL.
- 2. Page and items
Select page number and/or number of items per page.
- 3. Details
Click to see details of selected species.

Details managing species groups.
BACK: Go to previous screen without saving.
EDIT: Edit details. See edit subsection below.
DELETE: Delete entry from the list.
- 4. Edit
Modify the species group the selected entry belongs to.
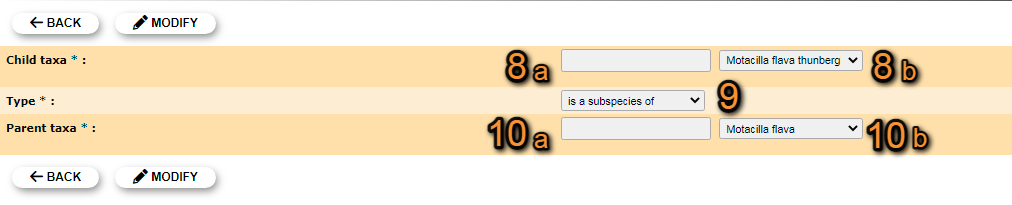
Editing managing species groups.
8. Child taxa: Type the species name, or part of it, in the left field (a) and select from the expandable menu on the right field (b).
9. Type: Select the grouping criteria from the expandable menu.
10. Parental taxa: Type the species name, or part of it, in the left field (a) and select from the expandable menu on the right field (b).
BACK: Go to previous screen without saving.
MODIFY: Save changes.
- 5. Delete
Delete entry. You will be asked to confirm.
- 6. NEW
Add a species, subspecies or genus to an existing group.

Managing species groups. Adding new species.
8. Child taxa: Type the species name, or part of it, in the left field (a) and select from the expandable menu on the right field (b).
9. Type: Select the grouping criteria from the expandable menu.
10. Parental taxa: Type the species name, or part of it, in the left field (a) and select from the expandable menu on the right field (b).
BACK: Go to previous screen without saving.
ADD: Save new species to the assigned group.
- 7. EXPORT
Download list as a .txt file.
[Top to Managing species groups]
[Top to Species list]
[Back to Species administration]
Regionalisation rarity level
[Top to Regionalisation rarity level]
[Top to Species list]
[Back to Species administration]
Admin species maps
Menu > Administration > Species administration > Admin species maps

Admin species maps.
[Top to Admin species maps]
[Back to Species administration]
Species for form
Menu > Administration > Species administration > Species for form
Species for form.
[Top to Species for form]
[Back to Species administration]
Fenología (cabecera)
Menu > Administration > Species administration > Fenología (Cabecera)

Fenología (cabecera)
[Top to Fenología (cabecera)]
[Back to Species administration]