Gestión de noticias
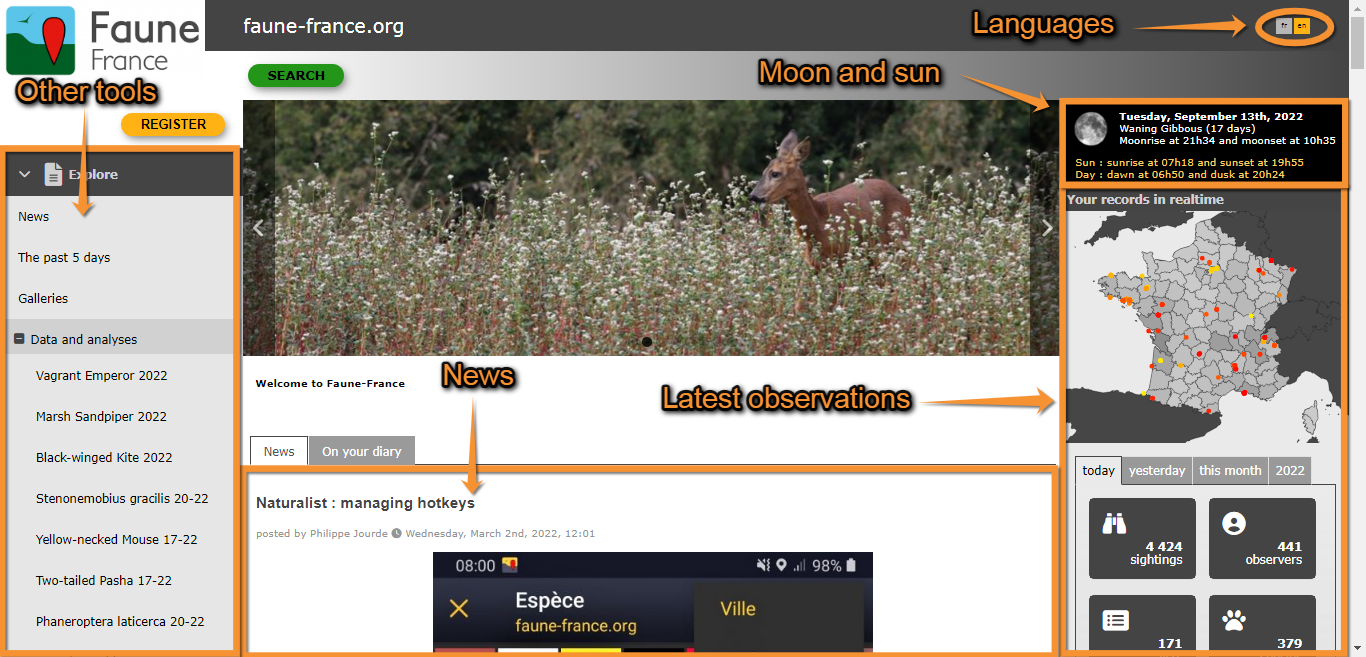
Las noticias aparecen por defecto en la pantalla de inicio, tanto para los usuarios registrados como para los no registrados (ver imagen Ejemplo de la interfaz principal como aparece en la página de Faune-France). Con los permisos correspondientes se pueden agregar o modificar noticias y/o fotografías en la parte superior. Accede:
Administración > Gestión de noticias

Gestión de noticias
Lista de todas las noticias que se muestran en la página de inicio. Utiliza las flechas bajo los títulos para alternar entre orden ascendiente y descendiente (ver imagen como ejemplo).

Número: Número asociado a otras entradas de noticias.
Tipo de noticia: Tipo de noticia. Consultar la sub sección ‘6. NUEVO’ más abajo para más información.
Grupo taxonómico: Grupo taxonómico al que hace referencia la noticia.
Protocolo: Nombre del protocolo al que hace referencia la noticia.
Fecha de la noticia: Fecha y hora cuando la noticia se activará.
Título: Título de la noticia.
- 1. Búsqueda
Reduce la lista escribiendo una palabra relevante en el campo en blanco y clicando BÚSQUEDA. Cuando haya algún filtro, clica MUESTRA TODO para ver la lista completa.
- 2. Búsqueda de página
Selecciona el número de página y/o el número de entradas por página.
- 3. Detalles
Muestra detalles de la noticia seleccionada.
- 4. Editar
Editar detalles.

ATRÁS: Ir a la pantalla anterior sin guardar.
MODIFICAR: Guardar cambios.
- 7. Tipo de noticias: Selecciona en el menú despleglable el tipo de noticias al que pertenece esta entrada. Consulta la sub sección ‘6. NUEVO’ más abajo para más información.
- 8. Grupo taxonómico: Cuando aplique, escribe el grupo taxonómico al que se refiere la noticia, o parte de éste, en el campo izquierdo (a) y selecciónalo en el menú desplegable de la derecha (b).
- 9. Protocolo: Cuando aplique, escribe el nombre del protocolo al que hace referencia la noticia, o parte de éste, en el campo de la izquierda (a) y selecciónalo en el menú desplegable de la derecha (b).
- Cuando se indique, solo los usuarios registrados a este protocolo podrán ver la noticia.
- 10. Fecha de la noticia: Día y hora en que se publicará la noticia. Si es una fecha en el futuro, la noticia aparecerá a partir de el día y la hora indicadas.
- 7. Tipo de noticias: Selecciona en el menú despleglable el tipo de noticias al que pertenece esta entrada. Consulta la sub sección ‘6. NUEVO’ más abajo para más información.

ATRÁS: Ir a la pantalla anterior sin guardar.
MODIFICAR: Guardar cambios.
- 11. Título: Selecciona el idioma en las pestañas superiores (a) y escribe / modifica el título en el idioma seleccionado (b). Si es necesario, repite el proceso para añadir / modificar títulos en diferentes idiomas.
- 12. Mensaje: Selecciona el idioma en las pestañas superiores (a) y escribe / modifica el título en el idioma seleccionado (b). Si es necesario, repite el proceso para añadir / modificar el contenido en diferentes idiomas.
- 13. Encabezado: Selecciona el idioma en las pestañas superiores (a) y escribe / modifica el título en el idioma seleccionado (b). Si es necesario, repite el proceso para añadir / modificar el encabezado en diferentes idiomas.
- 11. Título: Selecciona el idioma en las pestañas superiores (a) y escribe / modifica el título en el idioma seleccionado (b). Si es necesario, repite el proceso para añadir / modificar títulos en diferentes idiomas.

ATRÁS: Ir a la pantalla anterior sin guardar.
MODIFICAR: Guardar cambios.
- 14. Origen de información: De forma opcional, permite indicar el origen de la información en la noticia. Describe la fuente. Los enlaces url aparecen en código y no son clicables. La información aparecerá en pequeño tamaño al final de la noticia.
- 15. Enlace: Si fuera necesario, añade el enlace a la fuente de información. Éste se mostrará al final de la noticia, antes del documento si lo hubiera.
- 16. Texto a insertar en el enlace: Si hay un enlace, escribe / modifica el texto de éste.
- 17. Nombre de fichero: Actualiza / elimina / edita un fichero asociado a la noticia. Solo se acepta un fichero por noticia. Clica en Escoger fichero para actualizarlo. El fichero adjunto actual se indica al lado del botón.
- 18. Texto a insertar en el fichero: Si hubiera un documento, escribe / modifica el texto con el que se mostrará.
- 19. Imagen: Sube / elimina / modifica una imagen asociada a la noticia. Solo se acepta una imagen por noticia. Clica en Escoger fichero para actualizarla, y marca la casilla Marca para eliminar imagen para eliminarla. La imagen adjunta actual se indica al lado del botón.
- 20. Abrir en página nueva: Indica si esta noticia se abrirá en una nueva página.
- 14. Origen de información: De forma opcional, permite indicar el origen de la información en la noticia. Describe la fuente. Los enlaces url aparecen en código y no son clicables. La información aparecerá en pequeño tamaño al final de la noticia.
- 5. Eliminar
Eliminar la noticia seleccionada. Se te pedirá confirmación.
- 6. NEW
Add a new piece of news to the homepage.

BACK: Go to previous screen without saving.
ADD: Add piece of news to the homepage.
- 7. News type:
- NOTA: Actually (10.2023) the small icon is no more displayed for the news type on responsive local portals.
- Select from the expandable menu the type of news this entry refers to.
- Select from:
- Avinews: News related (initially to birds) to taxonomic group.
- Technews: News related to technical aspects.
- Tipnews: News related for tips.
- Atlasnews: News related to atlas work.
- Avinews: News related (initially to birds) to taxonomic group.
- 8. Taxonomic group: When applicable, type the taxonomic group the piece of news refers to, or part of it, in the left field (a) and select from the expandable menu in the right field (b).
- 9. Protocol: When applicable, type the name of the protocol the piece of news refers to, or part of it, in the left field (a) and select from the expandable menu in the right field (b).
- If you select a protocol, then only registered user for the protocol will see it.
- 10. News date: Choose the date and hour the new shall appear on the homepage.

BACK: Go to previous screen without saving.
ADD: Add piece of news to the homepage.
- 11. Title: Select the language from the tabs on top (a) and type the title in the selected language (b). If you need the news to appear for other languages, repeat the process to add titles in different languages.
- The new will only appear in language it is filled for.
- 12. Message:
- Select the language from the tabs on top (a) and type news content in the selected language (b). Repeat the process to add content in different languages. The new will only appear in language it is filled for.
- 13. Header: Select the language from the tabs on top (a) and type a header in the selected language (b). Repeat the process to add a header in different languages. The new will only appear in language it is filled for.

BACK: Go to previous screen without saving.
ADD: Add piece of news to the homepage.
- 14. Information source: If necessary, type the source of the news information.
- 15. Link: If necessary, add a link to news source.
- 16. Text to put in the link: If there is a link, indicate / modify the link's text.
- 17. File name: Click on Choose file to upload a file. Only one per news. Uploaded file is indicated next to the button.
- 18. Text to put in the file: If there is a file, type the text under which the file will be displayed.
- 19. Image: Click on Choose file to update an image. Only one per news. Uploaded image is indicated next to the button.
- 20. Open in a new page: Indicate if this piece of news will be opened in a new window.
- 14. Information source: If necessary, type the source of the news information.
News slideshow admin
List of images displayed at the top of homepage as a slideshow. Use arrows under titles to alternate between ascending and descending order (see image as an example).

News number: Piece of news the image is associated to.
Active? Indicates if the image will be displayed in the slideshow or otherwise, only in the news.
Order: Indicates in which order it will be displayed in the slideshow in relation to other images.
Images: Image.
Title: Image title (or other related short message) displayed in the image in the language the page is selected to.
- 1. Search
Reduce list by typing a relevant word on the blank menu, and clicking SEARCH. When a filter is applied, click on DISPLAY ALL to see the full list.
- 2. Search
Select page number and/or number of items per page.
- 3. Details
See details of image.

BACK: Go to previous screen without saving.
EDIT: Edit details. See subsection Edit below.
DELETE: Delete image. You will be asked to confirm.
- 7. ID: Number identifying each image. It is assigned automatically.
- 8. Active? Indicates if the image will be displayed in the slideshow in the homepage.
- 9. Images: See image uploaded for this entry.
- 10. Title: See image titles (or other short related text) in different languages when available.
- 11. Button? Indicates if there is a clickable button associated to the image redirecting to the news section.
- 12. News number: Piece of news the image is associated to. If the button option is active, clicking on it will redirect to this specific piece of news. If none is indicated, the button will redirect to the general news section.
- 13. Use an external link: Indicates if there is a clickable button associated to the image redirecting to the external site indicated in the next field.
- 14. External link: Address to which the button will redirect. If none is specified, even if the button to an external site is activated, it will redirect to the site's news section. If an external address is specified but the button is inactive, the image will not include a link.
- 7. ID: Number identifying each image. It is assigned automatically.
- 4. Edit
Modify the selected image

BACK: Go to previous screen without saving.
MODIFY: Save changes.
- 8. Active? Show/hide the selected image in the homepage.
- 15. Order: Modify the order in which it will be displayed in relation to other images.
- 9. Images: Change the image attached to this entry. Click on Choose file to select the image to upload. Image name will display next to the button.
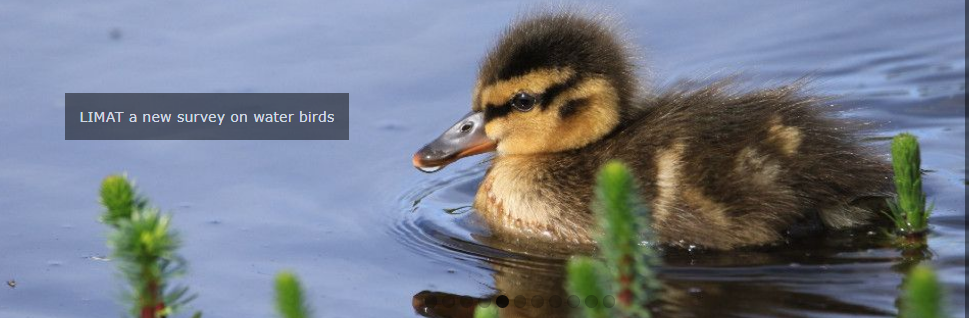
- 10. Title: Select a language from the tabs above to add or change a title (or other related short text) or change in (a) and type or modify the title (b). See image as an example on how it looks like.
- 11. Button? Indicate if there will be a clickable internal link in the image. By default, the link will redirect to the news page. If the field Title is empty, no link will be displayed. See image as an example on how it looks like.
- 12. News number: Select/modify from the expandable menu the piece of news you want to associate the image to. If the button option is active, it will redirect to this specific piece of news and not to the general news page. If the previous option is inactive, the image will not include a link even if a piece of news is selected in this section.
- 13. Use an external link: Indicate if there will be a clickable external link in the image. If the field Title is empty, no link will be displayed. See image as an example on how it looks like.
- 14. External link: Type/modify address of the external link. If the field is empty, the button will redirect to the internal news' site. If the button is inactive no link will be displayed in the image even if an external address is specified here.
- 8. Active? Show/hide the selected image in the homepage.
5. Delete
Delete selected image from slideshow on homepage. You will be asked to confirm.
6. NEW
Add a new image to homepage slideshow.

BACK: Go to previous screen without saving.
ADD: Save changes and add new image to slideshow.
- 15. Order: Type order in which it will be displayed in relation to other images.
- 9. Images: Upload image by clicking on Choose file to select the image to upload. Image name will display next to the button.
- 8. Active? Indicate if the image will be displayed in the homepage.
- 10. Title: Select a language from the tabs above to add a title in the selected language (a) and type title (b). You may repeat the process to add a title in different languages. This field could be used to add a short description or other related information. See image below on how it will look like.
- 15. Order: Type order in which it will be displayed in relation to other images.

- If the field is empty, the image will not show any additional text even if a link is added. See example below.
- If the field is empty, the image will not show any additional text even if a link is added. See example below.
- 11. Button? Indicate if the image will include a clickable internal link. The button will state "MORE INFORMATIONS" (see image below) and by default, the link will redirect to the news page unless the news number is indicated in the next field. A link will not show if the field Title is not filled.
- 11. Button? Indicate if the image will include a clickable internal link. The button will state "MORE INFORMATIONS" (see image below) and by default, the link will redirect to the news page unless the news number is indicated in the next field. A link will not show if the field Title is not filled.

- 12. News number: Select from the expandable menu the piece of news the image will be associated with. Note it will only link if the previous button option is active.
- 13. Use an external link: Indicate if the image will include a clickable link to an external site. The button will state "MORE INFORMATIONS" (see image above as an example) and will redirect to the site indicated in the next link. If none is indicated, it will redirect to the current site's news section. A link will not show if the field Title is not filled. If both Button? and External link fields are active, the image will show both links with the same title.
- 14. External link: Type the address of the external link. It will only redirect if the previous field is active. If no address is specified, even if the button to an external link is active, it will redirect to the site's news section.
- 12. News number: Select from the expandable menu the piece of news the image will be associated with. Note it will only link if the previous button option is active.
|
|