Admin news/fr: Difference between revisions
(Created page with "500px|thumb|center|Image dans le diaporama lorsque seul un titre a été ajouté.<br/>") |
(Created page with "<center> <table border="5" width="700px"> <tr> <td style="padding: 25px; text-align: left; font-family: sans-serif; color: black; background-color: hsl(201, 100%, 89%"> <!-- GREEN BOX (Conseils): hsl(157, 74%, 80%) YELLOW BOX (Résumés): #ffffdb" BLUE BOX (Information): hsl(201, 100%, 89%) RED BOX (Avertissements): hsl(0, 77%, 78%) -->") |
||
| Line 290: | Line 290: | ||
</div> | </div> | ||
:::'''15. Ordre:''' Type d'ordre d'affichage par rapport aux autres images. <br/> | |||
:::'''15. | :::'''9. Images:''' Téléchargez l'image en cliquant sur '''Choisir un fichier''' pour sélectionner l'image à télécharger. Le nom de l'image s'affichera à côté du bouton.<br/> | ||
:::'''9. Images:''' | :::'''8. Actif?''' Indiquer si l'image sera affichée sur la page d'accueil. <br/> | ||
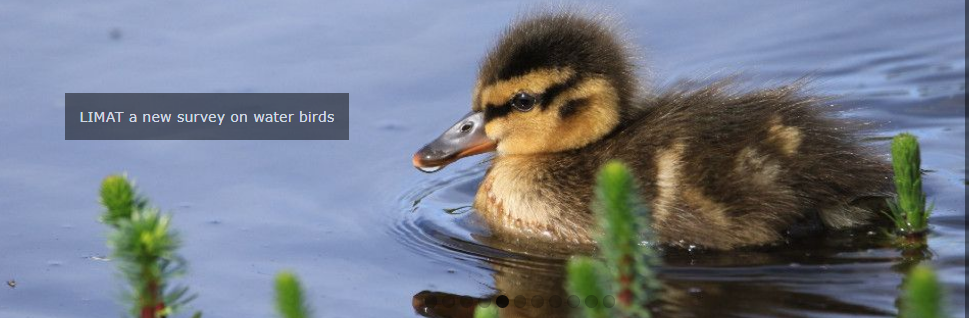
:::'''8. | :::'''10. Titre:''' Sélectionnez une langue dans les onglets ci-dessus pour ajouter un titre dans la langue sélectionnée (a) et tapez le titre (b). Vous pouvez répéter le processus pour ajouter un titre dans d'autres langues. Ce champ peut être utilisé pour ajouter une brève description ou d'autres informations connexes. Voir l'image ci-dessous pour savoir à quoi il ressemblera. <br/> | ||
:::'''10. | |||
<br/> | <br/> | ||
[[File:2023-08-29 slideshow with title.png|500px|thumb|center|Image dans le diaporama lorsque seul un titre a été ajouté.]]<br/> | [[File:2023-08-29 slideshow with title.png|500px|thumb|center|Image dans le diaporama lorsque seul un titre a été ajouté.]]<br/> | ||
Revision as of 11:45, 16 October 2023
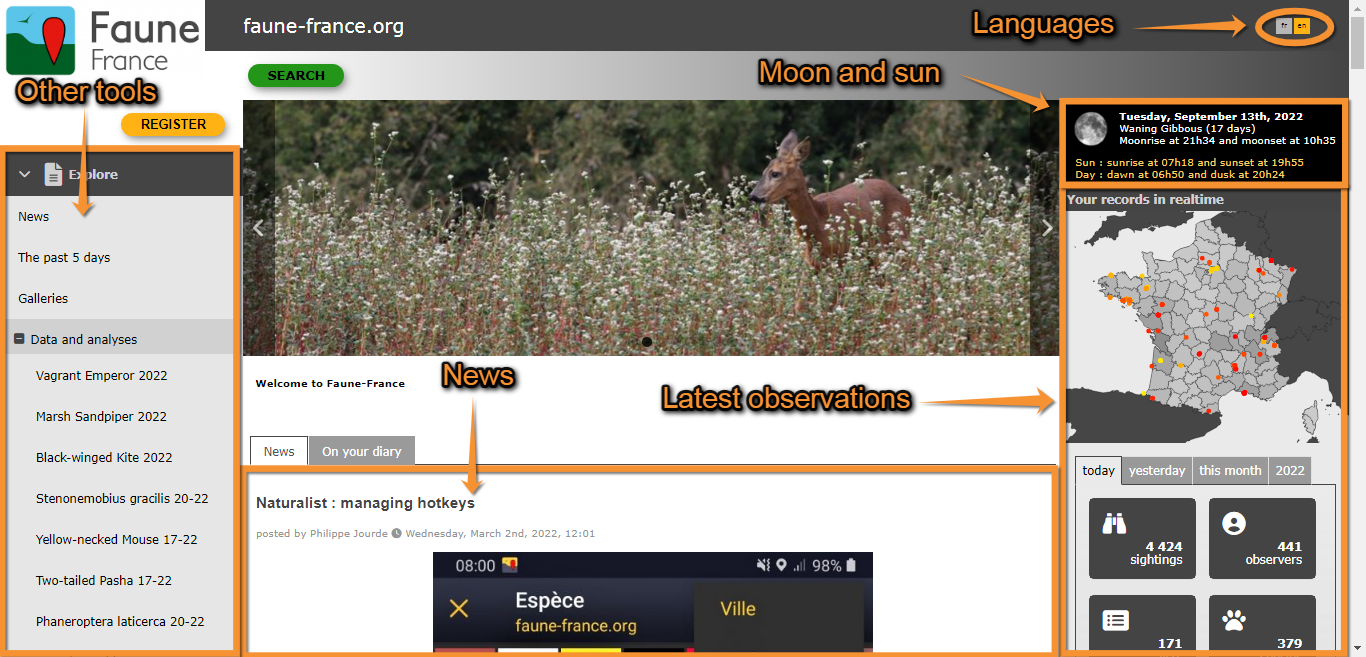
Les actualités apparaissent par défaut sur l'écran d'accueil des utilisateurs enregistrés et non enregistrés (voir l'image Exemple de l'interface principale du portail Faune-France). Avec les droits correspondants, il est possible de poster et de modifier les actualités et le diaporama en haut de page. Accès :
Administration > Nouvelles de l'admin

Admin news
List of news entries displayed on the homepage. Use arrows under titles to alternate between ascending and descending order (see image as an example).

Number: Number associated to other news entry.
News type: Type of news. Refer to sub section '6. NEW' below for more information.
Taxonomic group: Taxonomic group the piece of news refers to.
Protocol: Name of the protocol the piece of news refers to.
News date: Date and time from when the new will become active
Title: Piece of news' title.
- 1. Search
Reduce list by typing a relevant word on the blank menu, and clicking SEARCH. When a filter is applied, click on DISPLAY ALL to see the full list.
- 2. Page Search
Select page number and/or number of items per page.
- 3. Details
See details of the selected piece of news.
- 4. Edit
Modify details.

- 7. News type: Select from the expandable menu the type of news this entry refers to. Refer to sub section '6. NEW' below for more information.
- 8. Taxonomic group: When applicable, type the taxonomic group the piece of news refers to, or part of it, in the left field (a) and select from the expandable menu in the right field (b).
- 9. Protocol: When applicable, type the name of the protocol the piece of news refers to, or part of it, in the left field (a) and select from the expandable menu in the right field (b).
- When specified, only registered people for the concerned protocol will see the news.
- 10. News date: Date and time from when the news is active. If a date is in the future, then the news will be visible from that date and hour.
- 7. News type: Select from the expandable menu the type of news this entry refers to. Refer to sub section '6. NEW' below for more information.

- 11. Title: Select the language from the tabs on top (a) and type / modify the title in the selected language (b). Repeat the process to add / modify titles in different languages, if needed.
- 12. Message: Select the language from the tabs on top (a) and type / modify new's content in the selected language (b). Repeat the process to add / modify content in different languages.
- 13. Header: Select the language from the tabs on top (a) and type/ modify a header in the selected language (b). Repeat the process to add / modify a header in different languages.
- 11. Title: Select the language from the tabs on top (a) and type / modify the title in the selected language (b). Repeat the process to add / modify titles in different languages, if needed.

- 14. Information source: Optional, allows you to mention the source of the news information. Describe with a text where the information comes from, if you write an url, it will stay as a text and not become clickable. This will appear small at the end of the news.
- 15. Link: If necessary, add a link you want to appear at the bottom of the news just before document (if any).
- 16. Text to put in the link: If there is a link, indicate / modify the link's text.
- 17. File name: Update / delete / change a file associated to the piece of news. Only one document per news. Click on Choose file to update a file, and check Check to delete the image to delete it. Current uploaded file is indicated next to the button.
- 18. Text to put in the file: If there is a file, type / modify the text under which the file will be displayed.
- 19. Image: Upload / delete / change an image to the piece of news. Only one image per news! Click on Choose file to update an image, and check Check to delete the image to delete it. Current uploaded image is indicated next to the button.
- 20. Open in a new page: Indicate if this piece of news will be opened in a new window.
- 14. Information source: Optional, allows you to mention the source of the news information. Describe with a text where the information comes from, if you write an url, it will stay as a text and not become clickable. This will appear small at the end of the news.
- 5. Delete
Delete selected piece of news. You will be asked to confirm.
- 6. NEW
Add a new piece of news to the homepage.

- 7. News type:
- NOTA: Actually (10.2023) the small icon is no more displayed for the news type on responsive local portals.
- Select from the expandable menu the type of news this entry refers to.
- Select from:
- Avinews: News related (initially to birds) to taxonomic group.
- Technews: News related to technical aspects.
- Tipnews: News related for tips.
- Atlasnews: News related to atlas work.
- Avinews: News related (initially to birds) to taxonomic group.
- 8. Taxonomic group: When applicable, type the taxonomic group the piece of news refers to, or part of it, in the left field (a) and select from the expandable menu in the right field (b).
- 9. Protocol: When applicable, type the name of the protocol the piece of news refers to, or part of it, in the left field (a) and select from the expandable menu in the right field (b).
- If you select a protocol, then only registered user for the protocol will see it.
- 10. News date: Choose the date and hour the new shall appear on the homepage.

- 11. Title: Select the language from the tabs on top (a) and type the title in the selected language (b). If you need the news to appear for other languages, repeat the process to add titles in different languages.
- The new will only appear in language it is filled for.
- 12. Message:
- Select the language from the tabs on top (a) and type news content in the selected language (b). Repeat the process to add content in different languages. The new will only appear in language it is filled for.
- 13. Header: Select the language from the tabs on top (a) and type a header in the selected language (b). Repeat the process to add a header in different languages. The new will only appear in language it is filled for.

- 14. Information source: If necessary, type the source of the news information.
- 15. Link: If necessary, add a link to news source.
- 16. Text to put in the link: If there is a link, indicate / modify the link's text.
- 17. File name: Click on Choose file to upload a file. Only one per news. Uploaded file is indicated next to the button.
- 18. Text to put in the file: If there is a file, type the text under which the file will be displayed.
- 19. Image: Click on Choose file to update an image. Only one per news. Uploaded image is indicated next to the button.
- 20. Open in a new page: Indicate if this piece of news will be opened in a new window.
- 14. Information source: If necessary, type the source of the news information.
News slideshow admin
List of images displayed at the top of homepage as a slideshow. Use arrows under titles to alternate between ascending and descending order (see image as an example).

News number: Piece of news the image is associated to.
Active? Indicates if the image will be displayed in the slideshow or otherwise, only in the news.
Order: Indicates in which order it will be displayed in the slideshow in relation to other images.
Images: Image.
Title: Image title (or other related short message) displayed in the image in the language the page is selected to.
- 1. Search
Reduce list by typing a relevant word on the blank menu, and clicking SEARCH. When a filter is applied, click on DISPLAY ALL to see the full list.
- 2. Search
Select page number and/or number of items per page.
- 3. Details
See details of image.

BACK: Go to previous screen without saving.
EDIT: Edit details. See subsection Edit below.
DELETE: Delete image. You will be asked to confirm.
- 7. ID: Number identifying each image. It is assigned automatically.
- 8. Active? Indicates if the image will be displayed in the slideshow in the homepage.
- 9. Images: See image uploaded for this entry.
- 10. Title: See image titles (or other short related text) in different languages when available.
- 11. Button? Indicates if there is a clickable button associated to the image redirecting to the news section.
- 12. News number: Piece of news the image is associated to. If the button option is active, clicking on it will redirect to this specific piece of news. If none is indicated, the button will redirect to the general news section.
- 13. Use an external link: Indicates if there is a clickable button associated to the image redirecting to the external site indicated in the next field.
- 14. External link: Address to which the button will redirect. If none is specified, even if the button to an external site is activated, it will redirect to the site's news section. If an external address is specified but the button is inactive, the image will not include a link.
- 7. ID: Number identifying each image. It is assigned automatically.
- 4. Edit
Modify the selected image

- 8. Active? Show/hide the selected image in the homepage.
- 15. Order: Modify the order in which it will be displayed in relation to other images.
- 9. Images: Change the image attached to this entry. Click on Choose file to select the image to upload. Image name will display next to the button.
- 10. Title: Select a language from the tabs above to add or change a title (or other related short text) or change in (a) and type or modify the title (b). See image as an example on how it looks like.
- 11. Button? Indicate if there will be a clickable internal link in the image. By default, the link will redirect to the news page. If the field Title is empty, no link will be displayed. See image as an example on how it looks like.
- 12. News number: Select/modify from the expandable menu the piece of news you want to associate the image to. If the button option is active, it will redirect to this specific piece of news and not to the general news page. If the previous option is inactive, the image will not include a link even if a piece of news is selected in this section.
- 13. Use an external link: Indicate if there will be a clickable external link in the image. If the field Title is empty, no link will be displayed. See image as an example on how it looks like.
- 14. External link: Type/modify address of the external link. If the field is empty, the button will redirect to the internal news' site. If the button is inactive no link will be displayed in the image even if an external address is specified here.
- 8. Active? Show/hide the selected image in the homepage.
5. Delete
Delete selected image from slideshow on homepage. You will be asked to confirm.
6. NEW
Add a new image to homepage slideshow.

BACK: Go to previous screen without saving.
ADD: Save changes and add new image to slideshow.
- 15. Ordre: Type d'ordre d'affichage par rapport aux autres images.
- 9. Images: Téléchargez l'image en cliquant sur Choisir un fichier pour sélectionner l'image à télécharger. Le nom de l'image s'affichera à côté du bouton.
- 8. Actif? Indiquer si l'image sera affichée sur la page d'accueil.
- 10. Titre: Sélectionnez une langue dans les onglets ci-dessus pour ajouter un titre dans la langue sélectionnée (a) et tapez le titre (b). Vous pouvez répéter le processus pour ajouter un titre dans d'autres langues. Ce champ peut être utilisé pour ajouter une brève description ou d'autres informations connexes. Voir l'image ci-dessous pour savoir à quoi il ressemblera.
- 15. Ordre: Type d'ordre d'affichage par rapport aux autres images.

- Si le champ est vide, l'image n'affichera aucun texte supplémentaire, même si un lien est ajouté. Voir l'exemple ci-dessous.
- Si le champ est vide, l'image n'affichera aucun texte supplémentaire, même si un lien est ajouté. Voir l'exemple ci-dessous.
- 11. Button? Indique si l'image comprend un lien interne cliquable. Le bouton indiquera "PLUS D'INFORMATIONS" (voir l'image ci-dessous) et, par défaut, le lien redirigera vers la page d'actualités, à moins que le numéro de l'actualité ne soit indiqué dans le champ suivant. Un lien n'apparaîtra pas si le champ Titre n'est pas rempli.
- 11. Button? Indique si l'image comprend un lien interne cliquable. Le bouton indiquera "PLUS D'INFORMATIONS" (voir l'image ci-dessous) et, par défaut, le lien redirigera vers la page d'actualités, à moins que le numéro de l'actualité ne soit indiqué dans le champ suivant. Un lien n'apparaîtra pas si le champ Titre n'est pas rempli.

- 12. Numéro d'actualité: Sélectionnez dans le menu déroulant l'article auquel l'image sera associée. Notez que le lien n'apparaîtra que si l'option du bouton précédent est activée.
- 13. Utiliser un lien externe: Indique si l'image comprendra un lien cliquable vers un site externe. Le bouton indiquera "PLUS D'INFORMATIONS" (voir l'image ci-dessus à titre d'exemple) et redirigera vers le site indiqué dans le lien suivant. Si aucun site n'est indiqué, il sera redirigé vers la section "actualités" du site actuel. Un lien ne s'affichera pas si le champ Titre n'est pas rempli. Si les deux champs Bouton? et Lien externe sont actifs, l'image affichera les deux liens avec le même titre.
- 14. Lien externe: Saisir l'adresse du lien externe. Il ne sera redirigé que si le champ précédent est actif. Si aucune adresse n'est spécifiée, même si le bouton vers un lien externe est actif, il redirigera vers la section actualités du site.
- 12. Numéro d'actualité: Sélectionnez dans le menu déroulant l'article auquel l'image sera associée. Notez que le lien n'apparaîtra que si l'option du bouton précédent est activée.
|
|