Editing records
Note: images and examples are drawn from the French portal Faune-France. The design and position of some tools may vary slightly from portal to portal. To see a list of portals go to wiki section Local portals and partners. |
There are two ways in which you can modify your already submitted records: from the right hand column as you enter more records, or from the left hand column: All my observations.
From the right hand column: Latests sightings
On the right hand column as you enter those following the add sightings on this locality or add a precise sighting path (see section Web interface > Submitting records > Step 3/3: Transmit my sighting). The list shows your last 30 submitted observations, under each site and date. To edit a record click on the pencil and to delete use the bin (see image Editing records from latest sightings list). When selecting to edit a record, you get a short summary of the observation and three tabs from where to modify the data: picture and sound, data and site (see image Editing a simple record. Add a photo).
Modify a simple record
After a short summary to the record, you can modify the data according to three sections. Choose tabs to access the section you need modifying. Choose the bin above the tabs to delete the record (see image Editing records from the right hand column).
Picture and sound
Here you can add a picture or a sound file as in section Web interface > Submitting records > Step 3/3: Transmit my sighting, and in image Transmitting sightings, non mandatory fields. You can also delete all records by clicking the bin on the bottom left. When done adding new pictures, click Add at the bottom of the form. See image Editing a simple record. Add a photo.
Data
Choose tab Modify data and edit date, species, count, comments and/or additional information, except pictures and sounds, as in Web interface > Submitting records > Step 3/3: Transmit my sighting. Modify as needed and click Update at the bottom. See image Editing a simple record. Modify data.
Site
Select Edit place and navigate the map as in section Web interface > Submitting records > Step 1/3: Approximate choice of a site > By clicking on the map; and section Web interface > Submitting records > Step 2/3: Precise site choice > Add a precise sighting. Click on the map at the exact position of sighting. This record may get automatically associated to a new predetermined site. See image Editing a simple record. Edit place.
Modify a record from a list
Records that are part of a list are listed under a time frame and show a white line at the top (see image Example of records that belong to a list).
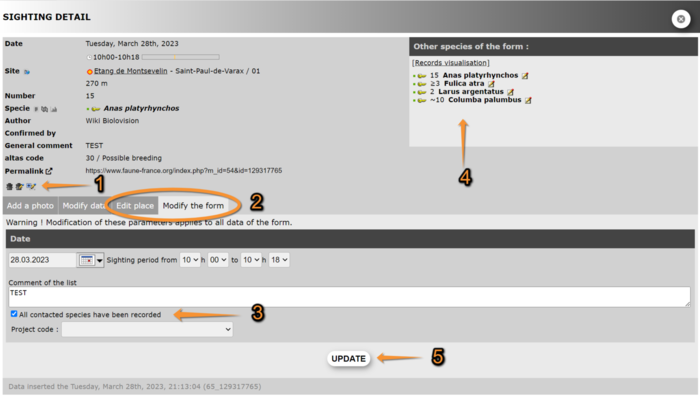
If a record belongs to a list, there are further options at the bottom of the summary. Click the bin with a pen to delete the full list, or click the pen with plus sign (+) to add a new record to the list. There is also one more tab to allow you to modify details for the full list: Modify the form (see image Editing a list). Any changes you make under the Modify the form or Edit place tabs will apply to the whole list.
From the left hand column: All my observations
It is also possible to modify your observations by going to All my observations on the left hand column of the screen (see image Editing records from all my observations). Click on the icons next to each record: bin to delete, pen to modify. If they are part of a list, you can also delete the full list (icon bin with pen). Place your mouse on top of each icon to see to which action they correspond. When editing, you will be taken to image Editing a list.


