Grey Partridge (NL): Difference between revisions
(Created page with "PERDIX <br/> <br/> <div class="toc" style="width:300px;"> <!-- La llargada s'ha de canviar aquí --> <div class="mw-collapsible mw-collapsed" data-expandtext="Show" data-collapsetext="Hide" style="width:250px;margin-bottom:0px;margin-top:0px;background-color:#f7f7f7;"> '''14 Grey Partridge''' <div class="mw-collapsible-content" style="width:300px;background-color:#f7f7f7;"> <!-- I també cal canviar la llargada aquí --> <ol>...") |
|||
| (13 intermediate revisions by the same user not shown) | |||
| Line 44: | Line 44: | ||
<center> | <center> | ||
<div class="toc" style="border-radius:5px;background-color:#ffffff;padding-left:8px;padding-right:8px;padding-bottom:8px;width: | <div class="toc" style="border-radius:5px;background-color:#ffffff;padding-left:8px;padding-right:8px;padding-bottom:8px;width:300px;"> | ||
[[File:Grey_partridge NL Menu.png| | [[File:Grey_partridge NL Menu.png|300px]] | ||
<div class="toc" style="border-radius:5px;padding-left:15px;text-align:left; font-size:12px;width: | <div class="toc" style="border-radius:5px;padding-left:15px;text-align:left; font-size:12px;width:285px;"> | ||
'''Grey Partridge | '''Grey Partridge.''' | ||
</div> | </div> | ||
</div> | </div> | ||
| Line 75: | Line 75: | ||
<br/> | <br/> | ||
Enter observations as if in a [[Entering_records# | Screen layout will automatically become horizontal if using a tablet, which the map section on the right, and the species section on the left (see image below).<br/> | ||
Enter observations as if in a [[Entering_records#With_list_in_the_field| '''list in the field''']]. <br/> | |||
<br/> | |||
<center> | |||
<div class="toc" style="border-radius:5px;background-color:#ffffff;padding-left:8px;padding-right:8px;width:700px;"> | |||
[[File:Horizontal protocol. Example.png|700px]] | |||
<div class="toc" style="border-radius:5px;padding-left:15px;text-align:left; font-size:12px;width:685px;"> | |||
'''Horizontal screen. Example.''' | |||
</div> | |||
<p style="color:black;font-size:12px;padding-left:5px;text-align:left;column-count:1;padding-right:5px;"> | |||
'''1. Enlarge:''' click to enlarge image. It will hide/unhide general information about your phone on the top line. <br/> | |||
'''2. Unlock:''' click on lock icon to unlock screen and be able to enter species. The screens locks automatically to prevent entering unreal data while in the field. <br/> | |||
'''3. Map section''' <br/> | |||
'''4. Species section''' <br/> | |||
</p> | |||
</div> | |||
</center> | |||
<br/> | |||
<br/> | |||
:'''Place'''<br/> | |||
Place your observation within the study area. <br/> | |||
<br/> | <br/> | ||
See wiki section Mobile interface > Protocols > Enter data > Entering observations > [[Protocols#Place|Place]] on how to interpret the map and place your observation.<br/> | See wiki section Mobile interface > Protocols > Enter data > Entering observations > [[Protocols#Place|Place]] on how to interpret the map and place your observation.<br/> | ||
<br/> | <br/> | ||
:'''Species'''<br/> | |||
See wiki section Mobile interface > Protocols > Enter data > Entering observations > [[Protocols#Species|Species]] on how to enter the species name. | Enter species ''''by search'''' or using protocol shortcuts when available. <br/> | ||
<br/> | |||
See wiki section Mobile interface > Protocols > Enter data > Entering observations > [[Protocols#Species|Species]] on how to enter the species name. <br/> | |||
<br/> | |||
See wiki section Mobile interface > [[Shortcuts|Shortcuts]] to learn more about shortcuts and how to create them.<br/> | |||
<br/> | |||
:'''Number of individuals''' <br/> | |||
Enter number of individuals using the counter provided.<br/> | |||
<br/> | |||
<center> | |||
<div class="toc" style="border-radius:5px;background-color:#ffffff;padding-left:8px;padding-right:8px;width:400px;"> | |||
[[File:Counter.png|400px]] | |||
<div class="toc" style="border-radius:5px;padding-left:15px;text-align:left; font-size:12px;width:385px;"> | |||
'''Number of individuals.''' | |||
</div> | |||
<p style="color:black;font-size:12px;padding-left:5px;text-align:left;column-count:1;padding-right:5px;"> | |||
'''5. Species:''' Registered species.<br/> | |||
'''6. Edit:''' Click to go to previous screen and change species name. <br/> | |||
'''7. Counter:''' Type number of individuals or use quick keys.<br/> | |||
</p> | |||
</div> | |||
</center> | |||
<br/> | |||
<br/> | <br/> | ||
Visit Mobile interface > Entering records > Directly in the field > [[Entering_records#Number_of_individuals| Number of individuals]] if necessary.<br/> | Visit Mobile interface > Entering records > Directly in the field > [[Entering_records#Number_of_individuals| Number of individuals]] if necessary.<br/> | ||
<br/> | <br/> | ||
:'''Plus'''<br/> | |||
Enter additional information using the icons provided. White background icons refer to atlas code/behaviour, and only one option is possible. Blue background icons refer to other information (ie. comments, flight direction...) and can be combined with several icons. <br/> | |||
<br/> | |||
Visit wiki section Mobile interface > Entering records > Directly in the field > Additional information > [[Entering records#icons|Entering additional information with icons]] for correspondence if necessary. Note not all icons may be available in all protocols.<br/> | |||
<br/> | <br/> | ||
<span id="Ending the list"></span> | <span id="Ending the list"></span> | ||
Latest revision as of 20:49, 9 April 2024
PERDIX
14 Grey Partridge
-
14.1 Start of list
14.2 Entering records
14.3 Ending the list
14.4 Editing records and/or protocols
14.5 Deleting records and/or protocols
14.6 Browsing records
|
|
Open the menu as for Submitting records and choose Grey Partridge (see image below).

Grey Partridge.
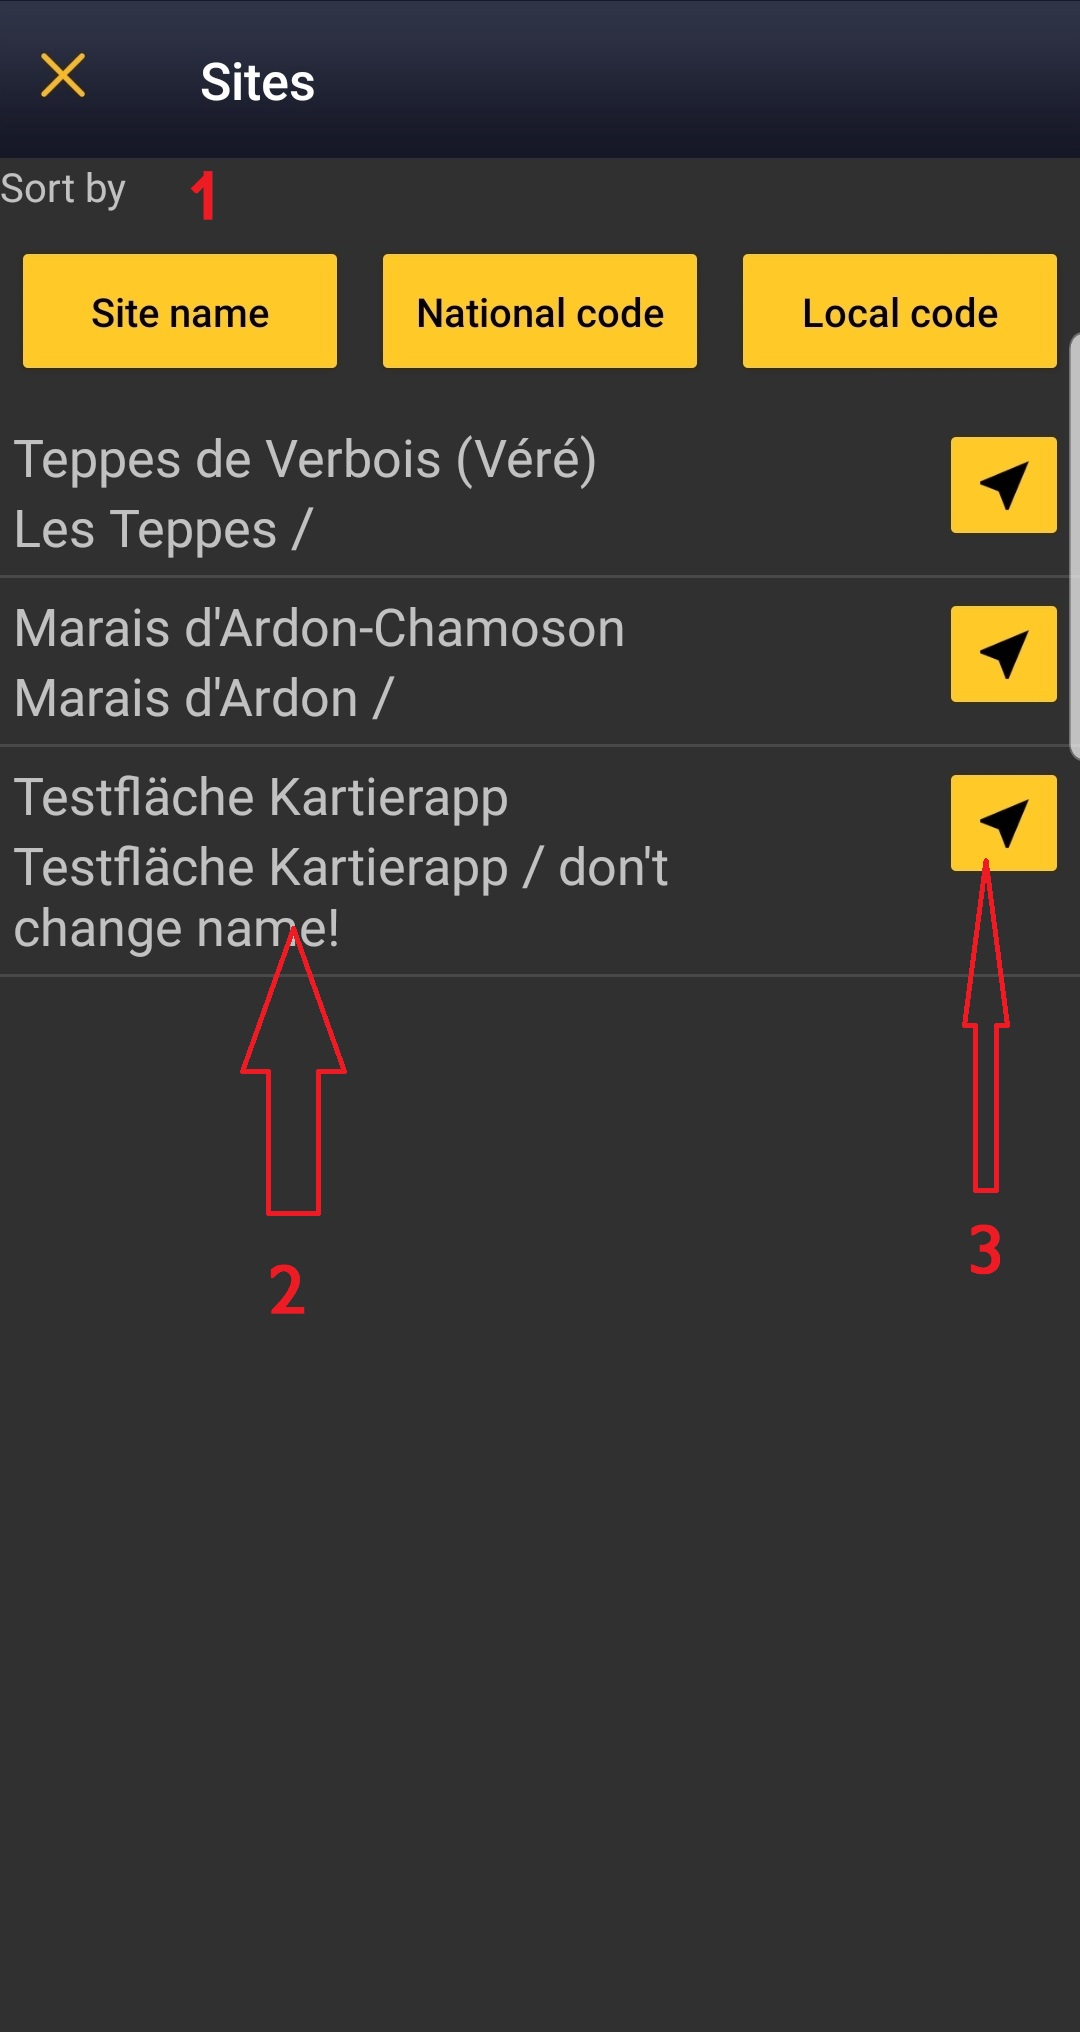
Choose the site you want to count at as explained in wiki section Mobile interface > Protocols > Enter data.
PERDIX Start of list
Enter general information before starting the count. Fields are protocol dependent and may change from country to country.
Visit wiki section Mobile interface > Protocols > Enter data > Start of list for details.
Click Next when done.
PERDIX Entering records
Screen layout will automatically become horizontal if using a tablet, which the map section on the right, and the species section on the left (see image below).
Enter observations as if in a list in the field.

Horizontal screen. Example.
1. Enlarge: click to enlarge image. It will hide/unhide general information about your phone on the top line.
2. Unlock: click on lock icon to unlock screen and be able to enter species. The screens locks automatically to prevent entering unreal data while in the field.
3. Map section
4. Species section
- Place
Place your observation within the study area.
See wiki section Mobile interface > Protocols > Enter data > Entering observations > Place on how to interpret the map and place your observation.
- Species
Enter species 'by search' or using protocol shortcuts when available.
See wiki section Mobile interface > Protocols > Enter data > Entering observations > Species on how to enter the species name.
See wiki section Mobile interface > Shortcuts to learn more about shortcuts and how to create them.
- Number of individuals
Enter number of individuals using the counter provided.

Number of individuals.
5. Species: Registered species.
6. Edit: Click to go to previous screen and change species name.
7. Counter: Type number of individuals or use quick keys.
Visit Mobile interface > Entering records > Directly in the field > Number of individuals if necessary.
- Plus
Enter additional information using the icons provided. White background icons refer to atlas code/behaviour, and only one option is possible. Blue background icons refer to other information (ie. comments, flight direction...) and can be combined with several icons.
Visit wiki section Mobile interface > Entering records > Directly in the field > Additional information > Entering additional information with icons for correspondence if necessary. Note not all icons may be available in all protocols.
PERDIX Ending the list
To finish the survey,
1. Stop recording,
2. Adjust time, if necessary,
3. Fill in/modify details, if necessary.
When done, click I recorded all species of the programe.
Visit wiki section Mobile interface > Enter data > Ending the list for details, if necessary.
Remember to synchronise your data as soon as possible after entering to avoid loosing it.
PERDIX Editing records and/or protocols
To edit records within a protocol, or to edit the protocol's general parameters, visit wiki section Mobile interface > Editing records > Editing protocols.
PERDIX Deleting records and/or protocols
To delete records within a protocol, or to delete the whole protocol, visit wiki section Mobile interface > Editing records > Deleting protocols.
PERDIX Browsing records
See your protocoled records:
- Before synchronisation
- In the phone. See more details in wiki section Accessing your own records.
- Before synchronisation
- After synchronisation
- In Mine. See more details in wiki section Accessing records' details.
- After synchronisation
- In Under verification (only if any data of the protocol needs more information)
- In Under verification (only if any data of the protocol needs more information)
- In the local portal. Go to the corresponding local portal, Menu > Explore > All my observations.
- In the local portal. Go to the corresponding local portal, Menu > Explore > All my observations.