Protocols/es: Difference between revisions
(Updating to match new version of source page) |
(Created page with "<table style="border-style: solid; border-color: black"> <tr> <td style="padding: 20px; text-align: left; font-family: sans-serif; color: black; background-color: #f0f0f0">") |
||
| Line 12: | Line 12: | ||
<br/> | <br/> | ||
<table style="border-style: solid; border-color: black"> | <table style="border-style: solid; border-color: black"> | ||
<tr> | <tr> | ||
<td style="padding: 20px; text-align: left; font-family: sans-serif; color: black; background-color: #f0f0f0"> | <td style="padding: 20px; text-align: left; font-family: sans-serif; color: black; background-color: #f0f0f0"> | ||
<div lang="en" dir="ltr" class="mw-content-ltr"> | <div lang="en" dir="ltr" class="mw-content-ltr"> | ||
Revision as of 11:53, 19 June 2023
Los protocolos son formas estandarizadas de recogida de datos. La metodología a seguir depende de cada estudio. Los protocolos solo estan disponibles cuando un socio local los ofrece. Ten presente que no todos los socios ofrecen los mismos protocolos.
Para acceder a los protocolos, un administrador tiene que darte acceso, y el coordinador del protocolo te dará las intrucciones para que puedas hacer el censo. Tu responsabilidad es censar en el lugar asignado siguiendo las instrucciones del protocolo. Sin embargo, no todos los socios te dan acceso al protocolo en NaturaList directamente. Mientras que siempre tendrás acceso a los protocolos que se te han asignado en la página local, a veces hace falta que un administrador te de aceso al protocolo en NaturaList.

Accede al protocolo como si fueras a intriducir observaciones sin protocolo (icono + en la esquina inferior derecha de la imagen, ver imagen de la derecha). Verás tantas entradas como el número de protocolos a los que se te haya dado acceso. Los que aparecen en blanco son los que están activos según la lista de especies elegida. Los que aparecen el gris están asociados a otra lista de especies, inactiva mientras no la modifiques (ver imagen Protocolos. Menú principal como ejemplo). Clica sobre el protocolo que necesitas.
|
|
Configuración de protocolos
Antes de empezara entrar observaciones al protocolo, quizás debas definir algunos parámetros:
- Lista de especies
- Menú > Preferencias > Especies > Lista de especies.
- Lista de especies
- Parámetros específicos para ciertos protocolos.
- Menú > Preferencias > Protocolos (ver imagen siguiente).
- Parámetros específicos para ciertos protocolos.

Lista de especies
La lista de especies seleccionada en tu dispositivo tiene que ser la misma que la lista de especies del país dónde tiene lugar el censo en tu protocolo. Cuando tu protocolo implica más de un grupo taxonómico, selecciona la lista de especies apropiada para cada uno de los grupos taxonómicos implicados.
Por ejemplo, si cuentas pájaros en Alemania bajo el Censo de aves acuáticas, tu lista de especies deberia ser la lista alemana. Si tu protocolo incluye pájaros y mamíferos en Francia, debes seleccionar al lista de especies de Francia tanto para pájaros como para mamíferos.
Para seleccionar la lista apropiada ves a Menú > Herramientas > Preferenciass > Especies > Lista de especies.
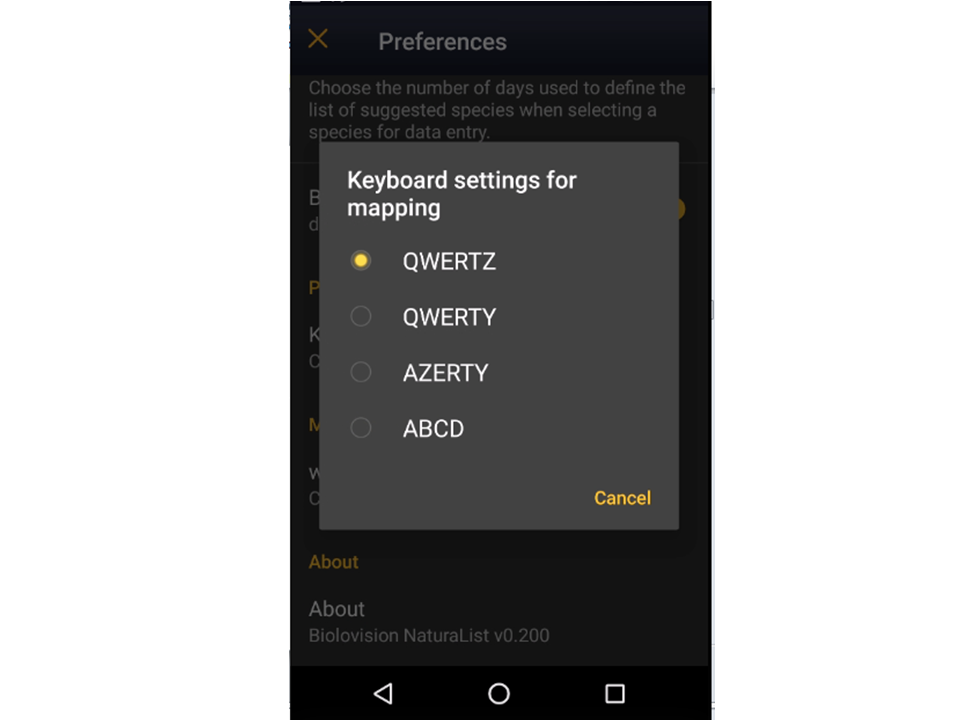
Configuración del teclado para mapas
Esta sección solo aparecerá en Menú > Preferencias > Protocolos si tienes acceso a un protocolo con cartografía desde una tablet:
-
Censo de aves acuáticas
CBBM in Protected areas
Common Breeding Bird Survey
Grey Partridge
Meadow Birds
Reed Breeding Species Census
Semi-Common Territorial Species census
Shorebirds, Anatidae, Grebes and Coots breeding
Territory Mapping
Elige una de las acciones para seleccionar la configuración de tu teclado (ver imagen Keyboard configuration for mapping).

Enter data
|
2 Enter data 2.1 Start of list 2.2 Entering records 2.3 Ending the list 2.4 Editing records and/or protocols 2.5 Deleting records and/or protocols 2.6 Browsing records |
Open the menu as for Submitting records and choose Waterbird census (see image below).

If you are registered for only one site, you will access directly to the next step: Start of list.
If you have more than one site to survey, it will list all your protocol sites (see image below).

1. Sort your protocol site by Site name, National code or Local code.
2. Click on the name to go directly to the next step Start of list.
3. Click on the arrow to get directions to your protocol location. It will open google maps on a new window.
|
NOTE: |
Start of list
Enter general information before starting the protocol (see image). Fields marked with an asterisk are mandatory. Fields available are protocol dependent and may differ from one country to another, even within the same protocol. Refer to specific information for each of the protocols for this section.

- Comment
You may enter a comment if you find it appropiate.
- Record the trace
Check if you want NaturaList to record your track. You will see a reminder to set your GPS on "High precision" and your power saving off for NaturaList. Go to Main menu > Preferences > GPS mode > Continuous (high reactivity) to set the right GPS mode (see wiki sectio Mobile interface > Getting started > Preferences > Location > GPS Mode on how to do it).
Click OK to continue and check if you wish not to see the reminder again. Check Do not ask again and keep this choice for future entries if you want to set Record the trace as the default option (see image below). Click OK to continue without setting Record the trace as the default option.

- After synchronisation, visualise your track at the local portal by:
- Clicking on any species from the list as if for editing, and selecting Go to website > Edit Place tab. See image Example of records that belong to a list.
- Logging into the website and going to edit your own data. Click on any observation belonging to the list, and select the Edit place tab. See image Example of records that belong to a list.
- Clicking on any species from the list as if for editing, and selecting Go to website > Edit Place tab. See image Example of records that belong to a list.
- After synchronisation, visualise your track at the local portal by:
- Hide all records from the public
Check if you want to keep your records privately. This will not prevent administrators to see them and contact you if necessary, but other users of NaturaList will not see your records.
- No species were seen
Check if your survey did not provide any data. Surveys with no species are also important results! It will mean you followed the established methodology, and therefore your survey is valid, but no birds were present. They can indicate major population changes and are of extreme importance for conservation purposes.
|
Surveys with no species are also important results! Please submit them. It will mean you followed the established methodology but no birds were present. It can be due to meteorology, disturbance, pollution or other major population changes and may be of extreme importance for conservation purposes. |
Click Validate when done.
Entering records
Enter observations as if in a list in the field.
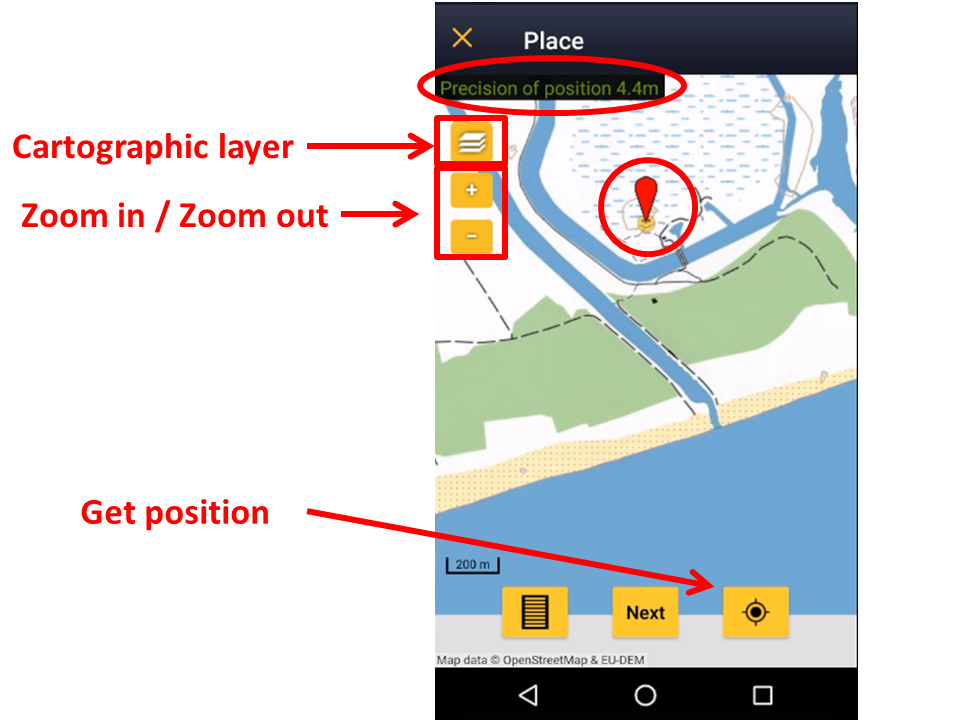
Place
It opens a map with your position (yellow smiley in the image below). Place the red marker where the individual, or group of individuals, are observed. If you have other observations that you would like to report, pause the ongoing protocol (pause icon on top bar, see image) and enter data as you are used to (all the options as explained in the wiki Mobile interface> Naturalist for Android > Submitting records).

1. Pause
2. Observation
3. Observer
4. Hide / unhide summary
After entering the first record, activate/deactivate (active when orange, inactive when yellow) the summary icon to see species name and associated information from already entered records (see image below). Click on the notebook icon at the bottom to see a list of all records on the ongoing protocol. Know more about the summary of species in a map at wiki section Mobile interface > Navigating the map > Understanding a summary of observations.

To see how to navigate the map, see wiki section Navigating the map.
|
|
Species
Enter species 'by search' or using protocol shortcuts when available, as explained in wiki section Mobile interface > Entering records > Directly in the field > Step 2: Species.
See wiki section Mobile interface > Shortcuts to learn more about shortcuts and how to create them.
- Number of individuals
- Number of individuals
See Mobile interface > Entering records > Directly in the field > Number of individuals if necessary.
|
|
Plus
Enter additional information as if it where a list in the field.
See wiki section Mobile interface > Submitting records > Directly in the field > Step 4: Additional information on how to do it, if necessary.
When done, click Save. It will take you to the Place screen to continue entering observations.
Ending the list
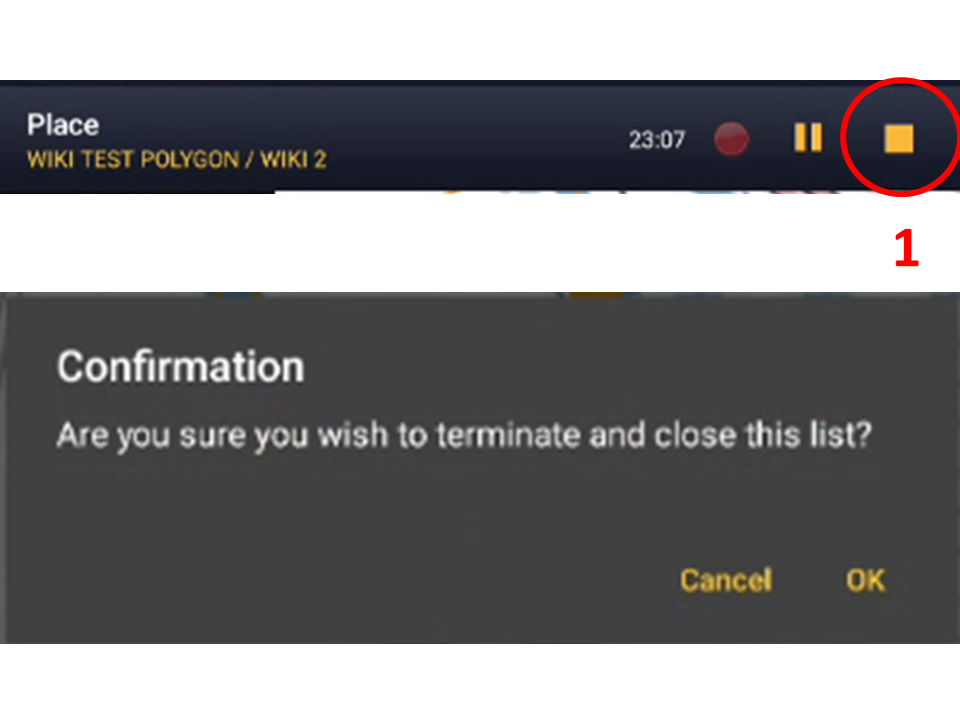
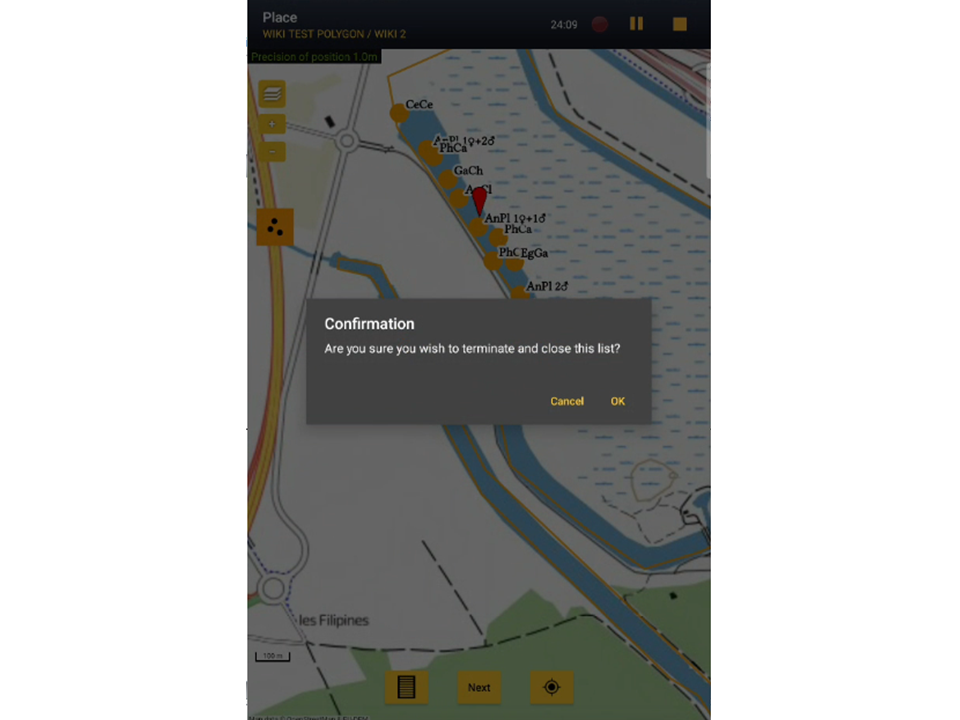
To finish the survey, click the stop icon at the top right corner of the Place screen (see image End the list). You will be prompted to confirm (see image Ending the list. Confirmation).


Adjust time, if necessary, and add or modify a comment. Finally, indicate which type of list you recorded (see image below).

Time: Adjust starting or ending time by clicking on the time button. See wiki section Mobile interface > Submitting records > Later > Date/Time to know how to modify the clock.
Comment: Add or modify a comment if necessary.
Which species list did you count?:
- Restricted list: You counted only the species of interest to the protocol (i.e. ducks).
- Extended list: You counted other water-related species besides those required by the protocol (i.e. ducks, herons and kingfishers).
- All species where reported (=complete list): You counted all species seen within the polygon (i.e. ducks, herons, kingfishers and passerines).
If the list took more than 30 minutes, you may be prompted to confirm before the list can be saved.
Remember to synchronise your data as soon as possible after entering to avoid loosing it.
Editing records and/or protocols
To edit records within a protocol, or to edit the protocol's general parameters, visit wiki section Mobile interface > Editing records > Editing protocols.
Deleting records and/or protocols
To delete records within a protocol, or to delete the whole protocol, visit wiki section Mobile interface > Editing records > Deleting protocols.
Browsing records
See your protocoled records:
- Before synchronisation
- In the phone. See more details in wiki section Accessing your own records.
- Before synchronisation
- After synchronisation
- In Mine. See more details in wiki section Accessing your own records.
- After synchronisation
- In Under verification (only if any data of the protocol needs more information)
- In Under verification (only if any data of the protocol needs more information)
- In the local portal. Go to the corresponding local portal, Menu > Explore > All my observations.
- In the local portal. Go to the corresponding local portal, Menu > Explore > All my observations.
Waterbird census
|
2 Waterbird census 2.1 Start of list 2.2 Entering records 2.3 Ending the list 2.4 Editing records and/or protocols 2.5 Deleting records and/or protocols 2.6 Browsing records |
Open the menu as for Submitting records and choose Waterbird census (see image below).
Choose the site you want to count at as explained in wiki section Mobile interface > Protocols > Enter data.
Start of list
Enter general information before starting the protocol (see image). Fields marked with an asterisk are mandatory. Fields available may differ from one country to another. All available fields for all countries are listed below.
- Comment
You may enter a comment if you find it appropiate.
- Important changes
Indicate if there have been major changes since your last visit.
- Additional observer
Indicate if you are accompanied by someone whose observations are also recorded.
- Ice
Indicate the percentatge of water surface that is frozen.
- Snow coverage
Indicate the proportion of snow cover.
- Count type
Tick roost count if you are counting roosting birds, or during day otherwise.
- Count method
Indicate if you are surveying from the ground, the air, the water, a different way, or if it is unknown.
- Optical equipment
Indicate which equipment you are using for the survey, if any. Note you can only choose one option.
- Coverage
Indicate how much of the designated polygon is covered in the survey.
- Water level
Indicate the water level.
- Visibility
Indicate the approximate distance within which it is possible to identify species.
- Waves
Indicate how are the waves.
- Conditions in general
Choose how are surveying conditions overall regarding weather and disturbances, and indicate on next section the reason if surveying conditions are not good.
- Reason(s) for moderate / bad conditions
If general conditions indicated above are noot good, click the yellow field to open an expandable menu and choose the reason (see image below). Only one option is possible: choose the one that better adjusts to reality.

- Count payed
Indicate if the count is payed for or not.
- Number of persons on shore
Enter number.
- Number of rowing boats
Enter number.
- Number of motor boats
Enter number
- Number of sailing boats
Enter number
- Number of canoes/kayaks
Enter number.
- Number of fishing boats
Enter number.
- Number of sports divers
Enter number.
- Number of surfers
Enter number.
- Additional observers
Indicate the name of other observers participating in the data collection.
- Important changes since last count?
Indicate if there has been any major change since your previous count, for example, some disturbance like noise or construction.
- Record the trace
Check if you want NaturaList to record your track. You will see a reminder to set your GPS on "High precision" and your power saving off for NaturaList. Go to Main menu > Preferences > Location > GPS mode > Continuous (high reactivity) to set the right GPS mode (see wiki section Mobile interface > Getting started > Preferences > Location > GPS Mode on how to do it).
Click OK to continue and check if you wish not to see the reminder again. Check Do not ask again and keep this choice for future entries if you want to set Record the trace as the default option (see image below). Click OK to continue without setting Record the trace as the default option.
- After synchronisation, visualise your track at the local portal by:
- Clicking on any species from the list as if for editing, and selecting Go to website > Edit Place tab. See image Example of records that belong to a list.
- Logging into the website and going to edit your own data. Click on any observation belonging to the list, and select the Edit place tab. See image Example of records that belong to a list.
- Clicking on any species from the list as if for editing, and selecting Go to website > Edit Place tab. See image Example of records that belong to a list.
- After synchronisation, visualise your track at the local portal by:
- Hide all records from the public
Check if you want to keep your records privately. This will not prevent administrators to see them and contact you if necessary, but other users of NaturaList will not see your records.
- No species were seen
Check if your survey did not provide any data. Surveys with no species are also important results! It will mean you followed the established methodology, and therefore your survey is valid, but no birds were present. They can indicate major population changes and are of extreme importance for conservation purposes.
|
Surveys with no species are also important results! Please submit them. It will mean you followed the established methodology but no birds were present. It can be due to methodology, disturbance, pollution or other major population changes and may be of extreme importance for conservation purposes. |
Click Validate when done.
Entering records
Enter observations as if in a list in the field.
Place
It opens a map with your polygon to survey (see image below). Place the red marker where the individual, or group of individuals, are observed.
Note only observations within the delimited polygon can be recorded. If you have other observations that you would like to report, pause the ongoing protocol (pause icon on top bar, see image) and enter data as you are used to (all the options as explained in the wiki Mobile interface> Naturalist for Android > Submitting records).
1. Pause
2. Observation
3. Observer
4. Hide / unhide summary
5. Polygon (notice the thin yellow line delimiting the polygon to survey)
After entering the first record, activate/deactivate (active when orange, inactive when yellow) the summary icon to see species name and associated information from already entered records (see image below). Click on the notebook icon at the bottom to see a list of all records on the ongoing protocol. Know more about the summary of species in a map at wiki section Mobile interface > Navigating the map > Understanding a summary of observations.
To see how to navigate the map, see wiki section Navigating the map.
|
|
Species
Enter species 'by search' or using protocol shortcuts when available, as explained in wiki section Mobile interface > Entering records > Directly in the field > Step 2: Species.
See wiki section Mobile interface > Shortcuts to learn more about shortcuts and how to create them.
- Number of individuals
- Number of individuals
See Mobile interface > Entering records > Directly in the field > Number of individuals if necessary.
|
|
Plus
Enter additional information as if it where a list in the field.
See wiki section Mobile interface > Submitting records > Directly in the field > Step 4: Additional information on how to do it, if necessary.
When done, click Save. It will take you to the Place screen to continue entering observations.
Ending the list
To finish the survey, click the stop icon at the top right corner of the Place screen (see image End the list). You will be prompted to confirm (see image Ending the list. Confirmation).
Adjust time, if necessary, and add or modify a comment. Finally, indicate which type of list you recorded (see image below).
Time: Adjust starting or ending time by clicking on the time button. See wiki section Mobile interface > Submitting records > Later > Date/Time to know how to modify the clock.
Comment: Add or modify a comment if necessary.
Which species list did you count?:
- Restricted list: You counted only the species of interest to the protocol (i.e. ducks).
- Extended list: You counted other water-related species besides those required by the protocol (i.e. ducks, herons and kingfishers).
- All species where reported (=complete list): You counted all species seen within the polygon (i.e. ducks, herons, kingfishers and passerines).
If the list took more than 30 minutes, you may be prompted to confirm before the list can be saved.
Remember to synchronise your data as soon as possible after entering to avoid loosing it.
Editing records and/or protocols
To edit records within a protocol, or to edit the protocol's general parameters, visit wiki section Mobile interface > Editing records > Editing protocols.
Deleting records and/or protocols
To delete records within a protocol, or to delete the whole protocol, visit wiki section Mobile interface > Editing records > Deleting protocols.
Browsing records
See your protocoled records:
- Before synchronisation
- In the phone. See more details in wiki section Accesssing records' details.
- Before synchronisation
- After synchronisation
- In Mine. See more details in wiki section Accesssing records' details.
- After synchronisation
- In Under verification (only if any data of the protocol needs more information)
- In Under verification (only if any data of the protocol needs more information)
- In the local portal. Go to the corresponding local portal, Menu > Explore > All my observations.
- In the local portal. Go to the corresponding local portal, Menu > Explore > All my observations.
[Top to Protocols]
[Top to Waterbird census]
Private territory mapping
|
3 Private territory mapping 3.1 Start of list 3.2 Entering records 3.3 Ending the list 3.4 Editing records and/or protocols 3.5 Deleting records and/or protocols 3.6 Browsing records |
Open the menu as for Submitting records and choose Private territory mapping (see image below).

Choose the site you want to count at as explained in wiki section Mobile interface > Protocols > Enter data.
Start of list
Enter general information before starting the count.

- Comments
Enter any comment if necessary.
- Record the trace
Check if you want to record the trace. See wiki section Mobile interface > Protocols > Enter data > Start of list > record the trace for more information.
- Hide all records from the public
Check to keep your observations private. Note even if other users cannot see your records, aministrators will still see them and may contact you regarding your observations.
Click Next when done.
Entering records
Screen layout will automatically become horizontal if using a tablet, which the map section on the right, and the species section on the left (see image below).
Enter observations as if in a list in the field.
Place

- 1. Enlarge: click to enlarge image. I will hide/unhide general information about your phone on the top line.
- 2. Unlock: click on lock icon to unlock screen and be able to enter species. The screens locks automatically to prevent entering unreal data while in the field.
- 1. Enlarge: click to enlarge image. I will hide/unhide general information about your phone on the top line.
See wiki section Mobile interface > Protocols > Enter data > Entering observations > Place to read and interpret the map.
Species

- 3. Shortcuts: Use shortcuts if available or create new ones to ease entering species.
- 3. Shortcuts: Use shortcuts if available or create new ones to ease entering species.
See wiki section Mobile interface > Protocols > Enter data > Entering observations > Species to enter the species name.
Additional information
Enter number of individuals and atlas code.

- 4. Species: Registered species.
- 4. Species: Registered species.
- 5. Edit: Click to go to previous screen and change species name.
- 5. Edit: Click to go to previous screen and change species name.
- 6. Counter: Type number of individuls or use quick keys to add or substract individuals. See wiki section ... to know how to use a counter, if necessary.
- 6. Counter: Type number of individuls or use quick keys to add or substract individuals. See wiki section ... to know how to use a counter, if necessary.
- 7. Atlas code: Click on an icon to indicate the main behaviour for individuals registered in this entry.
- 7. Atlas code: Click on an icon to indicate the main behaviour for individuals registered in this entry.

 |
Singing, drumming or displaying male present in breeding season in possible nesting habitat. |
 |
Unidentified individual in breeding season in possible nesting habitat. |
 |
Male in breeding season in possible nesting habitat. |
 |
Female in breeding season in possible nesting habitat. |
 |
Pair observed in suitable nesting habitat in breeding season. |
 |
Agitated behaviour or anxiety calls from adults, indicating a nest or young nearby. |
 |
Recently fledged young (nidicolous species) or downy young (nidifugous species) observed. |
 |
Nest-building or excavating of nest-hole observed. |
 |
Adult carrying faecal sac or food. |
 |
Nest containing eggs or youngs. |
 | No atlas code. |
Ending the list
To finish the survey, click the stop icon at the top right corner of the Place screen (see image End the list). You will be prompted to confirm (see image Ending the list. Confirmation).
Fill in details:
- 1. Time: Adjust starting or ending time by clicking on the time button. See wiki section Mobile interface > Submitting records > Later > Date/Time to know how to modify the clock.
- 2. Comment: Add or modify a comment if necessary.
- 3. Which species list did you count?:
- I recorded all species of the programme: You counted only the species of interest to the protocol, but you counted them all.
- All species where reported (=complete list): You counted all species seen within the polygon.
Remember to synchronise your data as soon as possible after entering to avoid loosing it.
Editing records and/or protocols
To edit records within a protocol, or to edit the protocol's general parameters, visit wiki section Mobile interface > Editing records > Editing protocols.
Deleting records and/or protocols
To delete records within a protocol, or to delete the whole protocol, visit wiki section Mobile interface > Editing records > Deleting protocols.
Browsing records
See your protocoled records:
- Before synchronisation
- In the phone. See more details in wiki section Accessing your own records.
- Before synchronisation
- After synchronisation
- In Mine. See more details in wiki section Accesssing records' details.
- After synchronisation
- In Under verification (only if any data of the protocol needs more information)
- In Under verification (only if any data of the protocol needs more information)
- In the local portal. Go to the corresponding local portal, Menu > Explore > All my observations.
- In the local portal. Go to the corresponding local portal, Menu > Explore > All my observations.
[Top to Protocols]
[Top to Private territory mapping]
Point count
|
4 Point count 4.1 Start of list 4.2 Entering records 4.3 Ending the list 4.4 Editing records and/or protocols 4.5 Deleting records and/or protocols 4.6 Browsing records |
Open the menu as for Submitting records and choose Private territory mapping (see image below).
Choose the site you want to count at as explained in wiki section Mobile interface > Protocols > Enter data.
Start of list
Enter general information before starting the count.
- Comments
Enter any comment if necessary.
- Record the trace
Check if you want to record the trace. See wiki section Mobile interface > Protocols > Enter data > Start of list > record the trace for more information.
- Hide all records from the public
Check to keep your observations private. Note even if other users cannot see your records, aministrators will still see them and may contact you regarding your observations.
- No species were seen (next step skipped)
Check if your survey did not provide any record. You will directly access Ending the list.
|
Surveys with no species are also important results! Please submit them. It will mean you followed the established methodology but no birds were present. It can be due to methodology, disturbance, pollution or other major population changes and may be of extreme importance for conservation purposes. |
Click Next when done.
Entering records
Enter observations as if in a list in the field.
- Place
See wiki section Mobile interface > Protocols > Enter data > Entering observations > Place on how to interpret the map and place your observation.
- Species
See wiki section Mobile interface > Protocols > Enter data > Entering observations > Species on how to enter the species name. Use shortcuts if necessary.
- Plus
Enter additional information as if it where a list in the field.
See wiki section Mobile interface > Submitting records > Directly in the field > Step 4: Additional information on how to do it, if necessary.
When done, click Save. It will take you to the Place screen to continue entering observations.
Ending the list
To finish the survey, click the stop icon at the top right corner of the Place screen (see image End the list). You will be prompted to confirm (see image Ending the list. Confirmation).
Fill in details:
- 1. Time: Adjust starting or ending time by clicking on the time button. See wiki section Mobile interface > Submitting records > Later > Date/Time to know how to modify the clock.
- 2. Additional observers: Indicate if someone else have taken part on teh count.
- 3. Conditions in general: Indicate how where the general conditions when surveying.
- 4. Important changes since last count: Indicate if there have been some remarkable changes from your previous survey.
- 5. Comment: Add or modify a comment if necessary.
- 6. Which species list did you count?:
- I recorded all species of the programme: You counted only the species of interest to the protocol, but you counted them all.
- All species where reported (=complete list): You counted all species seen from the point.
- I recorded all species of the programme: You counted only the species of interest to the protocol, but you counted them all.
Remember to synchronise your data as soon as possible after entering to avoid loosing it.
Editing records and/or protocols
To edit records within a protocol, or to edit the protocol's general parameters, visit wiki section Mobile interface > Editing records > Editing protocols.
Deleting records and/or protocols
To delete records within a protocol, or to delete the whole protocol, visit wiki section Mobile interface > Editing records > Deleting protocols.
Browsing records
See your protocoled records:
- Before synchronisation
- In the phone. See more details in wiki section Accessing your own records.
- Before synchronisation
- After synchronisation
- In Mine. See more details in wiki section Accesssing records' details.
- After synchronisation
- In Under verification (only if any data of the protocol needs more information)
- In Under verification (only if any data of the protocol needs more information)
- In the local portal. Go to the corresponding local portal, Menu > Explore > All my observations.
- In the local portal. Go to the corresponding local portal, Menu > Explore > All my observations.