Lettore audio
Ogni volta che una registrazione sonora viene allegato a un dato, a questo viene associato un sonogramma. È possibile
- ascoltare l'intera registrazione,
- selezionare una parte della registrazione da ascoltare,
- verificare la registrazione, se si è un validatore.
Accesso alle registrazioni
- sfogliando le registrazioni degli ultimi avvistamenti nella colonna di destra della pagina iniziale,
- sfogliando le registrazioni degli ultimi 5/15 giorni nella colonna di sinistra della pagina iniziale,
- ascoltando le proprie registrazioni in “Tutte le mie osservazioni”,
- utilizzando il motore di ricerca,
- nella Galleria,
- sul pannello di verifica (disponibile solo per i validatori).
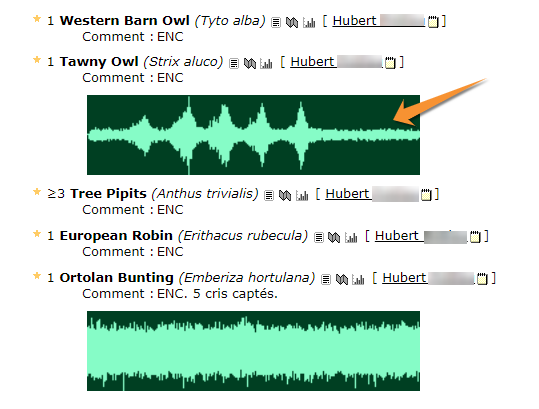
Toccare con il mouse un sonogramma (guarda l’immagine
qui sotto) per aprire lo strumento del riproduttore audio (vedere l'immagine Lettore audio vista generale). Se il file è vostro, vi verranno fornite ulteriori opzioni (vedi immagine Vista generale del lettore audio. File proprio).

Selezionare un sonogramma
Utilizzare il pulsante grigio di riproduzione per riprodurre l'intero sonogramma, oppure
creare una nuova finestra di riproduzione per riprodurre una parte selezionata del sonogramma (per ulteriori informazioni, vedere la sezione 8. Nuova finestra di riproduzione).
- 1. Selezionare il file
Tutti i file allegati alla registrazione (immagini e suoni). Selezionarne uno per visualizzarlo di seguito. Si noti la cornice gialla sul file attivo.

Vista generale del lettore audio. File proprio.
1. Selezionare il file
2. Nascondere/Non nascondere
3. Cancellare il file
4. Scaricare
5. Preferiti
- 2. Nascondere/Non nascondere
Fare clic per nascondere/non nascondere il file audio al pubblico. È possibile solo con i propri record. Se si visualizzano le registrazioni di qualcun altro, l'icona non sarà visibile.
- 3. Elimina file
Fare clic per eliminare il file. È possibile cancellare solo i propri file. Se si stanno consultando i documenti di altri, l'icona non viene visualizzata.
- 4. Scaricare
Fare clic per scaricare il sonogramma. È possibile scaricare solo i propri dati. Se si sta consultando la documentazione di qualcun altro, l'icona non viene visualizzata.
- 5. Preferiti
Fare clic per salvare il file audio tra i preferiti. Quando il segno di spunta è verde, la registrazione è salvata. Fare clic su un segno di spunta verde per rimuovere il file audio dai preferiti. Vedere i suoni e le immagini preferiti nella Galleria. Questa funzione è disponibile per tutti gli utenti registrati.

Vista generale del lettore audio.
6. Sonogramma completo.
7. Area dettagliata del sonogramma.
8. Nuova finestra di riproduzione.
A. Passa al file precedente.
B. Passa al file successivo.
C. Vedere il record associato.
6. Sonogramma completo.
Viene rappresentata l'intera lunghezza del sonogramma. Un rettangolo giallo indica quale parte di esso è attualmente rappresentata nell'area del sonogramma dettagliato (numero 7 nell'immagine Vista generale del lettore audio). Per impostazione predefinita, si tratta di 10 secondi.

Sonogramma completo.
9. Forma d'onda attiva
10. Ridimensionamento
11. Spostare
12. Guida al suono
- 9. Forma d'onda attiva
La forma d'onda attiva è evidenziata in blu, altrimenti è grigia.
- 10. Ridimensionamento
Utilizzare le frecce blu laterali per ingrandire o ridurre le dimensioni dell'area selezionata. L'immagine nell'area dettagliata del sonogramma (numero 7 nell'immagine Vista generale del lettore audio) si modifica di conseguenza.
- 11. Spostare
Utilizzare le frecce blu in basso per spostare l'area selezionata da visualizzare in dettaglio (7) lungo il sonogramma. L'immagine dell'area dettagliata dell'ecografia cambia di conseguenza.
NOTE
Blue icons Resize and Move refer to the full sonogram detail display (7).
Red icons Resize and Move refer to the active sonogram area (see Detailed sonogram area and New playback window below for details).
- 12. Sound guide
Red line indicating which part of the recording is playing. It moves along the sonogram as the playing progresses. See a similar line also appears in the detailed sonogram area below (number 7 in image Sound player general view) indicating which part is sounding. Move it along the sonogram with your mouse to start playing from a different point on the recording.
7. Detailed sonogram area
It is a representation of the highlighted area in the full sonogram (number 6 in image Sound player general view). The red line indicates which bit of it is playing and it moves along the recording as it plays.

Detailed sonogram.
13. Play/Pause
14. Continuous playing
15. New playback window
16. Clear all playback windows
- 13. Play/Pause (full sonogram)
Click Play/Stop button to start playing or stop it when needed. This function applies to the full sonogram.
- 14. Continuous playing
By default it is set on continuous playing (black icon). Click on the icon to play the recording only once (grey icon).
NOTE
Icons Play/Pause and Continuous playing apply to the full sonogram.
Red icons Play/Stop and Delete apply to the new playback window. See New playback window below for details.
8. New playback window
Click on New playback window to select part of the sonogram (see image below). This allows to focus on special frequencies when there is noise. Click more than once to create several boxes. Close all windows by clicking on Clear all playback windows.
NOTE: for the moment, the New playback window automatically disapear if you leave the webpage or choose another sound to play.

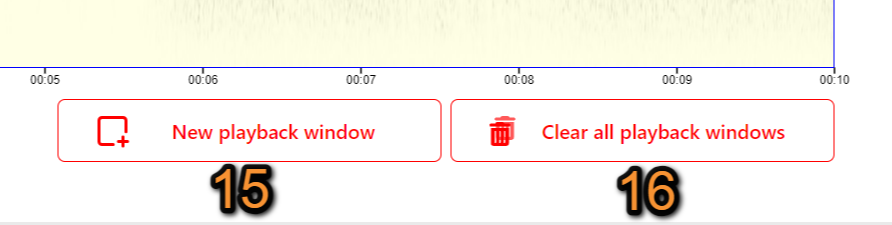
Open/close playback windows.
15. New playback window: Open a new playback window.
16. Close all playback windows: Close all playback windows. To close only one window use the bustbin icon (see number 20 in image Media:New playback window.png).
Clicking on New playback window will immediately show a new red framed box on the detailed sonogram area (see image below). Note the the full sonogram at the top (number 6 in image Sound player general view) also contains the red boxes.

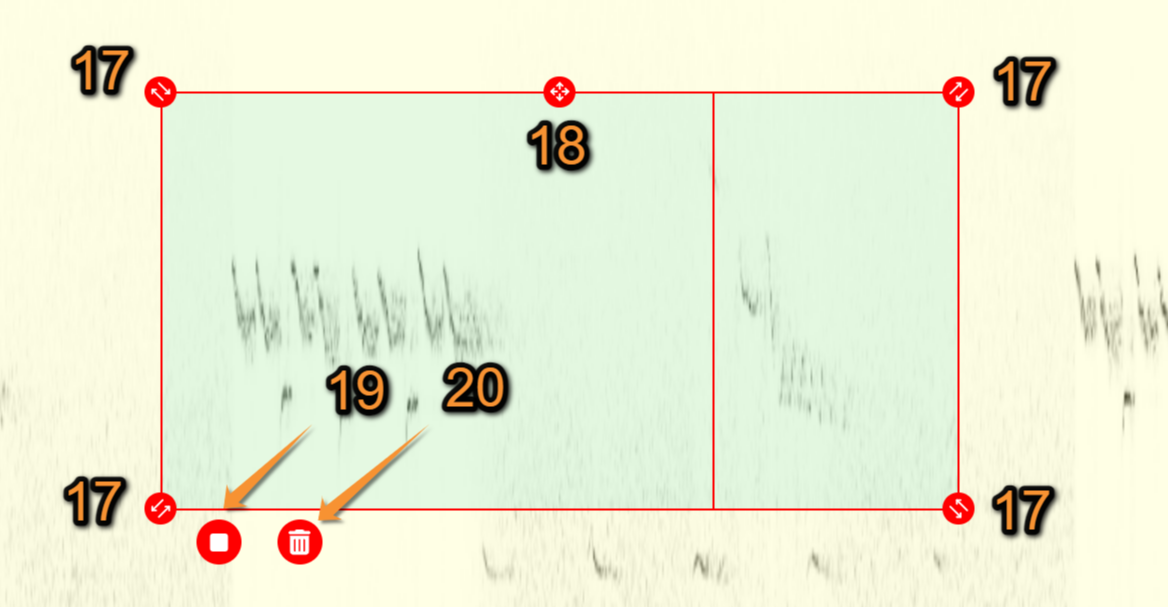
New playback window.
17. Resize
18. Move
19. Play/Stop
20. Delete
- 17. Resize
Use red arrows on corners to enlarge or decrease the area you want to play. It works both up and down and to the sides, allowing selecting sounds higher or lower in the diagram or further to right or left. It is possible to adjust the red box also while the recording is playing.
- 18. Move
Use red arrow at the middle top to move the red box to a different part of the detailed sonogram area. It is possible to move the red box also while the recording is playing.
NOTE
Blue icons Resize and Move refer to the full sonogram.
Red icons Resize and Move refer to the active Detailed sonogram area and New playback window.
- 19. Play/Stop (selected part)
Play/Stop the sound within the red box. Note when playing the recording through the red button, it will only reproduce the sounds represented within this box. If there are more than one box, you can decide which one to play. To play all sounds in the sonogram, use the general play button (number 8 in image Sound player general view).
- 20. Delete
Delete red box. No area will be selected when there is no red box in the detailed sonogram area and the recording will play in full. This button will only remove the red box it applies to. All other red boxes will remain on the detailed sonogram area. To remove all boxes at once, use the Unselect button (number 11 on image Sound player general view).
NOTE
Icons Play/Pause and Continuous playing apply to the full sonogram.
Red icons Play/Stop and Delete apply to the new playback window. See New playback window for details.
Nota: le immagini e gli esempi sono tratti dal portale francese Faune-France. Il design e la posizione di alcuni strumenti possono variare leggermente da portale a portale. Per consultare l'elenco dei portali, consultare la sezione del wiki Portali e partner locali. |