Exporting your data
-
TO EXPORT
- Browse your data
- Select a template (or create a new one)
- Choose a format
- Wait until the file is ready (Green)
- Click on the file name to download
From different places of the Local Website you can browse your data, and/or export your own in different formats (see section Available formats).
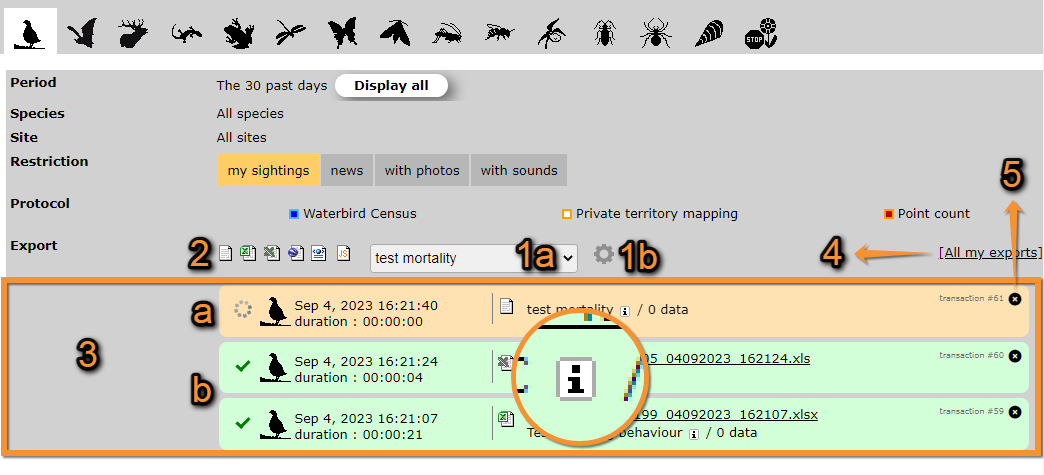
We take the example below from Explore > All my observations, the past 30 days (see image below).
- 1. Templates
Select a template from the expandable menu (1a) or create a new template (1b).
- 2. Formats
Select a format to download your data. Place the mouse pointer on the format icons to see which extension corresponds to each icon. Be aware the file will be generated immediately in the default template if no other have been selected.
- 3. Files
List of files ready to download (in green, 3b), and those being created (in orange, 3a). Wait for a file to be created and download by clicking on its name when ready (in green, 3b). Place the mouse pointer on the "i" icon when the file is ready in order to see the characteristics for each format type.
-
The export continues to be processed even if you leave the page or shut down your computer!
Big exports take time to generate.
- 4. All your exports
List of all files created to export by the current user.
- 5. Delete
Delete any file by clicking on the "X" on the top right corner of the file area.
Available formats
Data is available to download in different formats. See in the table below the differences between the formats.
| Name | Description | |
|---|---|---|
|
|
Tab separated plain text(.txt) | Data stored as a text, with columns separated by spaces. It can be opened with Microsoft Notepad, WordPad and TextEdit. |
|
|
MS Excel file (.xlsx) | Spreadsheets. It can be opened with Microsoft Excel. |
|
|
Google Earth (.KML) | Geo-referenced information that can be displayed in maps. It can be opened with GoogleEarth, but also with other GIS software. |
|
|
eXtensible Markup Language (.XML) | Data encrypted to be transferred between two computers through the web. It is used for the API. |
|
|
JavaScript Object Notation (.JSON) | Data encrypted to be transferred between two computers through the web. It is used for the API. |
Templates
Clicking on the expandable menu, choose an already made template (a) or create a new one (b) -See image below.

Templates.
a Choose an existing template.
b Create a new template.
Available templates differ from country to country, are created by local administrators and can be modified by users with rights. The following templates exist in all sites and cannot be modified. Note some templates are only available for certain users, like administrators, and registered users without special rights will not see them in their menus.
| Name | Distribution | Description |
|---|---|---|
| BASIC | Public | It does not include personal information, like observers' names and e-mail addresses. |
| BASIC+ | Administrators | It includes observers' names and e-mail addresses. Only available for administrators. |
| OLD_BASIC+ | Public | Template on the old website. It includes personal information but users can only download own data. |
| Wetlands+ | Private | Special template only for Wetlands program. |
To choose form a Template you have previously created, click on the templates wheel and choose from the list (see image below). Use arrows under titles to alternate between ascending and descending order (see this image as an example).
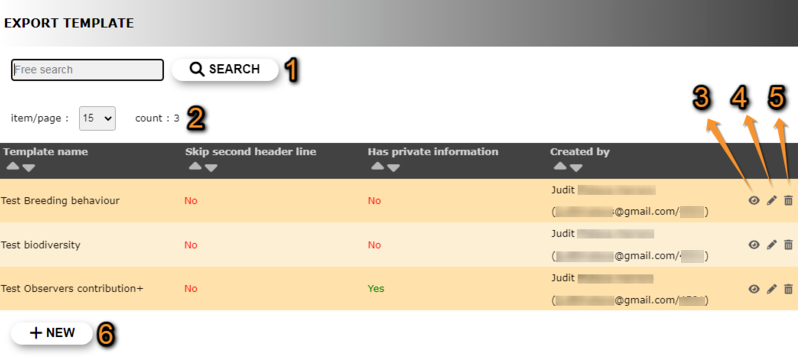
Exporting data. Templates list.
Template name: Name given to the template.
Skip second header line: Indicates if the template will have one or two headers. See sub-section Create a new template > 2. Skip second header line for more details.
Has private information: Indicates if it includes information about observers, like names, ID or e-mail addresses.
Created by: Name and email address of the creator.
1. Search
2. Number and Items
3. Details
4. Edit
5. Delete
6. New
- 1. Search
Enter the beginning or full name of the export mode you are seeking and click SEARCH. When a filter is applied, click on DISPLAY ALL to see the full list.
- 2. Number and Items
Select page number and/or number of items per page.
- 3. Details
Click to see details of selected template.
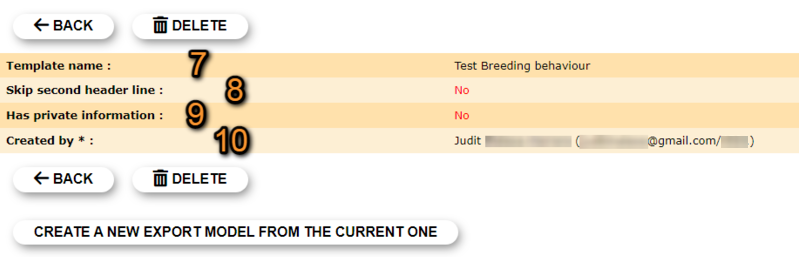
Details of a template.
BACK: Return to previous page.
DELETE: Delete the selected template.
CREATE A NEW EXPORT MODEL FROM THE CURRENT ONE: Modify the template to create a new one. See section New template from an existing one below for more information.
7. Template name: Name given to the selected template.
8. Skip second header line: Indicates if the template will have one or two headers. See sub-section Create a new template > 2. Skip second header line for details.
9. Has private information: Indicates if the template contains name, email address or observer's ID.
10. Created by: Name and email address of creator.
- 4. Edit
Modify details of selected template.
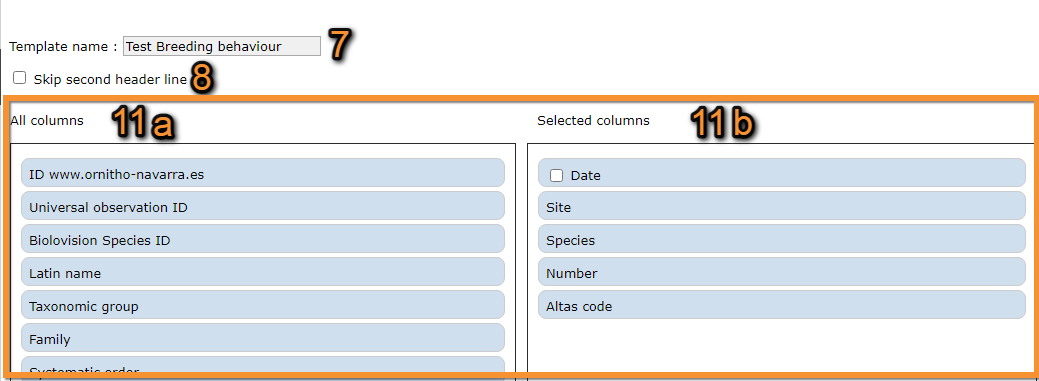
Editing a template.
7. Template name: Modify template name if necessary by typing on it.
8. Skip second header line: Check/uncheck depending on your preferences. See sub-section Create a new template > 2. Skip second header line for details.
11. Modify template fields: Left-click and drag field from one column to another (11a All available fields; 11b Current field in the template). Orange fields contain multiple possibilities while blue ones only contain one. Fields with clickable cells on them can be broken down into smaller fields or contain different formats (see table under New template from scratch for details).
At the bottom of the page,
- click CANCEL to go to previous screen without modifying the template, or
- click SAVE to save changes.
- click CANCEL to go to previous screen without modifying the template, or
- 5. Delete
Click on the bin to delete the template. Note it will be deleted immediately and irreversibly without asking for confirmation.
- 6. NEW
Create a new template. See section New template from scratch below for details.
[Top to Templates]
[Back to Exporting your data]
Create a new template
It is possible to create a new template. This will allow you to download only the data you are interested in. To create a new template, start from scratch or modify an existing one.
New template from an existing one
To create a template starting from an existing one,
- 1. click on the templates wheel (see image Templates, b)
- 2. select the existing template you want to work from and click on Details (see image Exporting data. Templates list, 3)
- 3. click CREATE A NEW EXPORT MODEL FROM THE CURRENT ONE at the bottom of the page (see image Details of a template). Fields on the right (4) are displayed in the original template, while on the left (3) are all other available ones.

Creating a new template from an existing one.
1. Template name
2. Distribution
3. Skip second header line
4. All columns
5. Selected columns
- 1. Template name
Type a name for the template.
- 2. Distribution
Select from the expandable menu who will see the new template:
· Public: All users can see and use this template.
· Private: Template only available for its creator. Administrators can always see it.
· Between admins: template only available for administrators.
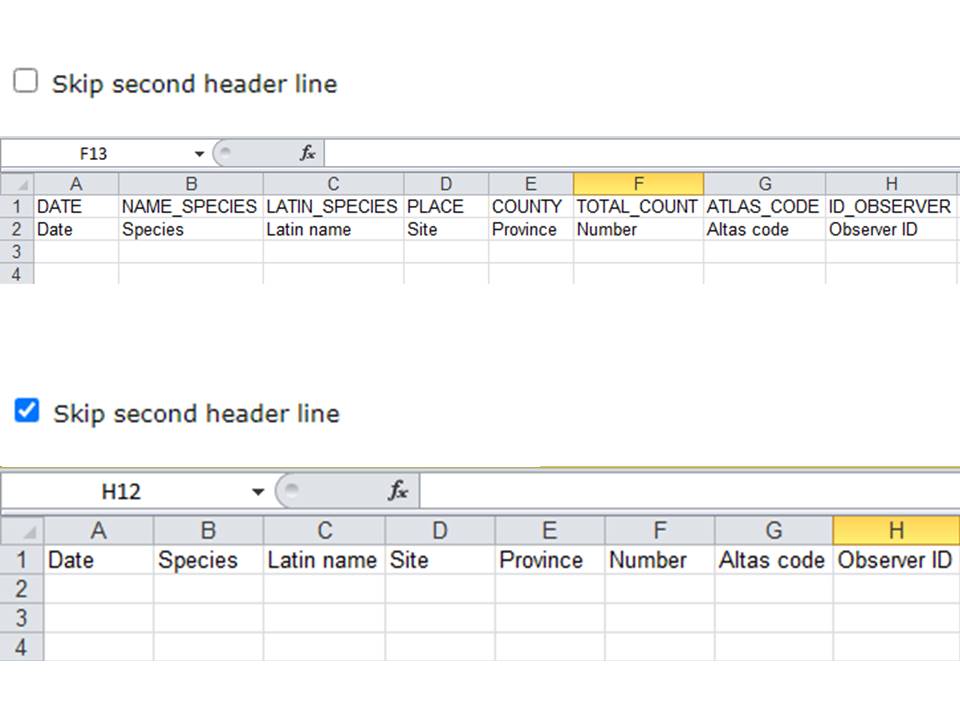
- 3. Skip second header line
By default, fields contain two headers: a regular one which is easy to visualise, and a second one to facilitate reading by certain programs when imported. Check to skip the second header line. See here examples with two headers (top), and one (bottom).
- 4. All columns
List of all fields available. Note available fields depend on the local portal you are using.
Click a field you would like to add in your protocol and drag it from the left-hand column to the right-hand column.
- 5. Selected columns
List of columns in the current template. To remove any, click on the field and drag it to the left-hand column. Orange fields contain multiple possibilities while blue ones only contain one. Some fields can be broken down into smaller fields or show different formats when indicated (see table under New template from scratch for details).
When done, at the bottom of the page,
- click CANCEL to go to previous screen without modifying the template, or
- click SAVE to save changes.
- click CANCEL to go to previous screen without modifying the template, or
[Top to New template from an existing one]
[Top to Create a new template]
[Top to Templates]
[Back to Exporting your data]
New template from scratch
To create a template starting from scratch,
- 1. click on the templates wheel (see image Templates, b).
- 2. click NEW (see image Exporting data. Templates list, 6).

Creating a new template from scratch.
1. Template name
2. Distribution
3. Skip second header line
4. All columns
5. Selected columns
- 1. Template name
Type a name for the template.
- 2. Distribution
Select from the expandable menu who will see the new template:
· Public: All users can see and use this template.
· Private: Template only available for its creator. Administrators can always see it.
· Between admins: template only available for administrators.
- 3. Skip second header line
By default, fields contain two headers: a regular one which is easy to visualise, and a second one to facilitate reading by certain programs when imported. Check to skip the second header line. See here examples with two headers (top), and one (bottom).
- 4. All columns
List of all fields available. Note available fields will depen on the local portal you are using.
Click a field you would like to have in your protocol and drag it from the left-hand column (3) to the right-hand column (4).
- 5. Selected columns
List of columns in the current template. To remove any, click on the field and drag it back to the left-hand column. Orange fields contain multiple possibilities while blue ones only contain one. Some fields can be broken down into smaller ones or contain different formats when checked. Expand the table below to see details for available fields.
| Available fields to export | ||||||||||
|---|---|---|---|---|---|---|---|---|---|---|
| Field | Dynamic1 | Sortable2 | Description | Example | ||||||
| Accuracy of location | NO | NO | ... | - | ||||||
| Accuracy of location ID | NO | NO | ... | - | ||||||
| Altitude | NO | NO | Altitude at which the altitude occurred. It refers to the altitude associated to the location unless corrected. |
- | ||||||
| Anonymous | NO | NO | Indicates if the observer is known. YES indicates the observer is anonymous; NO indicates the observer is known. |
- | ||||||
| Anonymous transmitter | NO | NO | Indicates if the reporter is known. YES indicates the reporter is anonymous; NO indicates the reporter is known. |
- | ||||||
| Asian predatory wasp data | YES | NO | ... | - | ||||||
| Atlas code | NO | NO | Atlas code according to the local portal you are entering data to. See code correspondence at Breeding evidence matching. |
- | ||||||
| Atmospheric pressure | NO | NO | Only available in Migration.net | - | ||||||
| Bearded vulture data | YES | NO | ... | - | ||||||
| Behaviour | YES | NO | Indicates the behaviour of the individual, if recorded. | - | ||||||
| Biolovision species ID | NO | NO | Number assigned automatically to indicate species number in Biolovision systems. | - | ||||||
| Census information | YES | NO | ... | - | ||||||
| Clarification of the observation | NO | NO | ... | - | ||||||
| Clarification of the observation ID | NO | NO | ... | - | ||||||
| Cloud coverage altitude level 1 | NO | NO | Only available in Migration.net | - | ||||||
| Cloud coverage amount (2nd level) | NO | NO | Only available in Migration.net | - | ||||||
| Cloud coverage level 1 | NO | NO | Only available in Migration.net | - | ||||||
| Cloud coverage type level 1 | NO | NO | Only available in Migration.net | - | ||||||
| Colony data | YES | NO | Indicates if the record contains any colony data. YES if the record contains colony data; NO otherwise. |
- | ||||||
| Comment | NO | NO | Comment about the observation left by the reporter, if any. | - | ||||||
| Comment of the list | NO | NO | Comment about the list left by the reporter, if any. | - | ||||||
| Complete list? | NO | NO | Indicates if the list the observation belongs to was complete. YES when it belongs to a complete list, NO otherwise. |
- | ||||||
| Confirmed by | NO | NO | ... | - | ||||||
| Contains colony information | NO | NO | Indicates if the record contains any colony information. YES if the record contains colony data; NO otherwise. |
- | ||||||
| Contains extended colony information | NO | NO | Indicates if the record contains any extended colony information. YES if the record contains colony data; NO otherwise. |
- | ||||||
| Contains media | NO | NO | Indicates if the record includes media information (sound or image files). YES when it contains any file; NO otherwise. |
- | ||||||
| Contains rarity committee data | NO | NO | ... | - | ||||||
| Contains stranding information | NO | NO | ... | - | ||||||
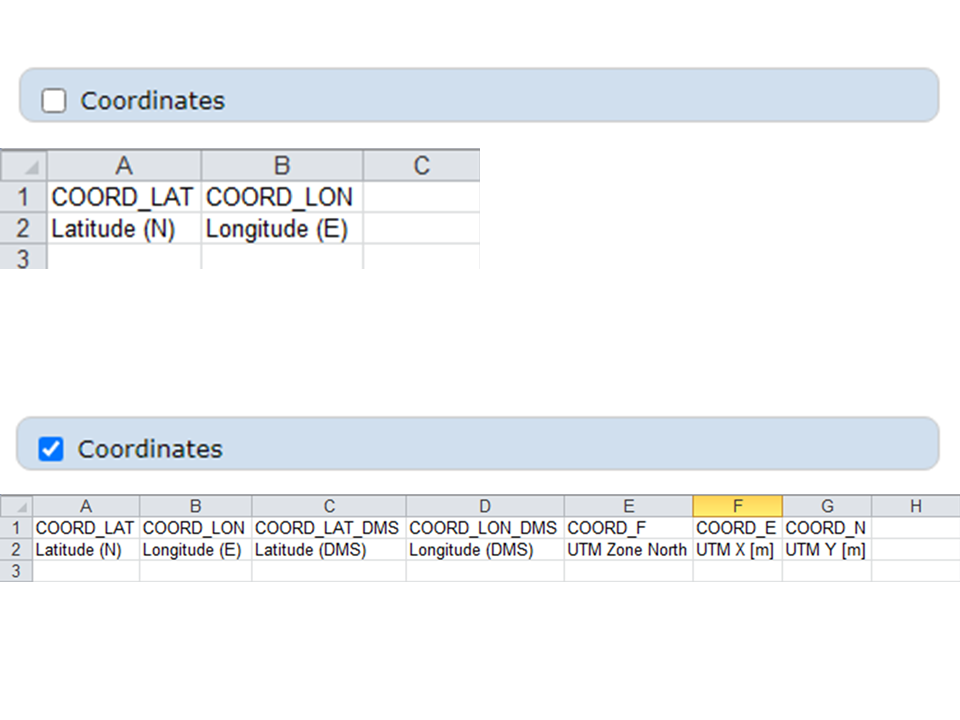
| Coordinates | NO | YES | Latitud (N) and Longitud (E) by default Latitud (N), Longitud (E), DMS and UTM |
Example | ||||||
| Country | NO | NO | Country the observation refers to. Refers to the geographical area the local portal covers. |
- | ||||||
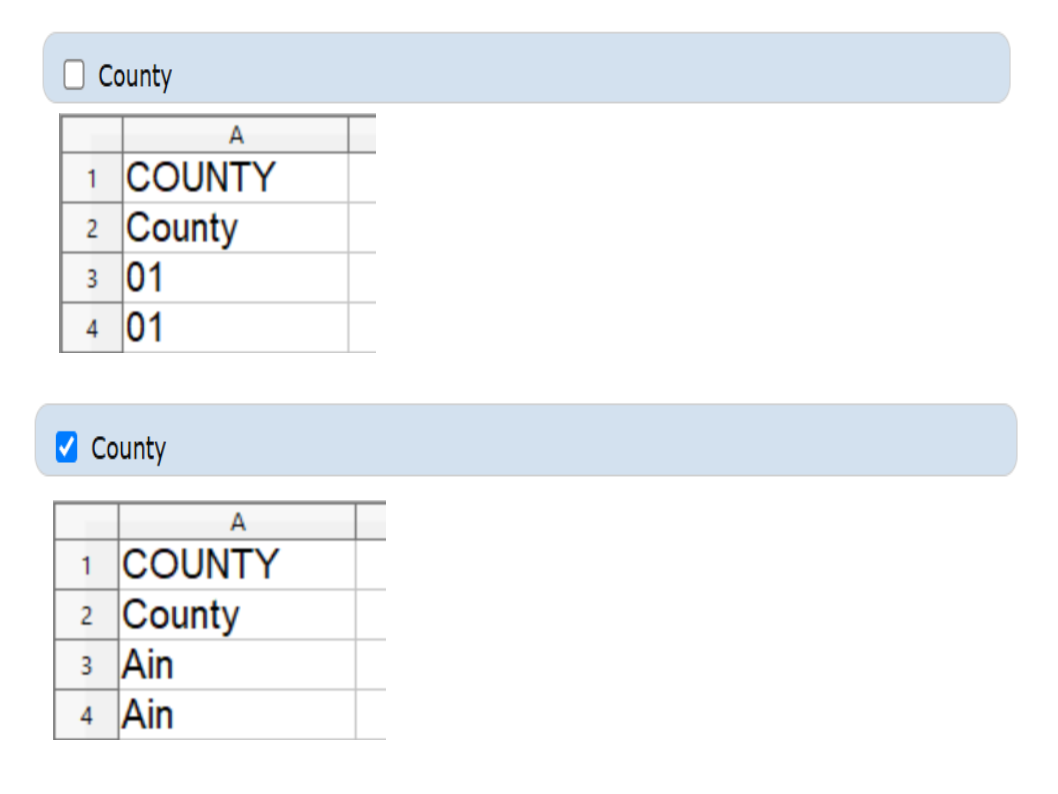
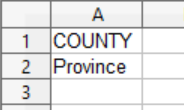
| County | NO | YES | County number ID by default County full name |
Example | ||||||
| Cumulonimbus | NO | NO | Only available in Migration.net | - | ||||||
| Cumulus | NO | NO | Only available in Migration.net | - | ||||||
| Data about protocol | YES | NO | ... | - | ||||||
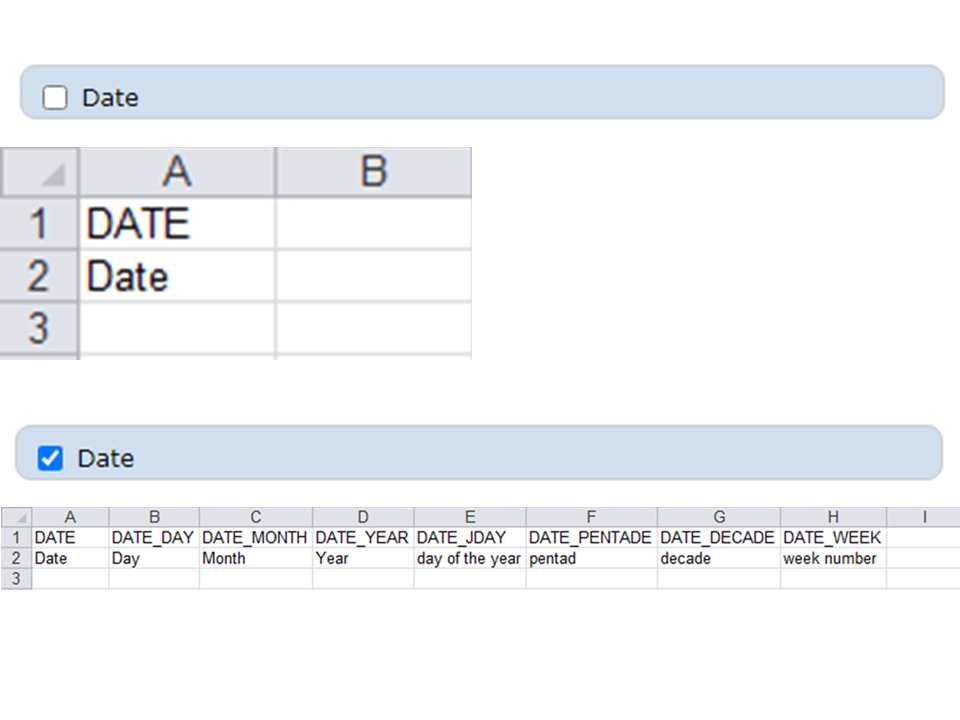
| Date | NO | YES | DD-month-YY by default Separated day, month and year, Julian day, pentad, decade and week number |
Example | ||||||
| Detail about offspring | YES | NO | Includes details about offspring. If YES the record includes information about offspring; if NO, it does not. |
- | ||||||
| Detail data (splitted) | YES | NO | ... | - | ||||||
| Details | NO | NO | ... | - | ||||||
| Determinator | NO | NO | ... | - | ||||||
| Determinator (comment) | NO | NO | ... | - | ||||||
| NO | NO | Observer's e-mail. | - | |||||||
| Estimation | NO | NO | Count precision of the observation. | - | ||||||
| Export authorization | NO | YES | ... | - | ||||||
| Family | NO | NO | Family the observation belongs to. | - | ||||||
| Family name | NO | NO | Family name of observer. | - | ||||||
| First name | NO | NO | First name of observer. | - | ||||||
| Grid cell | NO | NO | Grid cell the observation took place at. | - | ||||||
| Ground wind direction | NO | NO | Only available in Migration.net | - | ||||||
| Ground wind strength | NO | NO | Only available in Migration.net | - | ||||||
| Habitat | NO | NO | Only available in Migration.net | - | ||||||
| Hidden | NO | NO | Indicates if the data is private or public. YES when the record is private; NO when it is public. |
- | ||||||
| Hygrometry | NO | NO | Only available in Migration.net | - | ||||||
| ID ornitho.x3 | NO | NO | ... | - | ||||||
| In transit | NO | NO | ... | - | ||||||
| Includes mortality details | NO | NO | Indicates if the record includes mortality details. When YES it does contain details; when NO it does not. |
- | ||||||
| Includes ring details | NO | NO | Indicates if the record includes ring details. If YES it does contain details; if NO it does not. |
- | ||||||
| Info about offspring | NO | NO | Indicates if the record contains any information about offspring. YES when there is offspring information, NO if no information has been recorded. |
- | ||||||
| INSEE Code | NO | NO | ... | - | ||||||
| Insertion date | NO | NO | Date the observation is included in the system. | - | ||||||
| Last modification date | NO | NO | Date of observation's last edit. | - | ||||||
| Latin name | NO | NO | Scientific name of the observation. | - | ||||||
| List ID | NO | NO | Automatically assigned number to identify the list in Biolovision systems. | - | ||||||
| List type | NO | NO | ... | - | ||||||
| Locality ID | NO | NO | Automatically assigned number to identify the locality in Biolovision systems. | - | ||||||
| Markings | NO | NO | Only available in Migration.net | - | ||||||
| Media information | YES | NO | Indicates if the record contains media (sound or image files). YES when there is any file, NO when there are no files. |
- | ||||||
| Mixed flocks | NO | NO | Only available in Migration.net | - | ||||||
| Moral entity | NO | NO | ... | - | ||||||
| Moral entity abbreviation | NO | NO | ... | - | ||||||
| Moral entity abbreviation of the transmitter | NO | NO | ... | - | ||||||
| Moral entity of the transmitter | NO | NO | ... | - | ||||||
| Mortality data | YES | NO | Indicates if the record includes mortality data. YEs when the record contains mortality data; NO when it does not. |
- | ||||||
| Municipality | NO | NO | Name of the municipality where the observation took place. | - | ||||||
| Name of the object | NO | NO | ... | - | ||||||
| Nimbostratus | NO | NO | Only available in Migration.net | - | ||||||
| No commercial use | NO | NO | ... | - | ||||||
| No commercial use for transmitter | NO | NO | ... | - | ||||||
| Notation | NO | NO | ... | - | ||||||
| Number | NO | NO | Number of individuals observed. | - | ||||||
| Number of gun shots heard | NO | NO | Only available in Migration.net | - | ||||||
| Number of observers | NO | NO | Only available in Migration.net | - | ||||||
| Number of visitors | NO | NO | Only available in Migration.net | - | ||||||
| Object ID | NO | NO | ... | - | ||||||
| Observed route | NO | NO | Only available in Migration.net | - | ||||||
| Observer ID | NO | NO | Automatically assigned number to identify the observer in Boilovision systems. | - | ||||||
| Observing | NO | NO | Only available in Migration.net | - | ||||||
| Parametric values of the project | YES | NO | ... | - | ||||||
| Precipitation amount | NO | NO | Only available in Migration.net | - | ||||||
| Precipitation type | NO | NO | Only available in Migration.net | - | ||||||
| Private comment | NO | NO | Shows a private comment left by the transmitter. | - | ||||||
| Project code | NO | NO | Code of the project the records belongs to, if any. | - | ||||||
| Project name | NO | NO | Name of the project the record belongs to, if any. | - | ||||||
| Protocol | NO | NO | Name of the protocol the record belongs to, if any. | - | ||||||
| Province | NO | NO | Equivalent to County. Some portals name it Province. | Example | ||||||
| Rarity committee data | YES | NO | ... | - | ||||||
| Resting habitat | NO | NO | ... | - | ||||||
| Resting habitat ID | NO | NO | ... | - | ||||||
| Ring data | YES | NO | Indicates if there is any ringing data associated to the record. YES indicates the record contains ring data; NO otherwise. |
- | ||||||
| Second hand | NO | NO | Indicates if the reporter is also the observer. YES when reporter and observer are two different people; NO when the observer is also the reporter. |
- | ||||||
| Section information | YES | NO | ... | - | ||||||
| Singer | NO | NO | ... | - | ||||||
| Singing/hearing contact | NO | NO | Indicates if the individual/s has been heard singing or calling. YES if the individual/s was vocalising; NO if the individual/s was silent. |
- | ||||||
| Site | NO | NO | Site where the observation took place. | - | ||||||
| SOI ID | NO | NO | ... | - | ||||||
| SOS ID | NO | NO | ... | - | ||||||
| Source | NO | NO | Indicates if the record has been submitted through the web or the app, and through which option within app. | - | ||||||
| Species | NO | NO | Species name in the language of your preference. | - | ||||||
| Species sheet data (orange) | NO | NO | ... | - | ||||||
| Species ID | NO | NO | ... | - | ||||||
| Species sheet data | YES | NO | ... | - | ||||||
| Stranding information | YES | NO | ... | - | ||||||
| Stratocumulus | NO | NO | Only available in Migration.net | - | ||||||
| Stratus | NO | NO | Only available in Migration.net | - | ||||||
| Synonym of the entered latin name | NO | NO | ... | - | ||||||
| Synonym of the entered species name | NO | NO | ... | - | ||||||
| Systematic order | NO | NO | Number given by the system to indicate the systematic order of the observation in Biolovision products. | - | ||||||
| Taxonomic group | NO | NO | Taxonomic group (order) the observation belongs to. | - | ||||||
| Temperature | NO | NO | Only available in Migration.net | - | ||||||
| Tide 1 coefficient | NO | NO | Only available in Migration.net | - | ||||||
| Tide 1 end | NO | YES | Only available in Migration.net | - | ||||||
| Tide 1 start | NO | YES | Only available in Migration.net | - | ||||||
| Tide 2 coefficient | NO | NO | Only available in Migration.net | - | ||||||
| Tide 2 end | YES | NO | Only available in Migration.net | - | ||||||
| Tide 2 start | YES | NO | Only available in Migration.net | - | ||||||
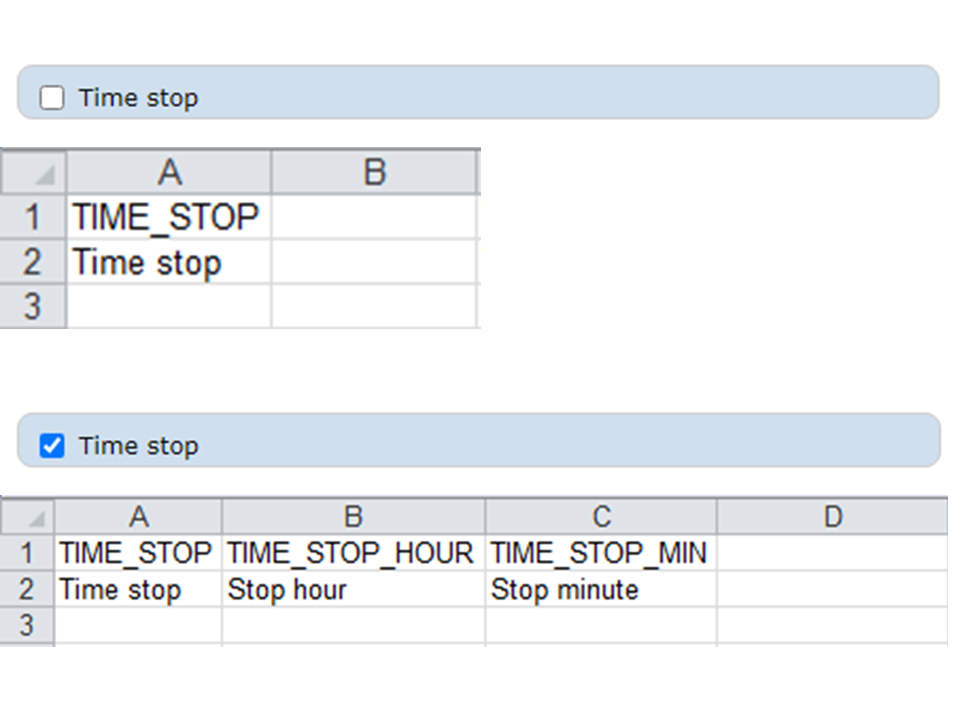
| Time start | NO | YES | 00:00 by default Separated hour and minutes |
Example | ||||||
| Time stop | NO | YES | 00:00 by default Separated hour and minutes |
Example | ||||||
| Timing | NO | NO | ... | - | ||||||
| Trace | NO | NO | ... | - | ||||||
| Trace length | NO | NO | ... | - | ||||||
| Transmitter E-mail | NO | NO | E-mail of reporter. | - | ||||||
| Transmitter ID | NO | NO | Automatically assigned number to identify the transmitter in Biolovision systems. | - | ||||||
| Transmitter name | NO | NO | First name of reporter. | - | ||||||
| Transmitter surname | NO | NO | Surname of reporter. | - | ||||||
| Type of record location | NO | NO | ... | - | ||||||
| Universal list ID | NO | NO | Automatically assigned number to identify the list in Biolovision systems. | - | ||||||
| Universal observation ID | NO | NO | Automatically assigned number to identify the observation in Biolovision systems. | - | ||||||
| Universal observer ID | NO | NO | Automatically assigned number to identify the observer in Biolovision systems. | - | ||||||
| Universal transmitter ID | NO | NO | Automatically assigned number to identify the reporter in Biolovision systems. | - | ||||||
| Upper wind direction | NO | NO | Only available in Migration.net | - | ||||||
| UUID | NO | NO | ... | - | ||||||
| Verify | NO | NO | ... | - | ||||||
| Verification type | NO | NO | ... | - | ||||||
| Video | NO | YES | ... | - | ||||||
| Visibility | NO | NO | Only available in Migration.net | - | ||||||
| Weather comments | NO | NO | Only available in Migration.net | - | ||||||
| 1A dynamic field may export data in more than one column. It is symbolised by an orange field. 2A sortable field contains a check cell to choose if you want to the default set (unchecked) or the expanded for of the field (in more than one column). |
||||||||||
When done, at the bottom of the page,
- click CANCEL to go to previous screen without modifying the template, or
- click SAVE to save changes.
- click CANCEL to go to previous screen without modifying the template, or
[Top to New template from scratch]
[Top to Create a new template]
[Top to Templates]
[Back to Exporting your data]
Exporting your trace
If you recorded your trace when creating a list in NaturaList, download length and/or waypoints by selecting filed Trace length and/or Trace when downloading your data. Alternatively, download only the track by selecting solely Trace.
Visit section above to know how to create a template containing your trace.

Exporting the trace.