Template:Step 3/3: Transmit my sighting.
Here is where you can properly start entering your observations. The required information will depend on whether you chose to add sightings to the locality, ad a precise sighting or record a daily list.
If accessed from add sightings on this locality or add precise location
The first part of the form is mandatory information, while the second you can skip it. On the right hand column you can see your last 30 records under the predetermined site they are associated, and have the option to delete or modify any of them (see section Web interface > Editing records).
Mandatory fields
.
Date and time
Type or select from the expandable calendar. By default you will be shown the current date. Add the time (optional) at the bottom of the panel when clicking on the calendar icon. For quick access there are few options on the right side (see image Transmitting sightings, mandatory fields. Date and Taxa).
Site
Reconfirm the approximate site selected previously and change altitude if necessary (for example when the slope is pronounced and two observations were seen on the same coordinate but at different altitudes). The altitude given by default is that of the predetermined site. At the bottom of the subsection there is the option to change the location; you will be taken back to Web interface > Submitting records > Step 1/3: Approximate choice of a site.
Taxa
There is a horizontal bar with different taxa silhouetted (see image Transmit sightings, mandatory fields. Taxa). Use the arrows on right and left to visualise all options. If necessary place the mouse over a silhouette to get the name of the taxa it represents. Click on the taxa your observation belongs to in order to access the list of species for this taxa (see Species below).
Species
Start typing the name of the species in the selected language (see Web interface > Getting started > Customise website > Recording language), and choose from the expandable menu on the right (see image Transmitting sightings, mandatory fields. Species). The most likely record is highlighted in grey. The species are listed alphabetically or systematically, depending on your preferences. To change the order, go to section Web interface > Getting started> Customise website. Move through the species with the keyboard arrows, moving the right hand bar with your mouse or roll the mouse wheel.
Number of individuals
Choose count precision on the left hand field and enter number (see image Transmitting sightings, mandatory fields. Count). Options are exact number, approximate number, a minimum number or not counted (if not counted, leave the right hand field blank). Not counting number of individuals is often used for those species occurring very commonly.
Ending the observation
If you do not want to add any additional non-mandatory information, scroll to the end of the page and press Save (see image Transmitting sightings, non-mandatory. Comments). You will be taken to image Transmitting sightings, mandatory fields. Count and your record will automatically appear in the list on the right hand column. Repeat the process if you wish to add any more records.
Additional information
The following information is not mandatory, but interesting if known.
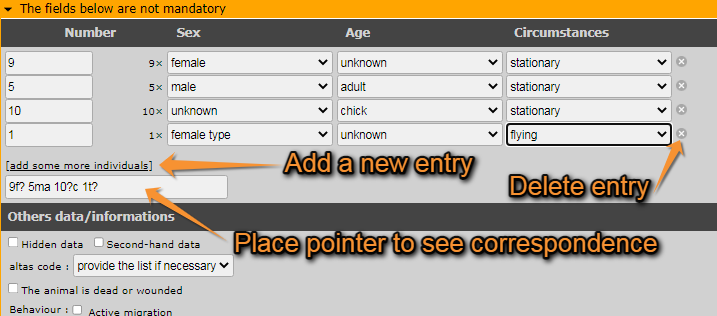
Sex and age of individuals
Type the number of individuals per each sex, age and circumstances of recording. Options are shown on expandable menus per section. You can break the record per age, sex, or circumstances subgroup by clicking on add some more individuals (see example in image Transmitting sightings, non-mandatory fields. Age and sex). Use the plus sign (+) next to the record to delete it. As you enter categories, a code is forming at the bottom right corner of subsection. Passing the mouse on top, you can read the correspondence. You can type the code directly if you know it.
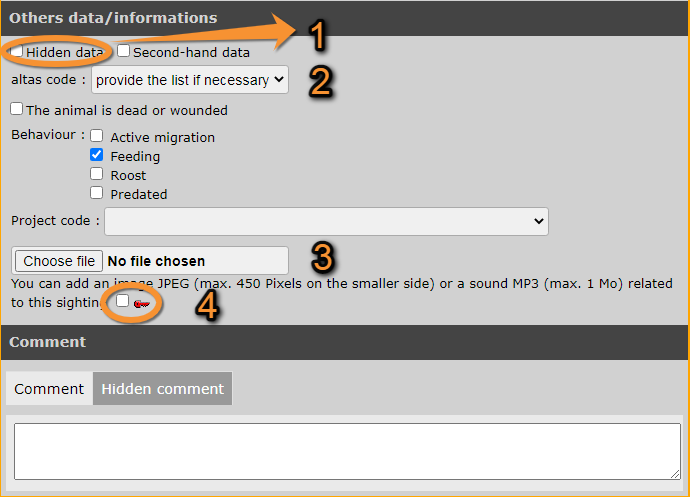
Other data/Information
- Hidden data
Tick the field if you do not want the record to appear publicly on the web site, neither for registered nor anonymous users. You and the administrators will still have access to the data. This option is useful to protect certain species or nesting sites. Note that some of the species and sites are automatically hidden at least part of the year. Go to Web interface > Species partially hidden to see which species will be automatically hidden and for which part of the year. If you still consider any of the other species or sites sensitive and want to protect them, tick the option.
- Second hand data
Tick the field when you are not the author of the observation. This may occur if someone comments an observation to you, or if you are browsing old records. Always seek permission from the author to publish the observation, even if shown as anonymous.
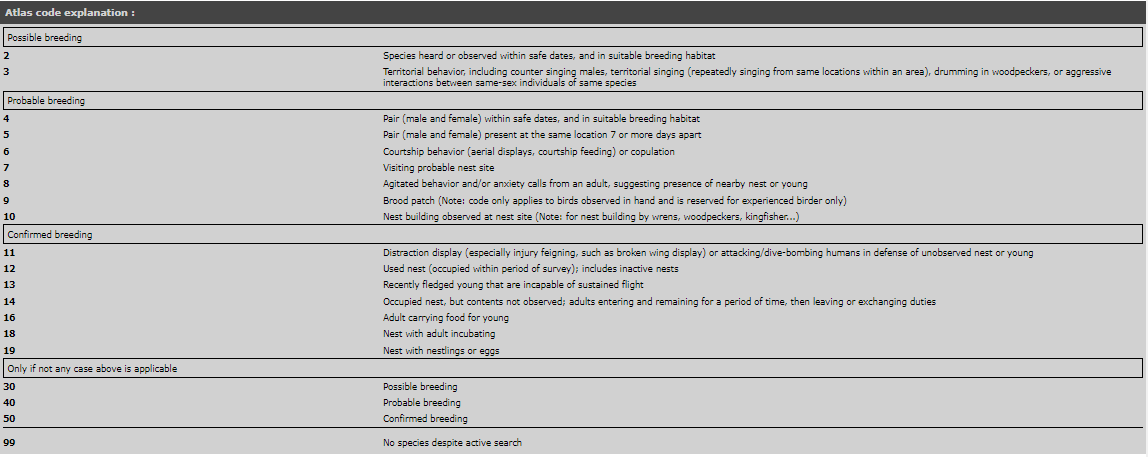
- Atlas code
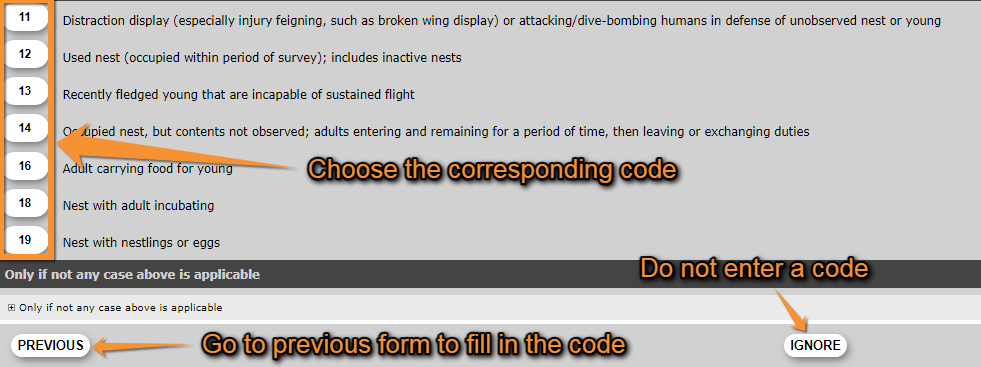
Go to Web interface > Codes and symbols or image Atlas codes to see correspondence. For some species, an atlas code is required at times. If not entered in that section, a new window prompting you to choose the code will appear after saving the record (see image Compulsory atlas code). You can click on the corresponding code, click on Previous to go back to image Transmitting sightings, non-mandatory fields. Other information to enter the code, or ignore and continue to next observation (see image ).

- Dead/wound
Tick if the animal observed is dead or wounded.
- Behaviour
Record the behaviour of the individual/s if known.
- Project code
Associate an existing project to the record or leave blank if the observation is not part of a project.
- Picture
Using the buttons at the end of the subsection, you can attach an image or a sound to the record. Make sure the file does follow the requirements of size, otherwise it will not attach. For pictures they are maximum 450 pixels on the largest side, and 600 MB; for sound files, 1 MB. To attach more than one file, click again on the attach button. Pictures and sound can also be added at a later stage (see section Web interface > Editting records).
Attach only those pictures or sound recordings you have taken yourself.
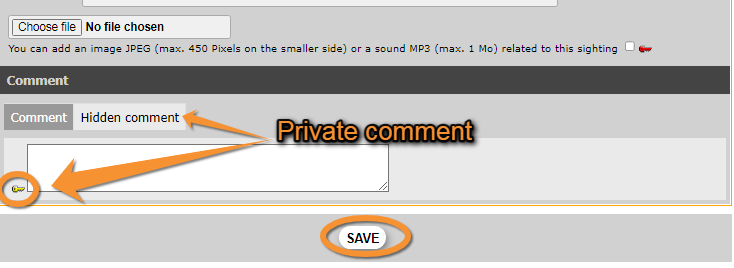
To make the file private (only you can see it), tick the box on the right (see image Transmitting sightings, non-mandatory fields. Other information).
Comments
Finally, you can leave a comment. It may be public or private. By default, the system will make it public (tab comment). To make it private, go to the hidden comment tab –it is marked by a yellow key on its left (see image Transmitting sightings, non-mandatory. Comments). Only you can see a hidden comment.
Ending the observation
When done with the record, click Save at the end of the page (see image Transmitting sightings, non-mandatory. Comments, and image Starting a list). The new observation will appear at the top of the right column and you will be able to continue entering observations for this site and date. If you need to change the site, go to Change site on the mandatory Site section and you will be taken to Web interface > Submitting records > Step 1/3: Approximate choice of a site. This may happen when covering a relatively wide area on the same day.
If accessed from a list (fill a daily form)
If you want to enter several observations that took place the same day at the same place and during a short interval of time, consider entering your data as a list. To do so, select location as in Step 1/3: Approximate choice of a site and in Step 2/3: Precise site choice and select Fill a daily form for this locality. Location will be pre-selected in next step.

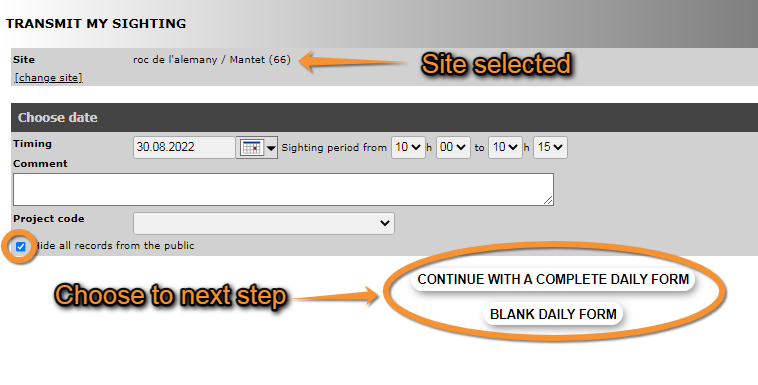
Date and time section
Indicate date, time, project and any comment if necessary.
- Site
Site is pre-selected from previous step and can be changed later if necessary.
- Date and time
Enter date and time as accurately as possible. It is recommended to not exceed 30 minutes. If your observations extend from that time, you can start a new list were you left off.
- Project
Choose from an expandable menu if observations you are submitting are part of a bigger study. Leave blank if your list is not part of an established project.
- Comments and public records
Optionally, add any comment and decide if records will be public. If the option is ticked, records will not be displayed on the website but will still be seen by administrators and used for data analyses (see image Starting a list).
- End form
Move to next section by choosing between Continue with a complete daily form or Blank daily form. Both take you to the following section List section (see image Starting a list).
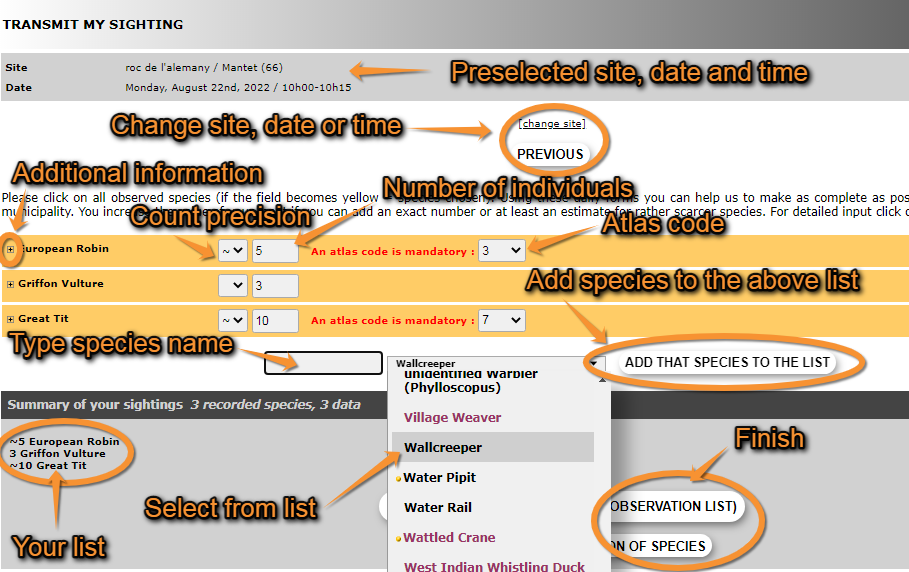
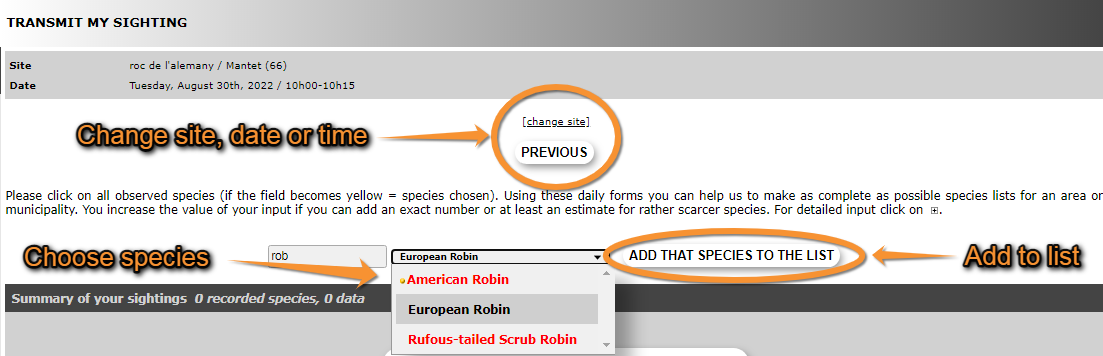
List section
At the top it shows the site, date and time you selected. Click Change site, for site, or Previous, for date and time, if you need to make any changes.
To enter records choose a species from the list or start typing the name on the left field and choose from the expandable list (see image Creating a list. Select species). To move through the list use the arrows on your keyboard, the wheel on the mouse, or move the line on the right with your mouse. To change the order in which you see the species, and the language of the species, see section Web interface > Getting started > Customise website. To see colour correspondence, see Web interface > Codes and symbols.
When done, add that species to the list (see image Transmitting sightings, list. Entering species). The new species will show on top of the species selection fields (see image ).

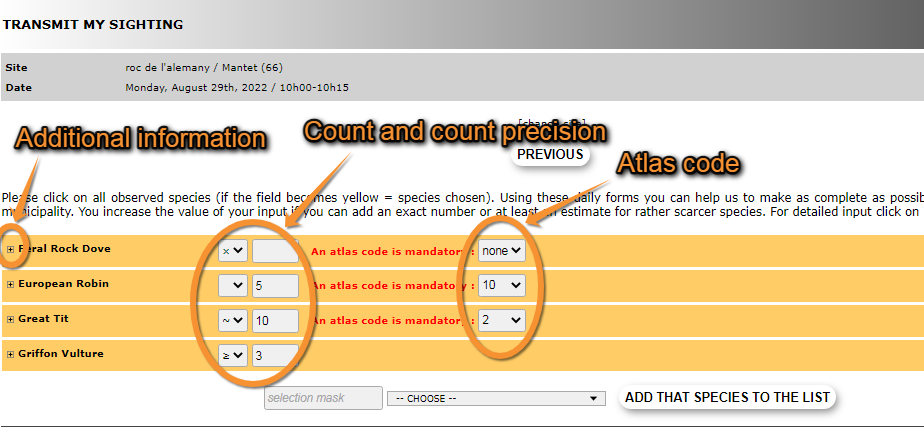
After entering the species name, enter the number of individuals and count precision in the field right from the species name (see image Trasmitting sightings, list. Entering count). Options are approximate number (~), minimum number (≥) or not counted (x). If you enter an exact count, do not choose count precision. If you did not count individuals, do not enter any number. Finally enter an atlas code, if required. To see correspondence of codes, go to Web interface > Codes and symbols. If unknown, you can choose “none” on the atlas code field. When the record is correctly entered, the name appears in yellow. You can enter additional information to the record now, or any time later, by clicking on the plus (+) sign next to the species name (see image Trasmitting sightings, list. Entering count).
Enter a new species and repeat the process.
Additional information
By clicking on the plus sign (+) at the left of the species name (see image Trasmitting sightings, list. Entering count), a new form will open.
Site
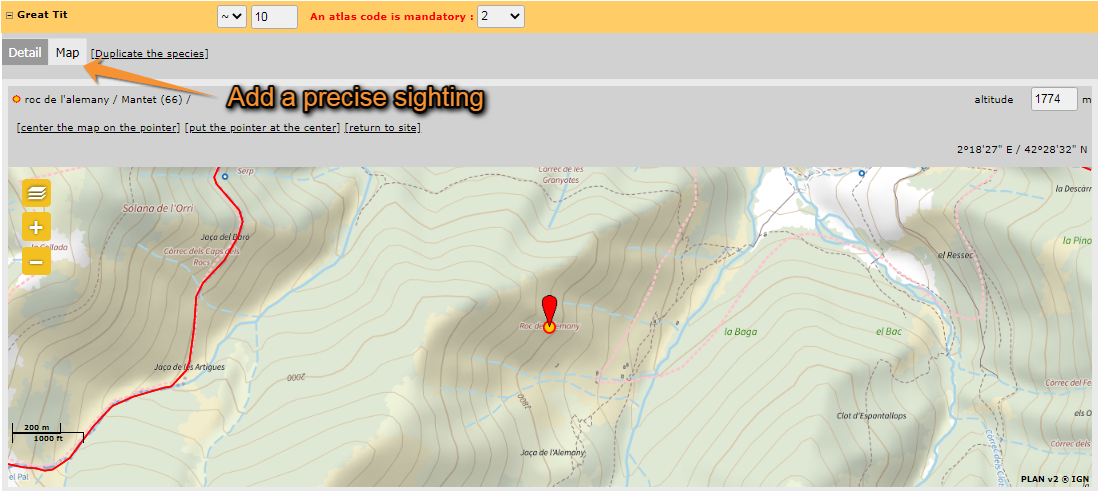
Choose a more precise site by clicking on the Map tab (see image Entering additional info. Precise location). Click on the exact position and adjust the altitude if necessary. To see how to navigate the map, see section Web interface > Navigating the map. At the top there are quick functions: choose as appropriate. When the position you select is too far from the previously selected site, a warning sign will appear and you will not be able to perform the action. This record should then be entered under a different site.
Duplicate the species
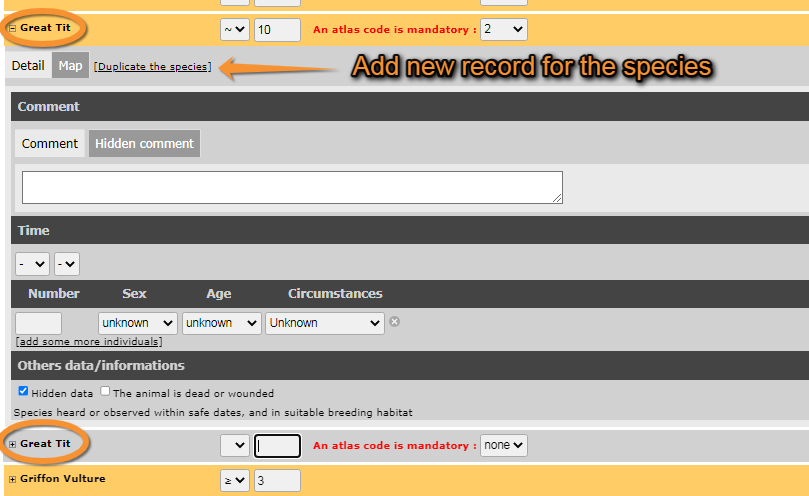
When clicking on Duplicate the species a new entry for the same species will be added to the list below the additional information form (see image Transmitting sighting, list. Additional information, deplicate record). It is useful when you need two different atlas codes for different individuals of the same species, or to record different groups of the same species at different locations (or example, to map territories).
Comments
Your comments can be public or private. To make them private click on the corresponding tab and a yellow key will appear on the left of the field (see image Transmitting sightings, non-mandatory. Comments).
Time
Select a precise time from the menu.
Number of individuals per age/sex/activity
Select how many individuals you recorded of each category, if known. To add a new line, click on “add some more individuals”. You can delete any entry by clicking on the right hand plus sign (+) of the record (see image Transmitting sightings, non-mandatory fields. Age and sex).
Others
Indicate by ticking the corresponding field if you want to hide additional information from the public or if the individual/s is dead or wounded.
When you have added all the additional information you have, you can hide the form by clicking on the minus sign (-) next to the species name (see image Trasmitting sightings, list. Entering count).
Ending the list
When all records are entered, indicate if you recorded all individuals detected (complete list) o only part of them.
You will then be taken to the start of a new list (section “If accessed from a list (fill a daily form)” > “Date and time section” (see image Starting a list)).