My account / Changing personal data, password or email/es: Difference between revisions
(Created page with "Nota: puedes utilizar diferentes idiomas en diferentes páginas, pero tendrás que configurar el idioma individualmente para cada página.<br /> <br />") |
(Created page with "<center> <table border="5" width="700px"> <tr> <td style="padding: 25px; text-align: left; font-family: sans-serif; color: black; background-color: hsl(201, 100%, 89%"> <!-- GREEN BOX (Tips): hsl(157, 74%, 80%) YELLOW BOX (Summaries): #ffffdb" BLUE BOX (Information): hsl(201, 100%, 89%) RED BOX (Warnings): hsl(0, 77%, 78%) -->") |
||
| Line 105: | Line 105: | ||
<br /> | <br /> | ||
==E-mail== | ==E-mail== | ||
Puedes actualizar tu dirección de coreo electrónico aquí (imagen [[Media:20092022WIKI Changing email.png|Cambiar email y contraseña]]).<br /> | |||
<br /> | <br /> | ||
#Introduce tu nueva direcciónd e correo electrónico. | |||
# | #Repite tu nueva direcciónd e correo electrónico (comprueva que lo has introducido correctamente). | ||
# | #Clica '''MODIFICAR'''.<br /> | ||
# | |||
<br /> | <br /> | ||
Ten en cuenta que si cambiaste tu dirección electrónica hace poco y no la acualizaste en la página, tu cuenta sigue estando asociada a tu dirección anterior. Utiliza tu antigua dirección para acceder a tu cuenta y a continuación ve a la sección correspondiente para actualizar tu email. Solamente podrás utilizar tu nueva dirección para iniciar sesión si la has actualizado en '''Mi cuenta'''. | |||
<center> | <center> | ||
<table border="5" width="700px"> | <table border="5" width="700px"> | ||
| Line 133: | Line 125: | ||
BLUE BOX (Information): hsl(201, 100%, 89%) | BLUE BOX (Information): hsl(201, 100%, 89%) | ||
RED BOX (Warnings): hsl(0, 77%, 78%) --> | RED BOX (Warnings): hsl(0, 77%, 78%) --> | ||
<p> | <p> | ||
<ul> | <ul> | ||
* | *Es importante mantener tu dirección de correo electrónico actualizada ya que es el método por el que los administradores se pondrán en contacto contigo si hubiera algún problema con tus datos. <br /> | ||
* | *A menos que indiques lo contrario, tu dirección de correo electrónico es visible tanto para administradores como para otros usuarios registrados. <br /> | ||
* | *Para cambiar quién tiene acceso a tu dirección de correo eletrónico ves a [[My_account_/_Changing_personal_data,_password_or_email#Hide_your_e-mail_only_or_be_anonymous|Interfaz web > Mi cuenta > Datos personales]].<br /> | ||
</ul></p> | </ul></p> | ||
</td></tr></table> | </td></tr></table> | ||
</center> | </center> | ||
<br /><br /> | <br /><br /> | ||
==Contraseña== | |||
<br /> | <br /> | ||
<center> | <center> | ||
<table border="5" width="700px"> | <table border="5" width="700px"> | ||
| Line 164: | Line 148: | ||
BLUE BOX (Information): hsl(201, 100%, 89%) | BLUE BOX (Information): hsl(201, 100%, 89%) | ||
RED BOX (Warnings): hsl(0, 77%, 78%) --> | RED BOX (Warnings): hsl(0, 77%, 78%) --> | ||
<p> | <p> | ||
<ul> | <ul> | ||
Tu eres la única persona que puede acceder a tu contraseña. Manténla en secreto y en lugar seguro. <br /> | |||
Si olvidas tu contraseña, clica en '''He perdido mi clave de acceso''' y se te mandará una nueva automáticamente. | |||
<br /> | <br /> | ||
</ul></p> | </ul></p> | ||
<div lang="en" dir="ltr" class="mw-content-ltr"> | <div lang="en" dir="ltr" class="mw-content-ltr"> | ||
Revision as of 16:06, 30 January 2023
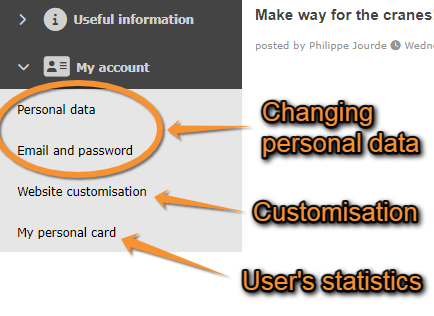
Al iniciar sesión aparece una nueva sección al final de la columna de la derecha llamada Mi cuenta.
En los diferentes aartados, se pueden modificar los datos personales, incluyendo la dirección de correo electrónico y la contraseña, personalizar los parámetros de la página y ver algunas estadísticas personales (imagen Mi cuenta). Modifica los campos necesarios en cualquiera de las secciones (excepto en Mi ficha personal, que són las estadísticas) y clica Modificar. los campos con asterisco són obligatorios.

Datos personales
Cambia o corrige los campos necesarios y clica Modificar al final. Los campos con asterisco són obligatorios.

.png)
Campos obligatorios
Nombre y apellido
Por integridad científica: las entidades colaboradoras necesitan saber quién envió los datos y poder ponerse en contacto.
Año de nacimiento
Algunos países requieren una edad mínima para usar la página. También se utiliza el año de nacimiento para identificar dos usuarios si tienen el mismo nombre y apellidos. El año de nacimiento nunca será publicado.
País y municipio
Al iniciar sesión, los mapas y las notícias serán relevantes para la localidad que nos facilites.
Idioma
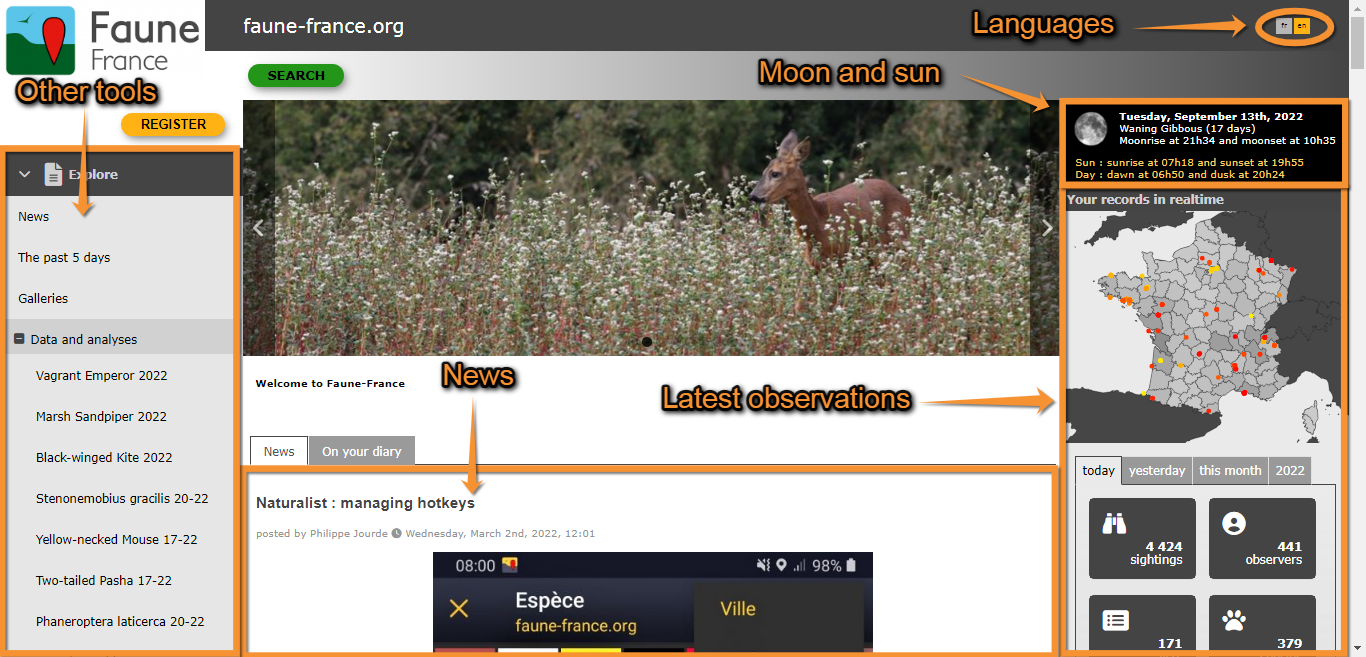
Por defecto, la página se mostrará en el idioma de tu navegador. Si fuera necesario, cambia el idioma de la página en la esquina superior derecha (imagen Ejemplo de interfaz web como se muestra en la página francesa Faune-France). No todos los idiomas están disponibles para todas las páginas. Puedes ver la correspondencia de los códigos en Idiomas disponibles.
Nota: puedes utilizar diferentes idiomas en diferentes páginas, pero tendrás que configurar el idioma individualmente para cada página.
Campos opcionales
Dirección
Tu dirección completa es útil para las entidades locales y pueden usarla para comunicarse contigo de la forma acordada.
Teléfono
Útil para la entidad colaboradora, que puede utilizarlo para ponerse en contacto contigo
Oculta tu email o publica anónimamente

- Anónimo: marca para publicar tus observaciones sin tu nombre. Los otros usuarios podrán ver tus observaciones pero no tu nombre. Sólo los administradores verán tu nombre.
- Oculta tu e-mail: Cuando tus observaciones se publican bajo tu nombre, puedes ocultar tu email marcando la casilla. Los otros usuarios podrán ver tus observaciones con tu nombre, pero no te podrán contactar. Los administradores siempre ven tu email y pueden contactarte en referencia a tus observaciones.
|
POR FAVOR, TEN EN CUENTA QUE LOS ADMINISTRADORES SIEMPRE PODRÁN VER TU NOMBRE Y DIRECCIÓN DE CORREO ELECTRÓNICO. Para saber quién tiene acceso a esta información en cada una de las páginas, ves a Menú > Infomación > Derechos de usuarios. |
Tu web personal
Puedes añadir un enlace a tu web personal en tu perfil escribiendo el enlace aquí.
Comentario para presentarte
Rellena el campo si quieres que otros usuarios sepan más sobre ti.
Término y condiciones
Puedes suprimir o reinstaurar tu aceptación a nuestros términos y condiciones.
Tu retrato
Puedes añadir tu foto en tu perfil.
Correo electrónico y contraseña
Cambia tu dirección de correo electrónico o contraseña en caso necesario.

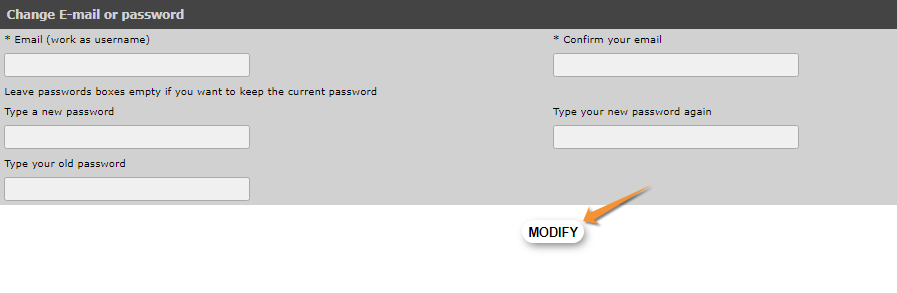
Puedes actualizar tu dirección de coreo electrónico aquí (imagen Cambiar email y contraseña).
- Introduce tu nueva direcciónd e correo electrónico.
- Repite tu nueva direcciónd e correo electrónico (comprueva que lo has introducido correctamente).
- Clica MODIFICAR.
Ten en cuenta que si cambiaste tu dirección electrónica hace poco y no la acualizaste en la página, tu cuenta sigue estando asociada a tu dirección anterior. Utiliza tu antigua dirección para acceder a tu cuenta y a continuación ve a la sección correspondiente para actualizar tu email. Solamente podrás utilizar tu nueva dirección para iniciar sesión si la has actualizado en Mi cuenta.
|
|
Contraseña
|
Si olvidas tu contraseña, clica en He perdido mi clave de acceso y se te mandará una nueva automáticamente. |
In order to better remember your password, we advise you to change the one you received by e-mail to log in the first time (or after requesting a new one). Use a combination of letters and numbers that is more memorable to you, if possible combining lower and upper case characters; and keep it safe.
To update your password:
- Enter your new password.
- Repeat your new password (make sure you write it correctly).
- Enter your old password (it is a security check).
- Click on MODIFY.

Website customisation
Choose hore how you want to visualize certain parameters on the interface when you are logged in.
Customise the way sightings are displayed on the home page
This subsection refers to the latest observations displayed on the right hand column on the main interface (see image Example of main interface as shown in Faune-France portal). Choose which region you want to see the records from, and which ones regarding how common or rare they are (ex. Ticking common and unusual, as well as Ain will only show those observations catalogued common or unusual in the region of Ain). To see the codes used to mark the rarity level, go to Web interace > Codes and symbols or to image Symbols for rarity level in Fauna-France. Use select/unselect to choose between all regions or none (see image How to display data).
- Choose the way you want to display data.
- Go next to the step for customisation, or
- Click on MODIFY at the bottom of the page.

Customize the way sightings are displayed in lists
This subsection is as in Customise the way sightings are displayed on the home page (see image How to display data) but allows you to choose how to display the data obtained from an active search with the left hand column when displaying data by last days or by search engine (see wiki section Web interface > Browsing records > as a registered user).
- Choose the way you want to display data.
- Go to the next step for customisation, or
- Click MODIFY at the bottom of the page.

Cartography
You can choose the map layer you want to see by default.
Click on the name to open an expandable menu with all available options (see image Customise website. Cartography).
You can also choose if you want to be able to zoom in the map or not by ticking/unticking the field (see image Customise website. Cartography, encircled). This option was done long time ago to allow using the website even if your connection was poor. It may nly be useful nowadays if you have a very bad network.
You will see and need maps when [[submitting records ( Web interface > Submitting records) or displaying records on a map (Web interface > Browsing records).
To learn how to navigate maps, go to Web interface > Navigating the map.
- Choose the way you want to display maps.
- Go to the next step for customization, or
- Click MODIFY at the bottom of the page.

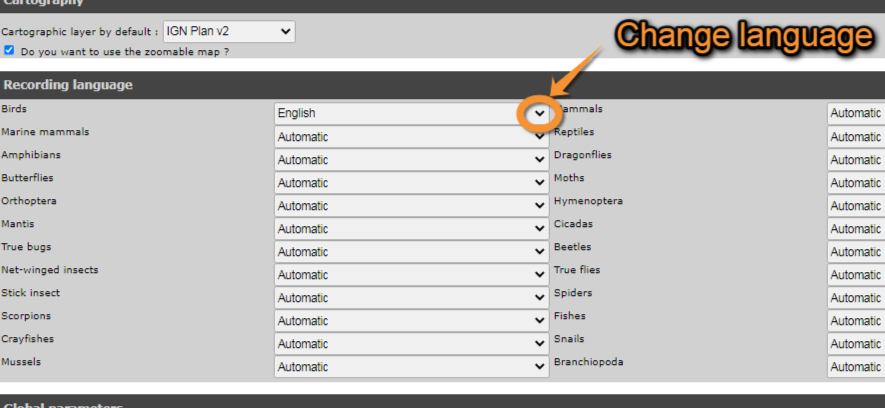
Recording language
For each taxa, choose from the expandable menu which language you would like the name of the species displayed. To see options, click on the arrow at the right of each species panel (see image Customise website. Recording language). You can choose between Latin/Scientific name, or any of the languages the web site is offered in. By default (Automatic) species will appear in the language you selected for the site on the right hand corner at the top of the page (see image Example of main interface as shown in Faune-France portal).
- Choose the language you want for the taxonomic group you use.
- Go to the next step for customization, or
- Click MODIFY at the bottom of the page.

Global parameters
- Choose the way you want to display data:
- Number of sightings per page. The number of observations displayed per page.
- Default gallery. How you want to see pictures and/or sounds by default.
- Default taxonomic group. Choose from the expandable panel which taxonomic group you want to see by defaut.
- I wish to receive the newletter. Check if you want to receive the newsletter (by e-mail).
- Do you want all your data hidden bydefault? Check if you want to hide your data by default. It hides automatically all your data and only you and administrators will see it.
- Species order. Choose if you want species displayed in systematic or alphabetical order.
- Number of pictures per page. Indicate how many pictures you want to see per page.
- Display pictures in listing. Check if you want little pictures displayed in listings.
- Hide synoptic map in my user profile. Check if you want to hide your synoptic map which is displayed in "Birder Detail", you can see how it looks to others in "My personal card" (with synoptic map displayed).
- Click MODIFY at the bottom of the page.

Mi ficha personal

It returns a summary of the user's activity visible to other registered users. It contains information about:
-
when the birder started to participate
when they have been active
the taxonomic groups they submitted
overall statistics
statistics for the current year, and
statistics by county.

for your own use you have also the last days data statistics.
If you do not want other users to access this information, you have to be anonymous. To become anonymous, go to Menu > My account > Personal data.