Enregistrer des données
|
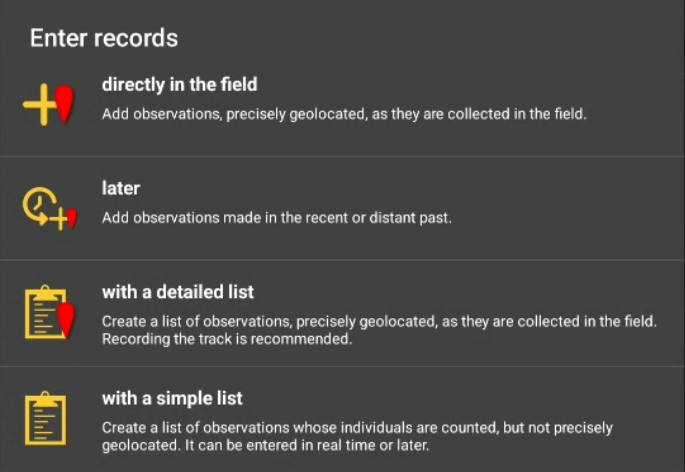
Si vous n'êtes pas encore familiarisé avec l'application, saisissez les enregistrements sous la forme suivante directement sur le terrain. C'est l'option la plus facile. Au fur et à mesure que vous vous familiarisez avec l'application, passez à d'autres options. Les listes sont les moyens les plus utiles de saisir des données à des fins de conservation. |
|
1:Choisissez le mode de saisie des données > 2:choisissez le lieu > 3:sélectionnez l'espèce > 4:sélectionnez le nombre > 5:sautez ou remplissez les champs non obligatoires > 6:sauvegardez > 7 : saisissez les données suivantes |
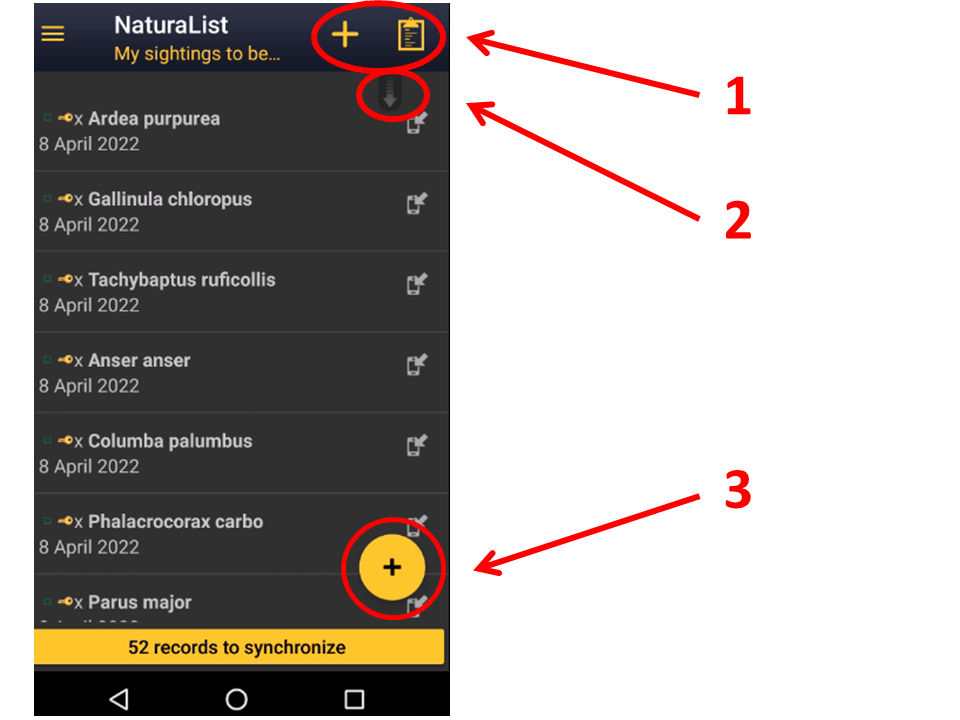
Pour saisir vos observations, cliquez sur le signe + en bas à droite (3) (voir image Soumettre des données). Un menu s'ouvre alors avec toutes les options possibles liées à votre compte (voir l'image Différentes options pour soumettre des enregistrements). Nous présentons ici les fonctions de base, les outils avancés seront décrits dans les rubriques Protocoles et Projets. Utilisez les raccourcis situés dans le coin supérieur droit (1) pour un accès direct à 'directement sur le terrain et 'avec une liste détaillée. Faites défiler vers le bas la flèche d'actualisation (2) pour actualiser les enregistrements. Elle est particulièrement utile pour parcourir les données Autour de moi.

Submitting records.
1. Raccourcis
2. Rafraîchir
3. Saisir les données

Différentes options pour soumettre des données.
Contents
-
1 Directement sur le terrain (+)
- 1.1 Étape 1 : Placement
1.2 Étape 2 : Espèces
1.3 Step 3: Nombre d'individus
1.4 Étape 4 (champs non obligatoires) : Informations complémentaires
- 1.4.1 Commentaires
1.4.2 Détails (Age et sexe)
1.4.3 Code atlas
1.4.4 Donnée cachée
1.4.5 Image
1.4.6 Mortalité / blessures
1.4.7 Direction
1.4.8 Bague
Directement sur le terrain (+)
Utiliser cette option saisir des observations occasionnelles en temps réel. Vous pouvez y accéder à partir du menu principal ou du raccourci situé dans le coin supérieur droit de l'écran.

Directement sur le terrain.
1 Directly in the field (+)
-
1.1 Étape 1 : Lieu
1.2 Étape 2 : Espèces
1.3 Étape 3 : Nombre d'individus
1.4 Étape 4 (champs non obligatoires) : Informations complémentaires
- 1.4.1 Commentaires
1.4.2 Détails (âge et sexe)
1.4.3 Code atlas
1.4.4 Donnée cachée
1.4.5 Image
1.4.6 Mortalité / blessures
Etape 1 : Lieu
|
Smiley = Position de l'observateur Marqueur rouge = Position de la/les individus |
Indiquez la position de l'individu observé en déplaçant la carte pour qu'elle corresponde au marqueur rouge.
Pour savoir comment naviguer sur la carte, voir la section wiki Interface mobile > Naviguer sur la carte. Un smiley gris indique que le GPS n'a pas détecté votre position. Utilisez l'icône viser (1) pour activer le GPS à la demande et attendez l'apparition du smiley jaune avant de continuer. La précision de votre GPS est indiquée en haut à gauche de la carte lorsque le smiley est jaune. Lorsque vous avez terminé, cliquez sur Suivant.
Note : Vous pouvez utiliser l'icône liste sur la gauche pour voir une liste de tous vos enregistrements précédents (voir image ci-dessous).

Lieu.
1. Obtenir la position
2. Continuer
3. Observations passées
Etape 2 : Espèces
En fonction des paramètres sélectionnés dans les préférences, il existe différentes possibilités de saisir le nom de l'espèce:
- Choisir par recherche: Choisissez le groupe taxonomique dans le panneau horizontal supérieur et commencez à taper le nom de l'espèce. Une liste apparaîtra en dessous, dans laquelle vous pourrez choisir l'espèce appropriée. Voir l'image Affichage des espèces par espèce.
- Choisir par groupe, famille, espèce: Commencez par sélectionner le groupe taxonomique, puis la famille et enfin l'espèce. Voir l'image Affichage des espèces par groupe, famille, espèce.
- Raccourcis: Utilisez les raccourcis situés en haut (voir l'image Raccourcis) pour saisir l'espèce plus rapidement, ou créer de nouveaux raccourcis si nécessaire. Visiter la section wiki Interface mobile > Raccourcis pour en savoir plus sur les raccourcis et la manière de les créer.
Note : vous pouvez modifier vos préférences en allant dans Menu > Préférences > Personnalisation> Affichage des espèces (voir l'image Affichage des espèces).
Étape 3 : Nombre d'individus
Saisissez d'abord le nombre d'individus et choisissez la précision du comptage.
Choisissez entre :
Non compté (un x apparaît) pas besoin d'entrer un nombre
1 : nombre approximatif d'individus
2 : nombre exact d'individus
3 : nombre égal ou le minimum d'individus
(voir l'image Saisie du nombre d'individus).
Si vous voulez signaler que vous n'avez pas vu d'individus, entrez le nombre exact 0 (0 et cliquez sur =).

Saisie du nombre d'individus.
1. Nombre approximatif
2. Nombre exact
3. Nombre minimum
|
|
Si vous devez ajouter de nouveaux individus au fur et à mesure que vous les comptez, cliquez sur Démarrer un compteur et continuez à ajouter ou à soustraire des individus (voir l'image Commencer un compteur) jusqu'à ce qu'ils soient tous comptés ou que vous deviez passer à une autre espèce. Cliquez sur Fermer pour terminer le comptage et continuer à saisir l'observation.

|
|
Étape 4 (champs non obligatoires) : Informations complémentaires
Vous pouvez ajouter ici des informations complémentaires concernant cette donnée ou l'ignorer et cliquer directement sur "enregistrer" pour terminer et pouvoir saisir de nouvelles données.
Les icônes apparaissent en jaune lorsqu'elles contiennent des informations que vous avez ajoutées.

Informations complémentaires.
Commentaires

Informations complémentaires. Commentaires.
Laissez un commentaire dans la section supérieure si vous souhaitez qu'il soit public et associé à votre dossier. Tout utilisateur enregistré le verra. Utilisez la section inférieure si vous souhaitez que votre commentaire reste privé.
A noter: les administrateurs le verront quand même. Pour en savoir plus sur les administrateurs, consultez la section wiki Portails locaux. > Administration.
Cliquez sur Valider lorsque vous avez terminé.

|
Pour valider votre enregistrement, vous devrez Sauver ultérieurement. |
Détails (âge et sexe)

Selon le groupe taxonomique que vous saisissez, les champs pour les détails diffèrent, voir l'image. Exemples de groupes non aviaires. Les exemples et explications ci-dessous ne s'appliquent qu'aux oiseaux.
Saisissez le nombre d'individus par sexe et par classe d'âge. Tapez le nombre ou utilisez les touches rapides +1 -1 pour changer rapidement le nombre. La touche Max comptera tous les individus entrés pour cette espèce. Au fur et à mesure que les données sont saisies, une liste apparaît au bas de l'écran. Faites défiler la barre de droite vers le haut ou vers le bas pour voir toutes les entrées, ou cliquez sur une croix pour supprimer une entrée si nécessaire (voir l'image ci-dessous). Lorsque vous avez terminé, cliquez sur Ajouter pour entrer une nouvelle classe ou sur Terminer pour terminer.


Exemples de "Détails" pour des groupes taxonomiques non aviaires. Orchidées (à gauche), odonates (à droite).
Code atlas

Informations complémentaires. Code atlas.
Select an atlas code, or no code. Available atlas codes will depend on the country you chose in Preferences and for your information it is displayed at the bottom of the screen (see image below).
|
|
Go to Menu > Preferences > Atlas code to change the code you use.

Hidden record

Additional information. Hidden record.
Select/unselect as needed.
A yellow key indicates the record will be hidden to other users, except administrators.
Default option depends on your ‘’’Preferences’’’. Go to Menu > Preferences > Hide record to change it.
Note some records are automatically hidden depending on the country or region your observation takes place in. Observations in countries not covered by any local partner are never automatically hidden. However, any user can hide records if they consider doing so will help protect the individuals, species or habitat.
To see which records will automatically be hidden locally, go to Web interface > Local portals > Species partially hidden.
To learn more about administrators, go to Web interface > Local portals > Administration.
Picture

Additional information. Picture.
Add a picture associated to your record. When accessing, it displays all images already attached to this record. To add a new picture, click on the top right hand corner + sign. If no picture is already attached, you are taken directly to the menu (see image below).

Adding a picture. Menu.
Choose between
- Enter pictures from gallery, if you have already taken them and they are stored on your phone's gallery. Pictures must be taken with your phone or inserted afterwards through a local portal. If no local portal exist, it is not currently possible to add a picture through data.biolovision.net.
- Take a picture then. If you do, do not forget to accept to upload it (see image below).
|
|

You can see the images as they are attached.
Hide/unhide the picture only, not the data, to other users by clicking on the corresponding key or delete by clicking on the cross (see image below). You will also be able to edit it at a later stage. When done, add another picture or Validate to move to other sections.

|
|
Mortality / injuries

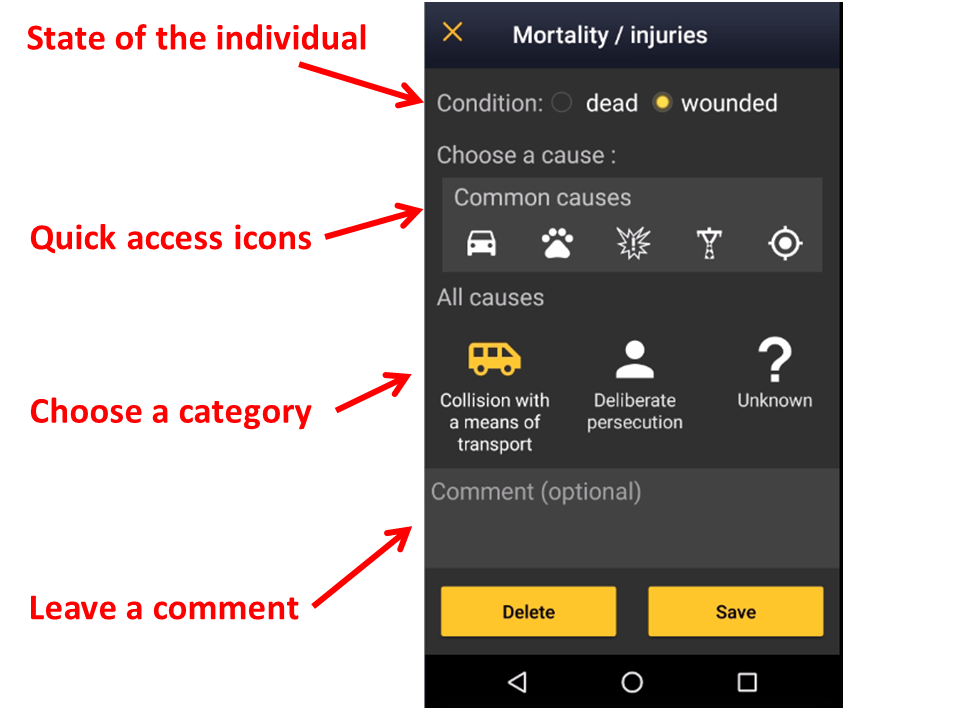
Additional information. Mortality / injuries.
Indicate if your observation corresponds to an injured or dead individual, and select the cause if known. Scroll down All causes to see all options (see image Selecting cause of injury 1). Click on the category to open a panel with all possible causes and enter details (see bottom image Selecting cause of injury 2). When done, click Validate. For quick selection, the icons of the most common causes are on top (see image Selecting cause of injury 1). When you finish entering the cause of death or injury click Save or if necessary, Delete. The entry can be modified later.


Selecting cause of injury 2.
Direction

Additional information. Direction.
Click on the compass to indicate flight direction (in the example below, the user clicked on SE).

Additional information. Selecting direction.
Ring

Additional information. Ring.
- 1. Select the type of marking by checking the corresponding cell, and
- 2. type the inscription on the ring.

Additional information. Recording ring.
Step 5 (last step): Ending the record
When you finish entering an observation, click Save. A green line on top will appear for some seconds to indicate the data is saved (number 1 in image below). You will be taken to Step 1: Place to enter new records.
To access the list of data already entered, click on the List button on the left of Next button (number 2 in image below). Click on any of the records to see details and/or edit (see Editing records).

Later
Enter casual observations after they occur.

Later.
|
Entering observations directly in the field is faster as date and time are already selected for you. Selecting a location is also faster if using the aim icon: you are already correctly positioned ! Entering observations later is useful when observations are noted on another support, such as a paper notebook, on rainy days, when the phone’s battery is low, or for any other reason you prefer not to use your device in the field. |
Step 1: Date / Time
|
|
Since you may be entering your observation after it occurred, entering a time is optional. Check Enter time to enter the time or leave it unchecked if you do not want to enter a time. Click on the date button to modify date and when date and time (optional) are correct, click Save to move to next step.

Enter date: Click on the default (current) date button to open a clickable calendar and choose the appropriate day.
Enter time:
- Tick Enter time.
- Click on the default (current) time to open a clickable clock (see image Entering date and time).
- Select first the hour, then the minutes, and finally the seconds. Or click on the corresponding part of the digital clock on top to indicate if you are adjusting hour, minutes or seconds. The parameter you are adjusting shows in bold in the digital clock (see image below). Exact seconds may be important for some taxa, for protocols, or in lists.
- Click OK to save and continue.
- Tick Enter time.

Step 2: Place
Place the red marker on the location where the observation took place (as described in wiki section Mobile interface > Submitting records > Directly in the field > Step 1: Place).
|
To learn how to navigate the map, see wiki section Mobile interface > Navigating the map. |
Step 3: Species
Enter species as described in wiki section Mobile interface > Submitting records > Directly in the field > Step 2: Species.
Step 4: Number of individuals
Enter the number of individuals as described in wiki section Mobile interface > Submitting records > Directly in the field > Step 3: Number of individuals. Note in this option one cannot Start a count as in other options.
Step 5 (non mandatory): Additional information
Enter any other additional information as described in wiki section Mobile interface > Submitting records > Directly in the field Step 4: Additional information.
Step 6 (last step): Ending the record
When you finish entering an observation, click Save and you will be taken to Step 1: Date/Time to allow you to enter other data later. A green line shows on top to prove data is saved, then automatically disappears.
With a detailed list
Select this option to create a list in the field in real time. You can access it from the menu or from the quick key at the top right corner of the screen.

With a detailed list.
3 With a detailed list
-
3.1 Step 1: Starting a list
3.2 Step 2: Place
3.3 Step 3: Species
3.4 Step 4: Additional information
3.5 Ending the list
Step 1: Starting a list
The 3 options below are optional. To go directly to the list, click Next.
- 1. Enter a comment about this list if appropriate. You can still comment individually every record.
- 2. Select Record the trace if you want to record your track. The default option is set in Main menu > Preferences > Personalization > Keeping the trace. Visit wiki section Mobile interface > Getting started > Preferences > Personalization > Keeping the trace to know more.
- 3. Select Hide all records from the public if you want it to be the default option while creating this list. You can change it later for individual observations you want to share anyway. Administrators will still have access to your records once submitted. Note: If in Preferences you chose to hide records, all your records, including lists are hidden automatically.
- 4. Click Next to start entering your data.

Note from that moment an intermittent red dot will appear at the top of your screen indicating the list is running. All records you enter are considered to be part of this list. The taxonomic group of the first record you enter will determine the taxonomic group of the list. If you enter a new taxonomic group, you will be warned and it will still be recorded though not as part of the list. You can see for how long the list is running along with the red dot. Use the keys on the right of the screen to pause or stop the list (see image below). Pause the list to enter other records alongside it, either from the same or different taxa.

|
STOP: End the list. The time will stop running. |
Step 2: Place
Place red marker at the observation's position by moving the map. By clicking on the aim icon (see image), the marker will automatically position at your GPS location and center it.
Note, "with a detailed list" requires you to indicate the exact position of the observation. Therefore, using the "aim" icon is useful to know where you are and for observations that are on your same spot, for example plants or some insects.
Click Next when done.
Note: The show/hide summary of observation (1 on image below) allows you to see other records of the list or to hide them. It allows too to select one of those records to modify or delete it.
To know how to navigate the map, go to wiki section How to navigate the map.

Selecting location on a list.
1. Show / hide summary of observations.
2. Select own position.
Step 3: Species
Enter species as described in wiki section Mobile interface > Submitting records > Directly in the field > Step 2: Species.
Additional information
Enter any other additional information as described in wiki section Mobile interface > Submitting records > Directly in the field > Step 4 (non mandatory fields): Additional information.
Ending the list
Click the stop button on the top to end the list and confirm (see image).

Adjust starting time and ending time if necessary, for example if you forgot to stop the list when you finished recording (see image below). Otherwise, since it is a real time list, starting and ending time will be automatically detected by starting and ending the list. Add any comment if necessary, and indicate if is a partial list (not all species detected were recorded) or if it is a complete list (all species seen or heard were recorded). A complete list does not refer to species present but to species detected.

When displaying data, observations belonging to a partial list are represented with a hollow green square, and those belonging to a complete list are indicate by a full green square. See wiki section Various > Symbols cheatsheet for more information.
With a simple list
Allows creating lists that took place in the past. It also allows entering records in real time, but the record gets a new precision marker called “unprecise”.

With a simple list.
4 With a simple list
-
4.1 Step 1: Date / Time
4.2 Step 2: Place
4.3 Step 3: Species
4.4 Additional information
4.5 Step 4: Ending the list
Step 1: Date / Time
By default the app shows the current date and time, which can be used as such to record a real time list. If your observations happened in the past, click on the date to modify it by selecting from the expandable calendar. Click on the time to select the starting time of the list and select from the expandable clock as in Mobile interface > Submitting records > Later > Step 1: Date / Time.
Add a comment if necessary and indicate if you want to hide the records from the public and/or record your trace. Visit wiki section Mobile interface > Getting started > Preferences > Personalization > Keeping the trace to know more about recording your trace. Administrators will still see them once they are synchronised. When done, click Next.
|
If you change the time within 5 minutes of the given time, or do not change it at all, your list is considered a real time list and you have the option to record the trace. You will not be able to indicate the position of your observation, and it will be automatically considered to be the same as the position of your GPS. If you change the time more than 5 minutes of the real time, your list is not considered a real time list and the option to record the trace gets unresponsive. You will be able to select the position of your observations on a map, as explained in next sub section Place. |
Step 2: Place
This option is only available if you are entering a list after it occurred. That is, if you changed the time in the previous screen more than 5 minutes from the real one.
Select the position as in Mobile interface > Submitting records > Later > Step 1: Date / Time. and click Next.
|
|
Step 3: Species
Enter species as described in wiki section Mobile interface > Submitting records > Directly in the field > Species.
Additional information
You will not be prompted to enter additional information. However, you can add it after entering a record in the list or after finishing the list (see Editing records for more information).
While creating the list, click on a species name after each record (see image below) to modify the number if necessary and the precision count. When a precision count is selected, you access the additional information menu. See wiki section Mobile interface > Submitting records > Directly in the field > Step 4 (non mandatory fields): Additional information to navigate all sections in the menu.
If only the number of individuals needs to be modified, use the plus and minus signs on the left of the species name to modify the count (see image below). The new number is saved automatically.
Use the cross on the right of the species name to delete the record.

1. Additional information / Edit record
2. Add / Substract individuals
3. Delete entry
If your list occurs in real time, the screen will also show GPS precision (on the top left corner, in green or red) and the number of species already entered (top right corner, see image below). If besides, you are in Africa, it will indicate in the middle the atlas grid number of the African atlas.

1. GPS precision
2. Number of species already entered
Step 4: Ending the list
When all records are entered, click on the "stop" icon at the top right corner to finish the list, and confirm (see image).

Click on the time button to open an expandable clock and introduce ending time as in Mobile interface > Submitting records > With a detailed list > Ending the list. Adjust starting time if necessary. Finally, indicate if you recorded all species present or only part of them (see image).

|
With a detailed list preselects date and time for you but requires you to enter the position for each record. If the position of the observation is your current position, use the aim icon to be faster. It also allows entering additional information for each record within each entry. With a simple list can also be used in the field. In this case, you need to select date as well as starting and ending time. However, you will not be prompted to enter the position for each observation and the additional information menu will not be automatically displayed for each record. This saves time and reduces the chances of missing some individuals. Use "With a simple list" also in the field in real time if you do not need to get exact positions for each individual or add detailed information (as age, sex, pictures or atlas codes) for most of them. |
Synchronisation
Once your finish entering your records and add or amend any information, consider synchronizing them. When synchronising, your records become public to other users and available to administrators for verification and planning conservation. If you selected to hide your records from the public, those won’t be visible to other users, but administrators will still see them, verify them and use them for conservation purposes.
To synchronise, click on the reminder at the bottom of the screen, both in your list of observations and on the starting screen and confirm (see image below).
Once your records are synchronised, you can no longer modify them in NaturaList, but you can do so from your local portal. See a list of local portals in the wiki section Various > Local portals and partners. Go to wiki section Web interface > Editing records for more information on how to edit records on the web site.
If no local portal exists for the site (for example in Africa or outside Europe), go to https:data.biolovision.net to make changes.

|
|
Create object
Allows to record a nest, a burrow, a birdhouse, or similar encountered on the field. This function is only available to users with special rights.
Access it as if entering data, and click Create object (see image below).

Place
Place the pointer at the object position as explained in wiki section Mobile interface > Entering records > Directly in the field > Step 1: Place and click Create (see image below).
Notice that when you are in the creating object mode, the pointer have a purple, blue circled dot that appears.

Information

Enter object information:
- 1. Name: Enter name for the object.
- 2. Comment: Leave a comment if necessary.
- 3. Picture: Upload a picture of the object by selecting from your phone (3a) or taking a new one (3b). Click the bin icon (encircled, below) to delete an uploaded image.
- Click on object position within the image (arrow, below). A hollow red circle will indicate the object.
- Click on object position within the image (arrow, below). A hollow red circle will indicate the object.

- 4. Life span: Indicate if is a short or long life object.
- 5. Height from the ground/water: Indicate the height at which the object is found, or check (6, below) if unknown.
Click Next when done.

- 7. Orientation: Select object's orientation clicking on the white outer circle. A red arrow will indicate the orientation.
Click Next when done.

- 8. Radius: In case the object is a territory, indicate the radius of the territory using the sliding bar (number 8 in picture below). A red line will indicate its limits.
- Note: when indicating a radius, the option "Artificial" is deactivated.
- 9. Nature:
- Indicate the nature of the object.
- Choose between Natural or Artificial. According the nature of the object, next step (10) will be different.

- 10. Object and Support:
- Select general nature of the object (10a) and, when automatically proposed, choose the most approximate support (10b) by opening the expandable menu (encircled).
- Note options are different for natural objects (right) and artificial objects (left), and details differ depending on the main support selected (see image below as an example).

Cliquez sur Enregistrer pour terminer et sauvegarder l'enregistrement une fois terminé.
Vous pouvez retrouver l'objet que vous avez créé dans : Menu > Outils > Mes objets
.