Enviar observaciones
|
Si aún no estás familiarizado con la aplicación, envia observaciones como Lista en vivo. Es la opción más sencilla. Así como te vayas familiarizando con la aplicación, explora las otras opciones. Desde el punto de vista de la conservación, las listas son la mejor opción para enviar observaciones. |
|
1: Escoge cómo quieres enviar los datos 2: Escoge el lugar 3: Selecciona la especie 4: Selecioona el número de individuos 5: Rellena los campos no obligatorios o salta la sección 6: Guarda 7: Introduce la siguiente observación |
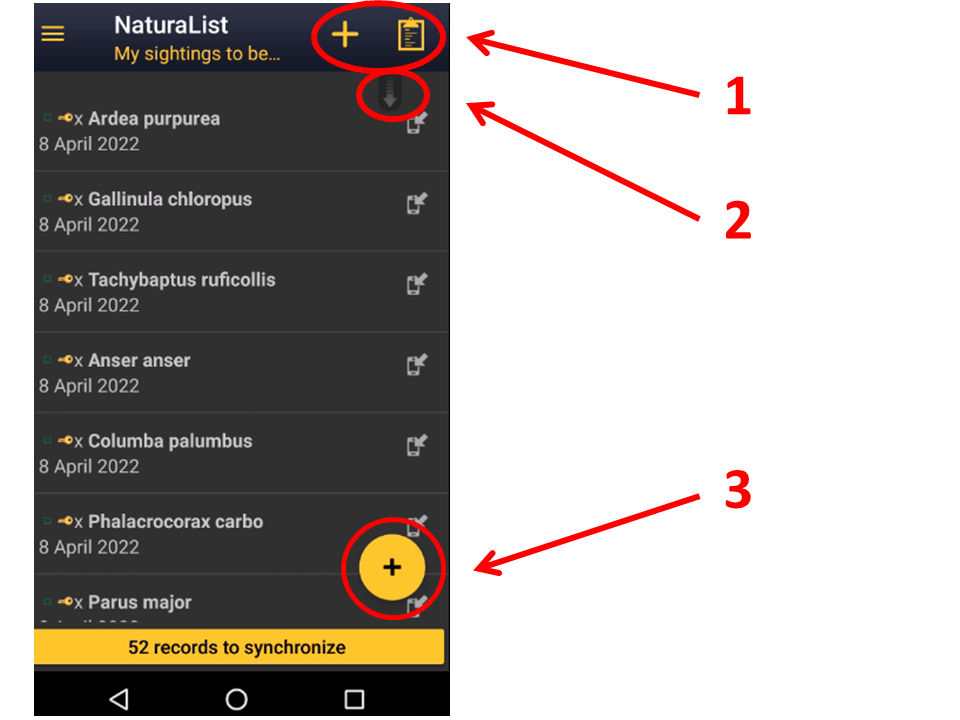
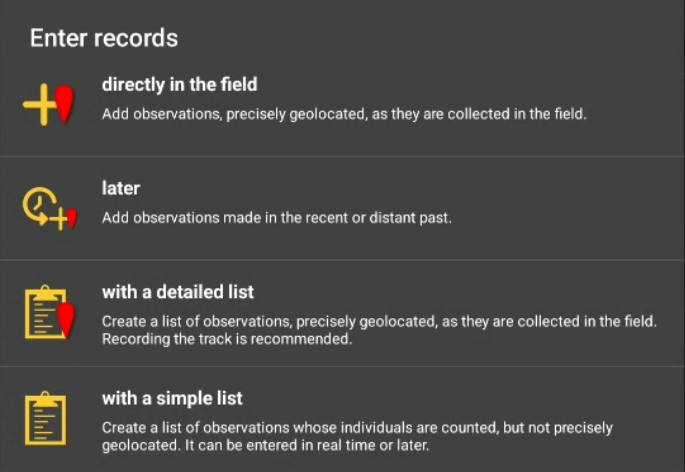
Para enviar tus observaciones, clica en el símbolo + en la esquina inferior derecha (3) (ver imagen Enviar observaciones). Se abrirá un menú con todas las opciones disponibles para tu cuenta (ver imagen Opciones disponbles para enviar observaciones). Aquí se describen las funciones básicas. Opciones más avanzadas se describen bajo Protocolos y Proyectos. Utiliza los atajos en la esquina superior derecha (1) para acceder directamente a Datos casuales en vivo y Lista en vivo. Arrastra hacia abajo la flecha de actualización (2) para actualizar las observaciones. Es especialmente útil cuando estás consultando observaciones A mi alrededor.

Enviar observaciones.
1. Atajos
2. Actualizar
3. Enviar observaciones

Opciones disponibles para enviar observaciones.
Contenido
-
1 Datos casuales en vivo (+)
- 1.1 Paso 1: Lugar
1.2 Paso 2: Especies
1.3 Paso 3: Número de individuos
1.4 Paso 4 (campos no obligatorios): Información adicional
- 1.4.1 Comentarios
1.4.2 Detalles (Edad y sexo)
1.4.3 Código atlas
1.4.4 Dato oculto
1.4.5 Media
1.4.6 Mortalidad / lesiones
1.4.7 Dirección
1.4.8 Anilla
Datos casuals en vivo (+)
Utiliza esta opción para entrar observaciones casuales en tiempo real. Puedes acceder desde el menú principal o a través del icono de acceso rápido de la esquina superior derecha.

Datos casuals en vivo.
1 Datos casuales en vivo (+)
-
1.1 Paso 1: Lugar
1.2 Paso 2: Especies
1.3 Paso 3: Número de individuos
1.4 Paso 4 (campos no obligatorios): Información adicional
- 1.4.1 Comentarios
1.4.2 Detalles (Edad y sexo)
1.4.3 Código atlas
1.4.4 Dato oculto
1.4.5 Media
1.4.6 Mortalidad / lesiones
Paso 1: Lugar
|
Emoticón = Posición del observador Marcador rojo = Posición de la observación |
Indica la posición del individuo observado moviendo el mapa hasta hacerla coincidir con el marcador rojo.
Para saber como moverte por el mapa, visita la sección wiki Interfaz movil > Navegando por el mapa. Un emoticón gris indica que el GPS no detectó tu posición. Usa el icono diana (1) para activar el GPS a petición y espera que aparezca un emoticón amarillo para continuar. La precisión de tu GPS se muestra en la esquina superior izquierda del mapa cuando el emoticón es amarillo. Cuando acabes, clica SIGUIENTE.
Nota: Usa el icono lista de la izquierda para ver una lista con todas tus observaciones anteriores (ver la siguiente imagen).

Lugar.
1. Obtén tu posición
'2. Continuar
3. Observaciones anteriores
Paso 2: Especies
Según los parámetros seleccionados en Preferencias, hay diferentes formas de introducir el nombre de la especie:
- Por Búsqueda: Escoge el grupo taxonómico en el panel horizontal superior y empieza a escribir el nombre de la especie. Aparecerá una lista donde escoger el nombre de la especie. Ver imagen Selecciona especies por Búsqueda.
- Por grupo, familia, especie: Empieza seleccionando el grupo taxonómico, después la familia y finalmente la especie. Ver imagen Selecciona especies por grupo, familia, especie.
- Atajos: Usa los atajos superiores (ver imagen Atajos) para introducir las especies más rápido, o crea nuevos atajos si lo necesitas. Visita la sección wiki Interfaz móvil > Atajos para saber más sobre atajos y saber como crearlos.
Nota: puedes modificar las preferencias en Menú > Preferencias > Personalización > Modo de selección (ver imagen Modo de selección).
Paso 3: Número
Introduce primero el número de individuos y escoge la precisión del conteo.
Escoge entre:
No contado (aparece una x) no es necesario introducir un número
1: número aproximado de individuos
2: número exacto de individuos
3: mínimo número de individuos
(ver imagen Introducir el número de individuos).
Si no viste ningún individuo y quieres indicarlo, introduce el número exacto 0 (0 y clica =).

Introducir el número de individuos.
1. Número aproximado
2. Número exacto
3. Número mínimo
|
|
Si se necesita añadir nuevos individuos así como avanza el conteo, clica en Comenzar a contar y añade o elimina individuos (ver imagen Comenzar a contar) hasta que todos esten contados o se necesite introducir individuos de una especie diferente. Clica Cerrar para cerrar el contador y continuar introduciendo la observación.

|
|
Paso 4 (campos no obligatorios): Información adicional
Añade información adicional sobre esta observación o ves directamente a "Guardar" para terminar esta observación y entrar otra nueva.
Los iconos aparecerán en amarillo cuando contengan información que ha introducido el usuario.

Información adicional.
Comentarios

Información adicional. Comentarios.
Introduce un comentario en la sección superior si quieres que sea publico y aparezca asociado a tu observación. Todos los usuarios registrados lo verán. Usa la sección inferior si quieres que tu comentario sea privado.
Ten en cuenta que los administradores seguirán viéndolo. Para saber más sobre administradores, ves a la sección wiki Administración.
Clica Registrar en terminar.

|
Para registrar tu observación, clicaRegistrar más adelante. |
Información (Edad y sexo)

Los campos de los detalles cambian en función del grupo taxonómico que se está registrando (ver imagen Ejemplos para grupos que no son aves. Los ejemplos y las explicaciones siguientes sólo se aplican a los registros de aves.
Introduce el número de individuos por cada clase de edad y sexo. Escribe el numero o utiliza las teclas +1 -1 para ir más rápido. La Tecla Max considerará todos los individuos registrados de esta especie. Así como se introducen los datos, aparece la lista debajo. Utiliza la barra de la derecha para ver todas las entradas, o clica en la x para borrar alguna de las entradas si fuera necesario (ver la imagen seguiente). Al terminar, clica Añadir para registrar una clase nueva o Terminar para terminar.


Ejemplos de Detalles para grupos taxonómicos que no son aves. Orquídeas (derecha), Libélulas (Izquierda).
Código atlas

Información adicional. Código atlas.
Selecciona un código de atlas, o ningún código. Los códigos disponibles dependen del país escogido en Preferencias y para tu información éste se muestra al pie de la pantalla (ver imagen siguiente).
|
|
Ves a Menú > Preferencias > Código de atlas de referencia para cambiar el Sistema de codificación utilizado.

Dato oculto

Información. Dato oculto.
Selecciona / deselecciona según sea necesario.
Una llave amarilla indica que la observación se ocultará a otros usuarios, pero no a los administradores.
La opción por defecto depende de tus Preferencias. Ves a Menú > Preferencias > Ocultar observaciones automáticamente para cambiarlo.
Ten en cuenta que algunas observaciones se ocultaran automáticamente dependiendo del país o la region donde tiene lugar la observación. Las observaciones en lugares sin portal local nunca se ocultan automáticamente. Sin embargo, cualquier usuario puede ocultar observaciones cuando considere que hacerlo puede proteger a los individuos, la especie o su habitat.
Para ver qué observaciones se ocultarán automáticamente, ves a la sección wiki Interfaz local > Especies ocultas.
Para saber más sobre administradores, ves a la sección wiki Administración.
Media

Información adicional. Media.
Añade un fichero multimedia asociado la observación, sea imagen o audio. Al acceder se muestran todos los ficheros que ya han sido asociados a la observación. Para añadir uno nuevo, clica el icono + en la esquina superior derecha. Si no existe ningún fichero asociado, se accede directamente al menú (ver imagen siguiente).

Añadir fichero. Menú.
Escoge entre
- Subir un fichero, si ya tomaste la foto o grabaste el audio y se encuentran en tu teléfono. Se pueden añadir más tarde a través del portal local, si existe. Cuando no existe portal local para el área que se está muestreando, no es possible añadir un fichero a través de data.biolovision.net.
- Añadir una foto, para tomar la foto en el momento. No olvides aceptar para subirla (ver imagen siguiente).
|
|

Puedes ver la imágenes así como se van adjuntando.
Clica el icono llave para mostrar/ocultar solamente los ficheros adjuntos, no la observación, a otros usuarios. Clica el icono papelera x para eliminar el fichero (ver imagen siguiente). Podrás editar más adelante. Al terminar, añade un fichero nuevo o clica x para volver al menú de información adicional.

|
|
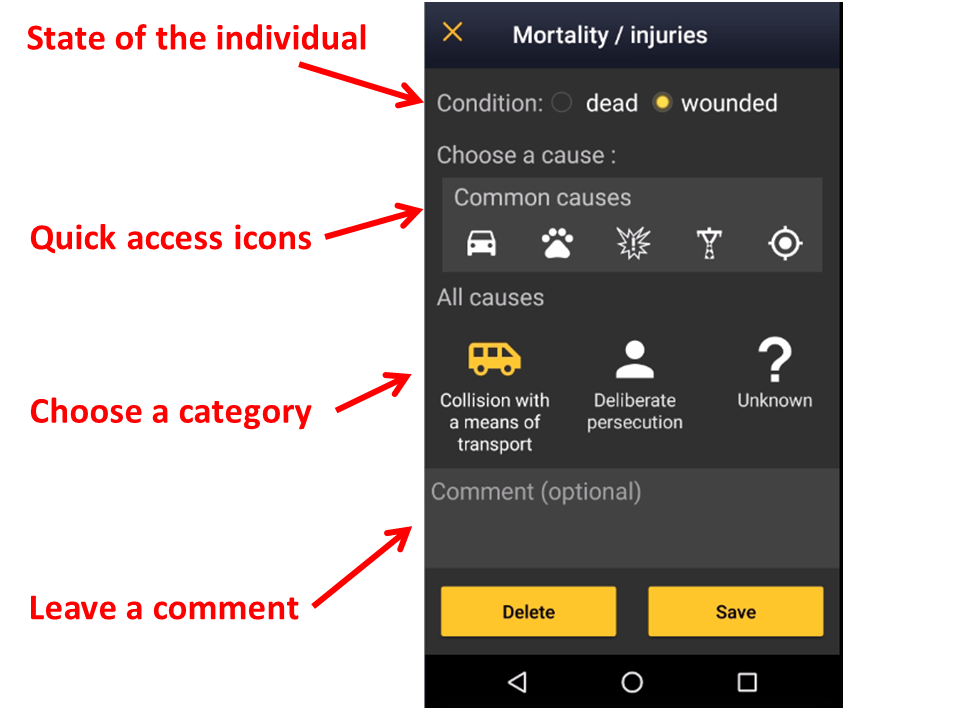
Mortality / injuries

Additional information. Mortality / injuries.
Indicate if your observation corresponds to an injured or dead individual, and select the cause if known. Scroll down All causes to see all options (see image Selecting cause of injury 1). Click on the category to open a panel with all possible causes and enter details (see bottom image Selecting cause of injury 2). When done, click Validate. For quick selection, the icons of the most common causes are on top (see image Selecting cause of injury 1). When you finish entering the cause of death or injury click Save or if necessary, Delete. The entry can be modified later.


Selecting cause of injury 2.
Direction

Additional information. Direction.
Click on the compass to indicate flight direction (in the example below, the user clicked on SE).

Additional information. Selecting direction.
Ring

Additional information. Ring.
- 1. Select the type of marking by checking the corresponding cell, and
- 2. type the inscription on the ring.

Additional information. Recording ring.
Step 5 (last step): Ending the record
When you finish entering an observation, click Save. A green line on top will appear for some seconds to indicate the data is saved (number 1 in image below). You will be taken to Step 1: Place to enter new records.
To access the list of data already entered, click on the List button on the left of Next button (number 2 in image below). Click on any of the records to see details and/or edit (see Editing records).

Later
Enter casual observations after they occur.

Later.
|
Entering observations directly in the field is faster as date and time are already selected for you. Selecting a location is also faster if using the aim icon: you are already correctly positioned ! Entering observations later is useful when observations are noted on another support, such as a paper notebook, on rainy days, when the phone’s battery is low, or for any other reason you prefer not to use your device in the field. |
Step 1: Date / Time
|
|
Since you may be entering your observation after it occurred, entering a time is optional. Check Enter time to enter the time or leave it unchecked if you do not want to enter a time. Click on the date button to modify date and when date and time (optional) are correct, click Save to move to next step.

Enter date: Click on the default (current) date button to open a clickable calendar and choose the appropriate day.
Enter time:
- Tick Enter time.
- Click on the default (current) time to open a clickable clock (see image Entering date and time).
- Select first the hour, then the minutes, and finally the seconds. Or click on the corresponding part of the digital clock on top to indicate if you are adjusting hour, minutes or seconds. The parameter you are adjusting shows in bold in the digital clock (see image below). Exact seconds may be important for some taxa, for protocols, or in lists.
- Click OK to save and continue.
- Tick Enter time.

Step 2: Place
Place the red marker on the location where the observation took place (as described in wiki section Mobile interface > Submitting records > Directly in the field > Step 1: Place).
|
To learn how to navigate the map, see wiki section Mobile interface > Navigating the map. |
Step 3: Species
Enter species as described in wiki section Mobile interface > Submitting records > Directly in the field > Step 2: Species.
Step 4: Number of individuals
Enter the number of individuals as described in wiki section Mobile interface > Submitting records > Directly in the field > Step 3: Number of individuals. Note in this option one cannot Start a count as in other options.
Step 5 (non mandatory): Additional information
Enter any other additional information as described in wiki section Mobile interface > Submitting records > Directly in the field Step 4: Additional information.
Step 6 (last step): Ending the record
When you finish entering an observation, click Save and you will be taken to Step 1: Date/Time to allow you to enter other data later. A green line shows on top to prove data is saved, then automatically disappears.
With a detailed list
Select this option to create a list in the field in real time. You can access it from the menu or from the quick key at the top right corner of the screen.

With a detailed list.
3 With a detailed list
-
3.1 Step 1: Starting a list
3.2 Step 2: Place
3.3 Step 3: Species
3.4 Step 4: Additional information
3.5 Ending the list
Step 1: Starting a list
The 3 options below are optional. To go directly to the list, click Next.
- 1. Enter a comment about this list if appropriate. You can still comment individually every record.
- 2. Select Record the trace if you want to record your track. The default option is set in Main menu > Preferences > Personalization > Keeping the trace. Visit wiki section Mobile interface > Getting started > Preferences > Personalization > Keeping the trace to know more.
- 3. Select Hide all records from the public if you want it to be the default option while creating this list. You can change it later for individual observations you want to share anyway. Administrators will still have access to your records once submitted. Note: If in Preferences you chose to hide records, all your records, including lists are hidden automatically.
- 4. Click Next to start entering your data.

Note from that moment an intermittent red dot will appear at the top of your screen indicating the list is running. All records you enter are considered to be part of this list. The taxonomic group of the first record you enter will determine the taxonomic group of the list. If you enter a new taxonomic group, you will be warned and it will still be recorded though not as part of the list. You can see for how long the list is running along with the red dot. Use the keys on the right of the screen to pause or stop the list (see image below). Pause the list to enter other records alongside it, either from the same or different taxa.

|
STOP: End the list. The time will stop running. |
Step 2: Place
Place red marker at the observation's position by moving the map. By clicking on the aim icon (see image), the marker will automatically position at your GPS location and center it.
Note, "with a detailed list" requires you to indicate the exact position of the observation. Therefore, using the "aim" icon is useful to know where you are and for observations that are on your same spot, for example plants or some insects.
Click Next when done.
Note: The show/hide summary of observation (1 on image below) allows you to see other records of the list or to hide them. It allows too to select one of those records to modify or delete it.
To know how to navigate the map, go to wiki section How to navigate the map.

Step 3: Species
Enter species as described in wiki section Mobile interface > Submitting records > Directly in the field > Step 2: Species.
Additional information
Enter any other additional information as described in wiki section Mobile interface > Submitting records > Directly in the field > Step 4 (non mandatory fields): Additional information.
Ending the list
Click the stop button on the top to end the list and confirm (see image).

Adjust starting time and ending time if necessary, for example if you forgot to stop the list when you finished recording (see image below). Otherwise, since it is a real time list, starting and ending time will be automatically detected by starting and ending the list. Add any comment if necessary, and indicate if is a partial list (not all species detected were recorded) or if it is a complete list (all species seen or heard were recorded). A complete list does not refer to species present but to species detected.

When displaying data, observations belonging to a partial list are represented with a hollow green square, and those belonging to a complete list are indicate by a full green square. See wiki section Various > Symbols cheatsheet for more information.
With a simple list
Allows creating lists that took place in the past. It also allows entering records in real time, but the record gets a new precision marker called “unprecise”.

With a simple list.
4 With a simple list
-
4.1 Step 1: Date / Time
4.2 Step 2: Place
4.3 Step 3: Species
4.4 Additional information
4.5 Step 4: Ending the list
Step 1: Date / Time
By default the app shows the current date and time, which can be used as such to record a real time list. If your observations happened in the past, click on the date to modify it by selecting from the expandable calendar. Click on the time to select the starting time of the list and select from the expandable clock as in Mobile interface > Submitting records > Later > Step 1: Date / Time.
Add a comment if necessary and indicate if you want to hide the records from the public and/or record your trace. Visit wiki section Mobile interface > Getting started > Preferences > Personalization > Keeping the trace to know more about recording your trace. Administrators will still see them once they are synchronised. When done, click Next.
|
If you change the time within 5 minutes of the given time, or do not change it at all, your list is considered a real time list and you have the option to record the trace. You will not be able to indicate the position of your observation, and it will be automatically considered to be the same as the position of your GPS. If you change the time more than 5 minutes of the real time, your list is not considered a real time list and the option to record the trace gets unresponsive. You will be able to select the position of your observations on a map, as explained in next sub section Place. |
Step 2: Place
This option is only available if you are entering a list after it occurred. That is, if you changed the time in the previous screen more than 5 minutes from the real one.
Select the position as in Mobile interface > Submitting records > Later > Step 1: Date / Time. and click Next.
|
|
Step 3: Species
Enter species as described in wiki section Mobile interface > Submitting records > Directly in the field > Species.
Additional information
You will not be prompted to enter additional information. However, you can add it after entering a record in the list or after finishing the list (see Editing records for more information).
While creating the list, click on a species name after each record (see image below) to modify the number if necessary and the precision count. When a precision count is selected, you access the additional information menu. See wiki section Mobile interface > Submitting records > Directly in the field > Step 4 (non mandatory fields): Additional information to navigate all sections in the menu.
If only the number of individuals needs to be modified, use the plus and minus signs on the left of the species name to modify the count (see image below). The new number is saved automatically.
Use the cross on the right of the species name to delete the record.

1. Additional information / Edit record
2. Add / Substract individuals
3. Delete entry
If your list occurs in real time, the screen will also show GPS precision (on the top left corner, in green or red) and the number of species already entered (top right corner, see image below). If besides, you are in Africa, it will indicate in the middle the atlas grid number of the African atlas.

1. GPS precision
2. Number of species already entered
Step 4: Ending the list
When all records are entered, click on the "stop" icon at the top right corner to finish the list, and confirm (see image).

Click on the time button to open an expandable clock and introduce ending time as in Mobile interface > Submitting records > With a detailed list > Ending the list. Adjust starting time if necessary. Finally, indicate if you recorded all species present or only part of them (see image).

|
With a detailed list preselects date and time for you but requires you to enter the position for each record. If the position of the observation is your current position, use the aim icon to be faster. It also allows entering additional information for each record within each entry. With a simple list can also be used in the field. In this case, you need to select date as well as starting and ending time. However, you will not be prompted to enter the position for each observation and the additional information menu will not be automatically displayed for each record. This saves time and reduces the chances of missing some individuals. Use "With a simple list" also in the field in real time if you do not need to get exact positions for each individual or add detailed information (as age, sex, pictures or atlas codes) for most of them. |
Synchronisation
Once your finish entering your records and add or amend any information, consider synchronizing them. When synchronising, your records become public to other users and available to administrators for verification and planning conservation. If you selected to hide your records from the public, those won’t be visible to other users, but administrators will still see them, verify them and use them for conservation purposes.
To synchronise, click on the reminder at the bottom of the screen, both in your list of observations and on the starting screen and confirm (see image below).
Once your records are synchronised, you can no longer modify them in NaturaList, but you can do so from your local portal. See a list of local portals in the wiki section Various > Local portals and partners. Go to wiki section Web interface > Editing records for more information on how to edit records on the web site.
If no local portal exists for the site (for example in Africa or outside Europe), go to https:data.biolovision.net to make changes.

|
|
Create object
Allows to record a nest, a burrow, a birdhouse, or similar encountered on the field. This function is only available to users with special rights.
Access it as if entering data, and click Create object (see image below).

Place
Place the pointer at the object position as explained in wiki section Mobile interface > Entering records > Directly in the field > Step 1: Place and click Create (see image below).
Notice that when you are in the creating object mode, the pointer have a purple, blue circled dot that appears.

Information

Enter object information:
- 1. Name: Enter name for the object.
- 2. Comment: Leave a comment if necessary.
- 3. Picture: Upload a picture of the object by selecting from your phone (3a) or taking a new one (3b). Click the bin icon (encircled, below) to delete an uploaded image.
- Click on object position within the image (arrow, below). A hollow red circle will indicate the object.
- Click on object position within the image (arrow, below). A hollow red circle will indicate the object.

- 4. Life span: Indicate if is a short or long life object.
- 5. Height from the ground/water: Indicate the height at which the object is found, or check (6, below) if unknown.
Click Next when done.

- 7. Orientation: Select object's orientation clicking on the white outer circle. A red arrow will indicate the orientation.
Click Next when done.

- 8. Radius: In case the object is a territory, indicate the radius of the territory using the sliding bar (number 8 in picture below). A red line will indicate its limits.
- Note: when indicating a radius, the option "Artificial" is deactivated.
- 9. Nature:
- Indicate the nature of the object.
- Choose between Natural or Artificial. According the nature of the object, next step (10) will be different.

- 10. Object and Support:
- Select general nature of the object (10a) and, when automatically proposed, choose the most approximate support (10b) by opening the expandable menu (encircled).
- Note options are different for natural objects (right) and artificial objects (left), and details differ depending on the main support selected (see image below as an example).

Click Save to end and save record when done.
You can find your created object in : Menu > Tools > My objects