Entering records: Difference between revisions
(→Media) |
|||
| (93 intermediate revisions by 2 users not shown) | |||
| Line 49: | Line 49: | ||
<!--T:8--> | <!--T:8--> | ||
<center> | <center> | ||
<div class="toc" style="border-radius:5px;background-color:#ffffff;padding-left:8px;padding-right:8px; padding-bottom:8px;width: | <div class="toc" style="border-radius:5px;background-color:#ffffff;padding-left:8px;padding-right:8px; padding-bottom:8px;width:400px;"> | ||
[[File:Enter records.png| | [[File:Enter records.png|400px]] | ||
<div class="toc" style="border-radius:5px;padding-left:15px;text-align:left; font-size:12px;width: | <div class="toc" style="border-radius:5px;padding-left:15px;text-align:left; font-size:12px;width:385px;"> | ||
'''Submitting records.''' | '''Submitting records.''' | ||
</div> | </div> | ||
<p style="color:black;font-size:12px;padding-left:30px;text-align:left;column-count:2;"> | <p style="color:black;font-size:12px;padding-left:30px;text-align:left;column-count:2;"> | ||
'''1.''' Shortcuts <br /> | '''1.''' [[Shortcuts|Shortcuts]] <br /> | ||
'''2.''' Refresh <br /> | '''2.''' Refresh <br /> | ||
'''3.''' Enter records <br /> | '''3.''' Enter records <br /> | ||
'''4.''' [[Entering_records#Sound|Record a sound]] <br/> | |||
'''5.''' [[Entering_records#Image|Take a picture]] <br/> | |||
</p> | </p> | ||
</div> | </div> | ||
</center> | </center> | ||
<br /> | <br /> | ||
| Line 91: | Line 93: | ||
1.3 [[Entering_records#Step_3:_Number_of_individuals|Step 3: Number of individuals]]<br /> | 1.3 [[Entering_records#Step_3:_Number_of_individuals|Step 3: Number of individuals]]<br /> | ||
1.4 [[Entering_records#Step_4_(non_mandatory_fields):_Additional_information|Step 4 (non mandatory fields): Additional information]]<br/> | 1.4 [[Entering_records#Step_4_(non_mandatory_fields):_Additional_information|Step 4 (non mandatory fields): Additional information]]<br/> | ||
1.5 [[Entering_records#Step_5_(last_step):_Ending_the_record|Step 5: Ending the record]]<br /> </ol></ol> | |||
<ol> | <ol> | ||
2 [[Entering_records#Later|Later]]<br/> | 2 [[Entering_records#Later|Later]]<br/> | ||
| Line 127: | Line 119: | ||
<ol> | <ol> | ||
5 [[Entering_records#Synchronisation|Synchronisation]]<br/> | 5 [[Entering_records#Synchronisation|Synchronisation]]<br/> | ||
6 [[Entering_records#Create an object|Create an object]]<br/></ol> | 6 [[Entering_records#Create an object|Create an object]]<br/> | ||
6 [[Entering_records#Additional information panel |Additional information panel]]<br/></ol> | |||
</div> | </div> | ||
</div> | </div> | ||
| Line 161: | Line 154: | ||
1.3 [[Entering_records#Step_3:_Number_of_individuals|Step 3: Number of individuals]]<br /> | 1.3 [[Entering_records#Step_3:_Number_of_individuals|Step 3: Number of individuals]]<br /> | ||
1.4 [[Entering_records#Step_4_(non_mandatory_fields):_Additional_information|Step 4 (non mandatory fields): Additional information]]<br/> | 1.4 [[Entering_records#Step_4_(non_mandatory_fields):_Additional_information|Step 4 (non mandatory fields): Additional information]]<br/> | ||
1.5 [[Entering_records#Step_5_(last_step):_Ending_the_record|Step 5: Ending the record]]<br /> </ol> | |||
</div> | </div> | ||
</div> | </div> | ||
| Line 362: | Line 344: | ||
===Step 4 (non mandatory fields): Additional information=== | ===Step 4 (non mandatory fields): Additional information=== | ||
<br /> | <br /> | ||
Add more information or modify existing one on this record. <br/> | |||
<br/> | <br/> | ||
Click on any icon to enter (or modify) information in the selected icon, and click '''Save''' when done to continue entering records. If you do not need to add or amend information, click '''Save''' directly to skip this section. <br/> | |||
<br/> | <br/> | ||
<!--T:50--> | <!--T:50--> | ||
<center> | <center> | ||
<div class="toc" style="border-radius:5px;background-color:#ffffff;padding-left:8px;padding-right:8px;padding-bottom:8px;width: | <div class="toc" style="border-radius:5px;background-color:#ffffff;padding-left:8px;padding-right:8px;padding-bottom:8px;width:300px;"> | ||
[[File:Add information menu.png| | [[File:Add information menu.png|300px]] | ||
<div class="toc" style="border-radius:5px;padding-left:15px;text-align:left; font-size:12px;width: | <div class="toc" style="border-radius:5px;padding-left:15px;text-align:left; font-size:12px;width:285px;"> | ||
'''Additional information.'''<br/> | '''Additional information panel.'''<br/> | ||
</div> | </div> | ||
</div> | </div> | ||
| Line 401: | Line 363: | ||
<br/> | <br/> | ||
<center> | |||
< | <div class="toc" style="border-radius: 5px; padding: 25px; text-align: left; font-family: sans-serif; color: black; width: 500px; background-color: hsl(201, 100%, 89%)"> | ||
<!-- GREEN BOX (Tips): hsl(157, 74%, 80%) | |||
YELLOW BOX (Summaries): #ffffdb" | |||
BLUE BOX (Information): hsl(201, 100%, 89%) | |||
RED BOX (Warnings): hsl(0, 77%, 78%) --> | |||
< | <p> | ||
<b>NOTE</b><br/> | |||
< | YELLOW ICON = the module contains information about the record.<br/> | ||
WHITE ICON = the module does not contain information about the icon. <br/> | |||
</p> | |||
</div> | </div> | ||
</center> | </center> | ||
<br /> | <br /> | ||
Sections available depend on the type of list, or [[Protocols#web|protocol]], and on the country. Visit wiki section Mobile interface > Submitting records > [[Entering records#Additional information panel|Additional information panel]] for full details on all available modules. <br/> | |||
<br/> | <br/> | ||
===Step 5 (last step): Ending the record=== | |||
<br /> | |||
<!--T: | <!--T:113--> | ||
When you finish entering an observation, click '''Save'''. A green line on top will appear for some seconds to indicate the data is saved (number 1 in image below). You will be taken to [[Entering records#Step 1: Place|Step 1: Place]] to enter new records. <br/> | |||
To access the list of data already entered, click on the '''[[Edit records#With the List button|List button]]''' on the left of '''Next''' button (number 2 in image below). Click on any of the records to see details and/or edit (see [[Edit_records| Editing records]]).<br /><br /> | |||
<!--T: | <!--T:114--> | ||
[[File:Record saved.png|700px|thumb|center|Records saved.]]<br /> | |||
<br /> | <br /> | ||
<!--T: | <!--T:115--> | ||
| |||
=Later= | |||
<br /> | |||
Enter casual observations after they occur. <br /> | |||
<br /> | <br /> | ||
<!--T: | <!--T:116--> | ||
<center> | <center> | ||
<table class="toc" width=" | <div class="toc" style="border-radius:5px;background-color:#ffffff;padding-left:8px;padding-right:8px;padding-bottom:8px;width:600px;"> | ||
[[File:Enter records later.png|600px]] | |||
<div class="toc" style="border-radius:5px;padding-left:15px;text-align:left; font-size:12px;width:585px;"> | |||
'''Later.''' | |||
</div> | |||
</div> | |||
</center> | |||
<br/> | |||
<br/> | |||
<!--T:117--> | |||
<center> | |||
<table class="toc" width="700px" style="border:1px solid black"> | |||
<tr> | <tr> | ||
<td style="padding: 25px; text-align: left; font-family: sans-serif; color: black; background-color: | <td style="padding: 25px; text-align: left; font-family: sans-serif; color: black; background-color: #ffffdb"> | ||
<!-- GREEN BOX (Tips): hsl(157, 74%, 80%) | <!-- GREEN BOX (Tips): hsl(157, 74%, 80%) | ||
YELLOW BOX (Summaries): #ffffdb" | YELLOW BOX (Summaries): #ffffdb" | ||
| Line 444: | Line 425: | ||
RED BOX (Warnings): hsl(0, 77%, 78%) --> | RED BOX (Warnings): hsl(0, 77%, 78%) --> | ||
<!--T: | <!--T:118--> | ||
<p> | <p> | ||
<ul> | <ul> | ||
<b> | <b> COMPARISON BETWEEN "DIRECTLY IN THE FIELD" AND "LATER" </b><br /> | ||
<br /> | |||
Entering observations directly in the field is faster as date and time are already selected for you. Selecting a location is also faster if using the aim icon: you are already correctly positioned ! <br /> | |||
<br /> | |||
Entering observations later is useful when observations are noted on another support, such as a paper notebook, on rainy days, when the phone’s battery is low, or for any other reason you prefer not to use your device in the field. <br /> | |||
</ul></p> | </ul></p> | ||
<!--T: | <!--T:119--> | ||
</td></tr></table> | </td></tr></table> | ||
</center> | </center> | ||
<br /> | <br /> | ||
<br/> | <br/> | ||
== | <!--T:120--> | ||
<br /> | <div class="toc" style="width:350px;"> <!-- La llargada s'ha de canviar aquí --> | ||
[[ | <div class="mw-collapsible mw-collapsed" data-expandtext="Show" data-collapsetext="Hide" style="width:300px;margin-bottom:0px;margin-top:0px;background-color:#f7f7f7;"> | ||
<br /> | '''2 Later''' | ||
<div class="mw-collapsible-content" style="width:350px;background-color:#f7f7f7;"> <!-- I també cal canviar la llargada aquí --> | |||
<ol> | |||
2.1 [[Entering_records#Step_1:_Date_/_Time|Step 1: Date / Time]] <br /> | |||
2.2 [[Entering_records#Step_2:_Place|Step 2: Place]]<br /> | |||
2.3 [[Entering_records#Step_3:_Species|Step 3: Species]]<br /> | |||
2.4 [[Entering_records#Step_4:_Number_of_individuals|Step 4: Number of individuals]]<br/> | |||
2.5 [[Entering_records#Step_5_(non_mandatory):_Additional_information|Step 5 (non-mandatory): Additional information]]<br/> | |||
2.6 [[Entering_records#Step_6_(last_step):_Ending_the_record|Step 6 (last step): Ending the records]]<br/> </ol> | |||
</div> | |||
</div> | |||
</div> | |||
<br/> | |||
<!--T: | <!--T:121--> | ||
===Step 1: Date / Time=== | |||
<br /> | <br /> | ||
<!--T: | <!--T:122--> | ||
<center> | <center> | ||
< | <table class="toc" width="700px" style="border:1px solid black"> | ||
<tr> | |||
< | <td style="padding: 25px; text-align: left; font-family: sans-serif; color: black; background-color:hsl(157, 74%, 80%)"> | ||
<!-- GREEN BOX (Tips): hsl(157, 74%, 80%) | |||
</p> | YELLOW BOX (Summaries): #ffffdb" | ||
</ | BLUE BOX (Information): hsl(201, 100%, 89%) | ||
RED BOX (Warnings): hsl(0, 77%, 78%) --> | |||
<!--T:123--> | |||
<p> | |||
<ul> | |||
*Entering a date is compulsory.<br /> | |||
*Entering time is not. Check the corresponding box to open the option to enter time (image [[Media:Later obs.png|Entering date and time]]).<br /> | |||
</ul></p> | |||
<!--T:124--> | |||
</td></tr></table> | |||
</center> | </center> | ||
<br /> | |||
<br /> | <br /> | ||
<!--T: | <!--T:125--> | ||
Since you may be entering your observation after it occurred, entering a time is optional. Check '''Enter time''' to enter the time or leave it unchecked if you do not want to enter a time. Click on the date button to modify date and when date and time (optional) are correct, click '''Save''' to move to next step.<br /> | |||
<br /> | |||
<br/> | |||
<!--T:126--> | |||
[[File:Later obs.png|700px|thumb|center|Entering date and time.]]<br /> | |||
<br /> | <br /> | ||
<!--T: | <!--T:127--> | ||
< | '''Enter date:''' Click on the default (current) date button to open a clickable calendar and choose the appropriate day. <br /> | ||
< | <br /> | ||
[[ | |||
< | <!--T:128--> | ||
''' | '''Enter time:''' <br /> | ||
</ | |||
< | <!--T:129--> | ||
</ | :*Tick '''Enter time'''. <br /> | ||
:*Click on the default (current) time to open a clickable clock (see image [[Media:Later obs.png|Entering date and time]]). <br /> | |||
:*Select first the hour, then the minutes, and finally the seconds. Or click on the corresponding part of the digital clock on top to indicate if you are adjusting hour, minutes or seconds. The parameter you are adjusting shows in bold in the digital clock (see image below). Exact seconds may be important for some taxa, for protocols, or in lists. <br /> | |||
:*Click '''OK''' to save and continue. <br /> | |||
<!--T:130--> | |||
<br /> | |||
<!--T:131--> | |||
[[File:Enter time.png|700px|thumb|center|Entering time.]]<br /> | |||
<br /> | <br /> | ||
<!--T: | <!--T:132--> | ||
===Step 2: Place=== | |||
<br /> | |||
Place the red marker on the location where the observation took place (as described in wiki section Mobile interface > Submitting records > Directly in the field > [[Entering_records#Step_1:_Place| Step 1: Place]]). <br /> | |||
<br /> | <br /> | ||
<!--T: | <!--T:133--> | ||
<center> | <center> | ||
<table class="toc" width="700px" style="border:1px solid black"> | <table class="toc" width="700px" style="border:1px solid black"> | ||
| Line 526: | Line 529: | ||
RED BOX (Warnings): hsl(0, 77%, 78%) --> | RED BOX (Warnings): hsl(0, 77%, 78%) --> | ||
<!--T: | <!--T:134--> | ||
<p> | <p> | ||
<ul> | <ul> | ||
Yellow smiley and red marker may not match in this case as the observation is entered <i>a posteriori</i>.<br /> | |||
<br /> | |||
To learn how to navigate the map, see wiki section [[Navigating_the_map_NaturaList| Mobile interface > Navigating the map]]. | |||
</ul></p> | </ul></p> | ||
<!--T: | <!--T:135--> | ||
</td></tr></table> | </td></tr></table> | ||
</center> | </center> | ||
| Line 538: | Line 543: | ||
<br /> | <br /> | ||
<!--T: | <!--T:136--> | ||
===Step 3: Species=== | |||
<br /> | |||
Enter species as described in wiki section Mobile interface > Submitting records > Directly in the field > [[Entering_records#Step_2:_Species | Step 2: Species]].<br /> | |||
<br /> | <br /> | ||
< | ===Step 4: Number of individuals=== | ||
[[ | <br /> | ||
Enter the number of individuals as described in wiki section Mobile interface > Submitting records > Directly in the field > [[Entering_records#Step_3:_Number_of_individuals | Step 3: Number of individuals]]. Note in this option one cannot '''Start a count''' as in other options. <br /> | |||
<br /> | <br /> | ||
===Step 5 (non mandatory): Additional information=== | |||
<br /> | |||
[[Entering_records#Step_4_(non_mandatory_fields):_Additional_information| | Enter any other additional information as described in wiki section Mobile interface > Submitting records > Directly in the field [[Entering_records#Step_4_(non_mandatory_fields):_Additional_information| Step 4: Additional information]].<br /> | ||
<br /> | |||
<br/> | |||
=== | <!--T:139--> | ||
===Step 6 (last step): Ending the record=== | |||
<br /> | <br /> | ||
When you finish entering an observation, click '''Save''' and you will be taken to [[Entering records#Step 1: Date / Time|Step 1: Date/Time]] to allow you to enter other data later. A green line shows on top to prove data is saved, then automatically disappears. | |||
<!--T: | <!--T:140--> | ||
<center> | <br /> | ||
<div style=" | |||
[[File: | <!--T:141--> | ||
< | | ||
''' | |||
</ | =With a detailed list= | ||
<br /> | |||
Select this option to create a list in the field in real time. You can access it from the menu or from the quick key at the top right corner of the screen.<br /> | |||
<br /> | |||
<!--T:142--> | |||
<center> | |||
<div class="toc" style="border-radius:5px;background-color:#ffffff;padding-left:8px;padding-right:8px;padding-bottom:8px;width:600px;"> | |||
[[File:With list in the field.png|600px]] | |||
<div class="toc" style="border-radius:5px;padding-left:15px;text-align:left; font-size:12px;width:585px;"> | |||
'''With a detailed list.''' | |||
</div> | |||
</div> | </div> | ||
</center> | </center> | ||
<br /> | <br/> | ||
<br/> | <br/> | ||
<!--T: | <!--T:143--> | ||
<div class="toc" style="width:300px;"> <!-- La llargada s'ha de canviar aquí --> | |||
<div class="mw-collapsible mw-collapsed" data-expandtext="Show" data-collapsetext="Hide" style="width:250px;margin-bottom:0px;margin-top:0px;background-color:#f7f7f7;"> | |||
< | '''3 With a detailed list''' | ||
<div class="mw-collapsible-content" style="width:300px;background-color:#f7f7f7;"> <!-- I també cal canviar la llargada aquí --> | |||
<ol> | |||
<!-- | 3.1 [[Entering_records#Step_1:_Starting_a_list|Step 1: Starting a list]] <br /> | ||
3.2 [[Entering_records#Step_2:_Place_2|Step 2: Place]]<br /> | |||
3.3 [[Entering_records#Step_3:_Species_2|Step 3: Species]]<br /> | |||
3.4 [[Entering_records#Step_4:_Number of individuals_2|Step 4: Number of individuals]]<br /> | |||
3.5 [[Entering_records#Step_5:_Additional_information|Step 5: Additional information]]<br/> | |||
3.6 [[Entering_records#Ending_the_list|Ending the list]]<br/></ol> | |||
</div> | |||
</div> | |||
</div> | |||
<br/> | |||
<!--T: | ===Step 1: Starting a list=== <!--T:144--> | ||
<!--T: | <!--T:145--> | ||
To | The 3 options below are optional. To go directly to the list, click '''Next'''.<br/> | ||
<br/> | <br/> | ||
<!--T:146--> | |||
:'''1.''' Enter a comment about this list if appropriate. You can still comment individually every record.<br/> | |||
<br/> | <br/> | ||
<!--T:147--> | |||
:'''2.''' Select '''Record the trace''' if you want to record your track. The default option is set in Main menu > Preferences > Personalization > [[Getting_started_NaturaList#Keeping_the_trace|Keeping the trace]]. Visit wiki section Mobile interface > Getting started > Preferences > Personalization > [[Getting_started_NaturaList#Keeping_the_trace|Keeping the trace]] to know more.<br/> | |||
<br/> | |||
<!--T:148--> | |||
:'''3.''' Select '''Hide all records from the public''' if you want it to be the default option while creating this list. You can change it later for individual observations you want to share anyway. [[Main_Page#Administration | Administrators]] will still have access to your records once submitted. Note: If in '''[[Getting started NaturaList#Preferences|Preferences]]''' you chose to[[Getting_started_NaturaList#Hide_record | hide records]], all your records, including lists are hidden automatically. <br/> | |||
<br/> | |||
<!--T:149--> | |||
:'''4.''' Click '''Next''' to start entering your data.<br /> | |||
<br /> | |||
<!--T:150--> | |||
[[File:Start list in the field.png|700px|thumb|center|Starting a list in the field.]] <br /> | |||
<br /> | |||
<!--T:151--> | |||
Note from that moment an intermittent red dot will appear at the top of your screen indicating the list is running. All records you enter are considered to be part of this list. The taxonomic group of the first record you enter will determine the taxonomic group of the list. If you enter a new taxonomic group, you will be warned and it will still be recorded though not as part of the list. You can see for how long the list is running along with the red dot. Use the keys on the right of the screen to pause or stop the list (see image below). Pause the list to enter other records alongside it, either from the same or different taxa.<br /> | |||
<br /> | |||
<!--T:152--> | |||
<center> | <center> | ||
<div class="toc" style="border-radius:5px;background-color:#ffffff;padding-left:8px;padding-right | <div class="toc" style="border-radius:5px;background-color:#ffffff;padding-left:8px;padding-right:8px;width:600px;"> | ||
[[File: | [[File:Recording list.png|600px]] | ||
<div class="toc" style="border-radius:5px;padding-left:15px;text-align:left; font-size:12px;width: | <div class="toc" style="border-radius:5px;padding-left:15px;text-align:left; font-size:12px;width:485px;"> | ||
''' | '''Recording a list in the field.''' | ||
</div> | </div> | ||
<p style="color:black;font-size:12px;padding-left:5px;text-align:left;column-count:1;padding-right:5px;"> | |||
'''1. Time:''' Time since the list started.<br/> | |||
'''2. Recording:''' Indicates the time is running. <br/> | |||
'''3. Break:''' Pause the list to enter observations that do not belong to the list. The time continues running. <br/> | |||
'''4. Stop:''' End the list. <br/> | |||
</p> | |||
</div> | </div> | ||
</center> | </center> | ||
| Line 606: | Line 652: | ||
<br/> | <br/> | ||
<!--T:153--> | |||
<center> | |||
<table class="toc" width="700px" style="border:1px solid black"> | |||
<tr> | |||
< | <td style="padding: 25px; text-align: left; font-family: sans-serif; color: black; background-color: #ffffdb"> | ||
<!-- GREEN BOX (Tips): hsl(157, 74%, 80%) | |||
YELLOW BOX (Summaries): #ffffdb" | |||
BLUE BOX (Information): hsl(201, 100%, 89%) | |||
RED BOX (Warnings): hsl(0, 77%, 78%) --> | |||
<!--T:154--> | |||
<p> | |||
<b> BREAK:</b> Enter other species from the same or different taxa but do not include them on the ongoing list. The time continues running.<br /> | |||
<br /> | |||
<b>STOP:</b> End the list. The time will stop running.<br /> | |||
</p> | |||
<!--T:155--> | |||
< | </td></tr></table> | ||
</center> | |||
< | <!--T:156--> | ||
<br /> | |||
<br /> | |||
<br/> | |||
<br/> | |||
===Step 2: Place=== | |||
<br /> | |||
Place red marker at the observation's position by moving the map. By clicking on the aim icon (see image), the marker will automatically position at your GPS location and center it. | |||
<!--T:157--> | |||
Note, "with a detailed list" requires you to indicate the exact position of the observation. Therefore, using the "aim" icon is useful to know where you are and for observations that are on your same spot, for example plants or some insects. | |||
<!--T: | <!--T:158--> | ||
Click '''Next''' when done. | |||
<!--T: | <!--T:159--> | ||
Note: The show/hide summary of observation (1 on image below) allows you to see other records of the list or to hide them. It allows too to select one of those records to modify or delete it.<br /> | |||
<br /> | |||
<!--T:160--> | |||
To know how to navigate the map, go to wiki section [[Navigating_the_map_NaturaList | How to navigate the map]]. <br /> | |||
<br /> | |||
<!--T:161--> | |||
<center> | <center> | ||
<div | <div style="width:700px; font-size:15px; border:0px solid grey;text-align:left;"> | ||
[[File: | [[File:Location on list.png|700px|center|Selecting location on a list.]] | ||
< | <p style="width:660px;text-align:left;border:0px solid grey;margin-left:110px;"> | ||
''' | '''Selecting location on a list.'''<br/> | ||
</ | </p> | ||
<p style="font-size:12px; color:red;text-align:left;margin-left:125px;margin-right:125px;"> | |||
'''1.''' Show / hide [[Navigating_the_map_NaturaList#Understanding_a_summary_of_observations|summary of observations]]. <br/> | |||
'''2.''' Select own position. <br/> | |||
</p> | |||
</div> | </div> | ||
</center> | </center> | ||
<br/> | <br /> | ||
<br/> | <br /> | ||
<!--T: | <!--T:162--> | ||
===Step 3: Species=== | |||
<br/> | <br /> | ||
Enter species as described in wiki section Mobile interface > Submitting records > Directly in the field > [[Entering_records#Step_2:_Species | Step 2: Species]].<br /> | |||
<br /> | |||
<!--T: | <!--T:163--> | ||
===Step 4: Number of individuals=== | |||
<br/> | <br/> | ||
Enter number of individuals as described in wiki section Mobile interface > Submitting records > Directly in the field > [[Entering_records#Step_3:_Number_of_individuals|Number of individuals]]. <br/> | |||
<br/> | <br/> | ||
===Step 5: Additional information=== | |||
<br /> | |||
<br/> | Enter any other additional information as described in wiki section Mobile interface > Submitting records > Directly in the field > [[Entering records#Step 4 (non mandatory fields): Additional information|Step 4 (non mandatory fields): Additional information]].<br /> | ||
<br /> | |||
< | <!--T:164--> | ||
| |||
===Ending the list=== | |||
<br /> | |||
<br/> | Click the stop button on the top to end the list and confirm (see image). <br /> | ||
<br /> | |||
<!--T:165--> | |||
[[File:End list in the field.png|700px|thumb|center|Ending list in the field.]]<br /> | |||
<br /> | |||
<br/> | |||
<!--T:166--> | |||
Adjust starting time and ending time if necessary, for example if you forgot to stop the list when you finished recording (see image below). Otherwise, since it is a real time list, starting and ending time will be automatically detected by starting and ending the list. Add any comment if necessary, and indicate if is a '''partial list''' (not all species detected were recorded) or if it is a '''complete list''' (all species seen or heard were recorded). A complete list does not refer to species present but to species detected. <br /> | |||
<br /> | |||
<!--T: | <!--T:167--> | ||
[[File:Full vs. partial list in the field.png|700px|thumb|center|Adjusting list time.]] | |||
<!--T: | <!--T:168--> | ||
When displaying data, observations belonging to a partial list are represented with a hollow green square, and those belonging to a complete list are indicate by a full green square. See wiki section Various > [[Symbols_cheatsheet|Symbols cheatsheet]] for more information. <br /> | |||
</ | |||
<br /> | <br /> | ||
<!--T: | <!--T:169--> | ||
| |||
<br/> | =With a simple list= | ||
<br /> | |||
Allows creating simplified lists in real time or that took place in the past. | |||
<br/> | You may not enter precisely each record, but you enter the records at your position (real time) or one point (observation entered in the past) the record gets a new precision marker called “unprecise” and the observation pressure is recorded.<br /> | ||
<br /> | |||
<!--T: | <!--T:170--> | ||
<center> | <center> | ||
<div class="toc" style="border-radius:5px;background-color:#ffffff;padding-left:8px;padding-right:8px;padding-bottom:8px;width:600px;"> | <div class="toc" style="border-radius:5px;background-color:#ffffff;padding-left:8px;padding-right:8px;padding-bottom:8px;width:600px;"> | ||
[[File: | [[File:List_in_the_past.png|600px]] | ||
<div class="toc" style="border-radius:5px;padding-left:15px;text-align:left; font-size:12px;width:585px;"> | <div class="toc" style="border-radius:5px;padding-left:15px;text-align:left; font-size:12px;width:585px;"> | ||
''' | '''With a simple list.''' | ||
</div> | </div> | ||
</div> | </div> | ||
</center> | </center> | ||
| Line 768: | Line 775: | ||
<br/> | <br/> | ||
<!--T: | <!--T:171--> | ||
<div class="toc" style="width:300px;"> <!-- La llargada s'ha de canviar aquí --> | |||
<div class="mw-collapsible mw-collapsed" data-expandtext="Show" data-collapsetext="Hide" style="width:250px;margin-bottom:0px;margin-top:0px;background-color:#f7f7f7;"> | |||
'''4 With a simple list''' | |||
<div class="mw-collapsible-content" style="width:300px;background-color:#f7f7f7;"> <!-- I també cal canviar la llargada aquí --> | |||
<ol> | |||
4.1 [[Entering_records#Step_1:_Date_/_Time_2|Step 1: Date / Time]] <br /> | |||
4.2 [[Entering_records#Step_2:_Place_3|Step 2: Place]]<br /> | |||
4.3 [[Entering_records#Step_3:_Species_3|Step 3: Species]]<br /> | |||
4.4 [[Entering_records#Additional_information_2|Additional information]]<br/> | |||
4.5 [[Entering_records#Step_4:_Ending_the_list|Step 4: Ending the list]] <br/> </ol> | |||
</div> | |||
</div> | |||
</div> | |||
<br/> | <br/> | ||
<!--T: | <!--T:172--> | ||
===Step 1: Date / Time=== | |||
<br /> | |||
By default the app shows the current date and time, which can be used as such to record a real time list. <br/> | |||
<br/> | |||
If your observations happened in the past, <br/> | |||
*click on the date to modify it by selecting from the expandable calendar <br/> | |||
*click on the time to select the starting time of the list and select from the expandable clock as in Mobile interface > Submitting records > Later > [[Entering_records#Step_1:_Date_/_Time| Step 1: Date / Time]]. <br /> | |||
<br /> | <br /> | ||
<!--T: | <!--T:173--> | ||
< | Add a comment if necessary and indicate if you want to hide the records from the public and/or record your trace. Administrators will still see them once they are synchronised. <br/> | ||
Visit wiki section Mobile interface > Getting started > Preferences > Personalization > [[Getting_started_NaturaList#Keeping_the_trace|Keeping the trace]] to know more about recording your trace. <br /> | |||
[[ | <br /> | ||
When done, click '''Next'''.<br/> | |||
<br/> | |||
<br/> | <br/> | ||
<!--T: | <!--T:174--> | ||
<center> | <center> | ||
<div class="toc" style="border-radius: 5px; padding: 25px; text-align: left; font-family: sans-serif; color: black; width: | <div class="toc" style="border-radius: 5px; padding: 25px; text-align: left; font-family: sans-serif; color: black; width: 600px; background-color: hsl(201, 100%, 89%)"> | ||
<!-- GREEN BOX (Tips): hsl(157, 74%, 80%) | <!-- GREEN BOX (Tips): hsl(157, 74%, 80%) | ||
YELLOW BOX (Summaries): #ffffdb" | YELLOW BOX (Summaries): #ffffdb" | ||
| Line 800: | Line 817: | ||
RED BOX (Warnings): hsl(0, 77%, 78%) --> | RED BOX (Warnings): hsl(0, 77%, 78%) --> | ||
<!--T: | <!--T:175--> | ||
<p> | <p> | ||
< | <b>NOTE</b><br/> | ||
<!--T:176--> | |||
</ | If you change the time within 5 minutes of the given time, or do not change it at all, your list is considered a real time list and you have the option to record the trace. You will not be able to indicate the position of your observation, and it will be automatically considered to be the same as the position of your GPS.<br /> | ||
<br/> | |||
<!--T: | <!--T:177--> | ||
</ | If you change the time more than 5 minutes of the real time, your list is not considered a real time list and the option to record the trace gets unresponsive. You will be able to select the position of your observations on a map, as explained in next sub section [[Entering_records#Step_2:_Place_3|Place]].<br/> | ||
</ | |||
< | <!--T:178--> | ||
</div> | |||
</center> | |||
<br /> | <br /> | ||
<!--T: | <!--T:179--> | ||
| |||
===Step 2: Place=== | |||
<br /> | |||
This option is only available if you are entering a list after it occurred. That is, if you changed the time in the previous screen more than 5 minutes from the real one.<br/> | |||
<br/> | <br/> | ||
< | <!--T:180--> | ||
Select the position as in Mobile interface > Submitting records > Later > [[Entering_records#Step_1:_Date_/_Time| Step 1: Date / Time]]. <br/> | |||
[[ | |||
<br/> | |||
<br/> | <br/> | ||
Click '''Next''' when done. <br /> | |||
<br /> | |||
<br/> | |||
<!--T:181--> | |||
<center> | <center> | ||
<div class="toc" style="border-radius: 5px; padding: 25px; text-align: left; font-family: sans-serif; color: black; width: 600px; background-color: hsl(201, 100%, 89%)"> | |||
<!-- GREEN BOX (Tips): hsl(157, 74%, 80%) | |||
<div class="toc" style="border-radius:5px;padding | YELLOW BOX (Summaries): #ffffdb" | ||
BLUE BOX (Information): hsl(201, 100%, 89%) | |||
RED BOX (Warnings): hsl(0, 77%, 78%) --> | |||
< | |||
<!--T:182--> | |||
< | <p> | ||
<b> NOTE:</b><br /> | |||
<br/> | |||
<!--T:183--> | |||
<br /> | *For a simple list (entered later than it occurred) the location will be the same for all the sightings, so the first time you select a place will be the position for all the following data you insert.<br /> | ||
*If you are covering a big area or different ecosystems, consider doing so in separate lists. | |||
<!--T: | <!--T:184--> | ||
</table> | |||
</ | |||
</center> | </center> | ||
<br /> | |||
<br /> | <br /> | ||
<!--T: | <!--T:185--> | ||
[[ | | ||
===Step 3: Species=== | |||
<br /> | |||
Enter species as described in wiki section Mobile interface > Submitting records > Directly in the field > [[Entering_records#Step_2:_Species|Species]].<br /> | |||
<br /> | |||
<!--T:186--> | |||
For a real time simplified list, it is now possible to enter the same species several times separately. All records are kept with their time and location (see image below). <br/> | |||
<br/> | |||
<center> | <center> | ||
<div style=" | <div class="toc" style="border-radius:5px;background-color:#ffffff;padding-left:8px;padding-right:8px;width:500px;"> | ||
[[File: | [[File:Enter_sp_in_simpler_list.png|500px]] | ||
<p style=" | <div class="toc" style="border-radius:5px;padding-left:15px;text-align:left; font-size:12px;width:485px;"> | ||
''' | '''Entering species with a simple list.''' | ||
</div> | |||
<p style="color:black;font-size:12px;padding-left:5px;text-align:left;column-count:1;padding-right:5px;"> | |||
'''1. Species list:''' Repeated species are saved separately. <br/> | |||
'''2. Sort list:''' Click on the clock (left) to sort the list chronologically, or on the letters (right) to do so alphabetically. <br/> | |||
'''3. [[Entering_records#GPS precision|Location and number of species]]:''' GPS precision (left) and the number of species already entered (right). Click on the map to see your location. <br/> | |||
'''4. Additional information:''' Click the dots to open the additional information panel. <br/> | |||
</p> | </p> | ||
</div> | </div> | ||
</center> | </center> | ||
<br/> | <br/> | ||
<br/> | <br/> | ||
For a real or delayed simplified list, you can also use symbols '''+''' and '''-''' to enter number of individuals (see image below). | |||
With that way the localtion is the same for all individuals. <br /> | |||
<br /> | |||
<br/> | |||
<center> | <center> | ||
<div style=" | <div class="toc" style="border-radius:5px;background-color:#ffffff;padding-left:8px;padding-right:8px;width:600px;"> | ||
[[File: | [[File:Plus_minus_indv.png|600px]] | ||
< | <div class="toc" style="border-radius:5px;padding-left:15px;text-align:left; font-size:12px;width:585px;"> | ||
''' | '''Adding/Subtracting individuals.''' | ||
</div> | </div> | ||
< | <p style="color:black;font-size:12px;padding-left:5px;text-align:left;column-count:1;padding-right:5px;"> | ||
'''1. Add individuals:''' Click on '''+''' to add individuals to the count. <br/> | |||
'''2. Subtract individuals:''' Click on '''-''' to subtract individuals to the count. <br/> | |||
''' | |||
</p> | </p> | ||
</div> | </div> | ||
</center> | </center> | ||
<br/> | <br/> | ||
<br/> | <br/> | ||
====< | ===Additional information=== | ||
<br/> | <br /> | ||
You will not be prompted to enter additional information. However, you can add it after entering a record in the list or after finishing the list (see [[Edit_records | Editing records]] for more information). <br /> | |||
<br /> | |||
<!--T: | <!--T:187--> | ||
While creating the list, click on a species name and select '''Edit record''' to access the additional information menu. <br/> | |||
See wiki section Mobile interface > Submitting records > [[Entering_records#Additional_information_panel|Additional information panel]] to navigate all sections in the menu. <br /> | |||
<br /> | |||
<!--T:188--> | |||
If only the number of individuals needs to be modified, use the plus and minus signs on the left of the species name to modify the count (see image below). The new number is saved automatically. <br /> | |||
<br /> | |||
<!--T:189--> | |||
Click on the species name and select '''Delete''' to delete the record.<br /> | |||
<br /> | |||
<!--T:190--> | |||
<center> | <center> | ||
<div style=" | <div class="toc" style="border-radius:5px;background-color:#ffffff;padding-left:8px;padding-right:8px;width:600px;"> | ||
[[File: | [[File:Add_info_in_list_later.png |600px]] | ||
<p style=" | <div class="toc" style="border-radius:5px;padding-left:15px;text-align:left; font-size:12px;width:585px;"> | ||
''' | '''Entering additional information in '''with simple later'''.''' | ||
</div> | |||
<p style="color:black;font-size:12px;padding-left:5px;text-align:left;column-count:1;padding-right:5px;"> | |||
'''1. Edit record:''' Enter additional information.<br/> | |||
'''2. Display more information:''' See location and summary of observation. <br/> | |||
'''3. Delete:''' Delete entry. <br /> | |||
</p> | </p> | ||
</div> | </div> | ||
</center> | </center> | ||
<br /> | <br/> | ||
<br/> | <br/> | ||
<!--T: | <!--T:191--> | ||
<span id="GPS precision"></span> | |||
If your list occurs in real time, the screen will also show GPS precision (on the top left corner, in green or red) and the number of species already entered (top right corner, see image below). If besides, you are in Africa, it will indicate in the middle the atlas grid number of the African atlas. <br/> | |||
<br/> | <br/> | ||
<!--T: | <!--T:192--> | ||
<center> | <center> | ||
<div style=" | <div class="toc" style="border-radius:5px;background-color:#ffffff;padding-left:8px;padding-right:8px;width:600px;"> | ||
[[File: | [[File:Gps precision.png|600px]] | ||
< | <div class="toc" style="border-radius:5px;padding-left:15px;text-align:left; font-size:12px;width:585px;"> | ||
''' | '''A real time simple list.''' | ||
</div> | |||
<p style="color:black;font-size:12px;padding-left:30px;text-align:left;column-count:2;"> | |||
'''1.''' GPS precision. Click on the map to see location. <br/> | |||
'''2.''' Number of species already entered <br/> | |||
</p> | </p> | ||
</div> | </div> | ||
</center> | </center> | ||
<br/> | <br/> | ||
<br/> | <br/> | ||
<!--T:193--> | |||
| |||
===Step 4: Ending the list=== | |||
<br /> | |||
When all records are entered, <br/> | |||
1. click on the "stop" icon at the top right corner to finish the list, and confirm (see image). <br /> | |||
</ | |||
</ | |||
<br /> | <br /> | ||
<!--T:194--> | |||
<center> | |||
<div class="toc" style="border-radius:5px;background-color:#ffffff;padding-left:8px;padding-right:8px; padding-bottom:8px;width:400px;"> | |||
[[File:End list later.png|400px]] | |||
<div class="toc" style="border-radius:5px;padding-left:15px;text-align:left; font-size:12px;width:385px;"> | |||
'''Ending ''with a simple list 1.''' | |||
<center> | |||
<div class="toc" style="border-radius:5px;background-color:#ffffff;padding-left:8px;padding-right:8px;padding-bottom:8px;width: | |||
[[File: | |||
<div class="toc" style="border-radius:5px;padding-left:15px;text-align:left; font-size:12px;width: | |||
''' | |||
</div> | </div> | ||
<p style="color:black;font-size:12px;padding-left:30px;text-align:left;column-count:2;"> | <p style="color:black;font-size:12px;padding-left:30px;text-align:left;column-count:2;"> | ||
<b> | <b>1a.</b> End list <br /> | ||
<b> | <b>1b.</b> Confirm <br/> | ||
</p> | </p> | ||
</div> | </div> | ||
| Line 1,027: | Line 1,000: | ||
<br/> | <br/> | ||
<!--T:195--> | |||
2. Click on the time button to open an expandable clock and introduce ending time if necessary as explained in wiki section Mobile interface > Submitting records > With a detailed list >[[Entering_records#Ending_the_list| Ending the list]]. <br/> | |||
[[Entering_records# | 3. Adjust starting time if necessary. <br/> | ||
<br/> | 4. Enter/ Modify a comment if necessary. <br/> | ||
5. Enter any other required information. It may vary from country to country. <br/> | |||
6. Finally, indicate if you recorded all species present or only part of them (see image). <br /> | |||
<br /> | |||
<br/> | |||
<br/> | |||
<!--T:196--> | |||
<center> | <center> | ||
<div class="toc" style="border-radius:5px;background-color:#ffffff;padding-left:8px;padding-right:8px;padding-bottom:8px;width:400px;"> | <div class="toc" style="border-radius:5px;background-color:#ffffff;padding-left:8px;padding-right:8px; padding-bottom:8px;width:400px;"> | ||
[[File: | [[File:End list later time.png|400px]] | ||
<div class="toc" style="border-radius:5px;padding-left:15px;text-align:left; font-size:12px;width:385px;"> | <div class="toc" style="border-radius:5px;padding-left:15px;text-align:left; font-size:12px;width:385px;"> | ||
''' | '''Ending ''with a simple list 2.''' | ||
</div> | </div> | ||
<p style="color:black;font-size:12px;padding-left:5px;text-align:left;column-count:1;padding-right:5px;"> | |||
<b>2/3.</b> Adjust starting (left) and ending (right) time <br/> | |||
<b>4/5.</b> Enter/Modify Comments or other information required <br /> | |||
<b>6.</b> Select type of list<br/> | |||
</p> | |||
</div> | </div> | ||
</center> | </center> | ||
| Line 1,053: | Line 1,025: | ||
<br/> | <br/> | ||
<!--T:197--> | |||
<center> | <center> | ||
<div class="toc" style="border-radius: 5px; padding: 25px; text-align: left; font-family: sans-serif; color: black; width: | <div class="toc" style="border-radius: 5px; padding: 25px; text-align: left; font-family: sans-serif; color: black; width: 700px; background-color: #ffffdb"> | ||
<!-- GREEN BOX (Tips): hsl(157, 74%, 80%) | <!-- GREEN BOX (Tips): hsl(157, 74%, 80%) | ||
YELLOW BOX (Summaries): #ffffdb" | YELLOW BOX (Summaries): #ffffdb" | ||
| Line 1,060: | Line 1,033: | ||
RED BOX (Warnings): hsl(0, 77%, 78%) --> | RED BOX (Warnings): hsl(0, 77%, 78%) --> | ||
<!--T:198--> | |||
<p> | <p> | ||
<b> | <b> COMPARISON BETWEEN "WITH A DETAILED LIST" AND "WITH A SIMPLE LIST"</b><br /> | ||
<b> | <br /> | ||
<b>With a detailed list</b> preselects date and time for you but requires you to enter the position for each record. If the position of the observation is your current position, use the aim icon to be faster. It also allows entering additional information for each record within each entry.<br /> | |||
<br /> | |||
<b>With a simple list</b> can also be used in the field. In this case, you need to select date as well as starting and ending time. However, you will not be prompted to enter the position for each observation and the additional information menu will not be automatically displayed for each record. This saves time and reduces the chances of missing some individuals.<br /> | |||
<br /> | |||
Use "With a simple list" also in the field in real time if you do not need to get exact positions for each individual or add detailed information (as age, sex, pictures or atlas codes) for most of them. <br /> | |||
</p> | </p> | ||
< | <!--T:199--> | ||
</center> | </center> | ||
<br /> | <br /> | ||
<br/> | |||
< | <!--T:200--> | ||
[[Entering_records#With_a_simple_list|[Top to <i>With a simple list</i>]]]<br/> | |||
[[#top|[Back to Submitting records]]]<br/> | |||
<br/> | <br/> | ||
=Synchronisation= | |||
< | <br /> | ||
< | <!--T:201--> | ||
Once your finish entering your records and add or amend any information, consider synchronizing them. When synchronising, your records become public to other users and available to administrators for verification and planning conservation. If you selected to '''hide your records from the public''', those won’t be visible to other users, but administrators will still see them, verify them and use them for conservation purposes. <br /> | |||
<br /> | |||
</ | |||
< | <!--T:202--> | ||
To synchronise, click on the reminder at the bottom of the screen, both in your list of observations and on the starting screen and confirm (see image below). <br/> | |||
<br/> | |||
</ | |||
< | <!--T:203--> | ||
Once your records are synchronised, you can no longer modify them in NaturaList, but you can do so from your local portal. See a list of local portals in the wiki section Various > [[Local portals and partners|Local portals and partners]]. Go to wiki section Web interface > [[Editing_records|Editing records]] for more information on how to edit records on the web site. <br /> | |||
[[ | <br /> | ||
</ | |||
< | <!--T:204--> | ||
If no local portal exists for the site (for example in Africa or outside Europe), go to [https://data.biolovision.net https:data.biolovision.net] to make changes. <br/> | |||
[ | <br/> | ||
</ | |||
< | <!--T:205--> | ||
< | <center> | ||
<div class="toc" style="border-radius:5px;background-color:#ffffff;padding-left:8px;padding-right:8px; padding-bottom:8px;width:600px;"> | |||
</ | [[File:Synchronisation.png|600px]] | ||
< | <div class="toc" style="border-radius:5px;padding-left:15px;text-align:left; font-size:12px;width:585px;"> | ||
</ | '''Synchronisation.''' | ||
</div> | |||
<p style="color:black;font-size:12px;padding-left:30px;text-align:left;column-count:2;"> | |||
<b>1.</b> Synchronise<br /> | |||
<b>2.</b> Confirm <br/> | |||
</p> | |||
</div> | |||
</center> | |||
<br/> | |||
<br/> | |||
< | <!--T:206--> | ||
< | <center> | ||
<div class="toc" style="border-radius: 5px; padding: 25px; text-align: left; font-family: sans-serif; color: black; width: 600px; background-color: #ffffdb"> | |||
<!-- GREEN BOX (Tips): hsl(157, 74%, 80%) | |||
YELLOW BOX (Summaries): #ffffdb" | |||
BLUE BOX (Information): hsl(201, 100%, 89%) | |||
RED BOX (Warnings): hsl(0, 77%, 78%) --> | |||
< | <!--T:207--> | ||
<p> | |||
<b> Why to synchronise:</b><br /> | |||
< | |||
< | |||
</ | |||
</ | |||
< | <!--T:208--> | ||
< | *Share your observations with fellow naturalists. <br /> | ||
*Participate in conservation initiatives. <br /> | |||
</ | *Back up your records online (otherwise you may lose them if your phone crashes). <br /> | ||
< | *Confirm dubious records. <br /> | ||
</ | </p> | ||
< | <!--T:209--> | ||
<td> | </td></tr></table> | ||
</center> | |||
</ | <br /> | ||
< | <br /> | ||
</ | |||
< | <!--T:210--> | ||
| |||
=Create an object= | |||
<br/> | <br/> | ||
<!--T:211--> | |||
Allows to record a nest, a burrow, a birdhouse, or similar encountered on the field, and attach it to an observation. This function is only available to users with special rights. <br/> | |||
For more information, visit the wiki section Mobile interface > [[Create_an_object|Create an object]]. <br/> | |||
<br/> | <br/> | ||
< | <!--T:212--> | ||
====Create an object==== | |||
<!--T:213--> | |||
Access it as if entering data, and click '''Create object''' (see image below). <br/> | |||
<br/> | <br/> | ||
<!--T:214--> | |||
<center> | <center> | ||
<div class="toc" style="border-radius:5px;background-color:#ffffff;padding-left:8px;padding-right:8px;padding-bottom:8px;width:600px;"> | |||
[[File:Create object in the menu.jpg|600px]] | |||
<div class="toc" style="border-radius:5px;padding-left:15px;text-align:left; font-size:12px;width:585px;"> | |||
'''Create an object. Main menu.''' | |||
<div class="toc" style="border-radius:5px;background-color:#ffffff;padding-left:8px;padding-right:8px;padding-bottom:8px;width: | |||
[[File: | |||
<div class="toc" style="border-radius:5px;padding-left:15px;text-align:left; font-size:12px;width: | |||
''' | |||
</div> | </div> | ||
</div> | </div> | ||
| Line 1,184: | Line 1,145: | ||
<br/> | <br/> | ||
< | <!--T:215--> | ||
Visit wiki section Mobile interface > Create an object > [[Create_an_object#Create_object|Create object]] to know how to create an object. <br/> | |||
<br/> | <br/> | ||
< | <!--T:216--> | ||
====Attach objects to observations==== | |||
<!--T:217--> | |||
Objects can be associated to observations either before or after synchronisation.<br/> | |||
<br/> | <br/> | ||
<!--T:218--> | |||
<center> | <center> | ||
<div class="toc" style="border-radius:5px;background-color:#ffffff;padding-left:8px;padding-right:8px;padding-bottom:8px;width: | {| style="text-align:left; border:0px solid black; vertical-align:top;"| | ||
[[File: | |- | ||
<div class="toc" style="border-radius:5px;padding-left:15px;text-align:left; font-size:12px;width: | |style="padding: 10px"| | ||
''' | <div class="toc" style="border-radius:5px;background-color:#ffffff;padding-left:8px;padding-right:8px;padding-bottom:8px;width:400px;"> | ||
[[File:Add object bf sync.png|400px]] | |||
<div class="toc" style="border-radius:5px;padding-left:15px;text-align:left; font-size:12px;width:385px;"> | |||
'''Attach an object to an observation (before synchronisation).''' | |||
</div> | |||
</div> | |||
|style="padding: 10px"| | |||
<div class="toc" style="border-radius:5px;background-color:#ffffff;padding-left:8px;padding-right:8px;padding-bottom:8px;width:400px;"> | |||
[[File:Add object af sync.png|400px]] | |||
<div class="toc" style="border-radius:5px;padding-left:15px;text-align:left; font-size:12px;width:385px;"> | |||
'''Attach an object to an observation (after synchronisation).''' | |||
</div> | </div> | ||
</div> | </div> | ||
|} | |||
</center> | </center> | ||
<br/> | <br/> | ||
<br/> | <br/> | ||
< | <!--T:219--> | ||
Visit wiki section Mobile interface > Create an object > [[Create_an_object#Attach_objects_to_observations|Attach objects to observations]] to know how to associate an object to an observation, for example, a nest. <br/> | |||
[[ | <br/> | ||
</ | |||
< | <!--T:220--> | ||
====Browse created objects==== | |||
<!--T:221--> | |||
Objects can be seen in NaturaList and on the local portal. <br/> | |||
<br/> | <br/> | ||
< | <!--T:222--> | ||
:::::: | <center> | ||
<div class="toc" style="border-radius:5px;background-color:#ffffff;padding-left:8px;padding-right:8px;padding-bottom:8px;width:400px;"> | |||
< | [[File:Object_to_synchronise.png|400px]] | ||
<div class="toc" style="border-radius:5px;padding-left:15px;text-align:left; font-size:12px;width:385px;"> | |||
<p style=" | '''List of created objects.''' | ||
</div> | |||
<p style="color:black;font-size:12px;padding-left:5px;text-align:left;column-count:1;padding-right:5px;"> | |||
<b>1.</b> Object pending synchronisation. <br /> | |||
<br/> | <br/> | ||
<i>Synchronised objects do not show any icon</i> | |||
</p> | |||
</ | |||
</div> | </div> | ||
</center> | </center> | ||
| Line 1,262: | Line 1,210: | ||
<br/> | <br/> | ||
<!--T:223--> | |||
<center> | |||
<div class="toc" style="border-radius:5px;background-color:#ffffff;padding-left:8px;padding-right:8px;width:600px;"> | |||
<!--T: | [[File:Object_associated_to_an_obs.png|600px]] | ||
<center> | |||
<div class="toc" style="border-radius:5px;background-color:#ffffff;padding-left:8px;padding-right | |||
[[File: | |||
<div class="toc" style="border-radius:5px;padding-left:15px;text-align:left; font-size:12px;width:585px;"> | <div class="toc" style="border-radius:5px;padding-left:15px;text-align:left; font-size:12px;width:585px;"> | ||
''' | '''Browsing object in the local portal.''' | ||
</div> | </div> | ||
<p style="color:black;font-size:12px;padding-left:5px;text-align:left;column-count:1;padding-right:5px;"> | |||
'''1.''' Access object <br/> | |||
'''2.''' Access associated observation <br/> | |||
</p> | |||
</div> | </div> | ||
</center> | </center> | ||
| Line 1,293: | Line 1,226: | ||
<br/> | <br/> | ||
<!--T: | <!--T:224--> | ||
Visit wiki section Mobile interface > Create an object > [[Create_an_object#Browsing_objects|Browse objects]] to see your created objects. <br/> | |||
<br/> | |||
< | |||
< | |||
<!--T: | <!--T:225--> | ||
====Edit objects==== | |||
<!--T: | <!--T:228--> | ||
Visit wiki section Mobile interface > Create an object > [[Create_an_object#Edit_objects|Edit objects]] to modify your objects. <br/> | |||
<br /> | |||
<br/> | <br/> | ||
<!--T: | ====Delete objects==== | ||
< | |||
<div class=" | <!--T:230--> | ||
Delete your objects directly from NaturaList. <br/> | |||
<div class=" | <br/> | ||
<!--T:231--> | |||
<center> | |||
<div class="toc" style="border-radius:5px;background-color:#ffffff;padding-left:8px;padding-right:8px;padding-bottom:8px;width:400px;"> | |||
[[File:Delete object.png|400px]] | |||
<div class="toc" style="border-radius:5px;padding-left:15px;text-align:left; font-size:12px;width:385px;"> | |||
'''Deleting an object.''' | |||
</div> | </div> | ||
</div> | </div> | ||
</center> | |||
<br/> | |||
<br/> | <br/> | ||
<!--T: | <!--T:232--> | ||
Visit wiki section Mobile interface > Create an object > [[Create_an_object#Delete_objects|Delete objects]] to delete your objects. <br/> | |||
<br /> | <br/> | ||
<!--T: | <!--T:233--> | ||
< | [[Entering_records#Create_an_object|[Top to Create an object]]]<br/> | ||
[[#top|[Back to Entering records]]]<br/> | |||
< | <br/> | ||
< | |||
< | </translate> | ||
=Additional information panel= | |||
<br/> | |||
<br /> | |||
Several modules allow to enter additional information to the recorded observation. Depending on the list or the protocol used, the additional information panel (see image below) may be opened automatically while entering observations (ie. directly in the field) or may require the user to access it as if editing the record (ie. with a simple list). <br/> | |||
Not all modules are available in all countries and lists/protocols. <br/> | |||
<br /> | <br/> | ||
< | <center> | ||
[[File: | <div class="toc" style="border-radius:5px;background-color:#ffffff;padding-left:8px;padding-right:8px;padding-bottom:8px;width:400px;"> | ||
<br /> | [[File:Screenshot_2024-05-13_170003.png|400px]] | ||
<div class="toc" style="border-radius:5px;padding-left:15px;text-align:left; font-size:12px;width:385px;"> | |||
'''Additional information panel. Example..''' | |||
</div> | |||
</div> | |||
</center> | |||
<br/> | |||
<br/> | |||
Expand the table below to see all available modules in the Additional information panel. Yellow icons indicate the module has some information in it (ie. Time or Map in the list below), while white icons indicate the module does not contain any information yet. <br/> | |||
<br/> | |||
<br /> | |||
< | <center> | ||
: | <table class="wikitable mw-collapsible mw-collapsed" style="border:1px solid black;" width="1100px" align="center" ; #customers tr="hover background-color: #ddd;}> | ||
: | <th colspan="11" style="background-color:white;">''' Additional information modules '''</th> | ||
<tr style="padding: 25px; text-align: center; font-size: 16px; font-family: sans serif; "> | |||
<th width="120px">Name</th> | |||
<th width="880px">Description</th> | |||
</tr> | |||
< | <tr style="padding: 25px; text-align: left; font-family: sans-serif; color: black; background-color: white"> | ||
<br /> | <td style="background-color: #303030;"> | ||
[[File:Atlas_code icon.png|frameless|center|100px]] | |||
</td> | |||
<td style="text-align:left">[[Entering_records#Atlas_code|<b>Atlas code</b>]]<br/>Add a code to indicate breeding stage. </td> | |||
</tr> | |||
< | <tr style="padding: 25px; text-align: left; font-family: sans-serif; color: black; background-color: white"> | ||
[[File: | <td style="background-color: #303030;"> | ||
< | [[File:Colony.png|frameless|center|100px]] | ||
</td> | |||
<td style="text-align:left">[[Entering records#Colony|<b>Colony</b>]] <br/> </td> | |||
</tr> | |||
< | <tr style="padding: 25px; text-align: left; font-family: sans-serif; color: black; background-color: white"> | ||
= | <td style="background-color: #303030;"> | ||
< | [[File:Comments.png|frameless|center|100px]] | ||
</td> | |||
< | <td style="text-align:left">[[Entering_records#Comments|<b>Comments</b>]]<br/>Add a comment about the observation, and hide or show it to the public. </td> | ||
</tr> | |||
<tr style="padding: 25px; text-align: left; font-family: sans-serif; color: black; background-color: white"> | |||
<td style="background-color: #303030;"> | |||
[[File:Detail.png|frameless|center|100px]] | |||
<tr | </td> | ||
<td style="text-align:left">[[Entering_records#Details_(Age_and_sex)|<b>Detail</b>]]<br/>Indicate the age and sex of individuals observed. </td> | |||
< | </tr> | ||
< | <tr style="padding: 25px; text-align: left; font-family: sans-serif; color: black; background-color: white"> | ||
< | <td style="background-color: #303030;"> | ||
< | [[File:Direction.png|frameless|center|100px]] | ||
</td> | |||
<br /> | <td style="text-align:left">[[Entering_records#Direction|<b>Direction</b>]]<br/>Indicate flight direction of individuals recorded. </td> | ||
</tr> | |||
</ | |||
< | <tr style="padding: 25px; text-align: left; font-family: sans-serif; color: black; background-color: white"> | ||
</td>< | <td style="background-color: #303030;"> | ||
</ | [[File:Extra protocol icon.png|frameless|center|100px]] | ||
< | </td> | ||
< | <td style="text-align:left">[[Entering_records#Extra_protocol|<b>Extra protocol</b>]]<br/>Add information about nests. </td> | ||
</tr> | |||
< | <tr style="padding: 25px; text-align: left; font-family: sans-serif; color: black; background-color: white"> | ||
= | <td style="background-color: #303030;"> | ||
< | [[File:Hidden record.png|frameless|center|100px]] | ||
</td> | |||
< | <td style="text-align:left">[[Entering_records#Hidden_record|<b>Hidden record</b>]]<br/>Choose to hide or show your observation to the public. It is independent from the comment: you can hide the comment and still show the observation.</td> | ||
</tr> | |||
< | <tr style="padding: 25px; text-align: left; font-family: sans-serif; color: black; background-color: white"> | ||
<td style="background-color: #303030;"> | |||
[[File:Map icon.png|frameless|center|100px]] | |||
</td> | |||
<td style="text-align:left">[[Entering_records#Map|<b>Map</b>]]<br/>See the observation's location. </td> | |||
</tr> | |||
== | <tr style="padding: 25px; text-align: left; font-family: sans-serif; color: black; background-color: white"> | ||
< | <td style="background-color: #303030;"> | ||
[[File:Media.png|frameless|center|100px]] | |||
< | </td> | ||
<td style="text-align:left">[[Entering_records#Media|<b>Media</b>]]<br/>Attach an image or a sound to your record. </td> | |||
</tr> | |||
< | <tr style="padding: 25px; text-align: left; font-family: sans-serif; color: black; background-color: white"> | ||
<td style="background-color: #303030;"> | |||
[[File:More details icon.png|frameless|center|100px]] | |||
</td> | |||
<td style="text-align:left">[[Entering records#More details|<b>More details</b>]]<br/> </td> | |||
</tr> | |||
== | <tr style="padding: 25px; text-align: left; font-family: sans-serif; color: black; background-color: white"> | ||
< | <td style="background-color: #303030;"> | ||
[[File:Mortality.png|frameless|center|100px]] | |||
< | </td> | ||
<td style="text-align:left">[[Entering_records#Mortality_/_injuries|<b>Mortality</b>]]<br/>Add information about injuries or deaths.</td> | |||
</tr> | |||
< | <tr style="padding: 25px; text-align: left; font-family: sans-serif; color: black; background-color: white"> | ||
= | <td style="background-color: #303030;"> | ||
< | [[File:Number ind.png|frameless|center|100px]] | ||
</td> | |||
<td style="text-align:left">[[Entering_records#Step_3:_Number_of_individuals|<b>Number of individuals</b>]]<br/>Enter or modify the number of individuals and the count precision</td> | |||
</tr> | |||
< | <tr style="padding: 25px; text-align: left; font-family: sans-serif; color: black; background-color: white"> | ||
< | <td style="background-color: #303030;"> | ||
[[File:Offspring.png|frameless|center|100px]] | |||
</td> | |||
<td style="text-align:left">[[Entering records#Offspring|<b>Offspring</b>]] </td> | |||
</tr> | |||
< | <tr style="padding: 25px; text-align: left; font-family: sans-serif; color: black; background-color: white"> | ||
<td style="background-color: #303030;"> | |||
[[File:protocol icon.png|frameless|center|100px]] | |||
</td> | |||
<td style="text-align:left">[[Entering_records#Protocol|<b>Protocol</b>]]<br/> </td> | |||
</tr> | |||
<tr style="padding: 25px; text-align: left; font-family: sans-serif; color: black; background-color: white"> | |||
<td style="background-color: #303030;"> | |||
[[File:Ring icon.png|frameless|center|100px]] | |||
</td> | |||
<td style="text-align:left">[[Entering_records#Ring|<b>Ring</b>]]<br/> </td> | |||
</tr> | |||
= | <tr style="padding: 25px; text-align: left; font-family: sans-serif; color: black; background-color: white"> | ||
<br /> | <td style="background-color: #303030;"> | ||
[[File:Species icon.png|frameless|center|100px]] | |||
< | </td> | ||
<td style="text-align:left">[[Entering_records#Step_2:_Species|<b>Species</b>]]<br/>Change species name. </td> | |||
</tr> | |||
< | <tr style="padding: 25px; text-align: left; font-family: sans-serif; color: black; background-color: white"> | ||
< | <td style="background-color: #303030;"> | ||
[[File:Species list.png|frameless|center|100px]] | |||
[[File: | </td> | ||
< | <td style="text-align:left">[[Entering_records#With_a_simple_list|<b>Species list</b>]]<br/>Change general information about the list the record belongs to. Click on the clock to change starting and/or ending time, enter/modify the comment, and/or check '''All species were recorded''' if all species were recorded. </td> | ||
</tr> | |||
</ | |||
</ | |||
< | |||
< | |||
< | <tr style="padding: 25px; text-align: left; font-family: sans-serif; color: black; background-color: white"> | ||
<td style="background-color: #303030;"> | |||
[[File:Study code.png|frameless|center|100px]] | |||
</td> | |||
< | <td style="text-align:left">[[Entering_records#Study code|<b>Study code</b>]]<br/>Select study code if your observation belong to any of the listed studies. </td> | ||
</tr> | |||
</ | |||
</ | |||
= | <tr style="padding: 25px; text-align: left; font-family: sans-serif; color: black; background-color: white"> | ||
<td style="background-color: #303030;"> | |||
[[File:Time.png|frameless|center|100px]] | |||
</td> | |||
<td style="text-align:left">[[Entering_records#Step_1:_Date_/_Time|<b>Time</b>]]<br/>Change time by clicking on the given time. Check '''Do not enter''' to hide record's time. </td> | |||
</tr> | |||
< | <tr style="padding: 25px; text-align: left; font-family: sans-serif; color: black; background-color: white"> | ||
<td style="background-color: #303030;"> | |||
< | [[File:.png|frameless|center|100px]] | ||
</td> | |||
<td style="text-align:left"> <b> | |||
<b/><br/> | |||
</td> | |||
</tr> | |||
< | </table> | ||
</center> | |||
<br/> | |||
<br/> | <br/> | ||
<!-- | <div class="toc" style="width:400px;"> <!-- La llargada s'ha de canviar aquí --> | ||
<div class="mw-collapsible mw-collapsed" data-expandtext="Show" data-collapsetext="Hide" style="width:350px;margin-bottom:0px;margin-top:0px;background-color:#f7f7f7;"> | |||
'''1.4 Additional information''' | |||
<div class="mw-collapsible-content" style="width:400px;background-color:#f7f7f7;"> <!-- I també cal canviar la llargada aquí --> | |||
<ol> 1 [[Entering_records#Atlas_code|Atlas code]]<br/> | |||
2 [[Entering_records#Colony|Colony]] <br/> | |||
3 [[Entering_records#Comments|Comments]] <br/> | |||
4 [[Entering_records#Details_(Age_and_sex)|Details (Age and Sex)]]<br/> | |||
5 [[Entering_records#Direction|Direction]]<br/> | |||
6 [[Entering_records#Extra_protocol|Extra protocol]]<br/> | |||
7 [[Entering_records#Hidden_record|Hidden record]]<br/> | |||
8 [[Entering_records#Map|Map]]<br/> | |||
9 [[Entering_records#Media|Media]]<br/> | |||
10 [[Entering_records#More details|More details]]<br/> | |||
11 [[Entering_records#Mortality_/_injuries|Mortality / injuries]]<br/> | |||
12 [[Entering_records#Number of individuals|Number of individuals]] <br/> | |||
13 [[Entering_records#Offspring|Offspring]]<br/> | |||
14 [[Entering_records#Protocol|Protocol]]<br/> | |||
15 [[Entering_records#Ring|Ring]]<br/> | |||
16 [[Entering_records#Species|Species]]<br/> | |||
17 [[Entering_records#Species list|Species list]]<br/> | |||
18 [[Entering_records#Study code|Study code]]<br/> | |||
19 [[Entering_records#Time|Time]]<br/> | |||
<br/> | |||
[[Entering_records#icons|Additional information on mapping protocols]]</ol> | |||
</div> | |||
</div> | |||
</div> | |||
<br/> | <br/> | ||
<br/> | <br/> | ||
===Atlas code=== | |||
<br /> | <br /> | ||
<!--T: | <!--T:66--> | ||
<center> | |||
<br /> | <div class="toc" style="border-radius:5px;background-color:#ffffff;padding-left:8px;padding-right:8px;padding-bottom:8px;width:300px;"> | ||
[[File:Add info atlas code.png|300px]] | |||
<div class="toc" style="border-radius:5px;padding-left:15px;text-align:left; font-size:12px;width:285px;"> | |||
'''Additional information. Atlas code.''' | |||
</div> | |||
</div> | |||
</center> | |||
<br/> | |||
<br/> | |||
<!--T: | <!--T:67--> | ||
[[ | Select an atlas code, or no code. Available atlas codes will depend on the country you chose in [[Getting_started_NaturaList#Atlas_list_code|'''Preferences''']] and for your information it is displayed at the bottom of the screen (see image below). <br /> | ||
<br /> | <br /> | ||
<!--T: | <!--T:68--> | ||
<center> | <center> | ||
< | <div class="toc" style="border-radius: 5px; padding: 25px; text-align: left; font-family: sans-serif; color: black; width: 600px; background-color: hsl(201, 100%, 89%)"> | ||
<!-- GREEN BOX (Tips): hsl(157, 74%, 80%) | <!-- GREEN BOX (Tips): hsl(157, 74%, 80%) | ||
YELLOW BOX (Summaries): #ffffdb" | YELLOW BOX (Summaries): #ffffdb" | ||
| Line 1,532: | Line 1,503: | ||
RED BOX (Warnings): hsl(0, 77%, 78%) --> | RED BOX (Warnings): hsl(0, 77%, 78%) --> | ||
<!--T: | <!--T:69--> | ||
<p> | <p> | ||
During the breeding season some countries may ask automatically to enter an atlas code. It is highly encouraged you do so (very useful, for example, for breeding atlas) but it is not compulsory.<br/> | |||
</p> | |||
<!--T: | <!--T:70--> | ||
</ | </div> | ||
</center> | </center> | ||
<br /> | <br /> | ||
<!--T: | <!--T:71--> | ||
Go to [[Getting_started_NaturaList#Atlas_list_code|Menu > Preferences > Atlas code]] to change the code you use.<br /> | |||
<br /> | <br /> | ||
<!--T: | <!--T:72--> | ||
<center> | |||
<div class="toc" style="border-radius:5px;background-color:#ffffff;padding-left:8px;padding-right:8px;padding-bottom:8px;width:600px;"> | |||
[[File:Atlas code.png|600px]] | |||
<div class="toc" style="border-radius:5px;padding-left:15px;text-align:left; font-size:12px;width:585px;"> | |||
'''Adding an atlas code''' | |||
</div> | |||
</div> | |||
</center> | |||
<br/> | |||
<br/> | |||
<!--T: | <!--T:73--> | ||
[[Entering_records#Atlas code|[Top to Atlas code]]]<br/> | |||
[[Entering_records#Additional_information panel|[Top to Additional information panel]]]<br/> | |||
<br/> | |||
===Colony=== | |||
<br/> | |||
<!--T: | <!--T:51--> | ||
[[Entering_records#Colony|[Top to Colony]]]<br/> | |||
<br /> | [[Entering_records#Additional_information panel|[Back to Additional information panel]]]<br/> | ||
<br/> | |||
===Comments=== | |||
<br /> | <br /> | ||
<!--T: | <!--T:52--> | ||
<center> | <center> | ||
<div style=" | <div class="toc" style="border-radius:5px;background-color:#ffffff;padding-left:8px;padding-right:8px;padding-bottom:8px;width:300px;"> | ||
[[File: | [[File:Add info comments.png|300px]] | ||
< | <div class="toc" style="border-radius:5px;padding-left:15px;text-align:left; font-size:12px;width:285px;"> | ||
''' | '''Additional information. Comments.'''<br/> | ||
</ | </div> | ||
< | </div> | ||
</center> | |||
''' | <br /> | ||
</ | <br/> | ||
<!--T:53--> | |||
Leave a comment in the top section if you want it to be public and associated to your record. Any registered user will see it. Use the lower section if you want to keep your comment private. | |||
<!--T:54--> | |||
Note administrators will still see it. To learn more about administrators, go to wiki section Local portals > [[Main_Page#Administration|Administration]]. | |||
<!--T:55--> | |||
Click '''Validate''' when done.<br /> | |||
<br /> | |||
<!--T:56--> | |||
<center> | |||
<div class="toc" style="border-radius:5px;background-color:#ffffff;padding-left:8px;padding-right:8px;padding-bottom:8px;width:600px;"> | |||
[[File:Comment.png|600px]] | |||
<div class="toc" style="border-radius:5px;padding-left:15px;text-align:left; font-size:12px;width:585px;"> | |||
'''Adding comments.'''<br/> | |||
</div> | |||
</div> | </div> | ||
</center> | </center> | ||
<br /> | <br /> | ||
<br /> | <br/> | ||
<!--T: | <!--T:57--> | ||
== | <center> | ||
<br /> | <div class="toc" style="border-radius: 5px; padding: 25px; text-align: left; font-family: sans-serif; color: black; width: 600px; background-color: hsl(201, 100%, 89%)"> | ||
<!-- GREEN BOX (Tips): hsl(157, 74%, 80%) | |||
YELLOW BOX (Summaries): #ffffdb" | |||
BLUE BOX (Information): hsl(201, 100%, 89%) | |||
RED BOX (Warnings): hsl(0, 77%, 78%) --> | |||
<!--T:58--> | |||
<p> | |||
<b> Validate</b> only validates the comments.<br /> | |||
To validate your record you will have to <b>Save</b> later.<br /> | |||
</p> | |||
<!--T:59--> | |||
</div> | |||
</center> | |||
<br /> | <br /> | ||
<!--T: | <!--T:60--> | ||
[[Entering_records#Comments|[Top to Comments]]]<br/> | |||
<br/> | [[Entering_records#Additional_information panel|[Back to Additional information panel]]]<br/> | ||
<br/> | <br/> | ||
=== | ===Details (Age and sex)=== | ||
<br /> | <br /> | ||
< | <center> | ||
<div class="toc" style="border-radius:5px;background-color:#ffffff;padding-left:8px;padding-right:8px;padding-bottom:8px;width:500px;"> | |||
[[File:Add info details.png|500px]] | |||
<div class="toc" style="border-radius:5px;padding-left:15px;text-align:left; font-size:12px;width:485px;"> | |||
< | '''Additional information. Details.''' | ||
</div> | |||
<br /> | </div> | ||
</center> | |||
<br/> | |||
<br/> | |||
<!--T: | <!--T:61--> | ||
[[ | According to the taxonomic group you are entering, fields for details differ, see image [[Media:Add info details other taxa.png|Examples for non avian groups]]. Examples and explanations just below apply only to birds.<br /> | ||
<br /> | <br /> | ||
<!--T: | <!--T:62--> | ||
Enter number of individuals per sex and age class. Type number or use +1 -1 quick keys to quickly change the number. Key '''Max''' will count all individuals entered for this species. As data is entered, a list will appear at the bottom. Scroll up and down from the right hand bar to see all entries, or click on cross to delete any entry if necessary (see image below). When done, click '''Add''' to enter a new class or '''finish''' to end. <br /> | |||
<br /> | <br /> | ||
<!--T: | <!--T:63--> | ||
[[File: | <center> | ||
<div class="toc" style="border-radius:5px;background-color:#ffffff;padding-left:8px;padding-right:8px;padding-bottom:8px;width:500px;"> | |||
[[File:Age and sex.png|500px]] | |||
<div class="toc" style="border-radius:5px;padding-left:15px;text-align:left; font-size:12px;width:485px;"> | |||
'''Adding age and sex to a record.''' | |||
</div> | |||
</div> | |||
</center> | |||
<br/> | |||
<br/> | |||
<!--T:64--> | |||
<center> | |||
<div class="toc" style="border-radius:5px;background-color:#ffffff;padding-left:8px;padding-right:8px;padding-bottom:8px;width:500px;"> | |||
[[File:Add info details other taxa.png|500px]] | |||
<div class="toc" style="border-radius:5px;padding-left:15px;text-align:left; font-size:12px;width:485px;"> | |||
'''Examples of ''Details'' for non-avian taxonomic groups. Orchids (left), Odonata (right).''' | |||
</div> | |||
</div> | |||
</center> | |||
<br/> | |||
<br/> | |||
<!--T: | <!--T:65--> | ||
[[Entering_records#Details|[Top to Details]]]<br/> | |||
<br /> | [[Entering_records#Additional_information panel|[Back to Additional information panel]]]<br/> | ||
<br/> | |||
< | ===Direction=== | ||
<br/> | |||
<!--T:105--> | |||
<!--T: | |||
<center> | <center> | ||
<div class="toc" style="border-radius:5px;background-color:#ffffff;padding-left:8px;padding-right:8px;padding-bottom:8px;width: | <div class="toc" style="border-radius:5px;background-color:#ffffff;padding-left:8px;padding-right:8px;padding-bottom:8px;width:300px;"> | ||
[[File: | [[File:Direction module.png|300px]] | ||
<div class="toc" style="border-radius:5px;padding-left:15px;text-align:left; font-size:12px;width: | <div class="toc" style="border-radius:5px;padding-left:15px;text-align:left; font-size:12px;width:285px;"> | ||
''' | '''Additional information. Direction.''' | ||
</div> | </div> | ||
</div> | </div> | ||
| Line 1,643: | Line 1,669: | ||
<br/> | <br/> | ||
<!--T: | <!--T:106--> | ||
< | Click on the compass to indicate flight direction (in the example below, the user clicked on SE).<br/> | ||
<div class=" | <br/> | ||
<div class=" | <!--T:107--> | ||
<center> | |||
<div class="toc" style="border-radius:5px;background-color:#ffffff;padding-left:8px;padding-right:8px;padding-bottom:8px;width:300px;"> | |||
[[File:Orientation.png|300px]] | |||
<div class="toc" style="border-radius:5px;padding-left:15px;text-align:left; font-size:12px;width:285px;"> | |||
'''Additional information. Selecting direction.'''<br/> | |||
</div> | </div> | ||
</div> | </div> | ||
</center> | |||
<br /> | |||
<br/> | |||
<!--T:108--> | |||
[[Entering_records#Direction|[Top to Direction]]]<br/> | |||
[[Entering_records#Additional_information panel|[Back to Additional information panel]]]<br/> | |||
<br/> | <br/> | ||
===Extra protocol=== | |||
=== | |||
<br/> | <br/> | ||
< | <center> | ||
<div class="toc" style="border-radius:5px;background-color:#ffffff;padding-left:8px;padding-right:8px;padding-bottom:8px;width:600px;"> | |||
[[File:Extra protocol.png|600px]] | |||
<div class="toc" style="border-radius:5px;padding-left:15px;text-align:left; font-size:12px;width:585px;"> | |||
'''Additional information. Extra protocol.'''<br/> | |||
</div> | |||
</div> | |||
</center> | |||
<br /> | <br /> | ||
<br/> | |||
Introduce required information about nests (see image below as an example). This section will only appear if you are entering data into a protocol that requieres nest information. Information required may vary depending on the protocol, and may include: <br/> | |||
* '''Intact nests:''' Type number of intact nests. <br/> | |||
* '''Nest location:''' Click on the yellow band to see options (see image [[Media:Nest location.png|Nest location]]) and choose the most appropriate. <br/> | |||
* '''Number of nests occupied by other species:''' Type number of nests occupied by other species. <br/> | |||
* '''Occupied nests:''' Type number of occupied nests. <br/> | |||
* '''Potencial breeding pairs:''' Type number of pairs that may be breeding. <br/> | |||
* '''Suspected nests:''' Type number of suspected nests. <br/> | |||
<br/> | |||
Remember fields marked with an asterisk are mandatory.<br/> | |||
<br/> | <br/> | ||
<center> | <center> | ||
<div class="toc" style="border-radius: 5px; | <div class="toc" style="border-radius:5px;background-color:#ffffff;padding-left:8px;padding-right:8px;padding-bottom:8px;width:500px;"> | ||
< | [[File:Rook._Extra_protocol_(1).png|500px]] | ||
<div class="toc" style="border-radius:5px;padding-left:15px;text-align:left; font-size:12px;width:485px;"> | |||
'''Extra protocol. Example.''' | |||
</div> | |||
</div> | |||
</center> | |||
<br/> | |||
<br/> | |||
[[Entering_records#Extra protocol|[Top to Extra protocol]]]<br/> | |||
[[Entering_records#Additional_information panel|[Back to Additional information panel]]]<br/> | |||
<br/> | <br/> | ||
===Hidden record=== | |||
<br /> | |||
<!--T: | <!--T:74--> | ||
<center> | |||
<div class="toc" style="border-radius:5px;background-color:#ffffff;padding-left:8px;padding-right:8px;padding-bottom:8px;width:300px;"> | |||
[[File:Add info hidden record.png|300px]] | |||
<div class="toc" style="border-radius:5px;padding-left:15px;text-align:left; font-size:12px;width:285px;"> | |||
'''Additional information. Hidden record.'''<br/> | |||
</div> | |||
</div> | </div> | ||
</center> | </center> | ||
<br /> | <br /> | ||
<br/> | |||
<!--T: | <!--T:75--> | ||
Select/unselect as needed. | |||
<!--T:76--> | |||
A yellow key indicates the record will be hidden to other users, except administrators. | |||
<!--T: | |||
<!--T:77--> | |||
Default option depends on your ‘’’Preferences’’’. Go to Menu > Preferences > Hide record to change it. | |||
<!--T: | <!--T:78--> | ||
Note some records are automatically hidden depending on the country or region your observation takes place in. Observations in countries not covered by any local partner are never automatically hidden. However, any user can hide records if they consider doing so will help protect the individuals, species or habitat. | |||
<!--T: | <!--T:79--> | ||
To see which records will automatically be hidden locally, go to Web interface > Local portals > [[Species_partially_hidden|Species partially hidden]]. | |||
<!--T: | <!--T:80--> | ||
To learn more about administrators, go to Web interface > Local portals > [[Main_Page#Administration|Administration]].<br /> | |||
<br /> | |||
<!--T: | <!--T:81--> | ||
</ | [[Entering_records#Hidden_record|[Top to Hidden record]]]<br/> | ||
[[Entering_records#Additional_information panel|[Back to Additional information panel]]]<br/> | |||
<br /> | <br/> | ||
<br /> | |||
===Map=== | |||
=== | |||
<br/> | <br/> | ||
<center> | <center> | ||
<div class="toc" style="border-radius:5px;background-color:#ffffff;padding-left:8px;padding-right:8px;width: | <div class="toc" style="border-radius:5px;background-color:#ffffff;padding-left:8px;padding-right:8px;padding-bottom:8px;width:400px;"> | ||
[[File: | [[File:Add_info_map.png|400px]] | ||
<div class="toc" style="border-radius:5px;padding-left:15px;text-align:left; font-size:12px;width: | <div class="toc" style="border-radius:5px;padding-left:15px;text-align:left; font-size:12px;width:385px;"> | ||
''' | '''Additional information. Map.''' | ||
</div> | </div> | ||
</div> | </div> | ||
</center> | </center> | ||
| Line 1,767: | Line 1,784: | ||
<br/> | <br/> | ||
Click to see your observation's position. <br/> | |||
Click <br/> | |||
* <b>Next</b> to Continue, or <br/> | |||
* "aim icon" to see your position (see image below). <br/> | |||
<br/> | |||
Visit wiki section Mobile Interface > [[Navigating_the_map_NaturaList|Navigating the map]] to interpret the map if necessary.<br/> | |||
<br/> | <br/> | ||
<center> | <center> | ||
<div class="toc" style="border-radius:5px;background-color:#ffffff;padding-left:8px;padding-right:8px;width: | <div class="toc" style="border-radius:5px;background-color:#ffffff;padding-left:8px;padding-right:8px;padding-bottom:8px;width:400px;"> | ||
[[File: | [[File:Go to map.png|400px]] | ||
<div class="toc" style="border-radius:5px;padding-left:15px;text-align:left; font-size:12px;width: | <div class="toc" style="border-radius:5px;padding-left:15px;text-align:left; font-size:12px;width:385px;"> | ||
''' | '''<i>Map</i>''' | ||
</div> | </div> | ||
<p style="color:black;font-size:12px;padding-left: | <p style="color:black;font-size:12px;padding-left:30px;text-align:left;column-count:2;"> | ||
<b>1.</b> Continue <br /> | |||
<b>2.</b> Show your position <br/> | |||
</p> | </p> | ||
</div> | </div> | ||
| Line 1,785: | Line 1,808: | ||
<br/> | <br/> | ||
[[Entering_records#Map|[Top to Map]]]<br/> | |||
<br /> | [[Entering_records#Additional_information panel|[Back to Additional information panel]]]<br/> | ||
<br/> | |||
<br /> | |||
===Media=== | |||
<br /> | <br /> | ||
<!--T: | <!--T:82--> | ||
Attach an image or a sound to your observation, either before or after entering a sighting, from: <br/> | |||
<br /> | * the [[Entering records#Add info|Additional information panel]], or <br/> | ||
* the [[Entering records#main|main screen]]. <br/> | |||
<br/> | |||
<!--T: | <!--T:83--> | ||
<span id="Add info"></span> | |||
<br /> | To use the Additional information menu, enter the observation first, and<br/> | ||
1. choose <b>Media</b> on the additional information panel (see image below) <br/> | |||
<br/> | |||
<!--T: | <!--T:84--> | ||
<center> | <center> | ||
<div class="toc" style="border-radius:5px;background-color:#ffffff;padding-left:8px;padding-right:8px;width: | <div class="toc" style="border-radius:5px;background-color:#ffffff;padding-left:8px;padding-right:8px;padding-bottom:8px;width:400px;"> | ||
[[File: | [[File:Add info picture.png|400px]] | ||
<div class="toc" style="border-radius:5px;padding-left:15px;text-align:left; font-size:12px;width: | <div class="toc" style="border-radius:5px;padding-left:15px;text-align:left; font-size:12px;width:385px;"> | ||
''' | '''Attaching media from the Additional information panel.''' | ||
</div> | </div> | ||
</div> | </div> | ||
</center> | </center> | ||
| Line 1,820: | Line 1,839: | ||
<br/> | <br/> | ||
<!--T: | <!--T:85--> | ||
< | It displays all images already attached to this record (see [[Media:Example.png|image]] as an example).<br/> | ||
<br/> | |||
<!--T:86--> | |||
2. choose between <br/> | |||
*[[Entering records#Upload|'''Upload a file''']], if you have already taken them and they are stored on your phone's gallery. Pictures must be taken with your phone or inserted afterwards through a local portal. If no local portal exist, it is not currently possible to add a picture through data.biolovision.net. <br /> | |||
*[[Entering records#Image|'''Add a photo''']] then. If you do, do not forget to accept to upload it. <br /> | |||
*[[Entering records#Sound|'''Record a sound''']] at the moment. <br/> | |||
<br/> | <br/> | ||
<!--T: | <!--T:87--> | ||
<center> | <center> | ||
<div class="toc" style="border-radius:5px;background-color:#ffffff;padding-left:8px;padding-right:8px;width: | <div class="toc" style="border-radius:5px;background-color:#ffffff;padding-left:8px;padding-right:8px;padding-bottom:8px;width:400px;"> | ||
[[File: | [[File:Select file.png|400px]] | ||
<div class="toc" style="border-radius:5px;padding-left:15px;text-align:left; font-size:12px;width: | <div class="toc" style="border-radius:5px;padding-left:15px;text-align:left; font-size:12px;width:385px;"> | ||
''' | '''Media. Select file.''' | ||
</div> | </div> | ||
<p style="color:black;font-size:12px;padding-left: | <p style="color:black;font-size:12px;padding-left:5px;text-align:left;column-count:1;padding-right:5px;"> | ||
'''1.''' | '''1. Upload a file:''' Click to upload a file already in your phone. <br/> | ||
''' | '''2. Add a photo:''' Click to take the picture to attach. <br/> | ||
'''3. Record a sound:''' Click on the microphone icon (or open the three dot menu if not displayed and on '''Record a sound''' to record the sound to attach). <br/> | |||
</p> | </p> | ||
</div> | </div> | ||
| Line 1,841: | Line 1,867: | ||
<br/> | <br/> | ||
< | <span id="main></span> | ||
To use quick access keys, take the picture or record the sound before entering the observation (see image below). <br/> | |||
<br/> | |||
< | |||
<br /> | |||
<center> | <center> | ||
<div class="toc" style="border-radius:5px;background-color:#ffffff;padding-left:8px;padding-right:8px; padding-bottom:8px;width:400px;"> | <div class="toc" style="border-radius:5px;background-color:#ffffff;padding-left:8px;padding-right:8px;padding-bottom:8px;width:400px;"> | ||
[[File: | [[File:Media quick access.png|400px]] | ||
<div class="toc" style="border-radius:5px;padding-left:15px;text-align:left; font-size:12px;width:385px;"> | <div class="toc" style="border-radius:5px;padding-left:15px;text-align:left; font-size:12px;width:385px;"> | ||
''' | '''Media. Quick access.''' | ||
</div> | </div> | ||
<p style="color:black;font-size:12px;padding-left: | <p style="color:black;font-size:12px;padding-left:5px;text-align:left;column-count:1;padding-right:5px;"> | ||
'''2. Add a photo:''' Click to take the picture to attach. <br/> | |||
< | '''3. Record a sound:''' Click to open the recorder. <br/> | ||
<i>It is not possible to upload a file before entering an observation. </i> | |||
</p> | </p> | ||
</div> | </div> | ||
| Line 1,866: | Line 1,887: | ||
<br/> | <br/> | ||
< | <span id="Upload"></span> | ||
:::<b>Upload a file</b> <br/> | |||
<br/> | |||
<br /> | |||
Direct access to the gallery in your phone. Choose the image or sound to attach to the observation the same way you would select any other file to attach to any platform (e-mail, whatsapp...). Some considerations must be taken into account: <br/> | |||
* The date of the observation must match the date the file was created. Some internal adjustments correct for differences in time zone.<br/> | |||
* Pictures are automatically resized to 3072 pixels on the longest side before being uploaded.<br/> | |||
* Sound files must be maximum 16 MB to upload. <br/> | |||
<br/> | |||
<br/> | <br/> | ||
<!--T: | |||
<!--T:88--> | |||
<center> | <center> | ||
<div class="toc" style="border-radius: 5px; padding: 25px; text-align: left; font-family: sans-serif; color: black; width: | <div class="toc" style="border-radius: 5px; padding: 25px; text-align: left; font-family: sans-serif; color: black; width: 600px; background-color: hsl(157, 74%, 80%)"> | ||
<!-- GREEN BOX (Tips): hsl(157, 74%, 80%) | <!-- GREEN BOX (Tips): hsl(157, 74%, 80%) | ||
YELLOW BOX (Summaries): #ffffdb" | YELLOW BOX (Summaries): #ffffdb" | ||
| Line 1,899: | Line 1,906: | ||
RED BOX (Warnings): hsl(0, 77%, 78%) --> | RED BOX (Warnings): hsl(0, 77%, 78%) --> | ||
<!--T: | <!--T:89--> | ||
<p> | <p> | ||
<b> | <b>NOTE</b>:<br /> | ||
*The date of the observation must match the date the file was created. <br /> | |||
*Pictures will be automatically resized to a maximum size of 3072 pixels before being sent.<br/> | |||
*Sound files should be maximum 16 MB to upload.<br /> | |||
</p> | </p> | ||
<!--T: | <!--T:90--> | ||
</div> | |||
</center> | </center> | ||
<br /> | <br /> | ||
<br/> | <br/> | ||
<!--T: | <!--T:91--> | ||
<span id="Image"></span> | |||
:::<b>Add a photo</b> <br/> | |||
<br/> | <br/> | ||
Direct access to the camera in your device. Take a picture normally and select: <br/> | |||
* <b>Retry</b> to repeat it, or <br/> | |||
<br /> | * <b>OK</b> to upload. <br/> | ||
< | |||
< | |||
< | |||
<br/> | <br/> | ||
<!--T: | <!--T:92--> | ||
<center> | <center> | ||
<div class="toc" style="border-radius:5px;background-color:#ffffff;padding-left:8px;padding-right:8px; padding-bottom:8px;width:600px;"> | <div class="toc" style="border-radius:5px;background-color:#ffffff;padding-left:8px;padding-right:8px;padding-bottom:8px;width:600px;"> | ||
[[File: | [[File:Take a picture.png|600px]] | ||
<div class="toc" style="border-radius:5px;padding-left:15px;text-align:left; font-size:12px;width:585px;"> | <div class="toc" style="border-radius:5px;padding-left:15px;text-align:left; font-size:12px;width:585px;"> | ||
''' | '''Taking a picture to upload.''' | ||
</div> | </div> | ||
<p style="color:black;font-size:12px;padding-left: | <p style="color:black;font-size:12px;padding-left:5px;text-align:left;column-count:1;padding-right:5px;"> | ||
<b>1.</b> | <b>1. Retry:</b> Repeat the photo. <br /> | ||
<b>2.</b> | <b>2. OK</b> Upload the photo. <br/> | ||
</p> | </p> | ||
</div> | </div> | ||
| Line 1,955: | Line 1,945: | ||
<br/> | <br/> | ||
<!--T: | <!--T:93--> | ||
See the images as they are attached. <br/> | |||
<br/> | |||
<!--T:94--> | |||
Hide/show the picture only, not the data, to other users by clicking on the corresponding key or delete by clicking on the bin (see image below). You will also be able to edit it at a later stage. When done, add another picture or close "Media" to access other sections or entering the observation. <br /> | |||
<br /> | |||
<!--T:95--> | |||
<center> | <center> | ||
<div class="toc" style="border-radius: 5px; padding: 25px; text-align: left; font-family: sans-serif; color: black; width: | <div class="toc" style="border-radius:5px;background-color:#ffffff;padding-left:8px;padding-right:8px; padding-bottom:8px;width:500px;"> | ||
[[File:Hidding image.png|500px]] | |||
<div class="toc" style="border-radius:5px;padding-left:15px;text-align:left; font-size:12px;width:485px;"> | |||
'''Hiding a picture.''' | |||
</div> | |||
<p style="color:black;font-size:12px;padding-left:30px;text-align:left;column-count:2;"> | |||
<b>1.</b> Hide/Show <br /> | |||
<b>2.</b> Delete <br/> | |||
</p> | |||
</div> | |||
</center> | |||
<br/> | |||
<br/> | |||
<!--T:96--> | |||
<center> | |||
<div class="toc" style="border-radius: 5px; padding: 25px; text-align: left; font-family: sans-serif; color: black; width: 500px; background-color: hsl(201, 100%, 89%)"> | |||
<!-- GREEN BOX (Tips): hsl(157, 74%, 80%) | <!-- GREEN BOX (Tips): hsl(157, 74%, 80%) | ||
YELLOW BOX (Summaries): #ffffdb" | YELLOW BOX (Summaries): #ffffdb" | ||
| Line 1,963: | Line 1,977: | ||
RED BOX (Warnings): hsl(0, 77%, 78%) --> | RED BOX (Warnings): hsl(0, 77%, 78%) --> | ||
<!--T: | <!--T:97--> | ||
<p> | <p> | ||
< | <ul> | ||
*Use the key icon to hide the image while keeping the record visible.<br /> | |||
*If you hide the record, the image is automatically hidden.<br /> | |||
</ul></p> | |||
<!--T: | <!--T:98--> | ||
</div> | |||
</center> | |||
</center> | |||
<br /> | <br /> | ||
<br /> | <br /> | ||
<!--T: | <!--T:99--> | ||
<span id="Sound"></span> | |||
:::<b>Record a sound</b> <br/> | |||
Press the microphone icon to start recording the sound. It will start recording immediately and the waveform is shown in real time. <br/> | |||
<br/> | <br/> | ||
< | <center> | ||
<div class="toc" style="border-radius:5px;background-color:#ffffff;padding-left:8px;padding-right:8px; padding-bottom:8px;width:400px;"> | |||
[[File:Stop recording (9).png|400px]] | |||
<div class="toc" style="border-radius:5px;padding-left:15px;text-align:left; font-size:12px;width:385px;"> | |||
'''Recording in real time.''' | |||
</div> | |||
<p style="color:black;font-size:12px;padding-left:30px;text-align:left;column-count:2;"> | |||
<b>1.</b> Stop recording. <br /> | |||
</p> | |||
</div> | |||
</center> | |||
<br/> | |||
<br/> | <br/> | ||
Press stop to stop recording, and: <br/> | |||
* Crop the waveform, if necessary, after stooping the recording (it is only possible to crop the time axis), or <br/> | |||
* <b>Validate</b> to access other sections or to enter the observation. <br/> | |||
< | |||
<br/> | <br/> | ||
<center> | <center> | ||
<div class="toc" style="border-radius:5px;background-color:#ffffff;padding-left:8px;padding-right:8px;padding-bottom:8px;width: | <div class="toc" style="border-radius:5px;background-color:#ffffff;padding-left:8px;padding-right:8px; padding-bottom:8px;width:400px;"> | ||
[[File: | [[File:Validate recording.png|400px]] | ||
<div class="toc" style="border-radius:5px;padding-left:15px;text-align:left; font-size:12px;width: | <div class="toc" style="border-radius:5px;padding-left:15px;text-align:left; font-size:12px;width:385px;"> | ||
''' | '''Validate recording.''' | ||
</div> | </div> | ||
<p style="color:black;font-size:12px;padding-left:5px;text-align:left;column-count:1;padding-right:5px;"> | |||
<b>1. Crop</b>: Use arrows to cut along the time axis. <br /> | |||
<b>2. Play</b>: Play recording. <br/> | |||
<b>3. Validate</b>: Upload recording. <br /> | |||
</p> | |||
</div> | </div> | ||
</center> | </center> | ||
| Line 2,011: | Line 2,032: | ||
<br/> | <br/> | ||
It is not currently possible to playback. <br/> | |||
<br/> | <br/> | ||
< | [[Entering_records#Media|[Top to Media]]]<br/> | ||
[[Entering_records#Additional_information panel|[Back to Additional information panel]]]<br/> | |||
<br/> | |||
< | ===More details=== | ||
<br/> | |||
[[Entering records#More details|[More details]]] <br/> | |||
[[Entering_records#Additional_information panel|[Back to Additional information panel]]]<br/> | |||
<br/> | <br/> | ||
<!--T: | ===Mortality / injuries=== | ||
<br /> | |||
<!--T:100--> | |||
<center> | <center> | ||
<div class="toc" style="border-radius:5px;background-color:#ffffff;padding-left:8px;padding-right:8px;padding-bottom:8px;width:400px;"> | <div class="toc" style="border-radius:5px;background-color:#ffffff;padding-left:8px;padding-right:8px;padding-bottom:8px;width:400px;"> | ||
[[File:Add | [[File:Add info injuries.png|400px]] | ||
<div class="toc" style="border-radius:5px;padding-left:15px;text-align:left; font-size:12px;width:385px;"> | <div class="toc" style="border-radius:5px;padding-left:15px;text-align:left; font-size:12px;width:385px;"> | ||
''' | '''Additional information. Mortality / injuries.''' | ||
</div> | </div> | ||
</div> | </div> | ||
</center> | </center> | ||
<br/> | <br/> | ||
<br/> | <br/> | ||
<!--T:101--> | |||
Indicate if your observation corresponds to an injured or dead individual, and select the cause if known. Scroll down '''All causes''' to see all options (see image [[Media:Enter injury.png|Selecting cause of injury 1]]). Click on the category to open a panel with all possible causes and enter details (see bottom image [[Media:Cause of injury.png|Selecting cause of injury 2]]). When done, click '''Validate'''. For quick selection, the icons of the most common causes are on top (see image [[Media:Enter injury.png|Selecting cause of injury 1]]). When you finish entering the cause of death or injury click '''Save''' or if necessary, '''Delete'''. The entry can be modified later. <br /> | |||
<br /> | |||
<!--T: | <!--T:102--> | ||
[[File:Enter injury.png|700px|thumb|center|Selecting cause of injury 1.]]<br /> | |||
<br/> | |||
<!--T: | <!--T:103--> | ||
<center> | <center> | ||
<div class="toc" style="border-radius:5px;background-color:#ffffff;padding-left:8px;padding-right:8px;padding-bottom:8px;width:400px;"> | <div class="toc" style="border-radius:5px;background-color:#ffffff;padding-left:8px;padding-right:8px;padding-bottom:8px;width:400px;"> | ||
[[File: | [[File:Cause of injury.png|400px]] | ||
<div class="toc" style="border-radius:5px;padding-left:15px;text-align:left; font-size:12px;width:385px;"> | <div class="toc" style="border-radius:5px;padding-left:15px;text-align:left; font-size:12px;width:385px;"> | ||
''' | '''Selecting cause of injury 2.'''<br/> | ||
<br/ | |||
</p> | </p> | ||
</div> | </div> | ||
</center> | </center> | ||
<br /> | |||
<br/> | <br/> | ||
<!--T:104--> | |||
[[Entering_records#Mortality_/_injuries|[Top to Mortality / injuries]]]<br/> | |||
[[Entering_records#Additional_information panel|[Back to Additional information panel]]]<br/> | |||
<br/> | <br/> | ||
<!--T: | ===Number of individuals=== | ||
<center> | <br/> | ||
<div class="toc" style="border-radius:5px;background-color:#ffffff;padding-left:8px;padding-right:8px;width: | |||
[[File: | [[Entering_records#Number of individuals|[Top to Number of individuals]]]<br/> | ||
<div class="toc" style="border-radius:5px;padding-left:15px;text-align:left; font-size:12px;width: | [[Entering_records#Additional_information panel|[Back to Additional information panel]]]<br/> | ||
''' | <br/> | ||
===Offspring=== | |||
<br/> | |||
[[Entering_records#Offspring|[Top to Offspring]]]<br/> | |||
[[Entering_records#Additional_information panel|[Back to Additional information panel]]]<br/> | |||
<br/> | |||
===Protocol=== | |||
<br/> | |||
[[Entering_records#Protocol|[Top to Protocol]]]<br/> | |||
[[Entering_records#Additional_information panel|[Back to Additional information panel]]]<br/> | |||
<br/> | |||
===Ring=== | |||
<br/> | |||
<!--T:109--> | |||
<center> | |||
<div class="toc" style="border-radius:5px;background-color:#ffffff;padding-left:8px;padding-right:8px;padding-bottom:8px;width:400px;"> | |||
[[File:Ring module.png|400px]] | |||
<div class="toc" style="border-radius:5px;padding-left:15px;text-align:left; font-size:12px;width:385px;"> | |||
'''Additional information. Ring.''' | |||
</div> | </div> | ||
</div> | </div> | ||
</center> | </center> | ||
| Line 2,092: | Line 2,121: | ||
<br/> | <br/> | ||
<!--T: | <!--T:110--> | ||
:'''1.''' Select the type of marking by checking the corresponding cell, and <br/> | |||
:'''2.''' type the inscription on the ring. <br/> | |||
<br/> | <br/> | ||
<!--T: | <!--T:111--> | ||
==== | <center> | ||
<div class="toc" style="border-radius:5px;background-color:#ffffff;padding-left:8px;padding-right:8px;padding-bottom:8px;width:400px;"> | |||
[[File:Ring.png|400px]] | |||
<div class="toc" style="border-radius:5px;padding-left:15px;text-align:left; font-size:12px;width:385px;"> | |||
'''Additional information. Recording ring.''' | |||
</div> | |||
</div> | |||
</center> | |||
<br/> | |||
<br/> | |||
<!--T:112--> | |||
[[Entering_records#Ring|[Top to Ring]]]<br/> | |||
[[Entering_records#Additional_information panel|[Back to Additional information panel]]]<br/> | |||
<br/> | |||
===Species=== | |||
<br/> | |||
[[Entering_records#Species|[Top to Species]]]<br/> | |||
[[Entering_records#Additional_information panel|[Back to Additional information panel]]]<br/> | |||
<br/> | |||
===Species list=== | |||
<br/> | |||
[[Entering_records#Species list|[Top to Species list]]]<br/> | |||
[[Entering_records#Additional_information panel|[Back to Additional information panel]]]<br/> | |||
<br/> | |||
===Study code=== | |||
<br/> | |||
[[Entering_records#Study code|[Top to Study code]]]<br/> | |||
[[Entering_records#Additional_information panel|[Back to Additional information panel]]]<br/> | |||
<br/> | |||
===Time=== | |||
<br/> | |||
< | [[Entering_records#Time|[Top to Time]]]<br/> | ||
[[Entering_records#Additional_information panel|[Back to Additional information panel]]]<br/> | |||
<br/> | |||
<!-- | |||
<span id="icons"></span> | |||
< | ==Entering additional information on mapping protocols== | ||
<br/> | |||
< | |||
Some protocols may give you the option to enter additional information with icons when entering species and number of species (see image below).<br/> | |||
< | <br/> | ||
==== | |||
<center> | |||
< | <div class="toc" style="border-radius:5px;background-color:#ffffff;padding-left:8px;padding-right:8px;padding-bottom:8px;width:400px;"> | ||
[[File:Add info with icons.png|400px]] | |||
<br/> | <div class="toc" style="border-radius:5px;padding-left:15px;text-align:left; font-size:12px;width:385px;"> | ||
'''Entering additional information with icons. Example.''' | |||
< | </div> | ||
<center> | </div> | ||
<div class="toc" style="border-radius:5px;background-color:#ffffff;padding-left:8px;padding-right:8px;padding-bottom:8px;width:400px;"> | </center> | ||
[[File: | <br/> | ||
<div class="toc" style="border-radius:5px;padding-left:15px;text-align:left; font-size:12px;width:385px;"> | <br/> | ||
''' | |||
</div> | <center> | ||
</div> | <div class="toc" style="border-radius: 5px; padding: 25px; text-align: left; font-family: sans-serif; color: black; width: 400px; background-color: hsl(157, 74%, 80%) "> | ||
<!-- GREEN BOX (Tips): hsl(157, 74%, 80%) | |||
YELLOW BOX (Summaries): #ffffdb" | |||
BLUE BOX (Information): hsl(201, 100%, 89%) | |||
RED BOX (Warnings): hsl(0, 77%, 78%) --> | |||
<p> | |||
<b>White background icons</b> = Atlas codes <br/> | |||
<b>Blue background icons</b> = Any other additional information fields <br/> | |||
</p> | |||
</div> | |||
</center> | |||
<br /> | |||
<b>Atlas codes</b> | |||
<br/> | |||
<center> | |||
<table style="width:70%; border:1;"> | |||
<tr style="padding: 25px; text-align: left; font-family: sans-serif; color: black; background-color: white"> | |||
<td> | |||
[[File:TM singing.png|frameless|center|100px]] | |||
</td> | |||
<td style="text-align:left">Singing, drumming or displaying male present in breeding season in possible nesting habitat. </td> | |||
</tr> | |||
<tr style="padding: 25px; text-align: left; font-family: sans-serif; color: black; background-color: white"> | |||
<td> | |||
[[File:TM breed hab.png|frameless|center|100px]] | |||
</td> | |||
<td>Unidentified individual in breeding season in possible nesting habitat.</td> | |||
</tr> | |||
<tr style="padding: 25px; text-align: left; font-family: sans-serif; color: black; background-color: white"> | |||
<td> | |||
[[File:TM male.png|frameless|center|100px]]</td> | |||
<td>Male in breeding season in possible nesting habitat.</td> | |||
</tr> | |||
<tr style="padding: 25px; text-align: left; font-family: sans-serif; color: black; background-color: white"> | |||
<td> | |||
[[File:TM female.png|frameless|center|100px]] | |||
</td> | |||
<td>Female in breeding season in possible nesting habitat.</td> | |||
</tr> | |||
<tr style="padding: 25px; text-align: left; font-family: sans-serif; color: black; background-color: white"> | |||
<td> | |||
[[File:TM pair.png|frameless|center|100px]] | |||
</td> | |||
<td>Pair observed in suitable nesting habitat in breeding season.</td> | |||
</tr> | |||
<tr style="padding: 25px; text-align: left; font-family: sans-serif; color: black; background-color: white"> | |||
<td> | |||
[[File:TM alarm calls.png|frameless|center|100px]] | |||
</td> | |||
<td>Agitated behaviour or anxiety calls from adults, indicating a nest or young nearby.</td> | |||
</tr> | |||
<tr style="padding: 25px; text-align: left; font-family: sans-serif; color: black; background-color: white"> | |||
<td> | |||
[[File:TM pulli.png|frameless|center|100px]] | |||
</td> | |||
<td>Recently fledged young (nidicolous species) or downy young (nidifugous species) observed. </td> | |||
</tr> | |||
<tr style="padding: 25px; text-align: left; font-family: sans-serif; color: black; background-color: white"> | |||
<td> | |||
[[File:TM nest building.png|frameless|center|100px]] | |||
</td> | |||
<td>Nest-building or excavating of nest-hole observed.</td> | |||
</tr> | |||
<tr style="padding: 25px; text-align: left; font-family: sans-serif; color: black; background-color: white"> | |||
<td> | |||
[[File:TM food.png|frameless|center|100px]] | |||
</td> | |||
<td>Adult carrying faecal sac or food.</td> | |||
</tr> | |||
<tr style="padding: 25px; text-align: left; font-family: sans-serif; color: black; background-color: white"> | |||
<td> | |||
[[File:TM nest.png|frameless|center|100px]] | |||
</td> | |||
<td>Nest containing eggs or young.</td> | |||
</tr> | |||
<tr style="padding: 25px; text-align: left; font-family: sans-serif; color: black; background-color: white"> | |||
<td> | |||
[[File:TN no code.png|frameless|center|100px]] | |||
</td> | |||
<td>No atlas code.</td> | |||
</tr> | |||
</table> | |||
</center> | |||
<br/> | |||
<br/> | |||
<b>Flight direction</b> | |||
<br/> | |||
<center> | |||
<table style="width:70%; border:1"> | |||
<tr style="padding: 25px; text-align: left; font-family: sans-serif; color: black; background-color: white"> | |||
<td> | |||
[[File:Flight direction NL.jpg|frameless|center|50px]] | |||
</td> | |||
<td style="padding-left: 25px;">Flying direction. Press, hold and drag to indicate flying direction. If the individual is moving around without a clear direction, press icon but do not indicate flight direction. It will be represented with concentric circles (ie. single male in image below).This information can be combined with others in the list (see example below), but should be introduced first.</td> | |||
</tr> | |||
</table> | |||
</center> | |||
<br/> | |||
<center> | |||
<div class="toc" style="border-radius:5px;background-color:#ffffff;padding-left:8px;padding-right:8px;padding-bottom:8px;width:400px;"> | |||
[[File:NL flight direction .jpg|400px]] | |||
<div class="toc" style="border-radius:5px;padding-left:15px;text-align:left; font-size:12px;width:385px;"> | |||
'''Example of information on flight direction.''' | |||
</div> | |||
</div> | |||
</center> | |||
<br/> | |||
<br/> | |||
<b>Relationship between individuals</b><br/> | |||
<br/> | |||
<p style="margin-left:100px;margin-right:100px;">When two similar individuals are recorded nearby (ie. two singing males of the same species), click on both records to open relationship options (see image below). </p><br/> | |||
<br/> | |||
<center> | |||
<div class="toc" style="border-radius:5px;background-color:#ffffff;padding-left:8px;padding-right:8px;padding-bottom:8px;width:500px;"> | |||
[[File:PTM relationship.jpg|500px]] | |||
<div class="toc" style="border-radius:5px;padding-left:15px;text-align:left; font-size:12px;width:485px;"> | |||
'''Relationship between individuals. Example.''' | |||
</div> | |||
</div> | |||
</center> | |||
<br/> | |||
<br/> | |||
<center> | |||
<table style="width:70%; border:1"> | |||
<tr style="padding: 25px; text-align: left; font-family: sans-serif; color: black; background-color: white"> | |||
<td> | |||
[[File:Same individual icon.jpg|100px|frameless|center]] | |||
</td> | |||
<td style="text-align:left">Both sightings correspond to the same individual. It is probably the same territory. It is reflected as a green line in the map.</td> | |||
</tr> | |||
<tr style="padding: 25px; text-align: left; font-family: sans-serif; color: black; background-color: white"> | |||
<td> | |||
[[File:Maybe same indv icon.jpg|100px|frameless|center]] | |||
</td> | |||
<td>It is unknown if both records correspond to the same individual/s. It is reflected as an orange line in the map.</td> | |||
</tr> | |||
<tr style="padding: 25px; text-align: left; font-family: sans-serif; color: black; background-color: white"> | |||
<td> | |||
[[File:Diff indv icon.jpg|100px|frameless|center]] | |||
</td> | |||
<td>Both records correspond to different individuals. It may define two different territories. It is reflected as a blue line in the map.</td> | |||
</tr> | |||
</table> | |||
</center> | |||
<br/> | |||
<p style="margin-left:100px;margin-right:100px;">Click <br/> | |||
::::::'''Save''' to save and continue entering data, or <br/> | |||
::::::'''X''' to close panel and continue entering data without indicating relationship. </p><br/> | |||
<br/> | |||
<p style="margin-left:100px;margin-right:100px;">To see how it will show in the web site, visit Web interface > Local portals > Protocols > Private territory mapping > Census results > [[Protocols_web#PTM_Observations_section| Observations section]]. </p><br/> | |||
<br/> | |||
<b>Comments</b> | |||
<br/> | |||
<center> | |||
<table style="width:70%; border:1"> | |||
<tr style="padding: 25px; text-align: left; font-family: sans-serif; color: black; background-color: white"> | |||
<td> | |||
[[File:Comments_icon_NL.png|center|50px]] | |||
</td> | |||
<td style="padding-left: 25px;">Comment.Type a comment, or a hidden comment in the corresponding fields and click '''Save'''. Visit wiki subsection Mobile interface > Submitting records > Directly in the field > Additional information > [[Entering_records#Comments|<i>Comments</i>]] for more information.</td> | |||
</tr> | |||
</table> | |||
</center> | </center> | ||
<br/> | <br/> | ||
<br/> | <br/> | ||
< | [[Entering_records#icons|[Top to Entering additional information on mapping protocols]]]<br/> | ||
[[Entering_records#Additional_information panel|[Back to Additional information panel]]]<br/> | |||
<br/> | <br/> | ||
Latest revision as of 17:18, 31 May 2024
TIP FOR BEGINNERS:
If you are not yet familiarised with the application, enter records as directly in the field. This is the easier option.
As you familiarise with the application, move to other options. Lists are the more useful way to enter data for conservation purposes.
Basics steps for entering data:
1:Choose the way you want to enter data > 2:choose place > 3:select species > 4:select number> 5:skip or fill in the non mandatory fields > 6:save > 7: enter next data
To enter your observations, click on the + sign at the bottom right corner (3) (see image Submitting records). A menu will open with all possible options linked to your account (see image Different options to submit records). We will present here the basic functions, advanced tools will be described under Protocols and Projects. Use the shortcuts on the top right corner (1) for a direct access to directly in the field and with a detailed list. Scroll down the refresh arrow (2) to refresh records. It is especially useful when browsing records Around me.


Different options to submit records.
Contents
Directly in the field (+)
Use this option to enter casual observations in real time. You can access it from the main menu or from the shortcut on the top right corner of the screen.

Directly in the field.
1 Directly in the field (+)
Step 1: Place
REMEMBER:
Smiley = Observer's position
Red marker = Data position
Indicate the position of the observed individual by moving the map to match the red marker.
To know how to navigate the map, see wiki section Mobile interface > Navigating the map. A grey smiley indicates the GPS did not detect your position. Use the "aim" icon (1) to activate the GPS on demand and wait for the yellow smiley before continuing. Your GPS precision is indicated on the top left of the map when the smiley is yellow. When done, click on Next.
Note: You can use the "list" icon on the left to see a list of all your previous records (see image below).

Location.
1. Get position
2. Continue
3. Past observations
Step 2: Species
According to the parameters selected in preferences, there are different possibilities to enter the species name:
- Choose by search: Choose the taxonomic group from the top horizontal panel and start typing the species name. A list will appear underneath from which to choose the correct species. See image Display of species by species.
- Choose by group, family, species: Start by selecting the taxonomic group, then the family and finally the species. See image Display of species by group, family, species.
- Shortcuts: Use the shortcuts on top (see image Shortcuts) to enter the species faster, or create new shortcuts if needed. Visit wiki section Mobile interface > Shortcuts to know more about shortcuts and how to create them.
Note: you can modify your preferences by going to Menu > Preferences > Personalisation > Display of species (see image Display of species).
Step 3: Number of individuals
Enter the number of individuals first and choose the accuracy of the count.
Choose between:
Not counted (an x will appear) no need to enter a number
1: approximate number of individuals
2: exact number of individuals
3: equal or minimum number of individuals
(see image Entering number of individuals).
If you did not see any individual and you want to signal it, enter exact number 0 (0 and click =).

Entering number of individuals.
1. Approximate number
2. Exact number
3. Minimum number
Enter FIRST the number of individuals and then the count precision. Once you enter the count precision, you are taken to the next screen and will have to use the back button to modify.
If you need to add new individuals as you count them, click on Start a counter and keep adding or subtracting individuals (see image Start a counter) until all are counted or you need to move to another species. Click Close to end the count and continue entering the observation.

Start a counter.
Start a counter can be very useful when counting flocks.
Step 4 (non mandatory fields): Additional information
Add more information or modify existing one on this record.
Click on any icon to enter (or modify) information in the selected icon, and click Save when done to continue entering records. If you do not need to add or amend information, click Save directly to skip this section.

Additional information panel.
NOTE
YELLOW ICON = the module contains information about the record.
WHITE ICON = the module does not contain information about the icon.
Sections available depend on the type of list, or protocol, and on the country. Visit wiki section Mobile interface > Submitting records > Additional information panel for full details on all available modules.
Step 5 (last step): Ending the record
When you finish entering an observation, click Save. A green line on top will appear for some seconds to indicate the data is saved (number 1 in image below). You will be taken to Step 1: Place to enter new records.
To access the list of data already entered, click on the List button on the left of Next button (number 2 in image below). Click on any of the records to see details and/or edit (see Editing records).

Later
Enter casual observations after they occur.

Later.
|
Entering observations directly in the field is faster as date and time are already selected for you. Selecting a location is also faster if using the aim icon: you are already correctly positioned ! Entering observations later is useful when observations are noted on another support, such as a paper notebook, on rainy days, when the phone’s battery is low, or for any other reason you prefer not to use your device in the field. |
Step 1: Date / Time
|
|
Since you may be entering your observation after it occurred, entering a time is optional. Check Enter time to enter the time or leave it unchecked if you do not want to enter a time. Click on the date button to modify date and when date and time (optional) are correct, click Save to move to next step.

Enter date: Click on the default (current) date button to open a clickable calendar and choose the appropriate day.
Enter time:
- Tick Enter time.
- Click on the default (current) time to open a clickable clock (see image Entering date and time).
- Select first the hour, then the minutes, and finally the seconds. Or click on the corresponding part of the digital clock on top to indicate if you are adjusting hour, minutes or seconds. The parameter you are adjusting shows in bold in the digital clock (see image below). Exact seconds may be important for some taxa, for protocols, or in lists.
- Click OK to save and continue.
- Tick Enter time.

Step 2: Place
Place the red marker on the location where the observation took place (as described in wiki section Mobile interface > Submitting records > Directly in the field > Step 1: Place).
|
To learn how to navigate the map, see wiki section Mobile interface > Navigating the map. |
Step 3: Species
Enter species as described in wiki section Mobile interface > Submitting records > Directly in the field > Step 2: Species.
Step 4: Number of individuals
Enter the number of individuals as described in wiki section Mobile interface > Submitting records > Directly in the field > Step 3: Number of individuals. Note in this option one cannot Start a count as in other options.
Step 5 (non mandatory): Additional information
Enter any other additional information as described in wiki section Mobile interface > Submitting records > Directly in the field Step 4: Additional information.
Step 6 (last step): Ending the record
When you finish entering an observation, click Save and you will be taken to Step 1: Date/Time to allow you to enter other data later. A green line shows on top to prove data is saved, then automatically disappears.
With a detailed list
Select this option to create a list in the field in real time. You can access it from the menu or from the quick key at the top right corner of the screen.

With a detailed list.
3 With a detailed list
Step 1: Starting a list
The 3 options below are optional. To go directly to the list, click Next.
- 1. Enter a comment about this list if appropriate. You can still comment individually every record.
- 2. Select Record the trace if you want to record your track. The default option is set in Main menu > Preferences > Personalization > Keeping the trace. Visit wiki section Mobile interface > Getting started > Preferences > Personalization > Keeping the trace to know more.
- 3. Select Hide all records from the public if you want it to be the default option while creating this list. You can change it later for individual observations you want to share anyway. Administrators will still have access to your records once submitted. Note: If in Preferences you chose to hide records, all your records, including lists are hidden automatically.
- 4. Click Next to start entering your data.

Note from that moment an intermittent red dot will appear at the top of your screen indicating the list is running. All records you enter are considered to be part of this list. The taxonomic group of the first record you enter will determine the taxonomic group of the list. If you enter a new taxonomic group, you will be warned and it will still be recorded though not as part of the list. You can see for how long the list is running along with the red dot. Use the keys on the right of the screen to pause or stop the list (see image below). Pause the list to enter other records alongside it, either from the same or different taxa.

Recording a list in the field.
1. Time: Time since the list started.
2. Recording: Indicates the time is running.
3. Break: Pause the list to enter observations that do not belong to the list. The time continues running.
4. Stop: End the list.
|
BREAK: Enter other species from the same or different taxa but do not include them on the ongoing list. The time continues running. |
Step 2: Place
Place red marker at the observation's position by moving the map. By clicking on the aim icon (see image), the marker will automatically position at your GPS location and center it.
Note, "with a detailed list" requires you to indicate the exact position of the observation. Therefore, using the "aim" icon is useful to know where you are and for observations that are on your same spot, for example plants or some insects.
Click Next when done.
Note: The show/hide summary of observation (1 on image below) allows you to see other records of the list or to hide them. It allows too to select one of those records to modify or delete it.
To know how to navigate the map, go to wiki section How to navigate the map.

Step 3: Species
Enter species as described in wiki section Mobile interface > Submitting records > Directly in the field > Step 2: Species.
Step 4: Number of individuals
Enter number of individuals as described in wiki section Mobile interface > Submitting records > Directly in the field > Number of individuals.
Step 5: Additional information
Enter any other additional information as described in wiki section Mobile interface > Submitting records > Directly in the field > Step 4 (non mandatory fields): Additional information.
Ending the list
Click the stop button on the top to end the list and confirm (see image).

Adjust starting time and ending time if necessary, for example if you forgot to stop the list when you finished recording (see image below). Otherwise, since it is a real time list, starting and ending time will be automatically detected by starting and ending the list. Add any comment if necessary, and indicate if is a partial list (not all species detected were recorded) or if it is a complete list (all species seen or heard were recorded). A complete list does not refer to species present but to species detected.

When displaying data, observations belonging to a partial list are represented with a hollow green square, and those belonging to a complete list are indicate by a full green square. See wiki section Various > Symbols cheatsheet for more information.
With a simple list
Allows creating simplified lists in real time or that took place in the past.
You may not enter precisely each record, but you enter the records at your position (real time) or one point (observation entered in the past) the record gets a new precision marker called “unprecise” and the observation pressure is recorded.

With a simple list.
4 With a simple list
-
4.1 Step 1: Date / Time
4.2 Step 2: Place
4.3 Step 3: Species
4.4 Additional information
4.5 Step 4: Ending the list
Step 1: Date / Time
By default the app shows the current date and time, which can be used as such to record a real time list.
If your observations happened in the past,
- click on the date to modify it by selecting from the expandable calendar
- click on the time to select the starting time of the list and select from the expandable clock as in Mobile interface > Submitting records > Later > Step 1: Date / Time.
Add a comment if necessary and indicate if you want to hide the records from the public and/or record your trace. Administrators will still see them once they are synchronised.
Visit wiki section Mobile interface > Getting started > Preferences > Personalization > Keeping the trace to know more about recording your trace.
When done, click Next.
NOTE
If you change the time within 5 minutes of the given time, or do not change it at all, your list is considered a real time list and you have the option to record the trace. You will not be able to indicate the position of your observation, and it will be automatically considered to be the same as the position of your GPS.
If you change the time more than 5 minutes of the real time, your list is not considered a real time list and the option to record the trace gets unresponsive. You will be able to select the position of your observations on a map, as explained in next sub section Place.
Step 2: Place
This option is only available if you are entering a list after it occurred. That is, if you changed the time in the previous screen more than 5 minutes from the real one.
Select the position as in Mobile interface > Submitting records > Later > Step 1: Date / Time.
Click Next when done.
NOTE:
- For a simple list (entered later than it occurred) the location will be the same for all the sightings, so the first time you select a place will be the position for all the following data you insert.
- If you are covering a big area or different ecosystems, consider doing so in separate lists.
Step 3: Species
Enter species as described in wiki section Mobile interface > Submitting records > Directly in the field > Species.
For a real time simplified list, it is now possible to enter the same species several times separately. All records are kept with their time and location (see image below).

Entering species with a simple list.
1. Species list: Repeated species are saved separately.
2. Sort list: Click on the clock (left) to sort the list chronologically, or on the letters (right) to do so alphabetically.
3. Location and number of species: GPS precision (left) and the number of species already entered (right). Click on the map to see your location.
4. Additional information: Click the dots to open the additional information panel.
For a real or delayed simplified list, you can also use symbols + and - to enter number of individuals (see image below).
With that way the localtion is the same for all individuals.

Adding/Subtracting individuals.
1. Add individuals: Click on + to add individuals to the count.
2. Subtract individuals: Click on - to subtract individuals to the count.
Additional information
You will not be prompted to enter additional information. However, you can add it after entering a record in the list or after finishing the list (see Editing records for more information).
While creating the list, click on a species name and select Edit record to access the additional information menu.
See wiki section Mobile interface > Submitting records > Additional information panel to navigate all sections in the menu.
If only the number of individuals needs to be modified, use the plus and minus signs on the left of the species name to modify the count (see image below). The new number is saved automatically.
Click on the species name and select Delete to delete the record.

Entering additional information in with simple later.
1. Edit record: Enter additional information.
2. Display more information: See location and summary of observation.
3. Delete: Delete entry.
If your list occurs in real time, the screen will also show GPS precision (on the top left corner, in green or red) and the number of species already entered (top right corner, see image below). If besides, you are in Africa, it will indicate in the middle the atlas grid number of the African atlas.

A real time simple list.
1. GPS precision. Click on the map to see location.
2. Number of species already entered
Step 4: Ending the list
When all records are entered,
1. click on the "stop" icon at the top right corner to finish the list, and confirm (see image).

Ending with a simple list 1.
1a. End list
1b. Confirm
2. Click on the time button to open an expandable clock and introduce ending time if necessary as explained in wiki section Mobile interface > Submitting records > With a detailed list > Ending the list.
3. Adjust starting time if necessary.
4. Enter/ Modify a comment if necessary.
5. Enter any other required information. It may vary from country to country.
6. Finally, indicate if you recorded all species present or only part of them (see image).

Ending with a simple list 2.
2/3. Adjust starting (left) and ending (right) time
4/5. Enter/Modify Comments or other information required
6. Select type of list
COMPARISON BETWEEN "WITH A DETAILED LIST" AND "WITH A SIMPLE LIST"
With a detailed list preselects date and time for you but requires you to enter the position for each record. If the position of the observation is your current position, use the aim icon to be faster. It also allows entering additional information for each record within each entry.
With a simple list can also be used in the field. In this case, you need to select date as well as starting and ending time. However, you will not be prompted to enter the position for each observation and the additional information menu will not be automatically displayed for each record. This saves time and reduces the chances of missing some individuals.
Use "With a simple list" also in the field in real time if you do not need to get exact positions for each individual or add detailed information (as age, sex, pictures or atlas codes) for most of them.
[Top to With a simple list]
[Back to Submitting records]
Synchronisation
Once your finish entering your records and add or amend any information, consider synchronizing them. When synchronising, your records become public to other users and available to administrators for verification and planning conservation. If you selected to hide your records from the public, those won’t be visible to other users, but administrators will still see them, verify them and use them for conservation purposes.
To synchronise, click on the reminder at the bottom of the screen, both in your list of observations and on the starting screen and confirm (see image below).
Once your records are synchronised, you can no longer modify them in NaturaList, but you can do so from your local portal. See a list of local portals in the wiki section Various > Local portals and partners. Go to wiki section Web interface > Editing records for more information on how to edit records on the web site.
If no local portal exists for the site (for example in Africa or outside Europe), go to https:data.biolovision.net to make changes.

Synchronisation.
1. Synchronise
2. Confirm
Why to synchronise:
- Share your observations with fellow naturalists.
- Participate in conservation initiatives.
- Back up your records online (otherwise you may lose them if your phone crashes).
- Confirm dubious records.
Create an object
Allows to record a nest, a burrow, a birdhouse, or similar encountered on the field, and attach it to an observation. This function is only available to users with special rights.
For more information, visit the wiki section Mobile interface > Create an object.
Create an object
Access it as if entering data, and click Create object (see image below).

Create an object. Main menu.
Visit wiki section Mobile interface > Create an object > Create object to know how to create an object.
Attach objects to observations
Objects can be associated to observations either before or after synchronisation.
|
Attach an object to an observation (before synchronisation). |
Attach an object to an observation (after synchronisation). |


Visit wiki section Mobile interface > Create an object > Attach objects to observations to know how to associate an object to an observation, for example, a nest.
Browse created objects
Objects can be seen in NaturaList and on the local portal.

List of created objects.
1. Object pending synchronisation.
Synchronised objects do not show any icon

Browsing object in the local portal.
1. Access object
2. Access associated observation
Visit wiki section Mobile interface > Create an object > Browse objects to see your created objects.
Edit objects
Visit wiki section Mobile interface > Create an object > Edit objects to modify your objects.
Delete objects
Delete your objects directly from NaturaList.

Deleting an object.
Visit wiki section Mobile interface > Create an object > Delete objects to delete your objects.
[Top to Create an object]
[Back to Entering records]
Additional information panel
Several modules allow to enter additional information to the recorded observation. Depending on the list or the protocol used, the additional information panel (see image below) may be opened automatically while entering observations (ie. directly in the field) or may require the user to access it as if editing the record (ie. with a simple list).
Not all modules are available in all countries and lists/protocols.

Additional information panel. Example..
Expand the table below to see all available modules in the Additional information panel. Yellow icons indicate the module has some information in it (ie. Time or Map in the list below), while white icons indicate the module does not contain any information yet.
| Additional information modules | ||||||||||
|---|---|---|---|---|---|---|---|---|---|---|
| Name | Description | |||||||||
|
|
Atlas code Add a code to indicate breeding stage. |
|||||||||
| Colony |
||||||||||
 |
Comments Add a comment about the observation, and hide or show it to the public. |
|||||||||
 |
Detail Indicate the age and sex of individuals observed. |
|||||||||
 |
Direction Indicate flight direction of individuals recorded. |
|||||||||
|
|
Extra protocol Add information about nests. |
|||||||||
 |
Hidden record Choose to hide or show your observation to the public. It is independent from the comment: you can hide the comment and still show the observation. |
|||||||||
|
|
Map See the observation's location. |
|||||||||
 |
Media Attach an image or a sound to your record. |
|||||||||
|
|
More details |
|||||||||
 |
Mortality Add information about injuries or deaths. |
|||||||||
 |
Number of individuals Enter or modify the number of individuals and the count precision |
|||||||||
 |
Offspring | |||||||||
| Protocol |
||||||||||
| Ring |
||||||||||
|
|
Species Change species name. |
|||||||||
 |
Species list Change general information about the list the record belongs to. Click on the clock to change starting and/or ending time, enter/modify the comment, and/or check All species were recorded if all species were recorded. |
|||||||||
 |
Study code Select study code if your observation belong to any of the listed studies. |
|||||||||
 |
Time Change time by clicking on the given time. Check Do not enter to hide record's time. |
|||||||||
|
|
||||||||||
1.4 Additional information
- 1 Atlas code
2 Colony
3 Comments
4 Details (Age and Sex)
5 Direction
6 Extra protocol
7 Hidden record
8 Map
9 Media
10 More details
11 Mortality / injuries
12 Number of individuals
13 Offspring
14 Protocol
15 Ring
16 Species
17 Species list
18 Study code
19 Time
Additional information on mapping protocols
Atlas code

Additional information. Atlas code.
Select an atlas code, or no code. Available atlas codes will depend on the country you chose in Preferences and for your information it is displayed at the bottom of the screen (see image below).
During the breeding season some countries may ask automatically to enter an atlas code. It is highly encouraged you do so (very useful, for example, for breeding atlas) but it is not compulsory.
Go to Menu > Preferences > Atlas code to change the code you use.

Adding an atlas code
[Top to Atlas code]
[Top to Additional information panel]
Colony
[Top to Colony]
[Back to Additional information panel]
Comments

Additional information. Comments.
Leave a comment in the top section if you want it to be public and associated to your record. Any registered user will see it. Use the lower section if you want to keep your comment private.
Note administrators will still see it. To learn more about administrators, go to wiki section Local portals > Administration.
Click Validate when done.

Adding comments.
Validate only validates the comments.
To validate your record you will have to Save later.
[Top to Comments]
[Back to Additional information panel]
Details (Age and sex)

Additional information. Details.
According to the taxonomic group you are entering, fields for details differ, see image Examples for non avian groups. Examples and explanations just below apply only to birds.
Enter number of individuals per sex and age class. Type number or use +1 -1 quick keys to quickly change the number. Key Max will count all individuals entered for this species. As data is entered, a list will appear at the bottom. Scroll up and down from the right hand bar to see all entries, or click on cross to delete any entry if necessary (see image below). When done, click Add to enter a new class or finish to end.

Adding age and sex to a record.

Examples of Details for non-avian taxonomic groups. Orchids (left), Odonata (right).
[Top to Details]
[Back to Additional information panel]
Direction

Additional information. Direction.
Click on the compass to indicate flight direction (in the example below, the user clicked on SE).

Additional information. Selecting direction.
[Top to Direction]
[Back to Additional information panel]
Extra protocol

Additional information. Extra protocol.
Introduce required information about nests (see image below as an example). This section will only appear if you are entering data into a protocol that requieres nest information. Information required may vary depending on the protocol, and may include:
- Intact nests: Type number of intact nests.
- Nest location: Click on the yellow band to see options (see image Nest location) and choose the most appropriate.
- Number of nests occupied by other species: Type number of nests occupied by other species.
- Occupied nests: Type number of occupied nests.
- Potencial breeding pairs: Type number of pairs that may be breeding.
- Suspected nests: Type number of suspected nests.
Remember fields marked with an asterisk are mandatory.
.png)
Extra protocol. Example.
[Top to Extra protocol]
[Back to Additional information panel]
Hidden record

Additional information. Hidden record.
Select/unselect as needed.
A yellow key indicates the record will be hidden to other users, except administrators.
Default option depends on your ‘’’Preferences’’’. Go to Menu > Preferences > Hide record to change it.
Note some records are automatically hidden depending on the country or region your observation takes place in. Observations in countries not covered by any local partner are never automatically hidden. However, any user can hide records if they consider doing so will help protect the individuals, species or habitat.
To see which records will automatically be hidden locally, go to Web interface > Local portals > Species partially hidden.
To learn more about administrators, go to Web interface > Local portals > Administration.
[Top to Hidden record]
[Back to Additional information panel]
Map

Additional information. Map.
Click to see your observation's position.
Click
- Next to Continue, or
- "aim icon" to see your position (see image below).
Visit wiki section Mobile Interface > Navigating the map to interpret the map if necessary.

Map
1. Continue
2. Show your position
[Top to Map]
[Back to Additional information panel]
Media
Attach an image or a sound to your observation, either before or after entering a sighting, from:
- the Additional information panel, or
- the main screen.
To use the Additional information menu, enter the observation first, and
1. choose Media on the additional information panel (see image below)

Attaching media from the Additional information panel.
It displays all images already attached to this record (see image as an example).
2. choose between
- Upload a file, if you have already taken them and they are stored on your phone's gallery. Pictures must be taken with your phone or inserted afterwards through a local portal. If no local portal exist, it is not currently possible to add a picture through data.biolovision.net.
- Add a photo then. If you do, do not forget to accept to upload it.
- Record a sound at the moment.

Media. Select file.
1. Upload a file: Click to upload a file already in your phone.
2. Add a photo: Click to take the picture to attach.
3. Record a sound: Click on the microphone icon (or open the three dot menu if not displayed and on Record a sound to record the sound to attach).
To use quick access keys, take the picture or record the sound before entering the observation (see image below).

Media. Quick access.
2. Add a photo: Click to take the picture to attach.
3. Record a sound: Click to open the recorder.
It is not possible to upload a file before entering an observation.
- Upload a file
- Upload a file
Direct access to the gallery in your phone. Choose the image or sound to attach to the observation the same way you would select any other file to attach to any platform (e-mail, whatsapp...). Some considerations must be taken into account:
- The date of the observation must match the date the file was created. Some internal adjustments correct for differences in time zone.
- Pictures are automatically resized to 3072 pixels on the longest side before being uploaded.
- Sound files must be maximum 16 MB to upload.
NOTE:
- The date of the observation must match the date the file was created.
- Pictures will be automatically resized to a maximum size of 3072 pixels before being sent.
- Sound files should be maximum 16 MB to upload.
- Add a photo
- Add a photo
Direct access to the camera in your device. Take a picture normally and select:
- Retry to repeat it, or
- OK to upload.

Taking a picture to upload.
1. Retry: Repeat the photo.
2. OK Upload the photo.
See the images as they are attached.
Hide/show the picture only, not the data, to other users by clicking on the corresponding key or delete by clicking on the bin (see image below). You will also be able to edit it at a later stage. When done, add another picture or close "Media" to access other sections or entering the observation.

Hiding a picture.
1. Hide/Show
2. Delete
- Use the key icon to hide the image while keeping the record visible.
- If you hide the record, the image is automatically hidden.
- Record a sound
- Record a sound
Press the microphone icon to start recording the sound. It will start recording immediately and the waveform is shown in real time.
.png)
Recording in real time.
1. Stop recording.
Press stop to stop recording, and:
- Crop the waveform, if necessary, after stooping the recording (it is only possible to crop the time axis), or
- Validate to access other sections or to enter the observation.

Validate recording.
1. Crop: Use arrows to cut along the time axis.
2. Play: Play recording.
3. Validate: Upload recording.
It is not currently possible to playback.
[Top to Media]
[Back to Additional information panel]
More details
[More details]
[Back to Additional information panel]
Mortality / injuries

Additional information. Mortality / injuries.
Indicate if your observation corresponds to an injured or dead individual, and select the cause if known. Scroll down All causes to see all options (see image Selecting cause of injury 1). Click on the category to open a panel with all possible causes and enter details (see bottom image Selecting cause of injury 2). When done, click Validate. For quick selection, the icons of the most common causes are on top (see image Selecting cause of injury 1). When you finish entering the cause of death or injury click Save or if necessary, Delete. The entry can be modified later.

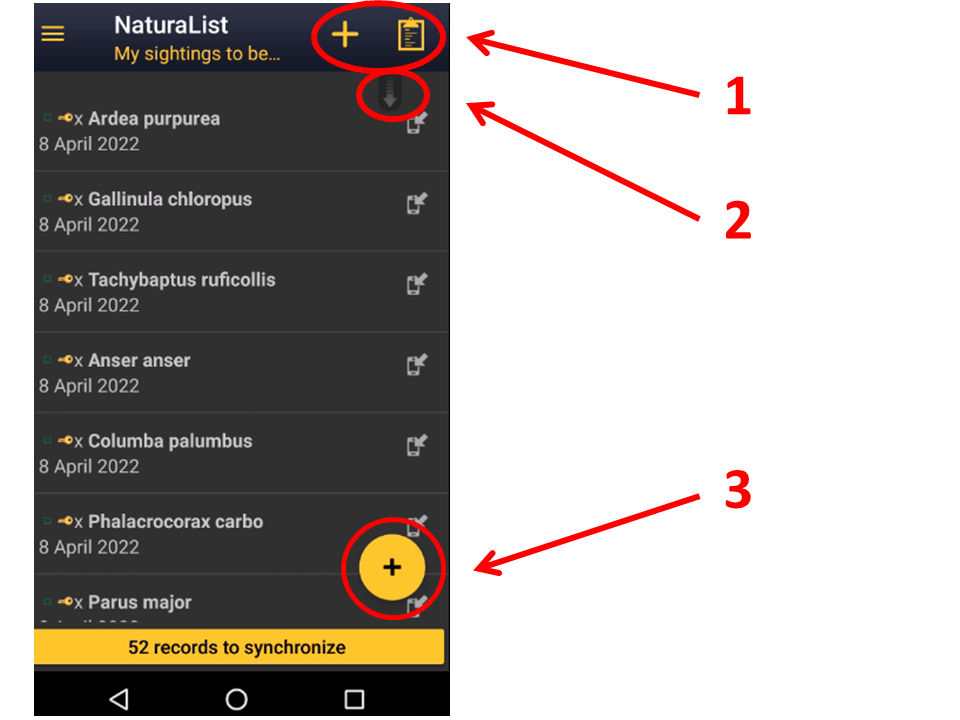
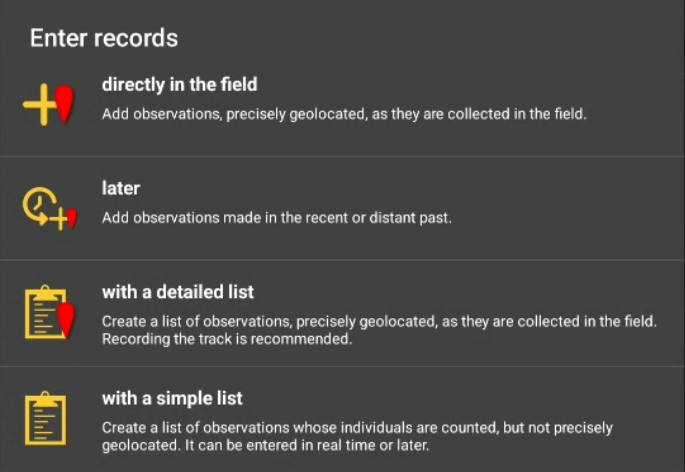
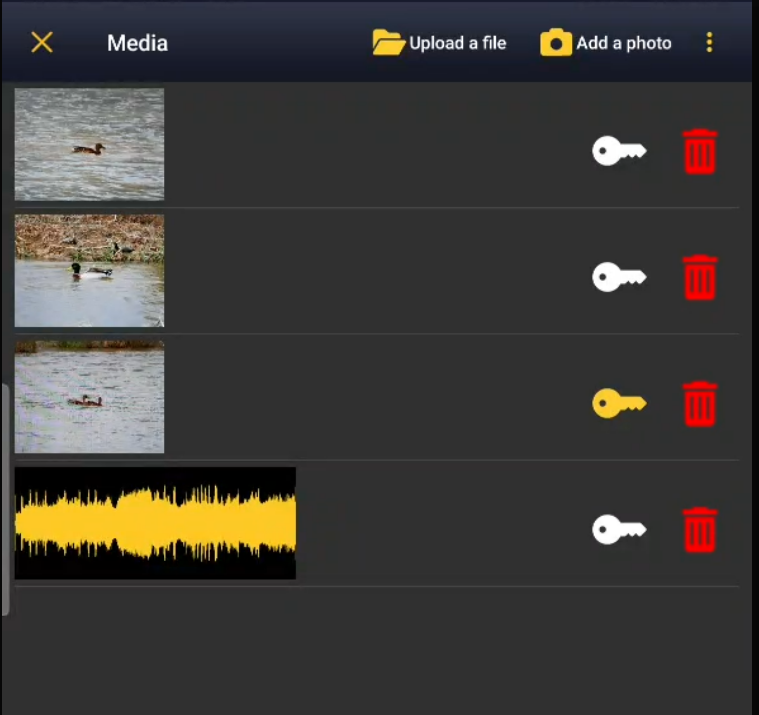
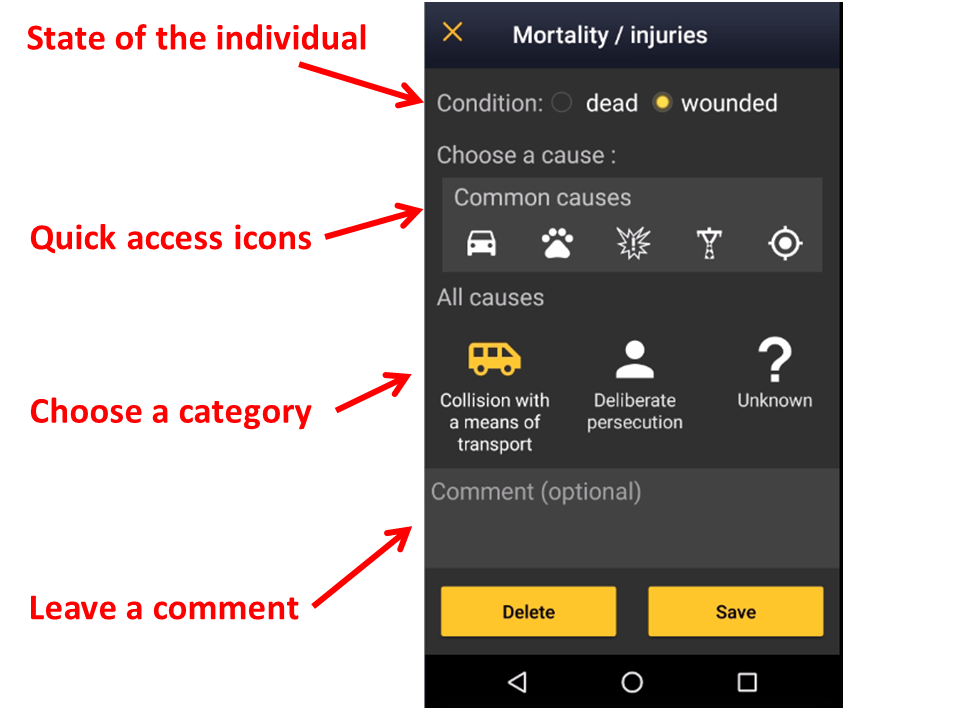

Selecting cause of injury 2.
[Top to Mortality / injuries]
[Back to Additional information panel]
Number of individuals
[Top to Number of individuals]
[Back to Additional information panel]
Offspring
[Top to Offspring]
[Back to Additional information panel]
Protocol
[Top to Protocol]
[Back to Additional information panel]
Ring

Additional information. Ring.
- 1. Select the type of marking by checking the corresponding cell, and
- 2. type the inscription on the ring.

Additional information. Recording ring.
[Top to Ring]
[Back to Additional information panel]
Species
[Top to Species]
[Back to Additional information panel]
Species list
[Top to Species list]
[Back to Additional information panel]
Study code
[Top to Study code]
[Back to Additional information panel]
Time
[Top to Time]
[Back to Additional information panel]
Entering additional information on mapping protocols
Some protocols may give you the option to enter additional information with icons when entering species and number of species (see image below).
![]()
Entering additional information with icons. Example.
White background icons = Atlas codes
Blue background icons = Any other additional information fields
Atlas codes
 |
Singing, drumming or displaying male present in breeding season in possible nesting habitat. |
 |
Unidentified individual in breeding season in possible nesting habitat. |
 |
Male in breeding season in possible nesting habitat. |
 |
Female in breeding season in possible nesting habitat. |
 |
Pair observed in suitable nesting habitat in breeding season. |
 |
Agitated behaviour or anxiety calls from adults, indicating a nest or young nearby. |
 |
Recently fledged young (nidicolous species) or downy young (nidifugous species) observed. |
 |
Nest-building or excavating of nest-hole observed. |
 |
Adult carrying faecal sac or food. |
 |
Nest containing eggs or young. |
 |
No atlas code. |
Flight direction
 |
Flying direction. Press, hold and drag to indicate flying direction. If the individual is moving around without a clear direction, press icon but do not indicate flight direction. It will be represented with concentric circles (ie. single male in image below).This information can be combined with others in the list (see example below), but should be introduced first. |

Example of information on flight direction.
Relationship between individuals
When two similar individuals are recorded nearby (ie. two singing males of the same species), click on both records to open relationship options (see image below).

Relationship between individuals. Example.
|
|
Both sightings correspond to the same individual. It is probably the same territory. It is reflected as a green line in the map. |
|
|
It is unknown if both records correspond to the same individual/s. It is reflected as an orange line in the map. |
|
|
Both records correspond to different individuals. It may define two different territories. It is reflected as a blue line in the map. |
Click
- Save to save and continue entering data, or
- X to close panel and continue entering data without indicating relationship.
- Save to save and continue entering data, or
To see how it will show in the web site, visit Web interface > Local portals > Protocols > Private territory mapping > Census results > Observations section.
Comments
|
|
Comment.Type a comment, or a hidden comment in the corresponding fields and click Save. Visit wiki subsection Mobile interface > Submitting records > Directly in the field > Additional information > Comments for more information. |
[Top to Entering additional information on mapping protocols]
[Back to Additional information panel]