Para acceder a la gestión de un protocolo necesitas tener Derechos de gestión de protocolos. Sólo los administradores de la página local puede darte acceso bajo ciertas condiciones.
Hay dos formas de acceder a la gestión de protocolos:
Desde el Manú principal > Administración
Si eres administrador, ves a la sección de administración en la columna de la izquierda (ver la imagen Administración), y ves a Gestión de protocolos. Abre el panel y selecciona Gestión de protocolos (ver imagen Gestión de protocolos).
Administración.
Gestión de protocolos.
Desde el Menú principal> Participar > Todos mis protocolos
Ves al Menú principal > Participar > Todos mis protocolos. Se mostrarán todos los protocolos a los que tienes acceso, sea como administrador o usuario sin derechos especiales. Los usuarios sin derechos especiales también pueden acceder de esta manera pero no verán todas las acciones disponibles para ese protocolo.
Sección idéntica a Censo de aves acuáticas que tomamos como ejemplo, disponible para usuarios registrados con derechos especiales. Permite imprimir mapas e introducir observaciones. Consulta la sección wiki Interfaz web > Protocolos > 'Nombre del protocolo' > Preparación y datos para más información.
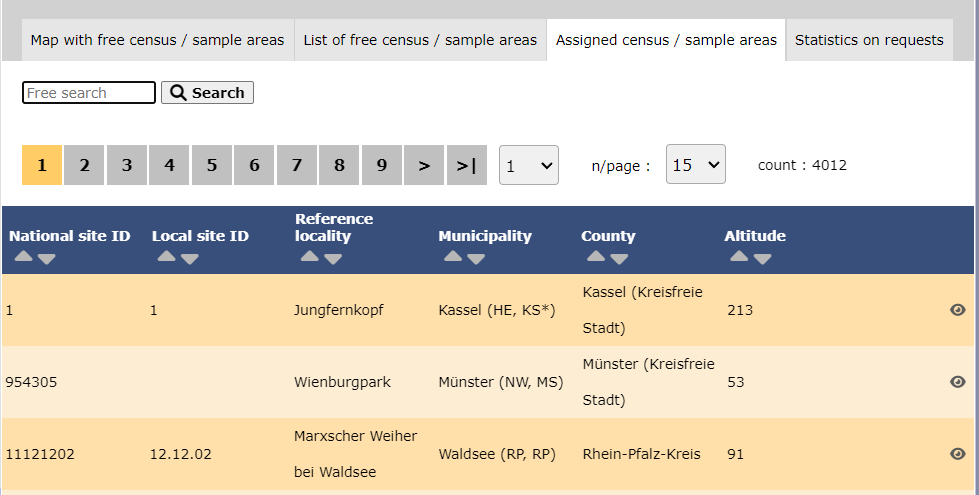
Lista de todos los lugares que permiten introducir datos (aquí como ejemplo el Censo de aves acuáticas). Usa las flechas bajo los títulos para alternar entre orden ascendiente y descendiente (consulta la imagen como ejemplo).
Protocolos. Lugares disponibles.
Nombre de referencia: Nombre oficial asignado al lugar de estudio. El nombre se lo da un administrador o un usuario con derechos especiales. Nombre personalizado: Nombre alternativo bajo el que también se conoce este lugar, o un nombre que sea más fácil para el usuario. Éste puede ser asignado por el usuario que tiene acceso a este sitio. Localidad de referencia: Nombre de la localidad bajo la que se asociarán todos los datos de este censo. Municipio: Municipio al que pertenece la localidad. Altitud: Altitud asociada a la localidad.
1. Buscar
Reduce la lista escribiendo el nombre del lugar, la Localidad, el Municipio, o parte de ellos, y clica BUSCAR.
Si hay algún filtro y quieres desactivarlo, clica en MOSTRAR TODO.
2. Buscar
Selecciona el número de página y/o el número de entradas por página.
3. Detalles
Clica para ver los detalles de los lugares seleccionados.
4. Editar
Clica para editar los detalles de los lugares seleccionados.
5. Lugar nuevo
Crea un nuevo lugar de estudio.
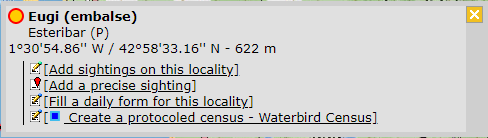
1. Clica + NUEVO bajo la lista. Selecciona el lugar como si introdujeras una observación (consulta la sección wiki Interfaz web > Enviar observaciones si fuera necesario) y selecciona la opción nueva: Crear un censo con protocolo -Nombre del protocol (aquí censo aves acuáticas, imagen siguiente).
Crear un lugar de estudio nuevo para el protocolo Censo de aves acuáticas.
2. Escribe el nombre del nuevo lugar.
Nombrar el nuevo sitio de estudio para el Censo de aves acuáticas.
Nombre de la localidad de referencia: Localidad bajo la que se asociarán todos los datos del protocolo. Lo crea el administrador al crear un nuevo lugar de estudio y no se puede modificar más tarde. Nombre de referencia: Escribe el nombre del nuevo sitio. Puede ser un nombre real o un código, y puede estar formado por letras, números o una combinación de ambos. Nombre???: Escribe un nombre adicional para el sitio, si se requiere. Éste nombre lo puede cambiar más tarde el usuario asignado a este sitio.
3. Escoge entre:
Dibujar un polígono, PUNTO O TRANSECTO como se explica en la sección wiki Interfaz web > Editor de geometría o,
Importar un shapefile:
Importar un polígono como shapefile.
1. Escoge el datum y 2. carga el fichero. 3. Al acabar, clica IMPORTAR.
Un polígono recién creado se puede exportar como shapefile para usar en el futuro o se puede modificar. Clica en el icono de fichero bajo la sección de Polígono (ver la imagen siguiente, en el círculo). Si es necesario, modifícala e IMPORTA como se explica más arriba.
Guardando el shapefile de un sitio acabado de crear.
4. Cuando el sitio nuevo eestá creado, hay tres opciones:
GUARDAR Y SEGUIR para guarsar el sitio y continuar haciendo cambios, o
GUARDAR E INTRODUCIR OBSERVACIONES para guardar y comenzar a introducir observaciones o
ELIMINAR EL SITIO si es necesario. Nota: esta opción solo está disponible si no hay observaciones asociadas a este sitio.
El sitio nuevo ya está creado y guardado (se indica en la parte superior de la página). Ahora se te da la opción de eliminarlo si fuera necesario (ver la imagen Eliminar un sitio recién creado). En caso contrario, ves a cualquier lugar de la página o repite todo el proceso para crear otros sitios sin perder el ya creado.
Usuario/Localidad
Protocolos. Usuario/Localidad.
Desde "Nombre del menú del protocolo (aquí Censo de aves acuáticas)", selecciona Usuario / Sitio para asignar usuarios a los sitios de estudio.
Acceso a las localidades
List of observers allowed to conduct "Name of the protocol (for example Waterbird Census Protocol)" and the site/s they are assigned to. Use arrows on columns to alternate between ascending and descending order (see image as an example).
Protocols. Access to sites.
User name: Name, email address and local site user number of observer. Reference name: Reference name of the "Name of the protocol (here Waterbird Census Protocol)" site (local official one).
1. Search
Reduce list by typing the name of a site, user, or part of it, and click SEARCH.
When a filter is applied and you want to deactivate it, click on DISPLAY ALL to see the full list.
2. Page and items
Select page number and/or number of items per page. Count indicate the total of items found for the search.
Detail for choosing page, item/page
3. Details
See details of observers and their assigned site.
Protocols. User/site Details.
User name: Observer name, email address and local site user number. Reference name: Name of site the observer has right to survey for the "Name of the protocol (here Waterbird Census Protocol)" . Custom name: Additional name under which the site is also known. 8. BACK: Go back to main list. 4. EDIT: See Edit subsection below. 5. DELETE: Revoque observer's right to survey this site for the "Name of the protocol (here Waterbird Census Protocol)" .
4. Edit
Modify the user assigned to this site, or the site assigned to this user.
Protocols. Editing User/site.
10. Modify observer assigned to this site. Start typing the name of the new observer (a) and choose from the expandable panel (b). 11. Modify site assigned to the observer. Start typing the name of the new site (a) and choose from the expandable panel (b). 8. BACK: Go to previous screen without saving changes. 9. MODIFY: Save changes.
5. Delete
Revoque the user's right to survey this site for the "Name of the protocol (here Waterbird Census Protocol)" .
6. EXPORT
Export list as a .txt file.
7. + NEW
Grant rights to observer to conduct "Name of the protocol (here Waterbird Census Protocol)" census on designated sites.
Protocols. Adding new user to site.
10. Select observer to grant access to a certain site. Start typing the name of the new observer (a) and choose from the expandable panel (b). 11. Select site to be assigned to the observer. Start typing the name of the new site (a) and choose from the expandable panel (b). 8. BACK: Go to previous screen without saving changes. 12. ADD: Save new addition.
Administration users rights
List of users and administrators with access to the "Name of the protocol (here Waterbird Census Protocol)" . Use arrows on columns to alternate between ascending and descending order (see image as an example).
Users and administrators of Waterbird census protocol.
1. Search
Reduce list by typing the name of a right, a user, or part of it, and click SEARCH.
When a filter is applied, to deactivate it, click on DISPLAY ALL.
2. Search
Select page number and/or number of items per page.
3. Details
See the rights granted to the selected observer.
Protocols. Rights details.
Number: This is for Biolovision's internal use. User name: Name, e-mail and local site user number of the user receiving the right. Right granted: Right the selected user is granted to. 8. BACK: Go back to main list. 4. EDIT: See Edit subsection below. 5. DELETE: Revoque observer's right to survey this site for the "Name of the protocol (here Waterbird Census Protocol)" .
4. Edit
Modify the rights granted to an observer.
Protocols. Editing rights.
10. Modify observer assigned to this right. Start typing the name of the new observer (a) and choose from the expandable panel (b). 11. Modify rights assigned to the observer. Start typing the name of the new right (a) and choose from the expandable panel (b). 8. BACK: Go to previous screen without saving changes. 9. MODIFY: Save changes.
5. Delete
Revoque the user's right to survey this site for the "Name of the protocol (here Waterbird Census Protocol)" .
6. + NEW
Add a new right to an observer.
Protocols. Adding new right.
10. Select observer to grant a right. Start typing the name of the new observer (a) and choose from the expandable panel (b). 11. Select right to be assigned to the observer. Start typing the name of the new right (a) and choose from the expandable panel (b). 8. BACK: Go to previous screen without saving changes. 12. ADD: Save new addition.
7. Protocol administrators
List of administrators of "Name of the protocol (here Waterbird Census Protocol)" and their email addresses.
Settings
Protocols. Settings.
Set protocol parameters.
Species list
Parametring a species list helps users to report all species of the protocol without forgetting any. It is faster for the user to enter records in the field because they only have to fill the number of individuals for mandatory species.
Please take time as an administrator to fill this section before the fieldwork season starts.
An extended list is useful if you want to add interesting but not mandatory species to a report.
List of species designated as part of a basic or an extended list. If no species are designated as part of any list, the section appears empty but users are still asked to indicate which list they are using. Use arrows under titles to alternate between ascending and descending order (see image as an example).
Protocols. Species list.
Species: list of species selected to survey. Extended species list?: species belonging to an extended species list. Order: order of appearance.
Reduce list by typing the name of a species, or part of it, and click SEARCH.
When a filter is applied, to deactivate it, click on DISPLAY ALL to see the full list.
2.Page and items
Select page number and/or number of items per page. Count indicate the total of items found for the search.
Detail for choosing page, item/page
3. Details
See name of species, their assigned order in the list and to which type of list they belong.
Protocols. Details of Species list.
Species: species selected for details display or editing. Extended species list?: Yes: species belong to extended species list / No: species belong to basic list. See Ending the list to know the difference between a basic, an extended and a complete list. Order: order of appearance. 7. BACK: Go to previous screen. 4. EDIT: See edit subsection below. 5.DELETE: Delete species from the list.
4. Edit
Modify details for the selected species.
Protocols. Editing species lists.
10. Species: Modify, if necessary, the name of the species (10a) and select from the expandable menu (10b). 11. Extended species list?: Choose if the species will be part of an extended list (YES) or a basic list (NO). 12. Order: Type the order in which the selected species will appear in the list. 13. BACK: Go back to previous screen without saving. 14. MODIFY: Save changes.
5. Delete
Delete the species from the list.
6. NEW
Add a new species to the list.
Protocols. Adding a new species to the list.
10. Species: Start typing the name, or part of the name, of the species (10a) and select from the expandable menu (10b). 11. Extended species list?: Choose if the species will be part of an extended list (YES) or a basic list (NO). 12. Order: Type the order in which the selected species will appear in the list. 13. BACK: Go back to previous screen without saving. 15. ADD: Add the list species to the list.
NOTE:
Even when no species are dessignated as a basic or an extended list (this section remains empty), users are still asked to indicate which list they follow.
We recommend to define these lists to avoid confusion and misunderstandings among users.
Parameters describing the protocol
List of all parameters describing the protocol and their current status. Parameters are protocol dependent. Please refer to each individual protocol for details.
Parameters
Shows the status of the Free area tool parameter for the "Name of the protocol (here Waterbird Census Protocol)" :
When active, it allows both users and administrators to see polygons that have not yet been assigned to an observer. Users can ask to be assigned to a site. See wiki section Web interace > Free area tool for details.
Protocols. Free area tool.
1. Details
Protocols. Free area tool details.
BACK: Go back to previous screen. EDIT: Modify details. See subsection Edit below.
2. Edit
Protocols. Editing free area tool.
Change status if necessary and click:
BACK to go to previous screen without saving changes, or
MODIFY to save changes.
When the Free area tool is active, administrators have a few more options than regular users when accessing the Free area tool as a user:
List of existing shortcut groups for this protocol.
1. Search
Reduce list by typing the name of the Shortcut group, or part of it, and click SEARCH.
2.
Page and items Select page number and/or number of items per page. Count indicates the total amount of items found for the search.Detail for choosing page, item/page
3. Details
See details for the selected group.
4. Edit
Edit selected shortcut group.
5. Delete
Delete shortcut group.
6. NEW
Create a new group.
Shortcuts
Shortcuts in protocol administration part
List of species for which a shortcut exists.
Species: Name of species. Shortcuts group: Name of the shortcuts group. Color code: Colour associated to this species. User may change it in NaturaList afterwards. Order: Order this species shortcut will appear in relation to other species shortcuts in the same group.
1. Search
Reduce list by typing the name of the group, or part of it, and click SEARCH.
2.
Page and items Select page number and/or number of items per page. Count indicates the total of items found for the search.Detail for choosing page, item/page
3. Details
See details for the selected group.
4. Edit
Edit selected shortcut group.
5. Delete
Delete shortcut group.
6. NEW
Create a new group.
BACK: Go to previous screen without saving. ADD: Add the new species to the list.
Species: Type the name, or part of the name, of the new speies on the left hand field and select from the expandable menu on the right.
Shortcuts group: Type the name of the group, or part of it, on the righthand field, and select it from the expandable menu on the left hand field.
Color code: Select a colour to associate to this shortcut. Users may change it in NaturaList afterwards.
Order: Type a number to indicate in which position this shortcut will appear in relation to other shortcuts in the same shortcuts group.
Check data
Protocols. Check data.
Visualise a summary of survey data.
Protocols. Check data.
1. Graphs
Scroll down to see all graphs:
Number of censuses: number of censuses per year from last years to present.
Census duration: total number of hours of survey per year, from last years to present.
Average census time: average number of minutes per survey.
2. Site / Observer
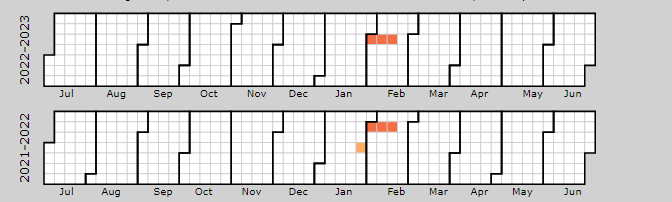
Select a site and/or an observer from the expandable menu. Type the name, or part of it, if nedeed to reduce the list of options. If only a site is observed, you will see surveys from all observers; if only an observer is selected, you will see all sites the observer has access to. See image below as an example of its results.
Protocols. Check data by selecting site and/or observer.
Place pointer on any coloured square to display date of survey and number of species recorded. Click on any date to display a list of species recorded on a new window.
The color is linked to the number of species counted during the census.
White: = 0 specie
Red : =1 specie
Orange to Yellow to Green: 11 level of colors according the number of species between 1 to 20.
Select a count period and a region from the expandable menu. A list will show all sites without data for the selected period and observers assigned to each of the listed sites. Click on any observer's name to access their personal card. Check the e-mail cell (image below, A) to send a message to the observer/s at the site; or check check all on top (image below, B) to send a general message to all observers at all sites.
Protocols. E-mail observers of empty censuses.
A message template is shown below the list, along with the email addresses receiving this message (see image below). Change recepients by selecting a new study site from the list above. Send it as it is or type a message in the designated area to personalise it. When done, click SEND THE REQUESTS to send the message.
Protocols. Sending emails about empty sites.
5. Type message to personalise email. 6. Message recipients.
Report
Protocols. Report.
Visualise pooled results from surveys.
Protocols. Filtering results.
1. Filter dates
Select the starting and ending date using the expandable calendar on the right or typing directly dd.mm.yyyy in the corresponding field.
2. Temporal aggregation
Select aggregating criteria from the expandable menu on the right. Options are:
Day: Shows results per day. This is the default option.
Pentad: Shows results in groups of five days.
Week: Shows results per week.
Decade: Shows results in groups of ten days.
Month: Shows results per month.
Year: Shows results per year.
3. Spatial aggregation
Select spatial aggregating criteria from the expandable menu on the right. Options are:
Country: Results are grouped per area covered by the local portal. If the portal only covers part of the country, only this part is considered; if the local portal covers the whole country, all the country is considered.
Canton: Cantons are country-specific administrative defined areas. Their official name differs from country to country: Kreis, province, district, commarca, county, and so on.
Municipality: Municipality, like a canton, is an area administratively defined and country specific.
Supersite: A supersite is a place that includes many other localities, and can only be used if it was previously created.
Place: A place is a group of Localities (see below) linked together within the protocol. It is either represented on the map by a yellow dot or hidden. For example, in STOC EPS census, one may have different point counts in a square. Each of the points represents a Locality, but the square with all the points is a Place. Do the search accordingly. Note sometimes Place and Locality are the same. For example, in the Common breeding bird survey, a Locality represents a transect, and there is only one transect per square.
Locality: A Locality is the exact location a survey takes place. It may represent a point, a transect or a polygon, depending on the study, and it is represented on the map as a dot.
4. Visualisation
SHOW: See results on screen, or
EXPORT: Download results on an excel file.
Protocols. Report results.
2. Temporal aggregation: Show total numbers of individuals of the specie indicated under the first column (5) In this example, the aggregation is per week. Weeks with no data, remain empty. Use the horizontal bar at the bottom to scroll through all results. 3. Study site name: Results aggregated by place. In this example, by locality. All study sites at the selected locality appear separately. Use the vertical bar on the right to scroll through all results. 5. List of species: List of species registered at each site.
Map
Protocols. Map.Display the area map by polygon. Map
It displays the statistics and information for the selected area:
1: Select area
2: Point displayed
3: pink point = areas where polygons are
4: statistics concerning the area displayed.
Select the site and see details as explained in wiki section Web interface > Protocols >"Name of the protocol "(here Waterbird census protocol) > Map.
Place the pointer on icons to see the meaning of each of them.
Add observations: Add further observations to this site or any other as described in wiki section Web interface > Protocols > Preparation and data > Add observations.
All site data: See all records associated to the site. From this screen (see image below) you can access other data as in the Search engine tool.
Protocols. Adding observations to a polygon.
List of records to be checked: See all records associated to the site needing verification.
Links for the square
Place the pointer on icons to see the meaning of each of them.
Modify the protocol: Modify the protocol as described in wiki section Web > Protocols > Preparation and data > Modify the protocol.
List of records to be checked: See all records associated to the site needing verification.
Data visualisation: See all protocols associated to this site as in Web interface > Protocols > "Name of the protocol" (here Waterbird protocol) Browse observations.
Results: See results as described in wiki section Web interface > Protocols > Preparation and data > Results.
Identical section to the one available to registered users with rights to the Waterbird Census Protocol. It allows printing maps and entering observations. See wiki section Web interface > Protocols > Waterbird protocol > Preparation and data for more information.
List of all existing sites allowing a Waterbird census.
Visit wiki section Web interface > Protocols > Sites for more information.
WATERBIRD User/Site
Waterbird census. User/Site
From the Waterbird census menu, select User / Site to assign users to study sites.
WATERBIRD Access to sites
List of observers allowed to conduct Waterbird census protocols and the site/s they are assigned to. Use arrows on columns to alternate between ascending and descending order (see image as an example).
Waterbird census protocol. Access to sites.
User name: Name and email address of observer. Reference name: Name of the Waterbird census site.
1. Search
Reduce list by typing the name of a user, reference name site or part of it, and click SEARCH.
When a filter is applied and you want to desactivate it, click on DISPLAY ALL.
2. Search
Select page number and/or number of items per page.
3. Details
See details of observers and their assigned site.
Waterbird census protocol. User/site Details.
User name: Observer name and email address. Reference name: Name of site the observer has right to survey for the Waterbird census protocol. Custom name: Additional name under which the site is also known. 8. BACK: Go back to main list. 9. EDIT: See Edit subsection below. 10. DELETE: Revoque observer's right to survey this site for the Waterbird census protocol.
4. Edit
Modify the user assigned to this site, or the site assigned to this user.
Waterbird census protocol. Editing User/site.
11. Modify observer assigned to this site. Start typing the name of the new observer (a) and choose from the expandable panel (b). 12. Modify site assigned to the observer. Start typing the name of the new site (a) and choose from the expandable panel (b). 13. BACK: Go to previous screen without saving changes. 14. MODIFY: Save changes.
5. Delete
Revoque the user's right to survey this site for the Waterbird census protocol.
6. EXPORT
Export list as a .txt file.
7. + NEW
Grant rights to observer to conduct Waterbird census on dessignated sites.
Waterbird census protocol. Adding new user to site.
11. Select observer to grant access to a certain site. Start typing the name of the new observer (a) and choose from the expandable panel (b). 12. Select site to be assigned to the observer. Start typing the name of the new site (a) and choose from the expandable panel (b). 13. BACK: Go to preious screen without saving changes. 15. ADD: Save new addition.
WATERBIRD Administration users rights
List of users and administrators with acces to the Waterbird census protocol. Use arrows on columns to alternate between ascending and descending order (see image as an example).
Users and administrators of Waterbird census protocol.
1. Search
Reduce list by typing the name of a user, of a right or part of it, and click SEARCH.
When a filter is applied and you want to deactivate it, click on DISPLAY ALL.
2. Search
Select page number and/or number of items per page.
3. Details
See the rights granted to the selected observer.
Waterbird census protocol. Rights details.
Number: File number. User name: Name of the user receiving the right. Right granted: Right the selected user is granted. 8. BACK: Go back to main list. 9. EDIT: See Edit subsection below. 10. DELETE: Revoque observer's right to survey this site for the Waterbird census protocol.
4. Edit
Modify the rights granted to an observer.
Waterbird census protocol. Editing rights.
11. Modify observer assigned to this site. Start typing the name of the new observer (a) and choose from the expandable panel (b). 12. Modify site assigned to the observer. Start typing the name of the new site (a) and choose from the expandable panel (b). 13. BACK: Go to previous screen without saving changes. 14. MODIFY: Save changes.
5. Delete
Revoque the user's right to survey this site for the Waterbird census protocol.
6. + NEW
Add a new right to an observer.
Waterbird census protocol. Adding new right.
11. Select observer to grant access to a certain site. Start typing the name of the new observer (a) and choose from the expandable panel (b). 12. Select site to be assigned to the observer. Start typing the name of the new site (a) and choose from the expandable panel (b). 13. BACK: Go to preious screen without saving changes. 15. ADD: Save new addition.
7. Protocol administrators
List of administrators of Waterbird census protocol and their email addresses.
WATERBIRD Settings
Waterbird census. Settings.
Set protocol parameters.
WATERBIRD Species list
List of species designated as part of a basic or an extended list. If no species are designated as part of any list, the section appears empty but users are still asked to indicate which list they are using. Use arrows under titles to alternate between ascending and descending order (see image as an example).
Waterbird census protocol. Species list.
Species: list of species to survey. Extended species list?: species belonging to an extended species. Order: order of appearance.
See Ending the list to know the difference between a basic, an extended and a complete list.
1. Search Reduce list by typing the name of a specie or part of it, and click SEARCH. When a filter is applied and you want to deactivate it, click on DISPLAY ALL.
2. Search
Select page number and/or number of items per page.
3. Details
See name of species, their assigned order in the lis and to which type of list they belong.
Waterbird census protocol. Details of Species list.
Species: list of species to survey. Extended species list?: species belonging to an extended species. See Ending the list to know the difference between a basic, an extended and a complete list. Order: order of appearance. 7. BACK: Go to previous screen. 4. EDIT: See edit subsection below. 5. DELETE: Delete species from the list.
4. Edit
Modify details for the selected species.
Waterbird census protocol. Editing species lists.
8. Species: Modify, if necessary, the name of the species (10a) and select from the expandable menu (10b). 9. Extended species list?: Choose if the species will be part of an extended list (YES) or a basic list (NO). 10. Order: Type the order in which the selected species will appear in the list. 7. BACK: Go back to previous screen without saving. 11. MODIFY: Save changes.
5. Delete
Delete the species from the list.
6. NEW
Add a new species to the list.
Waterbird census protocol. Adding a new species to the list.
8. Species: Start typing the name, or part of the name, of the species (10a) and select from the expandable menu (10b). 9. Extended species list?: Choose if the species will be part of an extended list (YES) or a basic list (NO). 10. Order: Type the order in which the selected species will appear in the list. 7. BACK: Go back to previous screen without saving. 12. ADD: Add the list species to the list.
NOTE:
Even when no species are dessignated as a basic or an extended list (this section remains empty), users are still asked to indicate which list they follow.
We recommend to define these lists to avoid confusion and misunderstandings among users.
WATERBIRD Parameters describing the protocol
List of all parameters describing the protocol and their current status. Use arrows under titles to alternate between ascending and descending order (see image as an example).
Waterbird census protocol. Settings.
1. Search
Select page number and/or number of items per page.
2. Active?
Indicates if the user will be asked to provide information about the corresponding parameter.
3. Mandatory?
Indicates if it will be mandatory to provide information regarding this parameter.
4. Order
Order in which the different parameters will appear at the beginning of the protocol.
5. Details
See details associated to the selected parameter.
Waterbird census protocol. Parameters display.
BACK: Go to previous screen. EDIT: Edit. See corresponding sub-section below.
6. Edit
Modify settings for the selected parameter.
Waterbirds census protocol. Editing parameter settings.
8. Select if the user will be asked to provide information about the corresponding parameter. 9. Select if it will be manatory to provide information regarding this parameter. 10. Type the order in which the parameter will appear at the beginning of the protocol. BACK: Go ack to the previous screen without saving changes. MODIFY: Save changes to the parameter.
7. Parameters
List of all possible parameters in Waterbird census protocols.
Comment
Allows user to enter a comment if necessary.
Important changes
Allows indicating if there have been major changes since last visit.
Additional observer
Space to indicate if the observer has been accompanied by someone whose observations were also recorded.
Ice
Indicates the percentage of water surface that is frozen. Options are:
no ice
0 - 10 %
10 - 50 %
50 - 90 %
90 - 100 %
100 %
Unknown
Snow coverage
Indicates the proportion of snow cover. Options are:
no snow
partly covered
completely covered
Unknown
Count type
User should choose one the options:
roost count
during day
Count method
The user indicates how they conducted the survey. Only one option is possible. Options are:
at ground
on airplane
on ship
other
unknown
Optical equipment
The user should indicate the equipment used for the survey. Only one option is possible. Options are:
None
Telescope
Binoculars
Unknown
Coverage
Serves to indicate how much of the designated polygon is covered in the survey. The user chooses between:
Partly
Complete
Unknown
Water level
Indicates the water level. Options are:
Dry / Empty
Low
Normal
High
Unknown
Visibility
Approximate distance within which it is possible to identify species. Options are:
0-100 m
100-300 m
300-1000 m
≥ 1000 m
Unknown
Waves
Provides information about the waves. Options are:
None
Small
Moderate
With crests
Unknown
Conditions in general
The user estimates how are surveying conditions overall regarding weather and disturbances, and indicate on next section the reason if surveying
conditions are not good. Options are:
Good / Normal
Moderate
Bad / heavely influenced
Unknown
Reason(s) for moderate / bad conditions
If general conditions indicated above were noot good,
clicking the yellow field the user opens an expandable menu and chooses the reason. Only one option is possible:
Fog
Rain
Wind
Hunting
Fishing
Sport
Mixed (weather)
Mixed (human)
Others
Count payed
The user can indicate if the count is payed for or not. Only options are
Yes
No
Number of persons on shore
The user can type the number of persons on shore.
Number of rowing boats
The user can type the number of rowing boats.
Number of motor boats
The user can type the number of motor boats.
Number of sailing boats
The user can type the number of sailing boats.
Number of canoes/kayaks
The user can type the number of canoes/kayaks.
Number of fishing boats
The user can type the number of fishing boats.
Number of sports divers
The user can type the number of sports divers.
Number of surfers
The user can type the number of surfers.
Additional observers
The user can indicate the name of other observers participating in the data collection.
Important changes since last count?
The user can indicate if there has been any major change since their previous count, for example, some disturbance like noise or construction.
Record the trace
By checking a cell, the user can have their track recorded.
Hide all records from the public
By checking the cell, the user hides all observations from the public. The observer an protocol administrators will always see them.
No species were seen
Allows the user to indicate if despite visiting the site and following the guidelines, there were no records.
WATERBIRD Parameters
Shows the status of the Free area tool parameter for the Waterbird census protocol:
YES: Free area tool is active.
NO: Free area tool is inactive.
When active, it allows both users and administrators to see polygons that have not yet been assigned to an observer. Users can ask to be assigned to a site. See wiki section Web interace > Free area tool for details.
Waterbird census protocol. Free area tool.
1. Details
BACK: Go back to previous screen. EDIT: Modify details. See subsection Edit below.
2. Edit
Waterbird census protocol. Editing free area tool.
Change status if necessary and click:
BACK to go to previous screen without saving changes, or
MODIFY to save changes.
WATERBIRD Check data
Waterbird census. Check data.
From the Waterbird census menu, select Check data to visualise a summary of survey data.
Waterbird census protocol. Check data.
1. Graphs
Scroll down to see all graphs:
Number of census: number of census per year from 2012 to present.
Census duration: total number of hours of survey per year, from 2010 to present.
Average census time: average number of minutes per survey.
2. Site / Observer
Select a site and/or an observer from the expandable menu. Type the name, or part of it, if nedeed to reduce the list of options. If only a site is observed, you will see surveys from all observers; if only an observer is selected, you will see all sites the observer has access to. See image below as an example of its results.
Waterbird census protocol. Check data by selecting site and/or observer.
Place pointer on any coloured square to display date of survey and number of species recorded. Click on any date to display a list of species recorded on a new window.
Select a count period and a region from the expandable menu. A list will show all sites without data for the selected period and observers assigned to each of the listed sites. Click on any observer's name to access their personal card. Check the e-mail cell (image below, A) to send a message to the observer/s at the site; or check check all on top (image below, B) to send a general message to all observers at all sites.
Waterbird census protocol. E-mail observers of empty census.
A message template is shown below the list, along with the email addresses receiving this message (see image below). Change recepients y selecting a new study site from the list above. Send it as it is or type a message on the designated area to personilse it. When done, click SEND THE REQUESTS to send the message.
Waterbird census protocol. Sending emails about empty sites.
5. Type message to personalise email. 6. Message recipients.
WATERBIRD Report
Waterbird census. Report.
From the Waterbird census menu, select Report to visualise pooled results from surveys.
Waterbird census protocol. Filtering results.
1. Filter dates
Select the starting and ending date using the expandable calendar on the right.
2. Temporal aggregation
Select aggregating criteria from the expandable menu on the right. Options are:
Day: Shows results per day. This is the default option.
Pentad: Shows results in groups of five days.
Week: Shows results per week.
Decade: Shows results in groups of ten days.
Month: Shows results per month.
Year: Shows results per year.
3. Spatial aggregation
Select spatial aggregating criteria from the expandable menu on the right. Options are:
Country: Results are grouped per area covered by the local portal. If the portal only covers part of the country, only this part is considered; if the local portal covers the whole country, all the country is considered.
Kanton: Kantons are country-specific administrative defined areas. Their official name differs from country to country: Kreis, province, commarca, county, and so on.
Municipality: Municipality, like kanton, is an area administratively defined and country specific.
Supersite: A supersite is a place that includes many other localities, and can only be used if it was previously created.
Place: A place is a group of Localities (see below) linked toghether within the protocol. It is either represented on the map by a yellow dot or hidden. For example, in STOC EPS census, one may have different point counts in a square. Each of the points represents a Locality, but the square with all the points is a Place. Do the search accordingly. Note sometimes Place and Locality are the same. For example, in the Common breeding bird survey, a Locality represents a transect, and there is only one transect per square.
Locality: A Locality is the exact location a survey takes place. It may represent a point, a transect or a polygon, depending on the study, and it is represented on the map as a dot.
4. Visualisation
SHOW: See results on screen, or
EXPORT: Download results on an excel file.
Waterbird census protocol. Report results.
2. Temporal aggregation: Results aggregated by time. In this example, per week. Weeks with no data, remain empty. Use the horizontal bar at the bottom to scroll through all results. 3. Spatial aggregation: Results aggregated by place. In this example, by locality. All study sites at the selected locality appear separately. Use the vertical bar on the right to scroll through all results. 5. List of species: List of species registered at each site.
WATERBIRD Map
Waterbird census. Map.
Select the site and see details as explained in wiki section Web interface > Protocols > Waterbird census protocol > Map.
Functions in section 4 are different from those of non-administrators.
Waterbird census protocol. Links for administrators.
Links for the polygon
Place the pointer on icons to see the meaning of each of them.
Add observations: Add further observations to this site or any other as described in wiki section Web interface > Protocols > Preparation and data > Add observations.
All site data: See all records associated to the site. From this screen (see image below) you can access other data as in the Search engine tool.
Waterbird census protocol. Adding observations to a polygon.
List of records to be checked: See all records associated to the site needing verification.
Links for the square
Place the pointer on icons to see the meaning of each of them.
Modify the protocol: Modify the protocol as described in wiki section Web > Protocols > Preparation and data > Modify the protocol.
Identical section to the one available to registered users with rights to the Private territory mapping. See wiki section Web interface > Protocols > Private territory mapping > Preparation and data for more information.
List of all existing sites allowing a protocoled data entry.
Visit wiki section Web interface > Protocols > Sites for more information.
OTHER MAPPING User/Site
Private territory mapping. User/Site.
From the Private territory mapping menu, select User / Site to assign users to study sites.
Visit wiki section Web interface > Protocols > User/Site
OTHER MAPPING Settings
Private territory mapping. Settings.
Set protocol parameters. Parameters and protocol dependent, see section [[ ]] below for parameters refering to Private territory mapping.
Visit wiki section Web interface > Protocols > Settings for general information.
OTHER MAPPING Species list
Create a list of species to survey. This protocol only accepts a list.
Visit wiki section Web interface > Protocols > Settings > Species list on how to do it.
OTHER MAPPING Parameters describing the protocol
List of all parameters describing the protocol and their current status. Private territory mapping does not have any specific parameters; a surveyor will only be asked:
Comments: Users may enter comment.
Record the trace: Users can choose to record the trace. See wiki section Mobile interface > Protocols > Enter data > Start of list > record the trace for more information.
Hide all records from the public: Users may keep observations private.
OTHER MAPPING Parameters
Shows the status of the Free area tool parameter for the Private territory mapping protocol.
Visit wiki section Web interface > Protocols > Settings > Parameters to learn more about protocol parameters.
OTHER MAPPING Check data
Private territory mapping. Check data.
Visualise a summary of survey data.
Visit wiki section Web interface > Protocols > Check data for more information.
OTHER MAPPING Report
Private territory mapping. Report.
Visualise pooled results from surveys.
Visit wiki section Web interface > Protocols > Report for more information.
OTHER MAPPING Map
Private territory mapping. Map.
Display the area map by polygon, and see its statistics.
Visit wiki section Web interface > Protocol > Map for more information.
Identical section to the one available to registered users with rights to the Point count. See wiki section Web interface > Protocols > Point count > Preparation and data for more information.
List of all existing sites allowing a Point count.
Visit wiki section Web interface > Protocols > Sites for more information.
POINT COUNT User/Site
Point count. User/Site.
From the Point count menu, select User / Site to assign users to study sites.
Visit wiki section Web interface > Protocols > User/Site
POINT COUNT Settings
Private territory mapping. Settings.
Set protocol parameters. Parameters and protocol dependent, see section [[ ]] below for parameters refering to Private territory mapping.
Visit wiki section Web interface > Protocols > Settings for general information.
POINT COUNT Species list
Create a list of species to survey. This protocol only accepts a list.
Visit wiki section Web interface > Protocols > Settings > Species list on how to do it.
POINT COUNT Parameters describing the protocol
List of all parameters describing the protocol and their current status. Private territory mapping does not have any specific parameters; a surveyor will only be asked:
Comments: Users may enter comment.
Record the trace: Users can choose to record the trace. See wiki section Mobile interface > Protocols > Enter data > Start of list > record the trace for more information.
Hide all records from the public: Users may keep observations private.
POINT COUNT Parameters
Shows the status of the Free area tool parameter for the Private territory mapping protocol.
Visit wiki section Web interface > Protocols > Settings > Parameters to learn more about protocol parameters.
POINT COUNT Check data
Point count. Check data.
Visualise a summary of survey data.
Visit wiki section Web interface > Protocols > Check data for more information.
POINT COUNT Report
Point count. Report.
Visualise pooled results from surveys.
Visit wiki section Web interface > Protocols > Report for more information.
POINT COUNT Map
Point count. Map
Display the area map by polygon, and see its statistics.
Visit wiki section Web interface > Protocol > Map for more information.
List of all existing sites allowing Woodpeckers' studies.
Visit wiki section Web interface > Protocols > Sites for more information.
This protocol requires 5 points:
Five study points in a Woodpecker protocol.
1. Draw point 2. Edit point 3. Locality the study area will belong to 4. Active point, either newly created or ready to edit 5. Survey area around the point. Click on any point to hide its survey area.
WOODPECKER User/Site
From the Woodpecker menu, select User / Site to assign users to study sites.
Visit wiki section Web interface > Protocols > User/Site
WOODPECKER Settings
WOODPECKER Species list
WOODPECKER Parameters describing the protocol
WOODPECKER Parameters
WOODPECKER Check data
Visualise a summary of survey data.
Visit wiki section Web interface > Protocols > Check data for more information.
WOODPECKER Report
Visualise pooled results from surveys.
Visit wiki section Web interface > Protocols > Report for more information.
WOODPECKER Map
Display the area map by polygon, and see its statistics.
Visit wiki section Web interface > Protocol > Map for more information.
Identical section to the one available to registered users with rights to the Waterbird Census Protocol. It allows printing maps and entering observations. See wiki section Web interface > Protocols > Rock Ptarmigans protocol > Preparation and data for more information.
Identical section to the one available to registered users with rights to the Waterbird Census Protocol. It allows printing maps and entering observations. See wiki section Web interface > Protocols > Black Grouse protocol > Preparation and data for more information.
Identical section to the one available to registered users with rights to the Waterbird Census Protocol. It allows printing maps and entering observations. See wiki section Web interface > Protocols > Woodcock monitoring > Preparation and data for more information.













.png)