Submitting records
TO SUBMIT RECORDS:
- Loggin to a local portal
- Select SUBMIT button on top or Transmit my sightings in left column
- Select the place of your observation by clicking on the map and selecting add sightings on this locality or add a precise sighting.
- Select taxonomic group, species and number of individuals, and fill or skip non mandatroy fields
- Click SAVE button
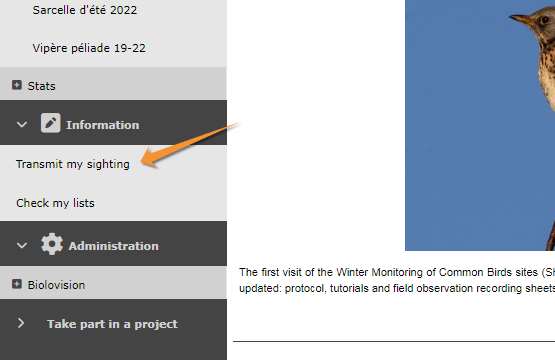
In order to enter observations, first you need an account (see wiki section Web interface > Getting started > Registration). Once logged in (see wiki section Web interface > Getting strated > Logging in) click on Submit (see image Send records from homepage) or access through the left hand menu under Information > Transmit my sighting (see image Send records from left column). The process will follow three stages: approximate choice of a site, precise location and enter an observation.
|
Send records from homepage |
Send records from left column |


Step 1/3: Approximate choice of a site
-
Good to know:
We recommend to select a place By clicking on the map. All other options remains for your convenience.
1. Step 1/3: Approximate choice of a site
There are different ways to locate your observation. We recommend to use by clicking on the map.


Step 1/3: Approximate choice of a site.
1. by choosing a municipality
2. choosing from
3. by clicking on the map
4. by typing text
5. by geographic coordinates
By choosing a municipality
Select a position by entering a municipality.
Type the beginning of the municipality's name on the left and select from the expandable panel on the right.

Approximate choice of a site by choosing a municipality.
Choose
· Display, to select a more precise location on a form, or
· Zoom on the municipality to select from the map below a more precise location.
[Top to Step 1/3: Approximate choice of a site]
[Top to Submitting records]
Choosing from
Choose one of the sites you have previously entered data to.
It shows up to 5 of the most visited sites during the last 6 months. Click on any of these sites to access options.

Approximate choice of a site choosing from.
Select Attach to map to display the location on the map below. It is especially useful to approach a site you know is nearby.
[Top to Step 1/3: Approximate choice of a site]
[Top to Submitting records]
By clicking on the map
SELECT A SITE BY CLICKING ON THE MAP:
- Zoom in
- Select a location (dot)
- Select an option:
- Add sighting on this locality: Observations are associated to this location.
- Add a precise sighting: Enter exact position of the observation.
- Fill a daily form for this locality: Start a list at this location.
- (Fill a protocol or project for this location: only for observers with corresponding rights.)
- Add sighting on this locality: Observations are associated to this location.
Select a location by clicking on the map below.
1.Zoom in to see locations.
· Locations are represented by a dot.
· Visit wiki section Web interface > Local portal > Navigating the map to know how to navigate through the map.
· Visit wiki section Various > Symbols cheatsheet to see the meaning of different dots.
· Centre at your location by clicking on go towards home.
· See how to change your location at wiki section Web interface > My account > Personal data > Non-mandatory fields > Address).
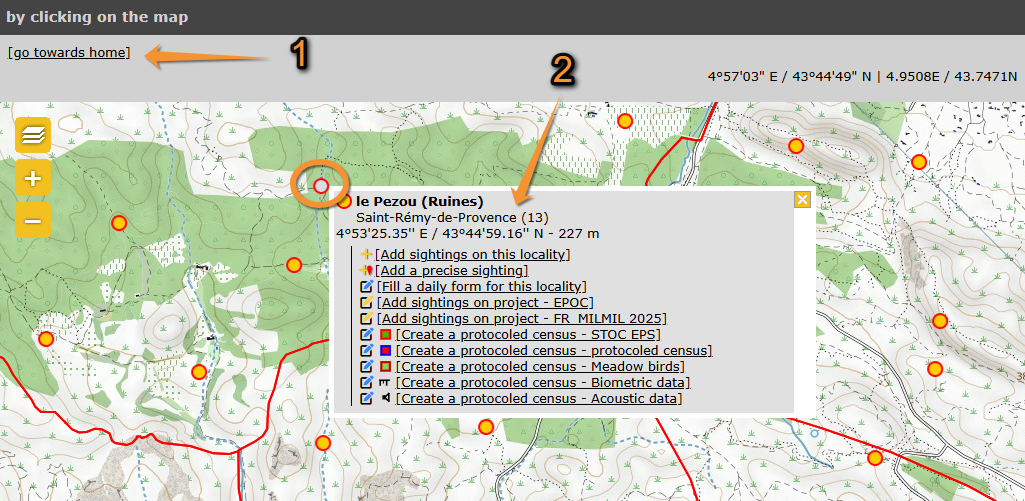
Choose a location by clicking on the map.
1 Center the map to your location.
2 Options associated to this point (active point becomes grey, encircled). Use ![]() to close.
to close.
-
See how to navigate the map: Web interface > Navigating the map
See meaning of different dots: Various > Symbols cheatsheet
Change your location at: Web interface > My account > Personal data > Non-mandatory fields > Address
2. Click on a location to see options for this location, or
Click anywhere on the map to see options at the point.
· Visit wiki section Web interface > Local portal > Submitting records > Step 2/3: Precise site choice to see details of the options.
· If clicking outside of a dot, only Add a precise sighting is possible.
· Users with special rights will be given additional options when clicking on a dot or on any point on the map.
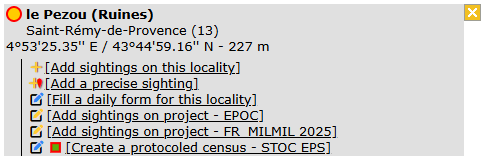
Choose a location by clicking on the map. Options.
| · |  |
Add sightings on this locality. |
| · |  |
Add a precise sighting. |
| . |  |
Fill in a daily form, or add records to a Protocol. |
| . |  |
Add records to a Project. |
- Add sightings on this locality
Access to next step Transmit my sightings.
Observations submitted do not show their exact position but all are associated to the selected location.
See wiki section Web interface > Submitting records > Step 3/3: Transmit my sighting > If accessed from add sightings on location or Add precise location for details.
- Add a precise sighting
Access to next step Transmit my sightings.
A red marker at the map section on top represents the position of your observation.
· Click and hold on the marker to move it to the exact position of the observation.
· Your observation gets automatically associated to the nearest existing location. It is marked by a yellow line.
· Use Ctrl and click (Cmd on Mac) to change the locality the observation is associated to.
· The predetermined altitude for the new location is shown on the field at the top left corner. Change altitude of observation if necessary.
· Depending on the portal, exact coordinates will only be visible to you and to administrators.
· Change site or Center the map on the pointer, if necessary.
· Expand/Collapse the map using the arrow at the bottom.
Visit wiki section Web interface > Local portals > Submitting records > Step 3/3: Transmit my sightings > add a precise sighting for details.

Red marker for precise data
- Fill a daily form for this locality
Enter a list associated to this location.
See wiki section Web interface > Local portals > Submitting records > Step 3/3: Transmit my sighting > If accessed from a list (fill a daily form) to know how to enter data.
[Top to by clicking on the map]
[Top to Step 1/3: Approximate choice of a site]
[Top to Submitting records]
By typing text
Search a location by typing its name.
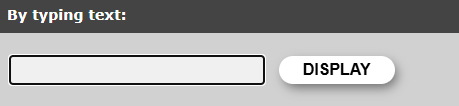
Approximate choice of a site by typing text.
1. Type the name of the location.
2. Click Display.
3. Choose one of the options.
Approximate choice of a site by typing text. Options.
To know more about these options, go to wiki section Web interface > Submitting records > Step 2/3: Precise site choice.
[Top to Step 1/3: Approximate choice of a site]
[Top to Submitting records]
By geographic coordinates
Select a location by entering its coordinates.

Approximate choice of a site by geographic coordinates.
1. Enter coordinates.
· Coordinates should follow the WGS 84 datum, either in degrees, minutes and second (example 2°17'23.36 E 42°28'13.82'N) or in decimal degrees (exemple E002.28982° N42.47051°). The system will automatically detect if you are using degrees, minutes and seconds or decimal degrees.
· Use negative coordinates for Western longitudes.
2. Click Display to access Step 3/3: Transmit my sighting.
The location will be marked on a map and listed under the closest pre-determined site. A yellow line indicates under which pre-determined location your sighting is listed. The coordinates of your observation will only be visible to you and to administrators.
Sighting associated to a pre-determined location.
· Coordinates should follow the WGS 84 datum, either in degrees, minutes and second (example 2°17'23.36 E 42°28'13.82'N) or in decimal degrees (exemple E002.28982° N42.47051°). The system will automatically detect if you are using degrees, minutes and seconds or decimal degrees.
· Use negative coordinates for Western longitudes.
[Top to by geographical coordinates]
[Top to Step 1/3: Approximate choice of a site]
[Top to Submitting records]
Step 2/3: Precise site choice
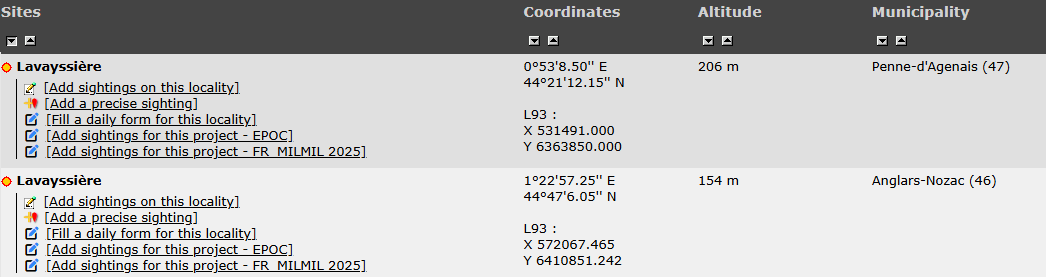
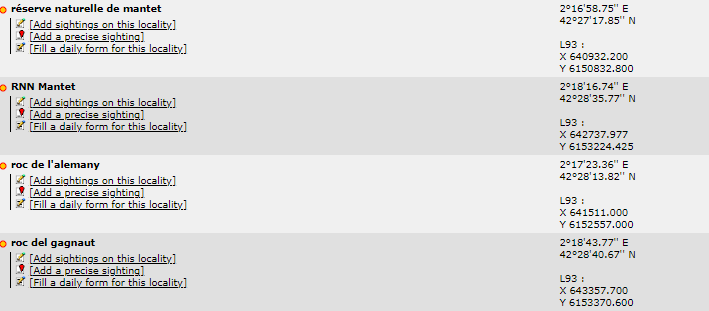
If accessed from By choosing a municipality > Display, list of all possible sites for this municipality and all options for each of them (see image Step 2/3: Precise site choice).
Please select your preferred option for the site your observation took place.

Step 2/3: Precise site choice.
| · | |
Add sightings on this locality. |
| · |  |
Add a precise sighting. |
| . |  |
Fill in a daily form, or add records to a Protocol. |
| . | |
Add records to a Project. |
Add sightings on this locality
Access to next step Transmit my sightings.
Observations submitted do not show their exact position but all are associated to the selected location.
See wiki section Web interface > Submitting records > Step 3/3: Transmit my sighting > If accessed from add sightings on location or Add precise location for details.
[Top to Step 2/3: Precise site choice]
[Top to Submitting records]
Add a precise sighting
Access to next step Transmit my sightings.
A red marker at the map section on top represents the position of your observation.
Click and hold on the marker to move it to the exact position of the observation.
TEXT
Adding a precise sighting is especially useful when you know the exact point of the observation but cannot work out to which predetermined location it belongs to; or for studies that require exact positions, for example when mapping nests or territories.
· Your observation gets automatically associated to the nearest existing location. It is marked by a yellow line.
· Use Ctrl and click (Cmd on Mac) to change the locality the observation is associated to.
· The predetermined altitude for the new location is shown on the field at the top left corner. Change altitude of observation if necessary.
· Depending the portal, exact coordinates will only be visible to you and to administrators.
· Change site or Center the map on the pointer, if necessary.
· Expand/Collapse the map using the arrow at the bottom.
See wiki section Web interface > Submitting records > Step 3/3: Transmit my sighting > If accessed from add sightings on location or Add precise location for details.

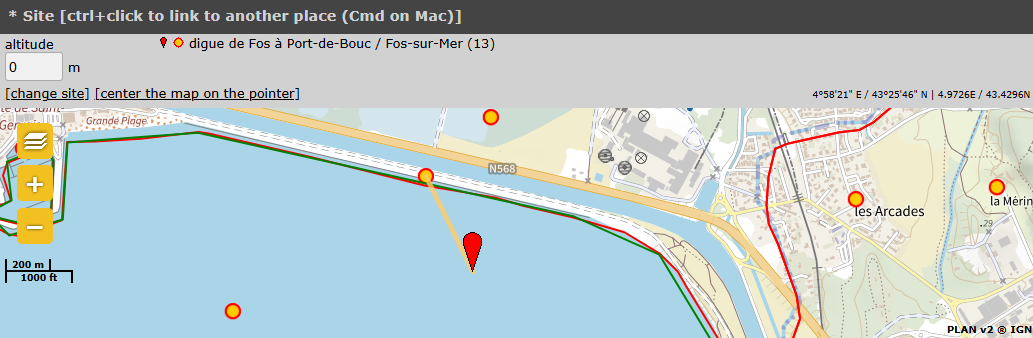
Add a precise site on the map.
1. Marker at exact location.
2. Location it gets associated to.
3. Altitud at allocated location.
4. Change site or center the map on the pointer.
5. Expand/Collapse map.
-
Both Add Sightings to this location and Add a precise sighting are most useful for partial lists and occasional recordings of some species. To make lists with more scientific value, see next subsection Fill a daily form for this locality.
[Top to add a precise sighting]
[Top to Step 2/3: Precise site choice]
[Top to Submitting records]
Fill a daily form for this locality
Access to Transmit my sighting.
It requires date and time and number of individuals for each species. You may add additional details.
Fill a daily form for this locality is the preferred option to record lists of observations. It requires more detailed information than if using add sightings on this location or add a precise sighting, but while it takes longer to submit, it also has more scientific value.
Visit wiki section Web interface > Submitting records > Step 3/3: Transmit my sighting > If accessed from a list (fill a daily form) for details.
[Top to Step 2/3: Precise site choice]
[Top to Submitting records]
Step 3/3: Transmit my sighting
Entering details of your observations.
The required information depends on whether you chose to add sightings to this locality, add a precise sighting or record a daily list.
3 Step 3/3: Transmit my sighting
-
3.1 If accessed from add sightings on this locality or add precise location
- 3.1.1 Mandatory fields
- 3.1.1.1 Date and time
3.1.1.2 Site
3.1.1.3 Taxa
3.1.1.4 Species
3.1.1.5 Number of individuals
3.1.1.6 Ending the observation entry
- 3.1.2 Additional information
- 3.1.2.1 Sex and age of individuals
3.1.2.2 Other data/Information
3.1.2.3 Comments
- 3.2 If accessed from a list (fill a daily form)
- 3.2.1 Date and time section
3.2.2 List section
3.2.3 Additional information
3.2.4 Ending the list entry
If accessed from add sightings on this locality or add precise location
The first part of the form is mandatory informatio.
The second part of the form is optional.
The right hand side lists your last 30 observations submitted. There are options to edit or delete any of them (see wiki section Web interface > Local portals > Editing records).
![]()
Step 3/3: Transmit my sightings.
1. Mandatory information.
2. Non mandatory information.
3. Your last records at this location.
1. Mandatory fields
The following information is required. Please provide it in order to continue submitting the observation.

Step 3/3: Transmit my sightings. Mandatory fields.
1. Date and time
2. Site
3. Species
4. Submitting records#Number of individuals
5. Your latest sightings.
Date and time
Enter the date of the observation by
· typing the date on the left hand field,
· selecting the date from the expandable calendar, or
· Using one of the quick access options.
By default if gives the the current date.
Enter time (optional) by typing at the bottom of the expandable calendar. Click 'OK' when done.
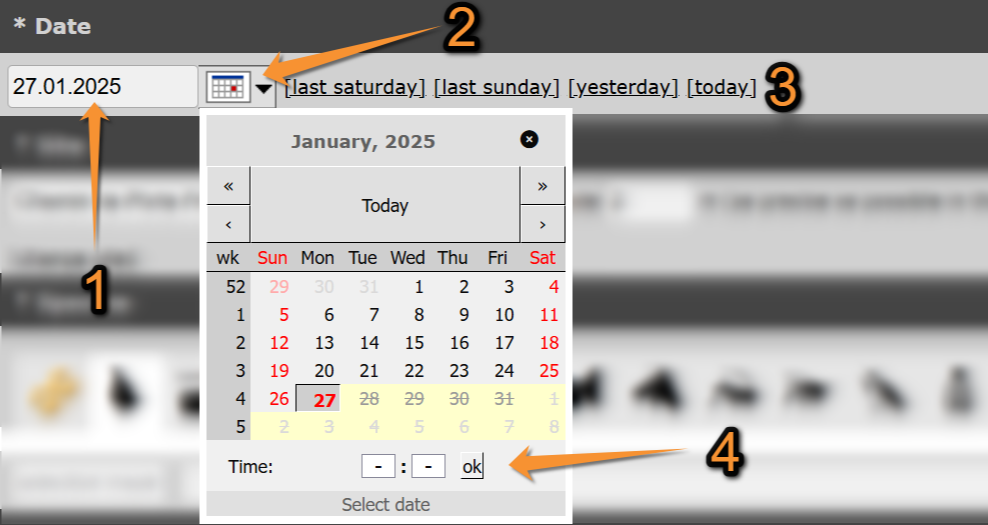
Transmitting sightings, mandatory fields. Date and Time.
1. Type date.
2. Select date from the expandable calendar.
3. Use timeframe from the quick access keys.
4. Enter time (optional).
[Top to Mandatory fields]
[Top to Step 3/3: Transmit my sighting]
[Top to Submitting records]
Site
Double check the site the observation is associated to.
Change site if necessary by
· selecting a new site on the expandable menu,
· clicking on change site (goes back to Step 1/3: Approximate choice of a sighting), or
· moving marker on the map (only available if accessed from add a precise sighting).
Change the altitude if necessary.
It is given automatically according to the site your observation is associated to. Pay special attention on slopes: two points may have the same coordinates but different altitudes.

Transmitting sightings, mandatory fields. Site when accessing from add a sighting to this list.
1. Change site on the expandable menu.
2. Change altitude.
3. Change site at Step 1/3: Approximate choice of a site.
Transmitting sightings, mandatory fields. Site when accessing from add a precise sighting.
[Top to Mandatory fields]
[Top to Step 3/3: Transmit my sighting]
[Top to Submitting records]
Species
1. Select the taxonomic group your observation belong to.
· Select from the horizontal bar.
· Use the arrow to see the remaining taxa.
· Place mouse pointer on the silhouettes to see which taxa they represent.
· DNA icon activates all taxa in the system.
· By default, active taxa are those indicated in your preferences. See wiki section Web interface > Local portals>
Getting started > My account > Website customisation to change your preferences.

Taxonomic groups.
An orange bar on top of the silhouette indicates only specialist can see and introduce records on this taxa.
A yellow bar on top of the silhouette indicates everybody can see records of this taxa, but only specialists can submit them.
No bar indicates everybody can see and submit records.
2. Select the species of the observation.
· Type the name of the species, or part of it, in the default language on the left field.
· Visit wiki section Web interface > Local portals > Getting started > My account > Website customisation > Recording language to assigned a default language to each taxonomic group.
· If the species is not available in the language of your choice, it will show its scientific name.
· You can type the different parts of the name in any order (ie. type either n r or r n to select Norther Raven).
· Select the name of the species on the expandable menu on the right.
· The species are listed alphabetically or systematically, depending on your preferences.
· If you selected all taxa (DNA icon, it lists for taxonomic group first, and the either alphabetically or systematically depending on your preferences.
· Visit wiki section Web interface > Local portals > My account > Website customisation > Global parameters to change the order.
· Move through the species with the keyboard arrows, moving the right hand bar with the mouse or rolling the mouse wheel.
· The letters used in the search are underlined.
· The scientific name is always included on the species name.
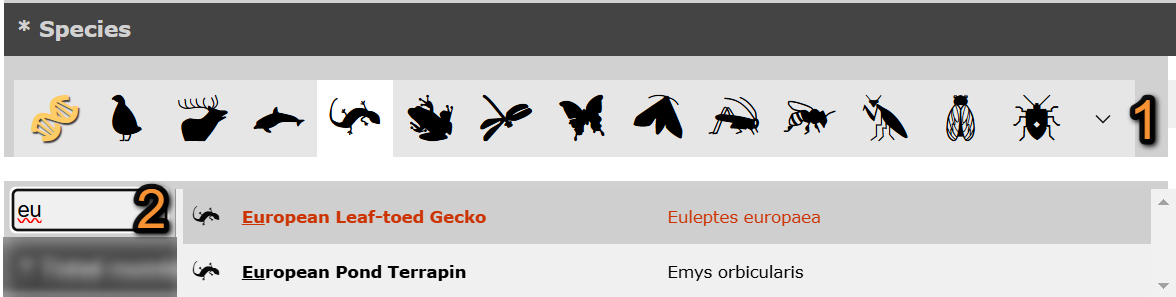
Transmitting sightings, mandatory fields. Taxa and Species.
1. Select taxonomic group.
2. Type name of the species, or part of it, on the left and select from the expandable menu on the right.
-
Get the name quickly typing only few letters. For example, if you search for common crane, enter "co cr" and it will be one of the species the system proposes to you; if you enter "c k " you will be proposed both Common Kestrel and Common Kingfisher. Note these abreviations are available in all supported languages in local portals, including German names of a single word -for example, type "s e" to find Samtente.
[Top to Mandatory fields]
[Top to Step 3/3: Transmit my sighting]
[Top to Submitting records]
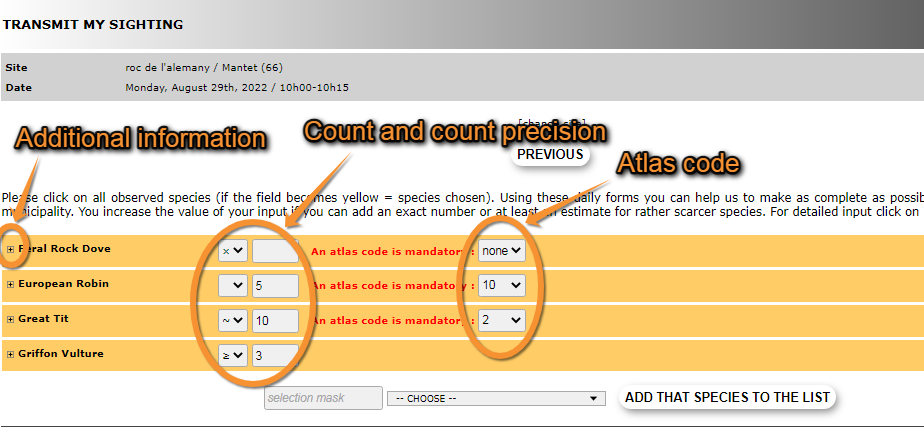
Number of individuals
Indicate number of individuals on the observation.
· Select count precision from the expandable menu on the left.
· Type number of individuals on the right field.
· If you selected not counted on the expandable menu, leave the right field empty.
· Not counting number of individuals is often used for those species occurring very commonly. Note that an estimate or minimum if you can provide it even roughly, is always better than a non counted.

Transmitting sightings, mandatory fields. Number of individuals.
1. Select count precision.
2. Type number of individuals.
[Top to Mandatory fields]
[Top to Step 3/3: Transmit my sighting]
[Top to Submitting records]
Ending the observation entry
If not adding any additional information, pre Save at the ned of the page.
The observation appears automatically in the list on the right hand column.
Repeat the process if you wish to add any more records.
[Top to Mandatory fields]
[Top to Step 3/3: Transmit my sighting]
[Top to Submitting records]
2. Additional information
The following information is not mandatory, but interesting if known.
![]()
Transmitting sightings, non-mandatory fields. General
1. Sex and age of individuals
2. Others data/Informations
3. Comment
Sex and age of individuals
Type the number of individuals per each sex, age and circumstances of recording by
- filling in the fields or
· Options are shown on expandable menus in each section.
· Click on add some more individuals to enter more than one age/sex group.
· Use the cross next to a record to delete it.
· Note the field Circumstances is country-specific and may not be present in your local portal.
- typing the code.
· Place the mouse pointer on top of the bottom right field to see codes correspondences.
· If you filled in the fields on top, the code is formed automatically.

Transmitting sightings, non mandatory fields. Sex and age of individuals.
1. Fill in the fields.
2. Delete entry.
3. Add a new entry.
4. Type code / See forming code / See code correspondence.
![]()
Transmitting sightings, non-mandatory fields. Age and sex.
[Top to Mandatory fields]
[Top to Step 3/3: Transmit my sighting]
[Top to Submitting records]
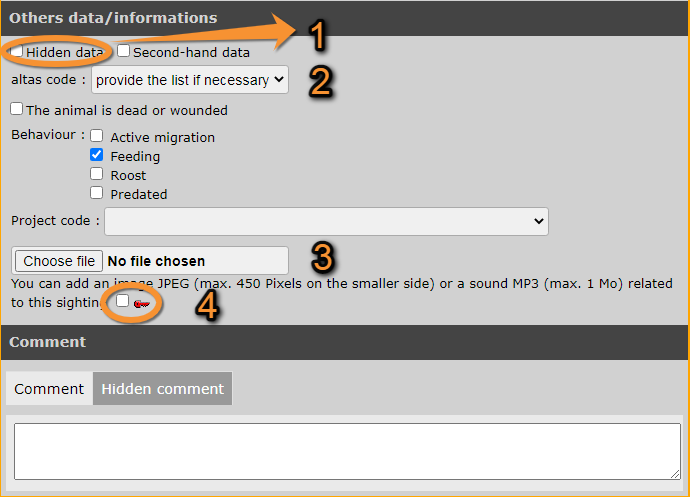
Others data/Information
![]()
Transmitting sightings, non-mandatory fields. Other information.
1. Hidden data
2. Second-hand data
3. Atlas code
4. ID markings
5. Injuries
6. Behaviour
7. Project code
8. Attached media
- 1. Hidden data
- 1. Hidden data
Tick the field if you do not want the record to appear publicly on the web site, neither for registered nor anonymous users. This will hide the record and all details associated to it, including pictures and sounds you may have attached. You and the administrators will still have access to the data. This option is useful to protect certain species or nesting sites. Note that some of the species and sites are automatically hidden at least part of the year. Go to wiki section Web interface > Species partially hidden to see which species will be automatically hidden and for which part of the year. If you still consider any of the other species or sites sensitive and want to protect them, tick the option.
- 2. Second hand data
- 2. Second hand data
Tick the field when you are not the author of the observation. This may occur if someone comments an observation to you, or if you are browsing old records. Always seek permission from the author to publish the observation, even if shown as anonymous.
- 3. Atlas code
- 3. Atlas code
Select from the expandable menu the atlas code which corresponds to your observation. If the correspondence of codes is unknown, visit wiki section Web interface > Codes and symbols or select one of the following:
· provide the list if necessary: to see the atlas codes and their correspondence when providing an atlas code is required (ie. during breeding season). It is the option by default.
· provide the list: to see the list with the correspondence of codes after saving the information on the current screen.
· don't provide the list: to not see he list of altas codes and their correspondence.
· none: to not select any atlas code.
If the list with the correspondence of atlas codes will show, it will do so after saving the current screen.

Compulsory atlas code.
1. PREVIOUS: Go to previous screen without saving.
2. IGNORE: Do not select an atlas code.
3. Atlas codes: Choose the corresponding code.
Check the 'singing cell' (see image below) if the individual is singing even if it is not the breeding season.

Singing cell.
- 4. ID markings
- 4. ID markings
Check to open the Ringing Module if the bird has any identificatory markings like a metal or colour ring, a wing tag, and so on.
- 5. Injuries
- 5. Injuries
Tick if the animal observed is dead or wounded. The mortality module will open before the record is saved. Please provide the details.
- 6. Behaviour
- 6. Behaviour
This section is country-specific and is not present in all portals. If existing, record the behaviour of the individual/s if known.
- 7. Project code
- 7. Project code
If asked, associate an existing project to the record or leave blank if the observation is not part of a project.
- 8. Media
- 8. Media
Using the buttons at the end of the subsection, you can attach an image or a sound to the record. There is no size limit to the picture you can upload but it must be taken on the date the observation occurs. Sound files are limited to a maximum size of 16 MB. To attach more than one file, click again on the attach button. Pictures and sounds can also be added at a later stage (see wiki section Web interface > Editing records).
Attach only those pictures or sound recordings you have taken yourself.
To make the file private (only you can see it), tick the box on the right (see image Transmitting sightings, non-mandatory fields. Other information, number 4). This will hide the picture or sound file, but not the observation or other details associated to it.
[Top to Mandatory fields]
[Top to Step 3/3: Transmit my sighting]
[Top to Submitting records]
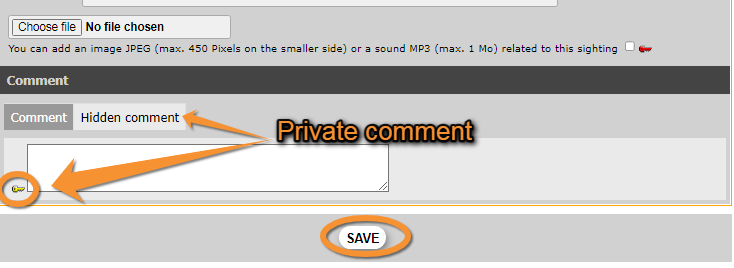
Comment
Finally, you can leave a comment. It may be public or private. By default, the system will make it public (tab comment). To make it private, go to the hidden comment tab –it is marked by a yellow key on its left (see image Transmitting sightings, non-mandatory. Comments). Only you can see a hidden comment.
![]()
Transmitting sightings, non-mandatory. Comments.
[Top to Mandatory fields]
[Top to Step 3/3: Transmit my sighting]
[Top to Submitting records]
Ending the observation entry
When done with the record, click Save at the end of the page (see image Transmitting sightings, non-mandatory. Comments, and image Starting a list). The new observation will appear at the top of the right column and you will be able to continue entering observations for this site and date. If you need to change the site, go to Change site on the mandatory Site section and you will be taken to wiki section Web interface > Submitting records > Step 1/3: Approximate choice of a site. This may happen when covering a relatively wide area on the same day.
Note if you marked any individual observed as death or injured, the mortality module will open before the record is saved. Please fill in the form with the requested details.
[Top to Mandatory fields]
[Top to Step 3/3: Transmit my sighting]
[Top to Submitting records]
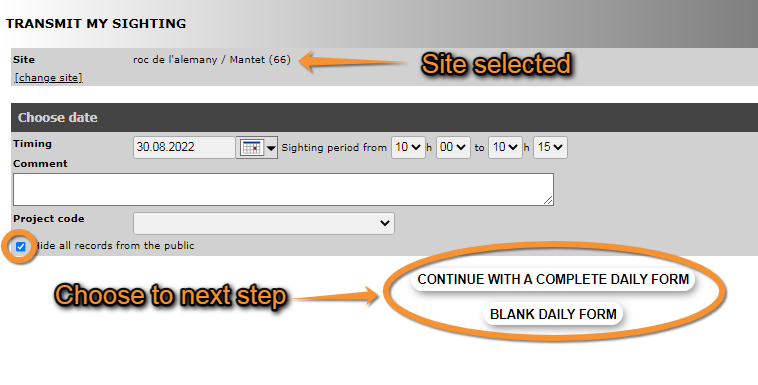
If accessed from a list (fill a daily form)
If you want to enter several observations that took place the same day at the same place and during a short interval of time, consider entering your data as a list. To do so, select location as in Step 1/3: Approximate choice of a site and in Step 2/3: Precise site choice and select Fill a daily form for this locality. Location will be pre-selected in next step.

Starting a list.
Date and time section
Indicate date and time, and the project your observation belongs to if asked. You may leave a comment if necessary. Tick the Hide all records from the public to hide your list to other users. Note administrators will still see your records.
- Site
Site is pre-selected from previous step and can be changed later if necessary.
- Date and time
Enter date and time as accurately as possible.
- Project
If asked, choose from an expandable menu if observations you are submitting are part of a bigger study. Leave blank if your list is not part of an established project.
- Comments and public records
Optionally, add any comment and decide if records will be public. If the option is ticked, records will not be displayed on the website but will still be seen by administrators and used for data analyses (see image Starting a list).
- Continue to next step
Move to next section by choosing between
- Continue with a complete daily form (all species seen are reported) or
- Blank daily form (no species were seen).
Or click NEXT.
All options take you to the following section: List section (see image Starting a list).
List section
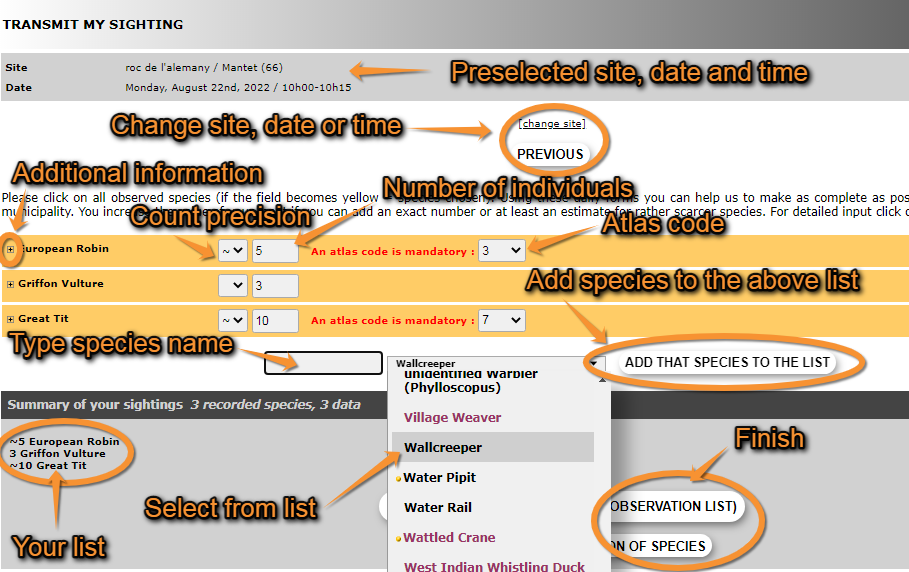
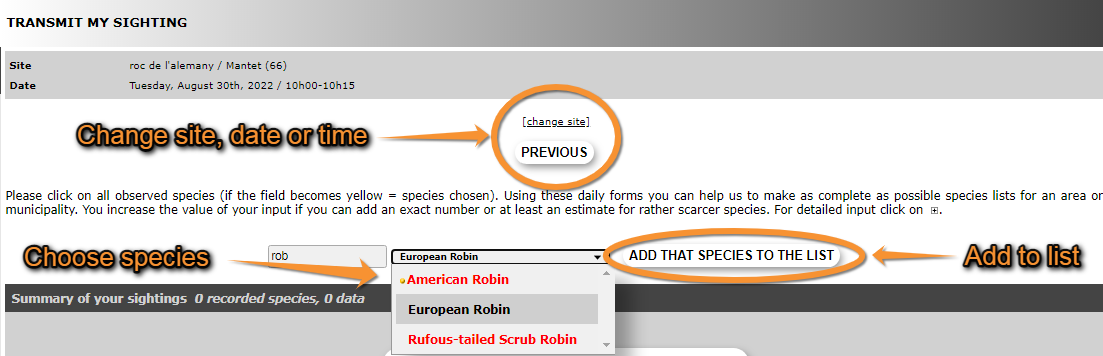
At the top it shows the site, date and time you selected. Click Change site, for site, or Previous, for date and time, if you need to make any changes.
To enter records choose a species from the list or start typing the name on the left field and choose from the expandable list (see image Creating a list. Select species). To move through the list use the arrows on your keyboard, the wheel on the mouse, or move the line on the right with your mouse. To change the order in which you see the species, and the language of the species, see section Web interface > My account > Website customisation > Global parameters > Species order or Recording language, respectively. To see colour correspondence, see Various > Symbols cheatsheet.
When done, add that species to the list (see image Transmitting sightings, list. Entering species). The new species will show on top of the species selection fields (see image Transmitting sightings, list. Entering count).

Transmitting sightings, list. Entering species.
After entering the species name, enter the number of individuals and count precision in the field right from the species name (see image Trasmitting sightings, list. Entering count). Options are approximate number (~), minimum number (≥) or not counted (x). If you enter an exact count, do not choose count precision. If you did not count individuals, do not enter any number. Finally enter an atlas code, if required. To see correspondence of codes, go to Web interface > Codes and symbols. If unknown, you can choose “none” on the atlas code field. When the record is correctly entered, the name appears in yellow. You can enter additional information to the record now, or any time later, by clicking on the plus (+) sign next to the species name (see image Transmitting sightings, list. Entering count).
![]()
Transmitting sightings, list. Entering count.
Enter a new species and repeat the process.
Additional information
By clicking on the plus sign (+) at the left of the species name (see image Transmitting sightings, list. Entering count), the section for additional information will expand.
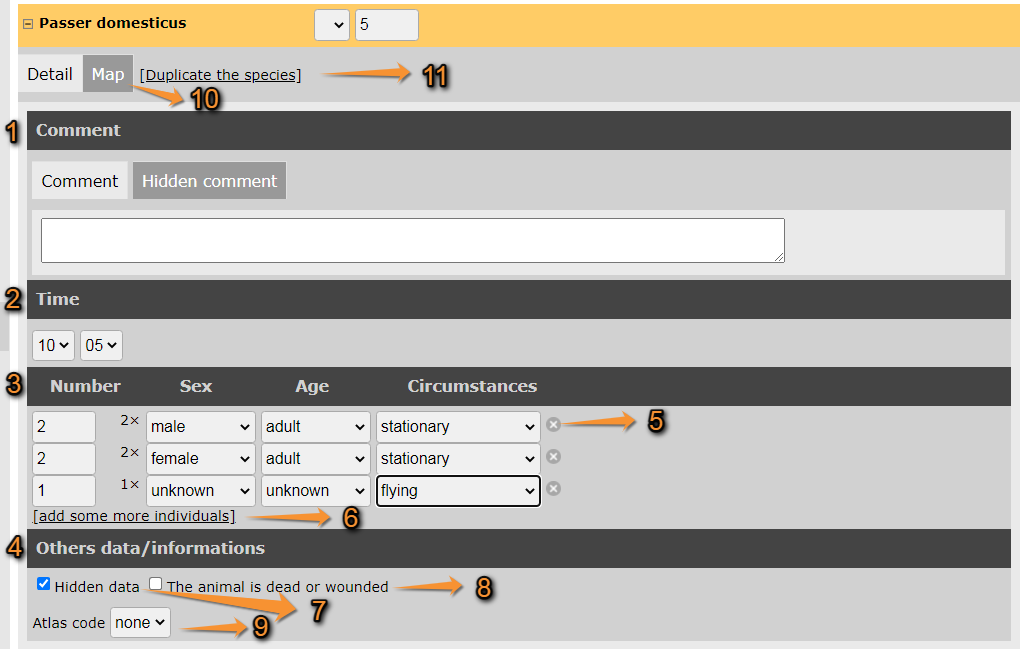
Entering additional information in a list.
- Detail tab: allows entering more details.
- 1. Comment: enter a comment under Comment if public, or under Hidden comment if it is private.
- 2. Time: enter an exact time if necessary, by choosing time and minutes from the expandable menus.
- 3. Number/Sex/Age/Circumstances: indicate the age, sex or behaviour of any individuals if known. Enter the number of individuals the following information applies to and choose parameters from the expandable menus. Delete an entry by clicking the cross on the left (number 5 in image above) and click on add some more individuals to create another subgroup (number 6 in image above).
- 4. Other data/informations: check the corresponding cell if you want to hide your observation from other users (number 7 in image above), or if the individual/s is/are wounded or dead (number 8 in image above). Note even if your observation is hidden, administrators will still see it. Checking the dead or wounded cell will open the mortality module at the end of the list before your records are saved. Finally, enter the atlas code if necessary by selecting from the expandable menu (number 9 in image above).
- 1. Comment: enter a comment under Comment if public, or under Hidden comment if it is private.
- 10. Map tab: modify the position of your observation if necessary. To know how to navigate the map, see wiki section Web interface > Navigating the map.
- 11. Duplicate the species: creates a new entry for the same species. May be useful when teh additional information or the exact position on the map do not apply for all individiuals of the same species seen while recording the list.
Ending the list entry
When all species are entered, indicate at the bottom of the page if it is a complete or a partial list.
- 1. Complete list: click on I recorded all species if you identified and recorded all species seen or heard.
- 2. Partial list: click on I recorded only a selection of the species if not all species seen or heard were identified or recorded.
If you marked any of the observations as dead or injured, the mortality module will open before saving the list. Please provide details for the relevant individuals.
Note: images and examples are drawn from the French portal Faune-France. The design and position of some tools may vary slightly from portal to portal. To see a list of portals go to wiki section Local portals and partners. |