Submitting records/es: Difference between revisions
No edit summary |
(Created page with "<p style="font-size:10px"> <ul> <p style="font-size:13px">3 Paso 3/3: Introducir observaciones <p style="margin-left: 30px;font-size:13px">3.1 Si se accede desde <b>Añadir observaciones a esta localidad</b> o <b>Añadir una posición exacta</b></p> <p style="margin-left: 55px;font-size:13px">3.1.1 Campos obligatorios</p> <p style="mar...") |
||
| Line 225: | Line 225: | ||
<td style="padding: 20px; text-align: left; font-family: sans-serif; color: black; background-color: #f0f0f0"> | <td style="padding: 20px; text-align: left; font-family: sans-serif; color: black; background-color: #f0f0f0"> | ||
<p style="font-size:10px"> | <p style="font-size:10px"> | ||
<ul> | <ul> | ||
<p style="font-size:13px">3 | <p style="font-size:13px">3 Paso 3/3: Introducir observaciones | ||
<p style="margin-left: 30px;font-size:13px">3.1 [[Submitting_records#If_accessed_from_add_sightings_on_this_locality_or_add_precise_location| | <p style="margin-left: 30px;font-size:13px">3.1 [[Submitting_records#If_accessed_from_add_sightings_on_this_locality_or_add_precise_location| Si se accede desde <b>Añadir observaciones a esta localidad</b> o <b>Añadir una posición exacta</b>]]</p> | ||
<p style="margin-left: 55px;font-size:13px">3.1.1 [[Submitting_records#Mandatory_fields| | |||
<p style="margin-left: 75px;font-size:13px">3.1.1.1 [[Submitting_records#Date_and_time| | <p style="margin-left: 55px;font-size:13px">3.1.1 [[Submitting_records#Mandatory_fields|Campos obligatorios]]</p> | ||
<p style="margin-left: 75px;font-size:13px">3.1.1.2 [[Submitting_records#Site| | |||
<p style="margin-left: 75px;font-size:13px">3.1.1.3 [[Submitting_records#Taxa| | <p style="margin-left: 75px;font-size:13px">3.1.1.1 [[Submitting_records#Date_and_time|Fecha y hora]]</p> | ||
<p style="margin-left: 75px;font-size:13px">3.1.1.4 [[Submitting_records#Species| | |||
<p style="margin-left: 75px;font-size:13px">3.1.1.5 [[Submitting_records#Number_of_individuals| | <p style="margin-left: 75px;font-size:13px">3.1.1.2 [[Submitting_records#Site|Localidad]]</p> | ||
<p style="margin-left: 75px;font-size:13px">3.1.1.6 [[Submitting_records#Ending_the_observation_entry| | |||
<p style="margin-left: 55px;font-size:13px">3.1.2 [[Submitting_records#Additional_information| | <p style="margin-left: 75px;font-size:13px">3.1.1.3 [[Submitting_records#Taxa|Grupo taxonómico]]</p> | ||
<p style="margin-left: 75px;font-size:13px">3.1.2.1 [[Submitting_records#Sex_and_age_of_individuals| | |||
<p style="margin-left: 75px;font-size:13px">3.1.2.2 [[Submitting_records#Other_data/Information| | <p style="margin-left: 75px;font-size:13px">3.1.1.4 [[Submitting_records#Species|Especie]]</p> | ||
<p style="margin-left: 75px;font-size:13px">3.1.2.3 [[Submitting_records#Comments| | |||
<p style="margin-left: 55px;font-size:13px">3.1.3 [[Submitting_records#Ending_the_observation_entry_2| | <p style="margin-left: 75px;font-size:13px">3.1.1.5 [[Submitting_records#Number_of_individuals|Número total de individuos]]</p> | ||
<p style="margin-left: 30px;font-size:13px">3.2 [[Submitting_records#If_accessed_from_a_list_(fill_a_daily_form)| | |||
<p style="margin-left: 55px;font-size:13px">3.2.1 [[Submitting_records#Date_and_time_section| | <p style="margin-left: 75px;font-size:13px">3.1.1.6 [[Submitting_records#Ending_the_observation_entry|Terminar de entrar la observación]]</p> | ||
<p style="margin-left: 55px;font-size:13px">3.2.2 [[Submitting_records#List_section| | |||
<p style="margin-left: 55px;font-size:13px">3.2.3 [[Submitting_records#Additional_information_2| | <p style="margin-left: 55px;font-size:13px">3.1.2 [[Submitting_records#Additional_information|Información adicional]]</p> | ||
<p style="margin-left: 55px;font-size:13px">3.2.4 [[Submitting_records#Ending_the_list_entry| | |||
<p style="margin-left: 75px;font-size:13px">3.1.2.1 [[Submitting_records#Sex_and_age_of_individuals|Sexo y edad de los individuos]]</p> | |||
<p style="margin-left: 75px;font-size:13px">3.1.2.2 [[Submitting_records#Other_data/Information|Otros datos/informaciones]]</p> | |||
<p style="margin-left: 75px;font-size:13px">3.1.2.3 [[Submitting_records#Comments|Comentarios]]</p> | |||
<p style="margin-left: 55px;font-size:13px">3.1.3 [[Submitting_records#Ending_the_observation_entry_2|Terminar de entrar la observación]]</p> | |||
<p style="margin-left: 30px;font-size:13px">3.2 [[Submitting_records#If_accessed_from_a_list_(fill_a_daily_form)|Si se accede desde una lista <b>(llenar una lista completa)</b>]]</p> | |||
<p style="margin-left: 55px;font-size:13px">3.2.1 [[Submitting_records#Date_and_time_section|Sección fecha y hora]]</p> | |||
<p style="margin-left: 55px;font-size:13px">3.2.2 [[Submitting_records#List_section|Sección listado]]</p> | |||
<p style="margin-left: 55px;font-size:13px">3.2.3 [[Submitting_records#Additional_information_2|Información adicional]]</p> | |||
<p style="margin-left: 55px;font-size:13px">3.2.4 [[Submitting_records#Ending_the_list_entry|Terminar la lista]]</p> | |||
</ul></p> | </ul></p> | ||
Revision as of 18:03, 23 May 2023
|
PARA ENVIAR OBSERVACIONES:
|
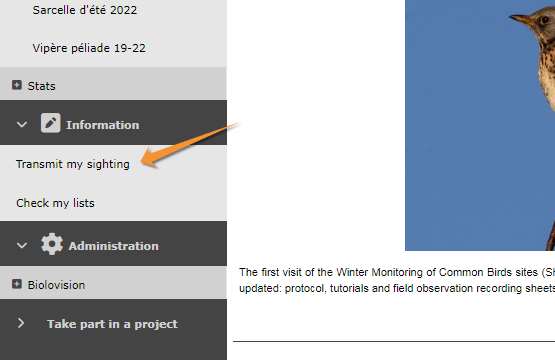
Para introducir observaciones, necesitas primero una cuenta (consulta la sección wiki Interfaz web > Cómo empezar > Registrarse). Una vez has iniciado sesión (sección wiki interfaz web > Cómo empezar > iniciar sesión) clica en Participar (ver imagen Enviar observaciones desde la página de inicio) o accede a través del menú de la izquierda: Participar > Introducir observaciones (ver imagen Enviar observaciones desde la columna de la izquierda). El proceso sigue tres pasos:
selección aproximada de la localización, selección exacta de una localidad e introducir observaciones.


Paso 1/3: Selección aproximada de la localización
|
recomendamos seleccionar un lugar Pinchando en el mapa. El resto de opciones se mantienen como alternativas. |
Existen varias formas de posicionar tu observación (ver imagen Paso 1/3: Selección aproximada de la localización).

Por texto
Busca un lugar tecleando su nombre. Se abrirá un panel con todas las posibilidades a escoger (ver imagen Paso 2/3: Selección exacta de una localidad).
Para conocer mejor las diferentes opciones, consulta la sección wiki Interfaz web > Participa: comparte observaciones > Paso 2/3: Selección exacta de una localidad.
Por coordenadas geográficas
Las coordenadas deben seguir el Datum WGS 84, sea en grados, minutos y segundos (ejemplo 2°17'23.36 E 42°28'13.82'N) o en grados decimales (ejemplo E002.28982° N42.47051°). El sistema detectará automáticamente si estás usando grados, minuts y segindos, o grados decimales. Usa coordenadas negativas para longitudes occidentales. Accederás a la seción wiki Interfaz web > Participa: Comparte observaciones > Paso 3/3: Introducir observaciones con el mismo formato que si hubieras añadido una posición exacta (consulta la sección wiki Interfaz web > Participa: Comparte observaciones > Paso 2/3: Selección exacta de una localidad > Añadir una posición exacta). En la sección siguiente la posición escogida se marcará en el mapa y se asociará al lugar pre-determinado más cercano (ver imagen Añadir una posición exacta en el mapa, la línea amarilla indica a que localidad pre-determinada se asocia la observación), pero las coordenadas exactas tan solo serán visibles para ti y para los administradores.
Por municipio
También se puede introducir un municipio. Teclea el inicio del nombre del municipio y selecciona del panel desplegable. Al clicar MOSTRAR, un formulario te pedirá una localización más precisa (consulta la sección wiki Interfaz web > Participa: Comparte observaciones > Paso 2/3: Selección exacta de una localidad). Al clicar HACER ZOOM AL MUNICIPIO se puede seleccionar una posición más exacta en el mapa de debajo (ver imagen Pinchando en el mapa).
Selecciona entre
Selecciona entre los sitios sugeridos según las localizaciones de tus observaciones anteriores. Se pueden ver hasta 5 de los lugares visitados con más frecuencia en los últimos 6 meses. Clica en cualquiera de estos sitios para acceder a un menú desplegble como el de la imagen Escoge localidad pinchando en el mapa. En selecciona entre existe la opción de mostrar en el mapa. Semostrará en el mapa de debajo el área que estás buscando, y puede ser muy útil para acercarse a un área cercana.
Pinchando en el mapa
|
SELECCIONAR UNA LOCALIZACIÓN PINCHANDO EN EL MAPA:
|
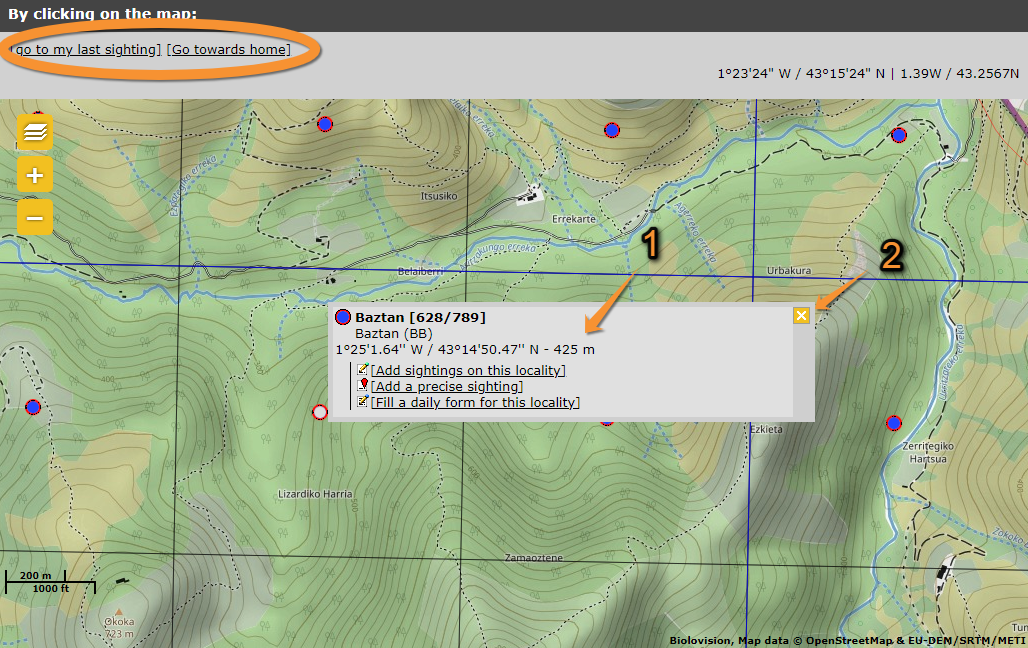
También se puede seleccionar del mapa de debajo. Las localidades se representan con un punto, y son visibles al aumentar la imagen lo suficiente. Consulta la sección wiki Interfaz web > Navegando por el mapa para saber más sobre los mapas, y la sección wiki Varios > Listado de símbolos para saber lo que significa cada punto. Puedes centrar el mapa en tu última localidad clicando en ir a mi último dato en la esquina superior izquierda; o en centrarlo en tu área clicando en vista general de mi área (círculo en la imagen Escoge localidad pinchando en el mapa). Pedes cambiar tu área en Mi cuenta > Datos personales > Dirección (consulta la sección wiki Interfaz web > Mi cuenta > Datos personales > Campos no-obligatorios > Dirección).
Consulta el significado de los diferentes puntos: Varios > Listado de símbolos Cambia tu localidad en: Interfaz web > Mi cuenta > Datos personales > Campos no-obligatorios > Dirección |
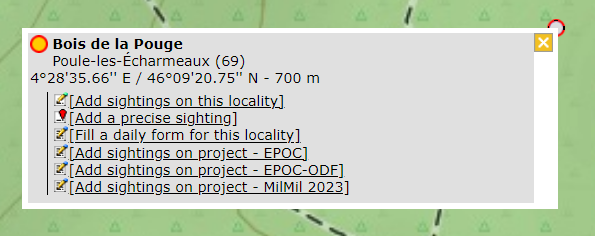
Clica en el punto deseado para ver las opciones para esta localidad (ver imagen Escoge localidad pinchando en el mapa, i la sección wiki Interfaz web > Participa: Comparte observaciones > Paso 2/3: Selección exacta de una localidad). Clicando en cualquier otro punto del mapa solo se puede añadir una posición exacta (ver la sección wiki Interfaz web > Participa: Comparte observaciones > Paso 2/3: Selección exacta de una localidad > Añadir una posición exacta, y la imagen Añade una posición exacta sin punto como ejemplo).

1 opciones disponibles para esta localidad (el punto del mapa correspondiente se vuelve gris).
2 Utiliza la cruz para cerrar.
Los usuarios con derechos especiales y aquellos que participan en protocolos y/o proyectos, tendrán más opciones al clicar sobre un punto o en cualquier otro lugar del mapa (clica para ver una imagen de ejemplo). Visita proyectos and Protocolos para saber más, y Administración para saber más sobre usuarios con derechos especiales.
- Añadir observaciones a esta localidad
Esta opción te llevará al siguiente paso Introducir observaciones. Las observaciones enviadas así no muestran su posición exacta sino que todas aparecen asociadas a la localidad seleccionada.
- Añadir una posición exacta
Aparece un marcador rojo en el mapa representando la posición de tu observación. Mueve el marcador a la posición exacta del individuo observado. La línea amarilla indica la localidad a la que tu observación aparecerá asociada. En algunos portales los usuarios registrados verán la posición exacta de tu observación, en el resto solo tu y los administradores podreis acceder a ésta, y los usuarios registrados verán la observación asociada la localidad que se indica.
Rellena los campos siguientes como en Paso 3/3: Introducir observaciones y clica SIGUIENTE en acabar. Los campos con asterisco son obligatorios.

- Llenar una lista completa para esta localidad
Permite enviar una lista asociada a esta localidad. Clica en la opción para empezar la lista. Consulta la sección wiki Interfaz web > Participa: Comparte observaciones > Paso 3/3: Introducir observaciones > Si se accede desde una lista (llenar una lista completa)
Paso 2/3: Selección exacta de una localidad
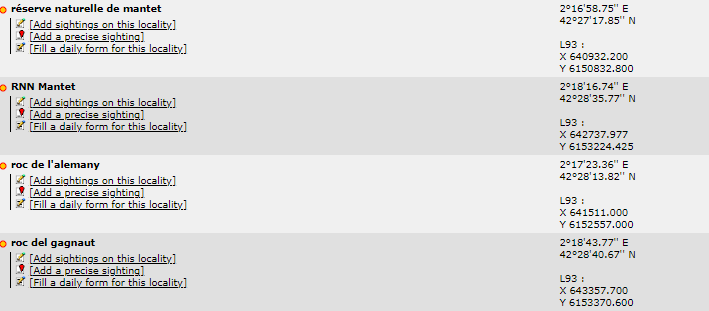
Si se accede por municipio > Mostrar devuelve una lista con todas las localidades posibles para este municipio, y todas las opciones para cada una de ellas (ver imagen Paso 2/3: Selección exacta de una localidad).
Por favor selecciona la mejor opción para la localidad de tu observación.

Añadir observaciones a esta localidad
Accederás a la sección wiki Interfaz web > Participa: Comparte observaciones > Paso 3/3: Introducir observaciones > Si se accede desde Añadir observaciones a esta localidad o Añadir una posición exacta, imagen Paso 3/3: Introducir observaciones. General.
Añadir una posición exacta
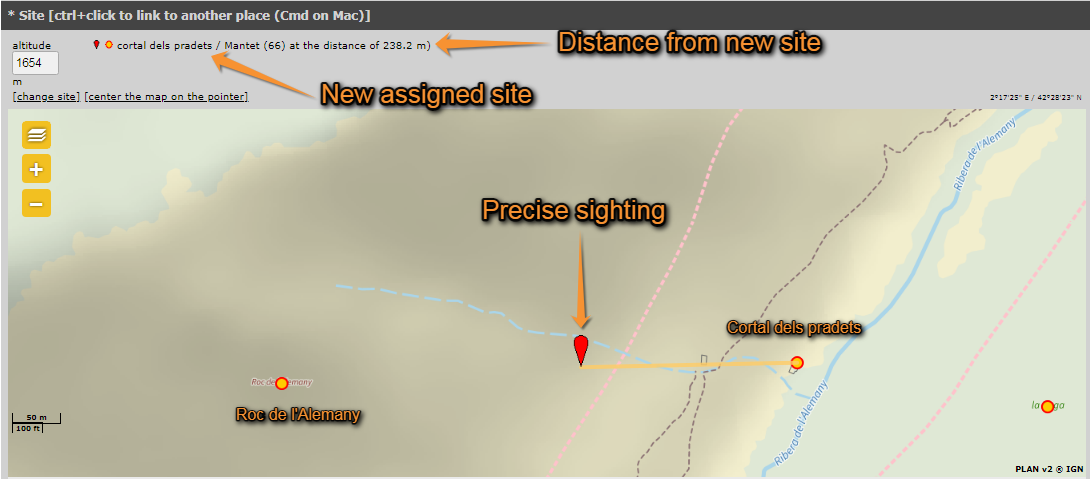
También accederás a la sección wiki Interfaz web > Participa: Comparte observaciones > Paso 3/3: Introducir observaciones pero aparecerá un apartado adicional al inicio donde se puede clicar la posición exacta del individuo observado (imagen Añadir una posición exacta en el mapa. Fíjate como la observación se asocia a la nueva posición exacta -línea amarilla en el mapa). El sistema asocia automáticamente esta observación con la localidad más cercana y la mostrará bajo este lugar. Para cambiar a qué localidad se asocia, presiona y mantén la tecla CTRL y clica sobre la localidad donde quieras asociarla. En algunos portales, las posiciones exactas solo son visibles para el observador y los administradores. Añadir una posición exacta es especialmente útil cuando se conoce la posición exacta de la observación pero se desconoce a que localidad predeterminada pertenece; o en los estudios que requieren una posición exacta, por ejemplo para mapear nidos o territorios. La altitud predeterminada en la nueva localidad se muestra en la esquina superior izquierda. Cambia la altitud de la observación si es necesario. Expande/contrae el mapa usando la flecha al pie del mapa.
.png)
|
|
Llenar una lista completa para esta localidad
Acederás a Interfaz web > Participa: Comparte observaciones > Paso 3/3: Introducir observaciones > Si se accede desde una lista (llenar una lista completa) .
Ésta es la mejor opción para registrar listas de observaciones. Se requiere más información que para Añadir observaciones a esta localidad o Añadir una posición exacta, pero aunque lleve más rato enviarla también tiene más valor científico. Se te pedirá introducir la fecha y la hora así como el número de individuos para cada especie detectada, además de otros detalles que quieras añadir.
Paso 3/3: Introducir observaciones
Aquí puedes empezar a introducir tus observaciones. La información requerida depende de si has accedido por Añadir observaciones a esta localidad, Añadir una posición exacta o Llenar una lista completa para esta localidad.
|
3 Paso 3/3: Introducir observaciones 3.1 Si se accede desde Añadir observaciones a esta localidad o Añadir una posición exacta 3.1.1 Campos obligatorios 3.1.1.1 Fecha y hora 3.1.1.2 Localidad 3.1.1.3 Grupo taxonómico 3.1.1.4 Especie 3.1.1.5 Número total de individuos 3.1.1.6 Terminar de entrar la observación 3.1.2 Información adicional 3.1.2.1 Sexo y edad de los individuos 3.1.2.2 Otros datos/informaciones 3.1.2.3 Comentarios 3.1.3 Terminar de entrar la observación 3.2 Si se accede desde una lista (llenar una lista completa) 3.2.1 Sección fecha y hora 3.2.2 Sección listado 3.2.3 Información adicional 3.2.4 Terminar la lista |
If accessed from add sightings on this locality or add precise location
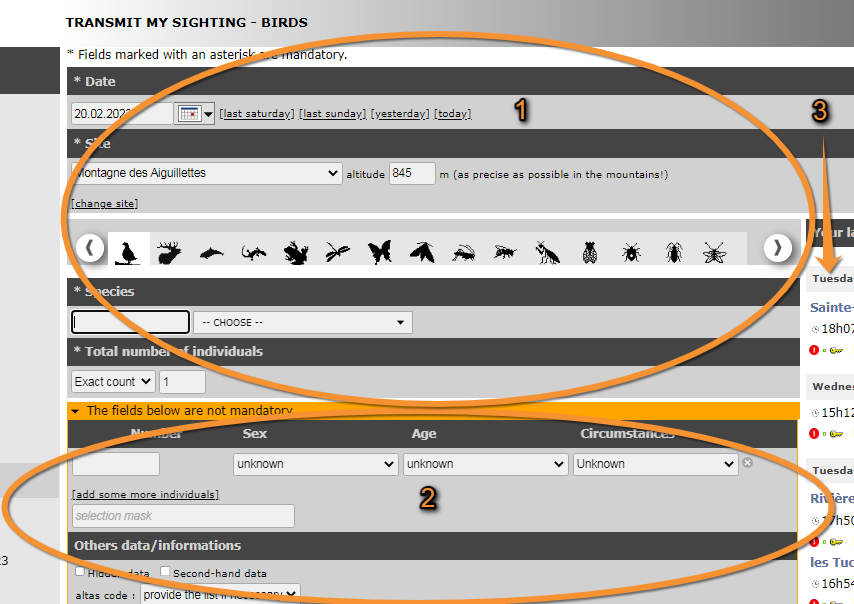
The first part of the form is mandatory information, while the second you can skip it. On the right hand column you can see your last 30 records under the predetermined site they are associated, and have the option to delete or modify any of them (see wiki section Web interface > Editing records).
Campos obligatorios
.
Date and time
Type or select from the expandable calendar. By default you will be shown the current date. Add the time (optional) at the bottom of the panel when clicking on the calendar icon. For quick access there are few options on the right side (see image Transmitting sightings, mandatory fields. Date and Taxa).
Site
Reconfirm the approximate site selected previously and change altitude if necessary (for example when the slope is pronounced and two observations were seen on the same coordinate but at different altitudes). The altitude given by default is that of the predetermined site. At the bottom of the subsection there is the option to change the location; you will be taken back to wiki section Web interface > Submitting records > Step 1/3: Approximate choice of a site.
Taxa
There is a horizontal bar with different taxa silhouetted (see image Transmit sightings, mandatory fields. Taxa). Use the arrows on right and left to visualise all options. If necessary place the mouse over a silhouette to get the name of the taxa it represents. Click on the taxa your observation belongs to in order to access the list of species for this taxa (see Species below).
Species
Start typing the name of the species in the selected language (see wiki section Web interface > Getting started > My account > Website customisation > Recording language), and choose from the expandable menu on the right (see image Transmitting sightings, mandatory fields. Species). The most likely record is highlighted in grey. The species are listed alphabetically or systematically, depending on your preferences. To change the order, go to wiki section Web interface > My account > Website customisation > Global parameters > Species order. Move through the species with the keyboard arrows, moving the right hand bar with your mouse or roll the mouse wheel.
|
|
Number of individuals
Choose count precision on the left hand field and enter number (see image Transmitting sightings, mandatory fields. Count). Options are exact number, approximate number, a minimum number or not counted (if not counted, leave the right hand field blank). Not counting number of individuals is often used for those species occurring very commonly. Note that an estimate or minimium if you can provide it even roughly, is allways better than a non counted.
Ending the observation entry
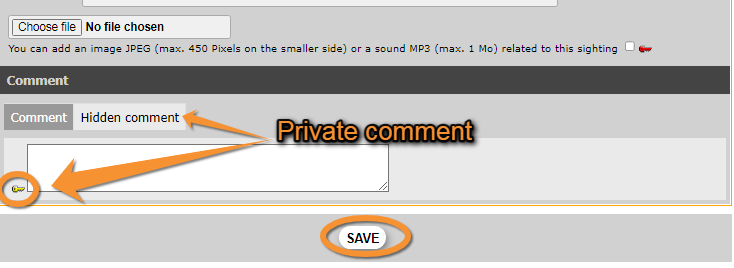
If you do not want to add any additional non-mandatory information, scroll to the end of the page and press Save (see image Transmitting sightings, non-mandatory. Comments). You will be taken to image Transmitting sightings, mandatory fields. Count and your record will automatically appear in the list on the right hand column. Repeat the process if you wish to add any more records.
Additional information
The following information is not mandatory, but interesting if known.
Sex and age of individuals
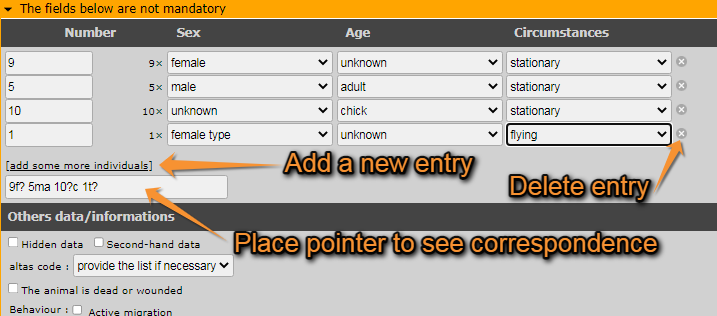
Type the number of individuals per each sex, age and circumstances of recording. Options are shown on expandable menus per section. You can break the record per age, sex, or circumstances subgroup by clicking on add some more individuals (see example in image Transmitting sightings, non-mandatory fields. Age and sex). Use the plus sign (+) next to the record to delete it. As you enter categories, a code is forming at the bottom right corner of subsection. Passing the mouse on top, you can read the correspondence. If you know it, you can type the code directly in the field "selection masque" where the resume of detail number of individuals is shown.
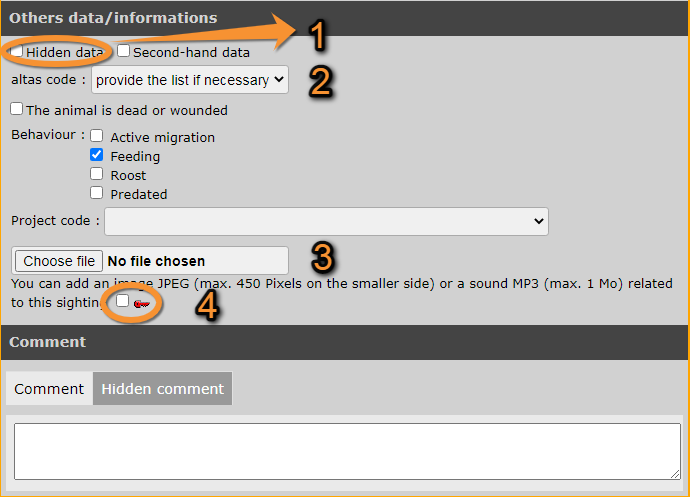
Other data/Information
- Hidden data
Tick the field if you do not want the record to appear publicly on the web site, neither for registered nor anonymous users. You and the administrators will still have access to the data. This option is useful to protect certain species or nesting sites. Note that some of the species and sites are automatically hidden at least part of the year. Go to wiki section Web interface > Species partially hidden to see which species will be automatically hidden and for which part of the year. If you still consider any of the other species or sites sensitive and want to protect them, tick the option.
- Second hand data
Tick the field when you are not the author of the observation. This may occur if someone comments an observation to you, or if you are browsing old records. Always seek permission from the author to publish the observation, even if shown as anonymous.
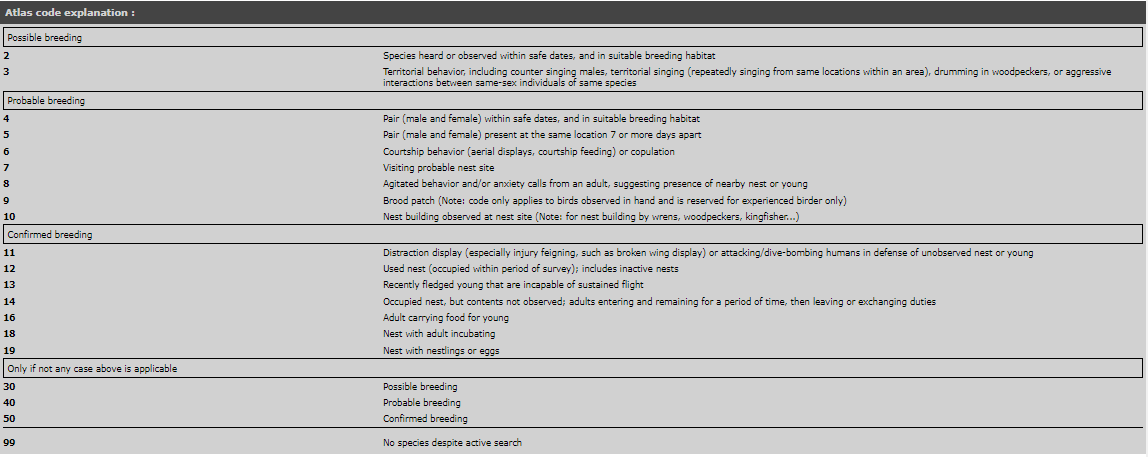
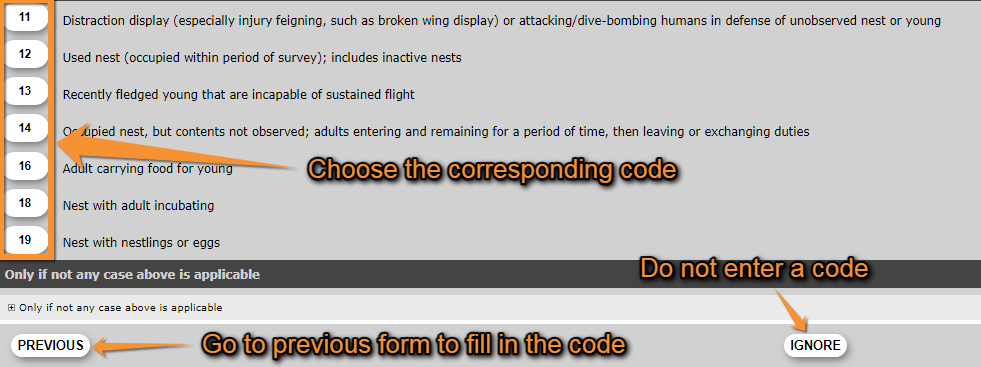
- Atlas code
Go to wiki section Web interface > Codes and symbols or image Atlas codes to see correspondence. For some species, an atlas code is required at times. If not entered in that section, a new window prompting you to choose the code will appear after saving the record (see image Compulsory atlas code). You can click on the corresponding code, click on Previous to go back to image Transmitting sightings, non-mandatory fields. Other information to enter the code, or Ignore and continue to next observation (see image Compulsory atlas code).

- Dead/wound
Tick if the animal observed is dead or wounded. The mortality module will open before the record is saved. Please provide the details.
- Behaviour
Record the behaviour of the individual/s if known.
- Project code
Associate an existing project to the record or leave blank if the observation is not part of a project.
- Picture
Using the buttons at the end of the subsection, you can attach an image or a sound to the record. There is no size limit to the picture you can upload but it must be taken on the date the observation occurs. Sound files are limited to a maximum size of 16 MB. To attach more than one file, click again on the attach button. Pictures and sound can also be added at a later stage (see wiki section Web interface > Editing records).
Attach only those pictures or sound recordings you have taken yourself.
To make the file private (only you can see it), tick the box on the right (see image Transmitting sightings, non-mandatory fields. Other information).
Comments
Finally, you can leave a comment. It may be public or private. By default, the system will make it public (tab comment). To make it private, go to the hidden comment tab –it is marked by a yellow key on its left (see image Transmitting sightings, non-mandatory. Comments). Only you can see a hidden comment.
Ending the observation entry
When done with the record, click Save at the end of the page (see image Transmitting sightings, non-mandatory. Comments, and image Starting a list). The new observation will appear at the top of the right column and you will be able to continue entering observations for this site and date. If you need to change the site, go to Change site on the mandatory Site section and you will be taken to wiki section Web interface > Submitting records > Step 1/3: Approximate choice of a site. This may happen when covering a relatively wide area on the same day.
Note if you marked any individual observed as death or injured, the mortality module will open before the record is saved. Please fill in the form with the requested details.
If accessed from a list (fill a daily form)
If you want to enter several observations that took place the same day at the same place and during a short interval of time, consider entering your data as a list. To do so, select location as in Step 1/3: Approximate choice of a site and in Step 2/3: Precise site choice and select Fill a daily form for this locality. Location will be pre-selected in next step.

Date and time section
Indicate date, time, project and any comment if necessary.
- Site
Site is pre-selected from previous step and can be changed later if necessary.
- Date and time
Enter date and time as accurately as possible.
- Project
Choose from an expandable menu if observations you are submitting are part of a bigger study. Leave blank if your list is not part of an established project.
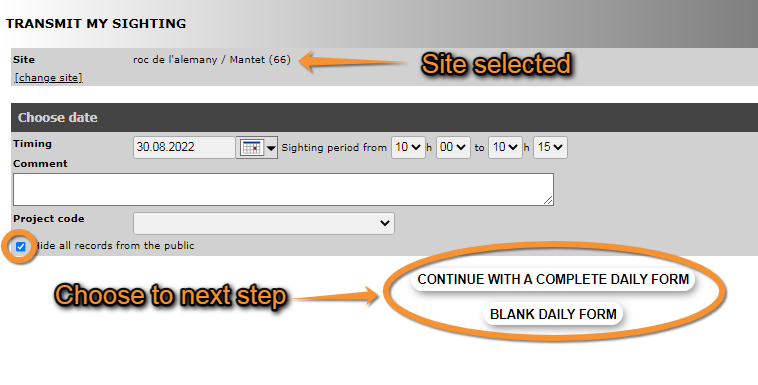
- Comments and public records
Optionally, add any comment and decide if records will be public. If the option is ticked, records will not be displayed on the website but will still be seen by administrators and used for data analyses (see image Starting a list).
- Continue to next step
Move to next section by choosing between
- Continue with a complete daily form (all species seen are reported) or
- Blank daily form (no species were seen).
Both options take you to the following section: List section (see image Starting a list).
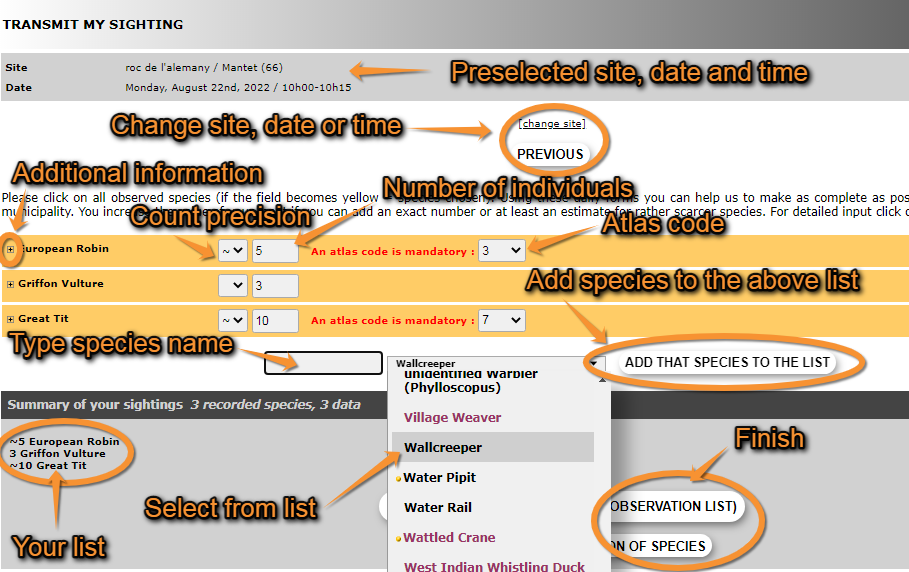
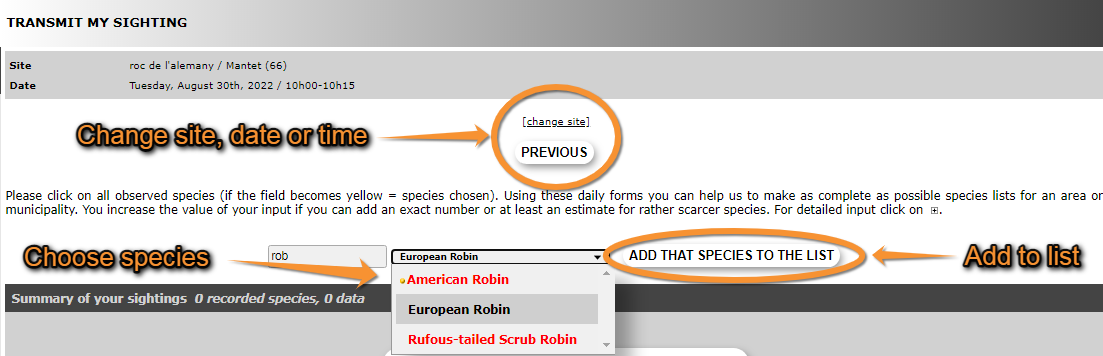
List section
At the top it shows the site, date and time you selected. Click Change site, for site, or Previous, for date and time, if you need to make any changes.
To enter records choose a species from the list or start typing the name on the left field and choose from the expandable list (see image Creating a list. Select species). To move through the list use the arrows on your keyboard, the wheel on the mouse, or move the line on the right with your mouse. To change the order in which you see the species, and the language of the species, see section Web interface > My account > Website customisation > Global parameters > Species order or Recording language, respectively. To see colour correspondence, see Various > Symbols cheatsheet.
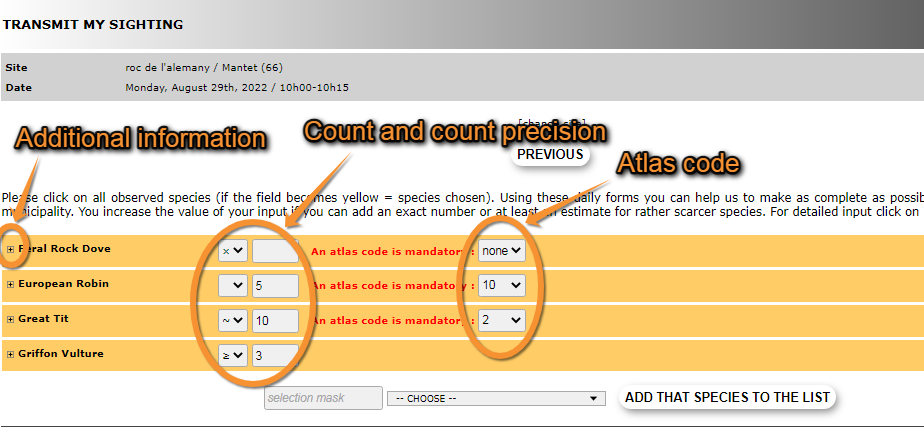
When done, add that species to the list (see image Transmitting sightings, list. Entering species). The new species will show on top of the species selection fields (see image Transmitting sightings, list. Entering count).

After entering the species name, enter the number of individuals and count precision in the field right from the species name (see image Trasmitting sightings, list. Entering count). Options are approximate number (~), minimum number (≥) or not counted (x). If you enter an exact count, do not choose count precision. If you did not count individuals, do not enter any number. Finally enter an atlas code, if required. To see correspondence of codes, go to Web interface > Codes and symbols. If unknown, you can choose “none” on the atlas code field. When the record is correctly entered, the name appears in yellow. You can enter additional information to the record now, or any time later, by clicking on the plus (+) sign next to the species name (see image Transmitting sightings, list. Entering count).
Enter a new species and repeat the process.
Additional information
By clicking on the plus sign (+) at the left of the species name (see image Transmitting sightings, list. Entering count), a new form will open.

.png)
.png)
- Detail tab: allows entering more details.
- 1. Comment: enter a comment under Comment if public, or under Hidden comment if it is private.
- 2. Time: enter an exact time if necessary, by choosing time and minutes from the expandable menus.
- 3. Number/Sex/Age/Circumstances: indicate the age, sex or behaviour of any individuals if known. Enter the number of individuals the following information applies to and choose parameters from the expandable menus. Delete an entry by clicking the cross on the left (number 5 in image above) and click on add some more individuals to create another subgroup (number 6 in image above).
- 4. Other data/informations: check the corresponding cell if you want to hide your observation from other users (number 7 in image above), or if the individual/s is/are wounded or dead (number 8 in image above). Note even if your observation is hidden, administrators will still see it. Checking the dead or wounded cell will open the mortality module at the end of the list before your records are saved. Finally, enter the atlas code if necessary by selecting from the expandable menu (number 9 in image above).
- 1. Comment: enter a comment under Comment if public, or under Hidden comment if it is private.
- 10. Map tab: modify the position of yor observation if necessary. To know how to navigate the map, see wiki section Web interface > Navigating the map.
- 11. Duplicate the species: creates a new entry for the same species. May be useful when teh additional information or the exact position on the map do not apply for all individiuals of the same species seen while recording the list.
Ending the list entry
When all species are entered, indicate at the bottom of the page if it is a complete or a partial list.
- 1. Complete list: click on I recorded all species if you identified and recorded all species seen or heard.
- 2. Partial list: click on I recorded only a selection of the species if not all species seen or heard were identified or recorded.
If you marked any of the observations as dead or injured, the mortality module will open before saving the list. Please provide details for the relevant individuals.
Nota: las imágenes y los ejemplos de esta wiki están sacados de la página francesa Faune-France. El diseño y la posición de algunas de las funciones pude variar según la página. Puedes consultar la lista de todas las páginas locales en la sección wiki Páginas locales y entidades colaboradoras. |