Getting started NaturaList
NaturaLlist is a worldwide compatible mobile application that allows browsing and sharing your biodiversity observations in a casual way like a field notebook, by list or with more advanced tools for protocolled collection of data.
To access all the functions of NaturaList, you need to be registered and logged in.
Unregistered users can access public "data around you" for the last days.
Several languages are available. See a list of all available languages at wiki section Various > Available languages.
Most functions are available for both Android and iOS. Some advanced tools, like protocols, are currently only available on Android. The application NaturaList is linked to data.biolovision.net and the existing ornitho portals (see image Dataflow between our tools). Those portals give you full possibilities for using, backup and share your data after synchronization. See what you can do in each of the “tools” at the table below. To see the list of local portals, visit wiki section Various > Local portals and partners.
| Functions for registered users | NaturaList Android | Naturalist iOS | Data.biolovision.net | Local portal |
|---|---|---|---|---|
| Enter casual observations | YES | YES | NO | YES6 |
| Enter an observation list | YES | YES | NO | YES6 |
| Enter observations a posteriori | YES | YES | NO | YES6 |
| Projects | YES | NO | NO | YES6 |
| Protocols | YES1 | NO | NO | YES1,6 |
| Display data (including rare) | YES | YES | NO | YES2,6 |
| Offline maps | YES | NO | NO | NO |
| Offline use | YES3 | YES4 | NO | NO |
| Share the position of your observation and send it to google maps | YES | YES | NO | NO |
| Statistics and other information | NO | NO | YES, partly | YES6 |
| Species names translation tool | YES | YES | NO | NO |
| Download your own data | NO | NO | YES | YES6 |
| Worldwide use | YES | YES | YES | NO |
| Edit/delete your data | YES5 | YES5 | NO | YES6 |
| Display your data on a map | NO | NO | YES | YES6 |
| Have extended possibilities for languages for species | YES | YES | YES | YES7 |
1 Only for users with special rights. To know more about users with special rights go to wiki section Web interface > Administration > User administration.
2 By specific search or automatically displayed during the last 5 days.
3 Except for synchronised data, downloading maps and see what’s around you.
4 Except for synchronised data and see what’s around you.
5 Before synchronisation.
6 Only data within the territory covered by the corresponding portal.
7 Only languages available locally.
Contents
2 Registration
3 Logging in
4 Preferences
- 4.1 Species
- 4.1.1 Choice of species
4.1.2 Language of the species
4.1.3 Position of taxonomic groups
- 4.2 Location
- 4.2.1 Cartographic layer
4.2.2 Offline map
4.2.3 GPS Mode
- 4.3 Personalisation
- 4.3.1 Starting the application
4.3.2 Atlas list code
4.3.3 Hide record
4.3.4 Display of species
4.3.5 Keeping the trace
4.3.6 Time span for species suggestion
4.3.7 Breeding evidence on the map
- 4.4 My account
4.5 About
- 4.5.1 Updates
Downloading the application
Android
|
REMEMBER:
|
To download your application, go to Google Play in your phone. Search NaturaList and install (see image Downloading NaturaList). Do not confuse with other applications with close names, for example iNaturalist.

Alternatively, scan the QR to download the application:

Once installed, open the application to log in if you are an existing user or to register if you have never done so before (see image Logging in).
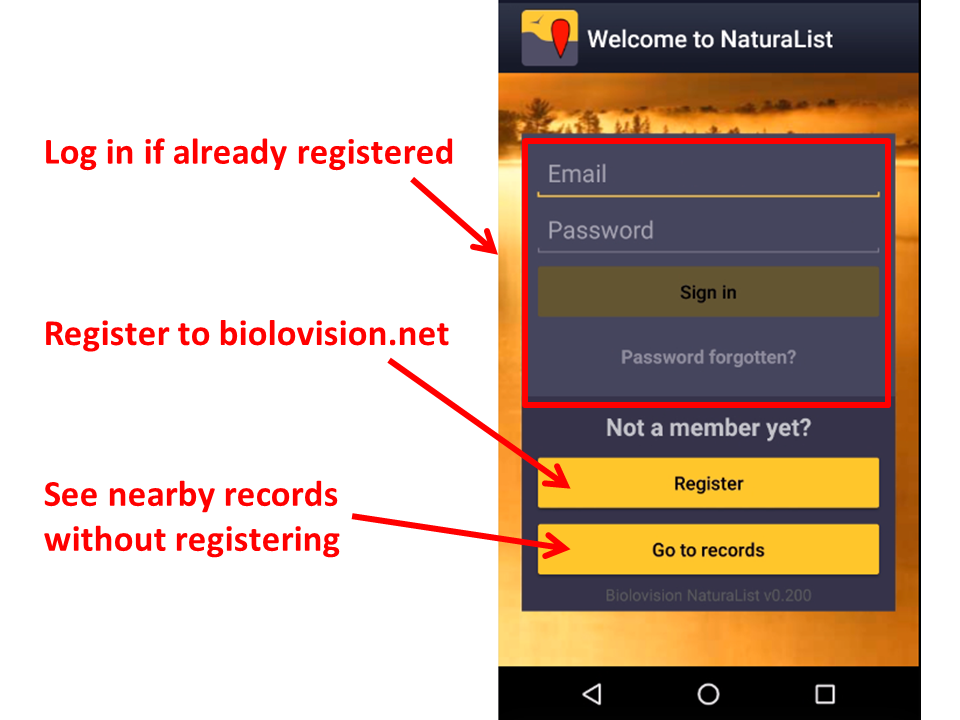

iOS
Registration
Unregistered users can still see nearby records. Click on Go to records to see the latest observations in your area (see image Logging in). If you want to access other tools you have to register.
If you never created an account on any of our platforms and want to do so
- click on Register (see image Logging in), and
- fill in the registration form (see images below). Fields with asterisk are mandatory. Please provide your full name and date of birth to individualise you when there is more than one observer with the same name. Please provide your country so default parameters can be tailored to your area: cartographic layer, atlas codes and protocols if/when applicable. Your contact details are necessary so an administrator can reach you when/if there are some records that require more information.


Check the appropriate boxes to use the application as an anonymous user or as a visible user, and decide who can see your email address.
An anonymous user has full functionality but observations submitted are not published under their name but as 'anonymous'. An anonymous user's email address is not public so other registered users will not be able to contact them. Note administrators can still do if the submitted record needs additional information.
A visible user also has full functionality and submitted observations are published under the observer's name. In this case, other registered users, as well as administrators, can contact the observer regarding their observation. Check if you do not want your email address to be available to other users. Administrators can still contact you regarding confusing records.
To know more about administrators, go to wiki section Web interface > Administration.
Logging in
Open the application and log in with your credentials. Your username is the email address you are registered with. If you forgot your password, click on Password forgotten? and check your inbox. A new password will be sent to your registered email address within minutes. Remember it may go to your spam folder. We advise you to change your password into a more memorable one (but not a simpler one) and keep it safely. Change your password at data.biolovision.net or at any of our local portals. Visit wiki section Web interface > Local portal> My account.
The first time you log in, read and accept (if you agree) our terms and conditions (see image Terms and conditions). You will always be able to come back to them at Menu > Tools > Terms and conditions.

When prompted, allow NaturaList to access:
- your location: allows the GPS to locate you correctly on the map for entering data or browsing data around you, and
- photos, media and files: allows NaturaList to take pictures for linking it to your observation when relevant, on your demand, or for playing sounds for some specific protocols.
Before you start using the application, you can follow a short tutorial (see image Short tutorial).

Preferences
Personalisation of NaturaList
4 Preferences
-
4.1 Species
- 4.1.1 Choice of species
4.1.2 Language of the species
4.1.3 Position of taxonomic groups
- 4.2 Location
- 4.2.1 Cartographic layer
4.2.2 Offline map
4.2.3 GPS Mode
- 4.3 Personalisation
- 4.3.1 Starting the application
4.3.2 Atlas list code
4.3.3 Hide record
4.3.4 Display of species
4.3.5 Keeping the trace
4.3.6 Time span for species suggestion
4.3.7 Breeding evidence on the map
- 4.4 My account
4.5 About
|
To define parameters, please ensure a good network connection. |
Use your application straight away with the default parameters or personalise them. When personalising the parameters, you can choose your preferred language, map layer, or have easy access to other’s observations, among others. Setting up your own preferences will help you with entering, editing and browsing records. Note although different tools of the application can work offline, you will need good internet connexion while setting your preferred parameters.
To start, go to the menu icon on the top left corner, and to Preferences (see image Preferences.).

Species
Choose the taxonomic group you want to enter and/or see, and the language to display species names.

Choice of species
|
|
|
When selecting a species list, you will access certain protocols and map layers specific for that list. |
Allows choosing which taxonomic groups to see on the phone, both for browsing records and for sharing observations. You can also choose the list of species for that area. Depending on the country selected list, you may have special access to some specific tools linked to protocols or some cartographic layers.
As it needs the list from the website, allow synchronisation (see image below).

For the taxonomic group you want to see on your device choose between (see image Choose species list):
Species list from a website to import a list of species from one of the local portals, or
Species list from a bio-geographical area to import the list according to a biogeographical area.
See the differences between both options:
| Gives access to: | Website list | Biogeographical area |
|---|---|---|
| all species in a biogeographial area | NO | YES |
| Propose specifically species present in a country | YES | NO |
| national maps (if available) | YES | NO |
| basic Openstreetmap layer | YES | YES |
| country or local specific project codes or features | YES1 | NO |
| country or local specific protocol tools | YES1 | NO |
1 Only for Android
To disable (hide) an already active taxonomic group, choose Disable/reset (see image below).

Language of the species
|
|
Choose a taxonomic group from the active ones and select the language in which you want to see or introduce records.
Please note not all species are translated in all languages, except for the scientific name which includes all species in our system. The number of species translated for each of the local languages is shown in parenthesis (see image Language of species). If you need a species to be added, contact your local administrator or if not existing support@biolovision.net, indicating its taxonomic group and scientific name.

Position of taxonomic group
|
|
Choose the order in which you want the different active taxonomic groups to be displayed when entering data. Use up and down arrows to change the order, or click and drag name. When done, close window from the cross on the top right corner (See image below).

|
|
Location

Select your preferences to visualise maps, download maps and optimise battery by re-arranging GPS parameters.
Cartographic layer
|
|
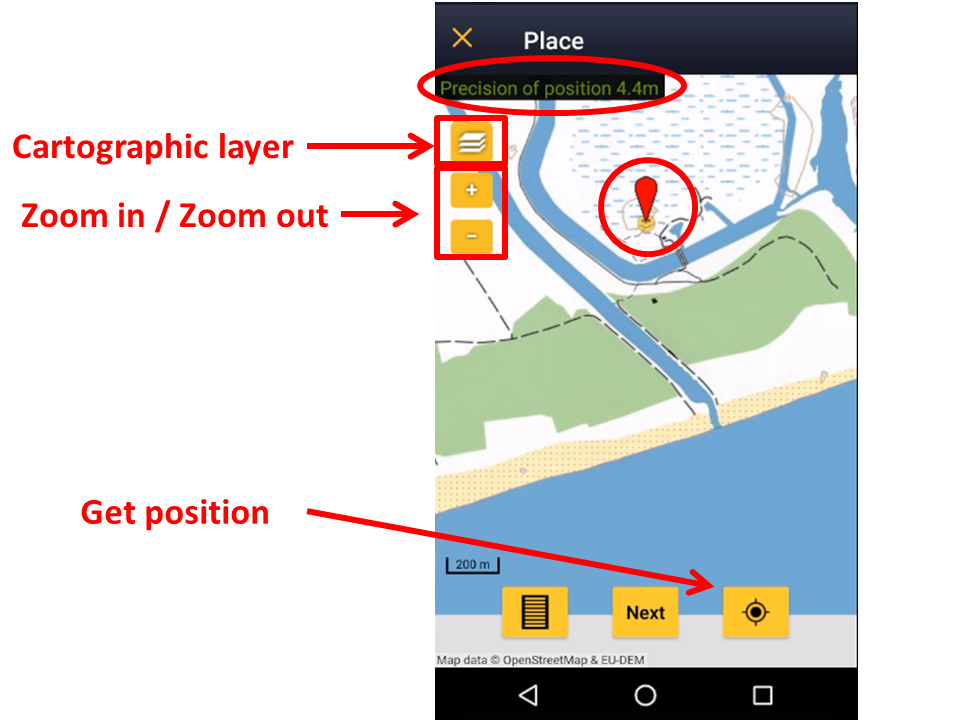
Choose from the list the cartographic layer that will appear by default. While entering data, you can always choose another one from those available according to the species list of your choice (see image Navigating the map as an example).
Offline map
|
|
Download maps in advance for using offline when the network is poor or you have no mobile data in the field or abroad, for example.
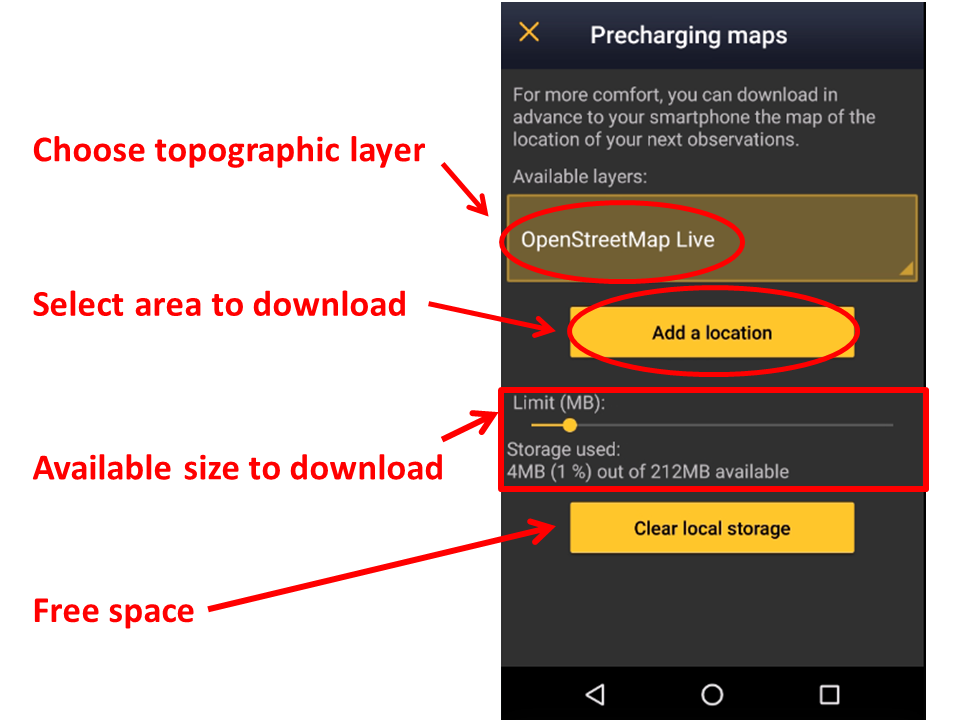
1: Click on the Available layers to open an expandable menu with all possible layers.
Slide bar to determine how much of your phone’s memory you want to dedicate to downloaded maps, and see underneath which percentage of the assigned amount is already occupied (see image Offline maps). Note the maximum possible amount is 2GB (due to European legislation regarding maps) and does not take into account how much space is available in your phone (go to your phone settings to find out).
2: Click on Add a location to choose the piece of map to download.
Choose by selecting a place name or the area directly in the map. Zoom in and out with the plus and minus buttons to adjust the exact area to download. Choose the maximum zoom you want to allow. This will determine the size of the map and the precision of it: the more zoom allowed, the more detailed the map but the more space it will take in your phone’s memory (see image Adding a location to download).
3: Click on download.
|
|
To remove maps and free storage space if you no longer need previously downloaded maps click on Clear local storage.
|
The Clear local storage function deletes all maps. |


GPS Mode
|
|
|
To save phone’s battery, choose GPS on demand. |
Choose how and when you want the GPS on. This will have an impact in your phone’s battery.
Continuous (high reactivity): GPS locates you constantly and quickly, but it uses a lot of battery. May be useful when surveying from a car (passengers only!), bike or similar.
Continuous (uses less battery): GPS is always active but takes a bit to locate you. It uses less battery than the previous option. It can be useful when surveying on foot and it is the option by default.
On request (save battery): GPS on only when manually requested. If few requests, saves battery better than the other 2 options.
Personalisation
Here you can choose the way to display the information you need or how things are organised to make you gain efficiency when using the application.

Starting the application
|
|
Choose which data to display on main screen when opening the application (see image Sets of observations to be displayed). To see all possibilities and their differences, go to wiki section Mobile interfce > Browsing records.
Atlas list code
Atlas codes differ from country to country. Choose which coding you want to use. If you selected biogeographical area when retrieving a species list (wiki section Choice of species; image Choose species list), the associated atlas code will be that of the EBCC.
|
When data are transferred to a local portal (synchronised) a code adaptation/translation is automatically done to fit with the corresponding locally used atlas code. |
Hide record
Allows choosing if some or all of your records will be hidden from other users (see image Hide record). Although NaturaList is about sharing data, you can opt out under certain circumstances. Note even if you hide records to other users, administrators can still see them. Check who can see your records when hidden by logging in into each of the local portals. Likewise, some records will be automatically hidden for conservation purposes even when you choose not to. To see which records and when will be hidden, go to wiki section Web interface > Local portals > Species partially hidden.
Don’t hide automatically: All records will be public both to users and to administrators, except those of conservation concern.
Hide automatically: All records will be hidden from general users, but administrators will still see them.
Hide common species: Other users will not see your records for the most common species, but will still see the rare ones.

When a record is hidden, a key logo appears next to the name. See Web interface > Local portals > Codes and symbols to see logo.
|
|
Display of species

When entering the observations, indicate how you want to see the species to choose from.
By group, family, species: first choose the taxonomic group, then the family and finally the species (see top images below).
Species: choose a taxonomic group from the top bar and a species from the list. Start typing the name of the species to narrow the options (see bottom image below).


Keeping the trace
Check as appropriate if you want the application to automatically record your track, or otherwise (see image below). By default, the option is set to "Do not record the trace". Whatever option you set in Preferences will be displayed by default in the lists, projects or protocols that give you the option to record your track.

If you want to record your track, set your phone's GPS at high precision, and your phone's saving power off for NaturaList. Go to Main menu > Preferences > GPS mode > Continuous (high reactivity) to set the right GPS mode (see wiki section Mobile interface > Getting started > Preferences > Location > GPS Mode on how to do it).
- Before synchronisation, it is possible to delete the trace by:
- going to Menu > In the phone > Update this record > Trace as if for editing any record in the list. See Mobile interface > Editing records > Before synchronisation > From records In the phone to know more about how to access the option, and scroll down to Trace to see how to delete the trace.
- Before synchronisation, it is possible to delete the trace by:
- After synchronisation, visualise your track at the local portal by:
- Clicking on any species from the list as if for editing, and selecting Go to website > Edit Place tab. See image Example of records that belong to a list.
- Logging into the website and going to Explore > All my observations. Click on any observation belonging to the list, and select the Edit place tab. See wiki section Web interface > Editing records > Modify a record from a list > Edit place, on how to do it. See image Example of records that belong to a list.
- Clicking on any species from the list as if for editing, and selecting Go to website > Edit Place tab. See image Example of records that belong to a list.
- After synchronisation, visualise your track at the local portal by:
Time span for species suggestion
Select how often you want the memory of species renewed. Whenever you enter a species, the phone suggests you the last names you entered to accelerate the process (see image List of last species entered). Select a long time span if you often see the same species or a short one if you tend to move between very different environments. Time span is given in days (from the example below, bottom image, 5 days -image Species time span).


Breeding evidence on the map
Click to select/unselect if you want to see breeding evidence displayed on your maps (see image). This function is useful for maps diplayed while entering lists or protocols.

If activated, the corresponding icon shows darker than when deactivated on the species map, and the atlas code appears in brakets next to the species code (see image). This function is only available for with list in the field.

My account
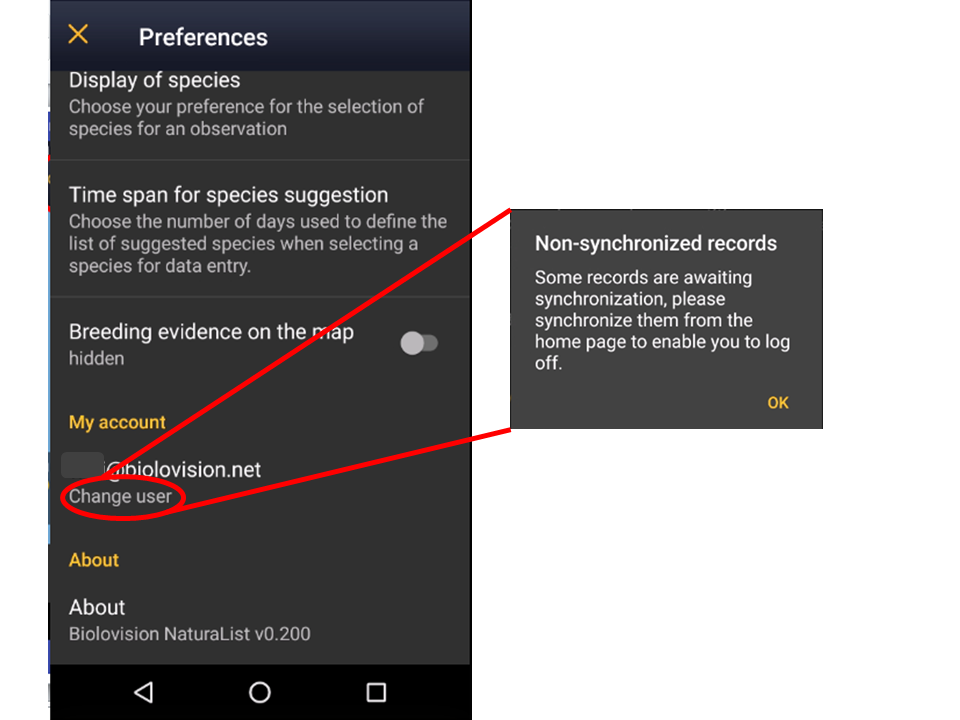
You will see the email address you are logged in from. Click on Change user (see image My account) to change the user if you are using more than one account or if different users share a device. You will be prompted to synchronise data before changing users.

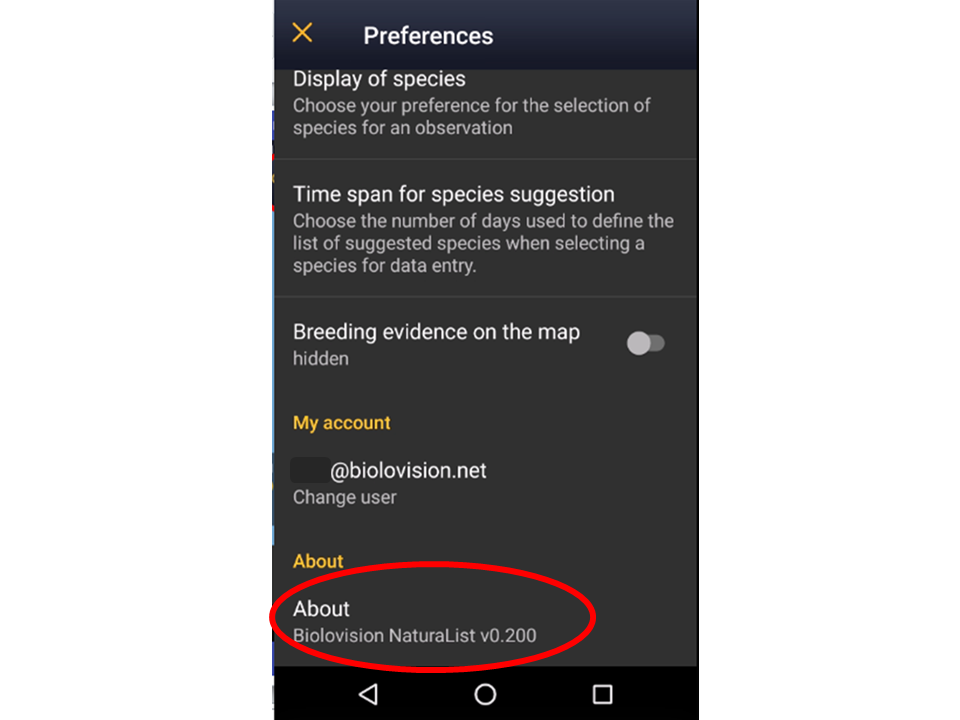
About
It indicates the version of Naturalist you are using (see image About). You will need it if you ever contact support.

Updates
We recommend always using the latest version. Biolovision is constantly improving functions and correcting mistakes. Old versions of NaturaList may not have full functionality or may contain mistakes than have already been corrected in newer versions. In some cases, this may result in not being able to synchronise your data and loosing it irreversibly.
In most cases, your application will update automatically when you connect to internet via wifi, but if you are using 4G, 5G or if you deactivated the updating function in Google Play, it may require action:
- If you are using 4G or 5G, set GooglePlay to update NaturaList automatically by tapping on Manage apps & device > Manage. Go to Google Play Help for more information.
- If you deactivated automatic updates in Google Play, update NaturaList manually from time to time, especially before conducting a survey.