Protocols
Protocols are standardised ways of collecting data. The methodology to follow depends on each study. Protocols are only available when a Local Portal supports them. Note not all partners support the same protocols.
To access a protocol, an administrator needs to give you access, and the coordinator of the protocol will give you guidelines on how to conduct the survey. You will be responsible to survey the site assigned to you following the protocol guidelines. However, not all partners give you access automatically to the protocol in NaturaList. While you will always have access to protcols assigned to you through local portals, an administrator will have to grant you access to it through NaturaList in some occasions.

Access the protocol as if entering non protocoled observations (+ icon at the bottom right corner, see right image). You will have as many entries as the number of protocoled census you are registered for. The ones in white are the ones activated for the species list you choose. The ones in grey are linked to another species list and are not activated until you modify it (see image Protocols. Main menu as an example). Click on the protocol you need.
Contents
Protocols
-
· Bee-eater
· Bewick's Swan
· Birds of prey
· Black Grouse census
· CBBS-P
· Cirl Bunting
· CoBiMo
· Corncrake points
· DDPS territory maping
· Grey Partridge
· Jackdaw census
· Meadow birds census
· MHB & BDM
· MZH territory mapping
· Other territory mapping
· Point count
· Private territory mapping
· Rock Ptarmigans census
· Rook census
· Sand Martin census
· Single nesting species
· STOC_EPS
· STOC Montagne points
· STOC Sites points
· Waterbird census
· Woodpeckers
· Woodcock monitoring
· Woodpecker territory
Protocol settings
Before starting to enter data in a protocol, you may have to set some parameters:
· List of species
Menu > Preferences > Species > Choice of species.
· Parameters specific to certain protocols.
Menu > Preferences > Protocols (see image below).

Protocols.
List of species
The list of species selected in your device has to be the one from the country the protocol takes place. If your protocol involves more than one taxonomic group, select the appropriate species list for all taxa involved.
For example, if counting birds in Germany under the Waterbird census protocol, your list for birds should be that of Germany. If your protocol involves birds and mammals in France, you should select the french species list for both birds and mammals.
To select the appropriate list go to Menu > Tools > Preferences > Species > Choice of species.
[Top to Protocol settings]
[Top to Protocols]
Keyboard settings for mapping
This section will only appear in Menu > Preferences > Protocols if you have access to country-specific protocols using a tablet interface with cartography:
-
Breeding Waterbirds
CBBM in Protected areas
Common Breeding Bird Survey
Grey Partridge
Meadow Birds
Reed Breeding Species Census
Semi-Common Territorial Species census
Shorebirds, Anatidae, Grebes and Coots breeding
Private Territory Mapping
Choose one of the options to select the configuration of your keyboard (see image Keyboard configuration for mapping).
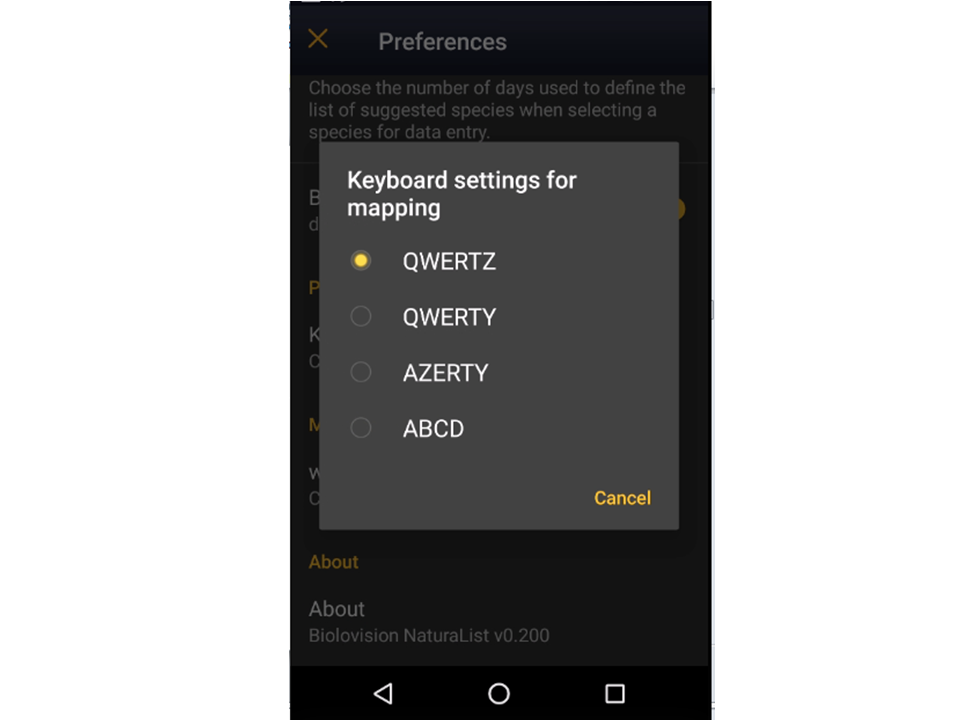
Keyboard configuration for mapping.
[Top to Protocol settings]
[Top to Protocols]
Enter data
2 Enter data
Open the menu as for Submitting records and choose the protocol you want to use.
· Active protocols are recognizable by their corresponding colourful symbol (same as in the web interface), while inactive ones are identified by a generic protocol icon (see image below).
· Change your list of species to active/deactivate proto cols by going to Menu > Preferences > Species > Choice of species and synchronise it to the country granted you access to the protocol you wish to enter data to.

Protocols. Main menu.
1. Inactive protocols
2. Active protocols
Notice the user has synchronised their bird list to Germany. Therefore, can only enter data to German protocols at the current stage. To enter data to Swiss protocols, they need to change their bird list.
If you are registered for only one site, you will access directly to the next step: Start of list.
If you have more than one site to survey, it will list all your protocol sites (see image below).

Selecting the protocol site.
1. Sort your protocol site by Site name, National code or Local code.
2. Click on the name to go directly to the next step Start of list.
3. Click on the arrow to get directions to your protocol location. It will open google maps on a new window.
1. Sort your protocol site by Site name, National code or Local code.
2. Click on the name to go directly to the next step Start of list.
3. Click on the arrow to get directions to your protocol location. It will open google maps on a new window.
NOTE:
The species list you selected in the device shall be the one of the local portal that grants you access to the protocol.
From the example above (image Protocols. Main menu), the current list of species on the device corresponds to the local partner giving access to Waterbird census (appears in white and is clickable), but not to the local partner giving access to the Territory mapping (appears in grey and is not clickable). To access non active protocols, change the list of species.
To change the list of species go to
Menu > Preferences > Species > Choice of species
(wiki section Mobile interface > Getting started > Preferences > Species > Choice of species).
Start of list
Enter general information before starting the protocol (see image below).
· Fields marked with an asterisk are mandatory.
· Fields available are protocol dependent and may differ from one country to another, even within the same protocol.
· Visit wiki section Web interface > Protocols > Preparation and data > Add observations > Starting the protocol for a list of all possible fields.

Starting the list.
1. Comment
2. Record the trace
3. Hide all records from the public
4. No species were seen
- Comment
You may enter a comment if you find it appropriate.
- Record the trace
Check if you want NaturaList to record your track. You will see a reminder to set your GPS on "High precision" and your power saving off for NaturaList.
Go to Main menu > Preferences > Location > GPS mode > Continuous (high reactivity) to set the right GPS mode (see wiki section Mobile interface > Getting started > Preferences > Location > GPS Mode on how to do it).
Click OK to continue and check if you wish not to see the reminder again. Check Do not ask again and keep this choice for future entries if you want to set Record the trace as the default option (see image below). Click OK to continue without setting Record the trace as the default option.
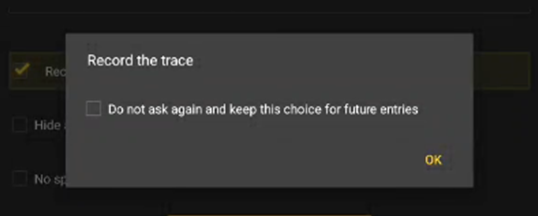
Check to set Record the trace as the default option.
· After synchronisation, visualise your track at the local portal by:
- · Clicking on any species from the list as if for editing, and selecting Go to website > Edit Place tab. See image Example of records that belong to a list.
- · Logging into the website and going to edit your own data. Click on any observation belonging to the list, and select the Edit place tab. See image Example of records that belong to a list.
- · Clicking on any species from the list as if for editing, and selecting Go to website > Edit Place tab. See image Example of records that belong to a list.
- Download your trace after synchronisation as described in Web interface > Export your data > Exporting your trace.
- Download your trace after synchronisation as described in Web interface > Export your data > Exporting your trace.
- Hide all records from the public
Check if you want to keep your records privately. This will not prevent administrators to see them and contact you if necessary, but other users of NaturaList will not see your records.
- No species were seen
Check if your survey did not provide any data. Surveys with no species are also important results! It will mean you followed the established methodology, and therefore your survey is valid, but no birds were present. They can indicate major population changes and are of extreme importance for conservation purposes.
-
"My survey did not provide any data"
Surveys with no species are also important results! Please submit them.
It will mean you followed the established methodology but no birds were present. It can be due to meteorology, disturbance, pollution or other major population changes and may be of extreme importance for conservation purposes.
Click Next when done.
[Top to Enter data]
[Back to Protocols]
Entering records
Enter observations as if Enter a list of precise observations.
Horizontal protocols
With some protocols, screen layout will automatically become horizontal if using a tablet, with the map section on the right, and the species section on the left (see top image below).
If using a phone, use the grey vertical tab to change between Place and Species screen (highlighted in orange on the bottom images below).
Enter observations as if in a list in the field.

Horizontal screen (tablet). Example.
1. Enlarge: click to enlarge image. It will hide/unhide general information about your phone on the top line.
2. Unlock: click on lock icon to unlock screen and be able to enter species. The screens locks automatically to prevent entering unreal data while in the field.
3. Map section
4. Species section
|
Vertical screen (telephone). Map section. Example. Touch the bottom left area of the screen and drag to the right to access next section. |
Vertical screen. Species section. Example.
Enter species (left image) and number of individuals (right image). |


Gesture navigation mode
Phone function that allows controlling the smartphone using swipes instead of traditional buttons.
· Some newest models have the mode activated by default. Otherwise, go to System > Gestures > System navigation > Gesture navigation.
· Oldest models do not have the function.
When using the gesture navigation mode, use only the bottom part of the screen to move through the different protocol sections (marked by a grey line). The upper part of the screen is reserved for the normal navigation mode.
If gesture navigation mode is not active or non existent, use the whole length of the screen corner to move through different parts of the protocol.
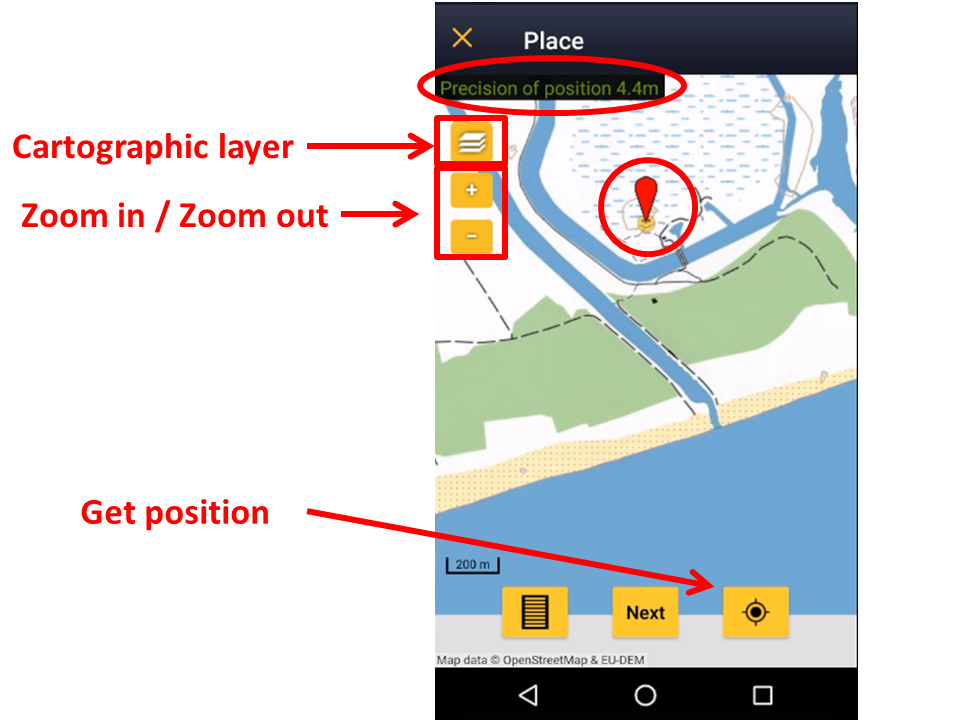
Place
Map with your position (yellow smiley, see image below).
Place the red marker (observation position) where the individual, or group of individuals, are observed.
· To report observations outside of the ongoing protocol, pause it (see image below) and enter data normally (options explained in wiki section Mobile interface> Naturalist for Android > Submitting records).
· To report a protocoled species outside of the study area (ie. a lek has changed position), click on the observation's position and confirm when prompted.

Protocol. Place.
1. Pause/Break
2. Observation
3. Observer
4. Hide / Unhide summary
5. Limit of study area
· After entering the first record, activate/deactivate (active when orange, inactive when yellow) the summary icon to see species name and associated information from already entered records (see image below). Know more about the summary of species in a map at wiki section Mobile interface > Navigating the map > Understanding a summary of observations.
· Click on the notebook icon at the bottom to see a list of all records on the ongoing protocol.

Protocol. Summary of observations.
1. Activate/Deactivate summary
2. Summary of observation
3. Records of ongoing protocol
To see how to navigate the map, see wiki section Navigating the map.
The Red Marker indicates the position of your observation. The Smiley indicates your position. When the smiley gets yellow, the GPS has detected your position. Check how accurate the reading is on the top left corner (image Navigating the map). Always check your position on the map. Please place the red marker at your observation, not at your position. Be as accurate as possible.
Protocol overtime
· Some protocols use a timer.
· In those cases, a time bar is shown at the top.
· The timer can go overtime: a buzzer sets off at the end of the oficial time but the time continues running.
· The buzzer will only activate when the app is active. It does not set off if the list in pause or the phone screen is off.
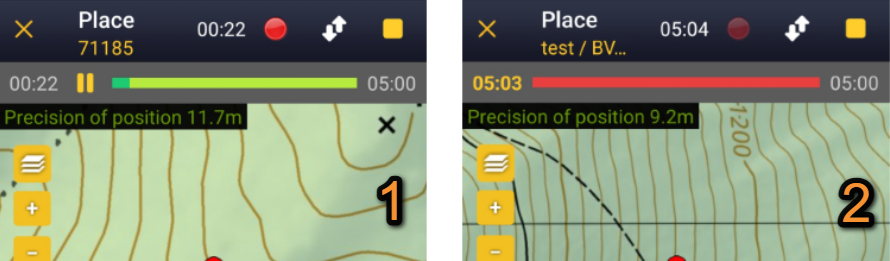
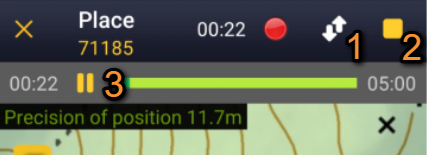
Overtime bar.
1. The protocol is within oficial time.
2. The timeline indicates overtime.
Example above: The user is 0:22 minutes into the 5 minutes protocol (left image). The user is 5:03 minutes into the protocol, thus 0:03 minutes overtime (right image).
Species
Enter species 'by search' or using protocol shortcuts when available, as explained in wiki section Mobile interface > Entering records > Enter independent observations > Step 2: Species.
See wiki section Mobile interface > Shortcuts to learn more about shortcuts and how to create them.
- Number of individuals
Enter number of individuals and precision count.
Visit Mobile interface > Entering records > Enter independent observations > Number of individuals if necessary.
Entering records using a counter could be useful for abundant species that are not grouped.
Extra protocol
Enter additional information regarding nests.
Visit wiki section Mobile interface > Submitting records > Enter independent observations > Additional information > Extra protocol for details.
Plus
Enter additional information as if Enter a list of precise observations.
See wiki section Mobile interface > Submitting records > Enter independent observations > Step 4: Additional information on how to do it, if necessary.
When done, click Save. It will take you to the Place screen to continue entering observations.
[Top to Enter data]
[Back to Protocols]
Ending the list
To finish the survey,
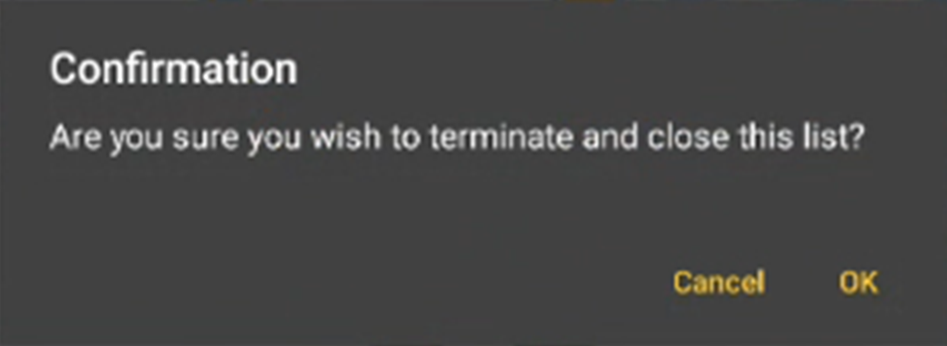
1. Stop recording: click the stop icon at the top right corner of the Place screen (see image below). You will be prompted to confirm.
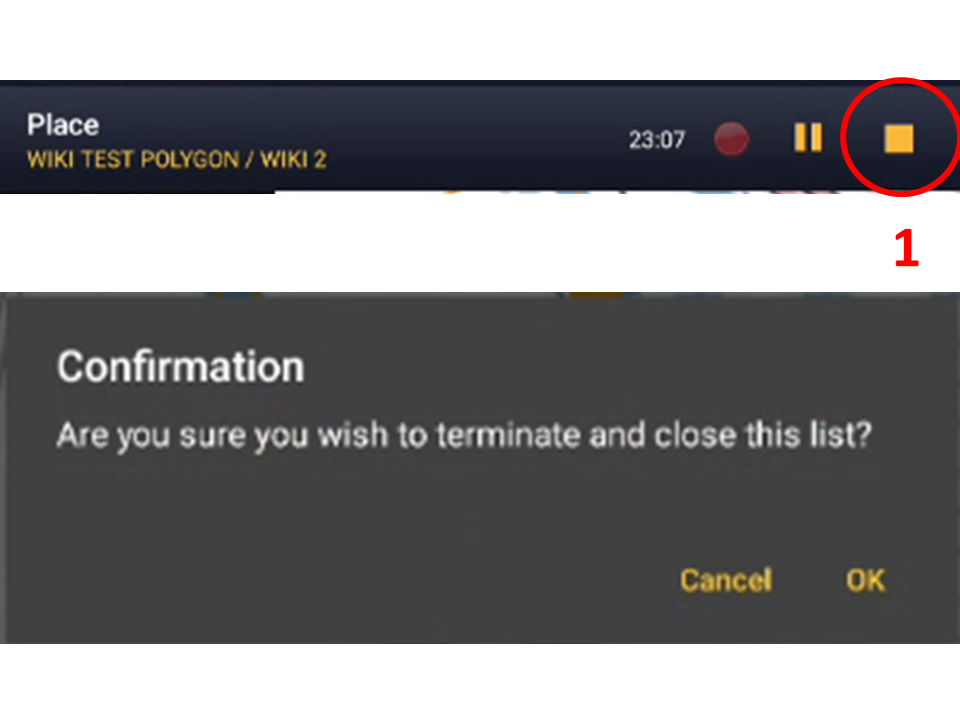
Ending the list.
1. Stop recording
2. Adjust time: If necessary, adjust starting or ending time by clicking on the time button. See wiki section Mobile interface > Submitting records > Enter previous observations > Date/Time to know how to modify the clock.
3. Fill in / modify details: Add or modify a comment if necessary, or enter additional information when requested.
4. Choose type of list: Indicate which type of list you recorded. Visit Various > Glossary to know he meaning of each of them, if necessary.
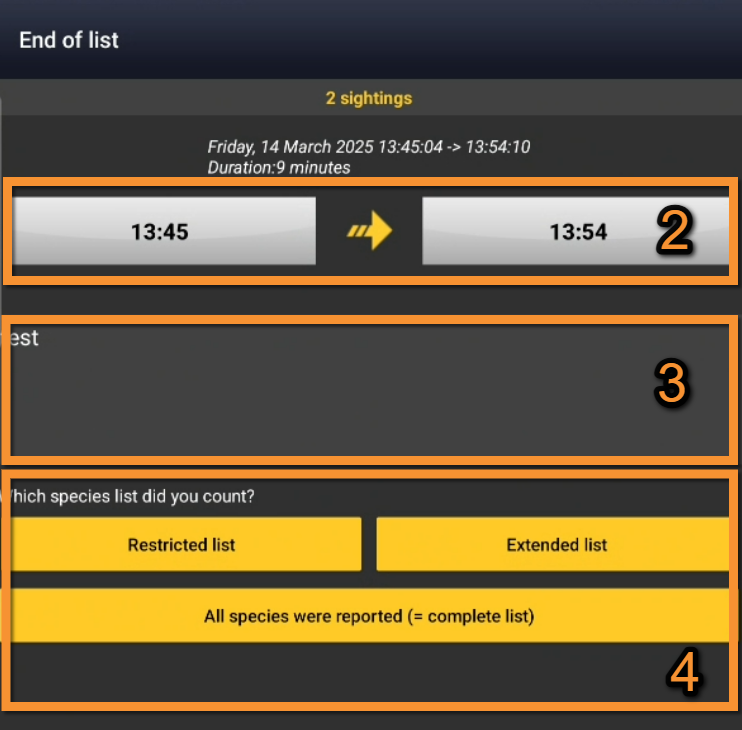
Ending the list. Final adjustments.
2. Adjust time
3. Type/Modify comments if necessary
4. Choose type of list
Remember to synchronise your data as soon as possible after entering to avoid loosing it.
Stop vs. Break vs. Pause
Use STOP to end and close the list/protocol.
Use BREAK to temporarily exit the list/protocol without properly closing it, ie. to enter some data outside of the current list. The time continues running.
Use PAUSE to pause a protocol according to its methodology. The time stops running. It is protocol dependent and do not appear in all protocols.
Stop vs. Break.
1. Take a Break from protocol.
2. Stop and close protocol.
3. Pause the protocol.
When using Break,
a reminder will appear on your main screen (see image below).
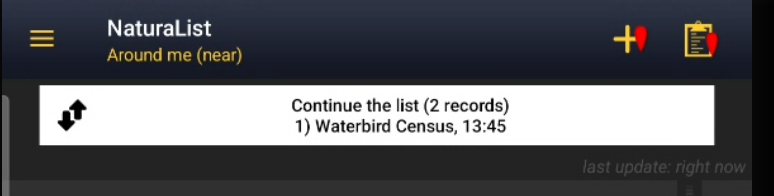
Resume protocol.
To resume the protocol, press on the list to continue and continue normally.
[Top to Enter data]
[Back to Protocols]
Editing records and/or protocols
To edit records within a protocol, or to edit the protocol's general parameters, visit wiki section Mobile interface > Editing records > Editing protocols.
[Top to Enter data]
[Back to Protocols]
Deleting records and/or protocols
To delete records within a protocol, or to delete the whole protocol, visit wiki section Mobile interface > Editing records > Deleting protocols.
[Top to Enter data]
[Back to Protocols]
Browsing records
See your protocolled records:
- Before synchronisation
- In the phone. See more details in wiki section Accessing your own records.
- Before synchronisation
- After synchronisation
- In Mine. See more details in wiki section Accessing your own records.
- After synchronisation
- In Under verification (only if any data of the protocol needs more information)
- In Under verification (only if any data of the protocol needs more information)
- In the local portal. Go to the corresponding local portal, Menu > Explore > All my observations.
- In the local portal. Go to the corresponding local portal, Menu > Explore > All my observations.