Protocol management
To access the administration of a protocol you need the Protocol administrator right. Only an Admin of the Local portal can provide you such access, under certain conditions.
The easiest way to access protocol functions is through the Protocol panel. See wiki section Accessing protocols below for details.
See below a comparing table with all existing protocols, their availability and requirements. Protocols are not available by default; Administrators should request Biolovision the desired protocols.
| Protocols summary table | |||||||||||
|---|---|---|---|---|---|---|---|---|---|---|---|
| Name | Code | Group | Web support |
NaturaList Android |
Points | Transects | Polygons | Surveys/Year | |||
| Number | Time/point1 | Number | Time/transect1 | Number | Time/polygon1 | ||||||
| Acoustic data | ACOUSTIC | Birds | YES | NO | |||||||
| Bee-eater | BEEEATER | Birds | YES | YES | 1 | undetermined | undetermined | ||||
| Bewick's Swan | BEWICKII | Birds | YES | YES | 1 | undetermined | undetermined | ||||
| Biometric data | BIOMETRIC | Bats | YES | NO | |||||||
| Birding bird protocol | BVM | Birds | YES | YES | 3-23 | 5 | 2 | ||||
| Birds of Prey | SNSP_RAPTOR | Birds | NO | YES | 1 | undetermined | undetermined | ||||
| Black Grouse protocol | TETRAO_TETRIX | Birds | YES | YES | 1 | ≥ 60 | 2?? | ||||
| Breeding waterbirds | WATERBIRD_BREEDING | Birds | YES | YES | 1 | undetermined | undetermined | ||||
| Butterflies monitoring | PSMD | Birds | YES | NO | 1 | 10 | |||||
| CBBS in Protected areas | CBBM_PROTECTED_AREAS | Birds | NO | YES | |||||||
| Cirl Bunting | CIRL | Birds | YES | YES | many | undetermined | |||||
| CoBiMo | COBIMO | Birds | NO | YES | ≥ 1 | undetermined | undetermined | ||||
| Corncrake | CORNCRAKE | Birds | YES | YES | |||||||
| Crane | CRANE_ROOST | Birds | YES | YES | |||||||
| Ecological area sample | OEFS | Birds | YES | NO | undetermined | ||||||
| Forest birds | PTAKI_LESNE | Birds | YES | NO | 1 | undetermined | 4 | ||||
| Garzaie Italia?? | GI | Birds | YES | NO | 1 | undetermined | undetermined | ||||
| GLC | GLC | Birds | YES | NO | 1 | undetermined | undetermined | ||||
| Goose/Swan (field) census | GOOSE_SWAN_FIELD | Birds | YES | YES | 1 | undetermined | undetermined | ||||
| Goose/Swan (roost) census | GOOSE_SWAN_ROOST | Birds | YES | YES | 1 | undetermined | undetermined | ||||
| Great Cormorant | CORMORANT | Birds | YES | NO | undetermined | ||||||
| Grey Heron | ARDEA | Birds | YES | YES | 1 | undetermined | undetermined | ||||
| Grey Partridge | PERDIX | Birds | YES | YES | 1 | 1 | undetermined | undetermined | |||
| Gulls & Terns | GULLS_TERNS | Birds | YES | YES | |||||||
| Jackdaw | JACKDAW | Birds | YES | YES | 1 | undetermined | undetermined | ||||
| Meadow birds | MEADOW | Birds | YES | NO | ≥ 1 | ||||||
| MF Monitoring of breeding birds in wetlands | MF | Birds | NO | YES | 1 | undetermined | undetermined | ||||
| MHB & BDM | MHB_BDM | Birds | NO | YES | 1 | undetermined | undetermined | ||||
| Monitoraggio Nazionale Italiano Anfibi | MNIA | Amphibians | YES | NO | 1 | undetermined | undetermined | ||||
| Monitoraggio Nazionale Italiano Rettili | MNIR | Reptiles | YES | NO | 1 | undetermined | undetermined | ||||
| Monitoring high-alpine birds | CBBM_HIGHALPS | Birds | YES | NO | undetermined | ||||||
| Moonwatch census | MOONWATCH | Birds | YES | NO | |||||||
| Nightjar | NIGHTJAR | Birds | YES | NO | undetermined | ||||||
| NocMig census | NOCMIG | Birds | YES | NO | |||||||
| Nou Atles diurn??? | NOU_ATLES_DIURN??? | Birds | YES | NO | 5 | 60 | 2 | ||||
| Nou Atles nocturn?? | NOU_ATLES_NOCTURN?? | Birds | YES | NO | 2 | 60 | 1 | ||||
| Other territory mapping | OTHER_MAPPING | Birds | NO | YES | 1 | undetermined | undetermined | ||||
| Point count | POINT_COUNT | Birds | YES | YES | 1 | ||||||
| Private territory mapping | TERRITORY_MAPPING | Birds | NO | YES | |||||||
| Protocoled census | PROTOCOLED | Birds | YES | NO | ≥ 1 | ≥ 1 | ≥ 1 | ||||
| Protocoled census | GENERIC_BIRD/PROTOCOLED? | Birds | YES | NO | 0-50 | undetermined | 0-50 | undetermined | 0-50 | undetermined | undetermined |
| Reed-breeding species | REEDBREEDERS | Birds | YES | YES | |||||||
| Rock Ptarmigans protocol | LAGOPUS_MOTA | Birds | YES | YES | 1 | undetermined | 1 | 60 | 2 | ||
| Rook | CORVUS | Birds | YES | YES | 1 | undetermined | undetermined | ||||
| Sand Martin | RIPARIA | Birds | YES | YES | 1 | undetermined | undetermined | ||||
| Scops-owl | SCOPS | Birds | YES | YES | |||||||
| Semi-common territorial species | CBBM_SEMI_COMMON | Birds | YES | YES | |||||||
| SHOC | SHOC | Birds | YES | NO | 10 | undetermined | 2 | ||||
| SHOC Sites | SHOC-SITE | Birds | YES | YES | ≥1 | undetermined | |||||
| SHOC sites RNF | SHOC-SITE-RNF | Birds | YES | YES | ≥1 | undetermined | |||||
| Shorebirds, Anatidae, Grebes and Coots breeding | LIMAT | Birds | YES | YES | |||||||
| Single nesting species (SNSP) | SNSP | Birds | NO | YES | |||||||
| Small Owls | OWLS_SMALL | Birds | YES | YES | |||||||
| SOCC Seguiment d'ocells comuns a Catalunya | SOCC | Birds | YES | NO | 1 | 120-150 | 4 | ||||
| STOC EPS | STOC_EPS | Birds Mammals |
YES | NO | 10 | 5 | 9 | undetermined | 3 | ||
| STOC Montagne | STOC_MONTAGNE | Birds | YES | YES | ≥10 | 10 | ≥9 | 2 | |||
| STOC ONF | STOC_ONF | Birds Mammals |
YES | NO | 10 | 5 | 3 | ||||
| STOC Sites | STOC_SITES | Birds | YES | YES | 1-50 | 5 | undetermined | ||||
| STOC Sites RNF | STOC_SITES_RNF | Birds | YES | NO | 1-50 | 5 | undetermined | ||||
| VBS Monitoring of breeding birds on training military areas | VBS | Birds | NO | YES | 1 | undetermined | undetermined | ||||
| Waterbird census protocol | WATERBIRDS | Birds | YES | YES | 1 | undetermined | undetermined | ||||
| White stork | WHITESTORK | Birds | YES | NO | undetermined | ||||||
| Woodcock monitoring | WOODCOCK | Birds | YES | YES | 1? | undetermined | |||||
| Woodpeckers | WOODPECKER | Birds | YES | YES | 5 | ||||||
| Woodpecker territory | PICIDAE | Birds | YES | YES | |||||||
| Wryneck | WRYNECK | Birds | YES | YES | |||||||
| 1 Time is provided in minutes. | |||||||||||
Technical functions of protocols
Open the table below to see a list of existing functions for protocols, with technical details and examples. Click on an image to enlarge.
| Technical functions of protocols | ||||||||||
|---|---|---|---|---|---|---|---|---|---|---|
| Name | Code | Type | Default value | Description | Image1 | |||||
| ID | ID | Full name | automatic | Unique number associated to protocol and determined by Biolovision. | ||||||
| Name | NAME | Chain of caracteres (45) | - | Name describing the protocol. | ||||||
| Symbol | SYMBOL | Chain of caracteres (512) | - | Icon identifying a record belonging to a protocol. | 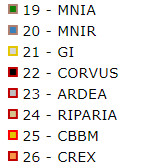 |
|||||
| Patron | TEMPLATE | Chain of caracteres (45) | - | PDF template name for printing maps2. Requires one file per language. The right part and corners must remain empty (to be filled automatically). QR on corners contain geographic coordinates for data digitization. | 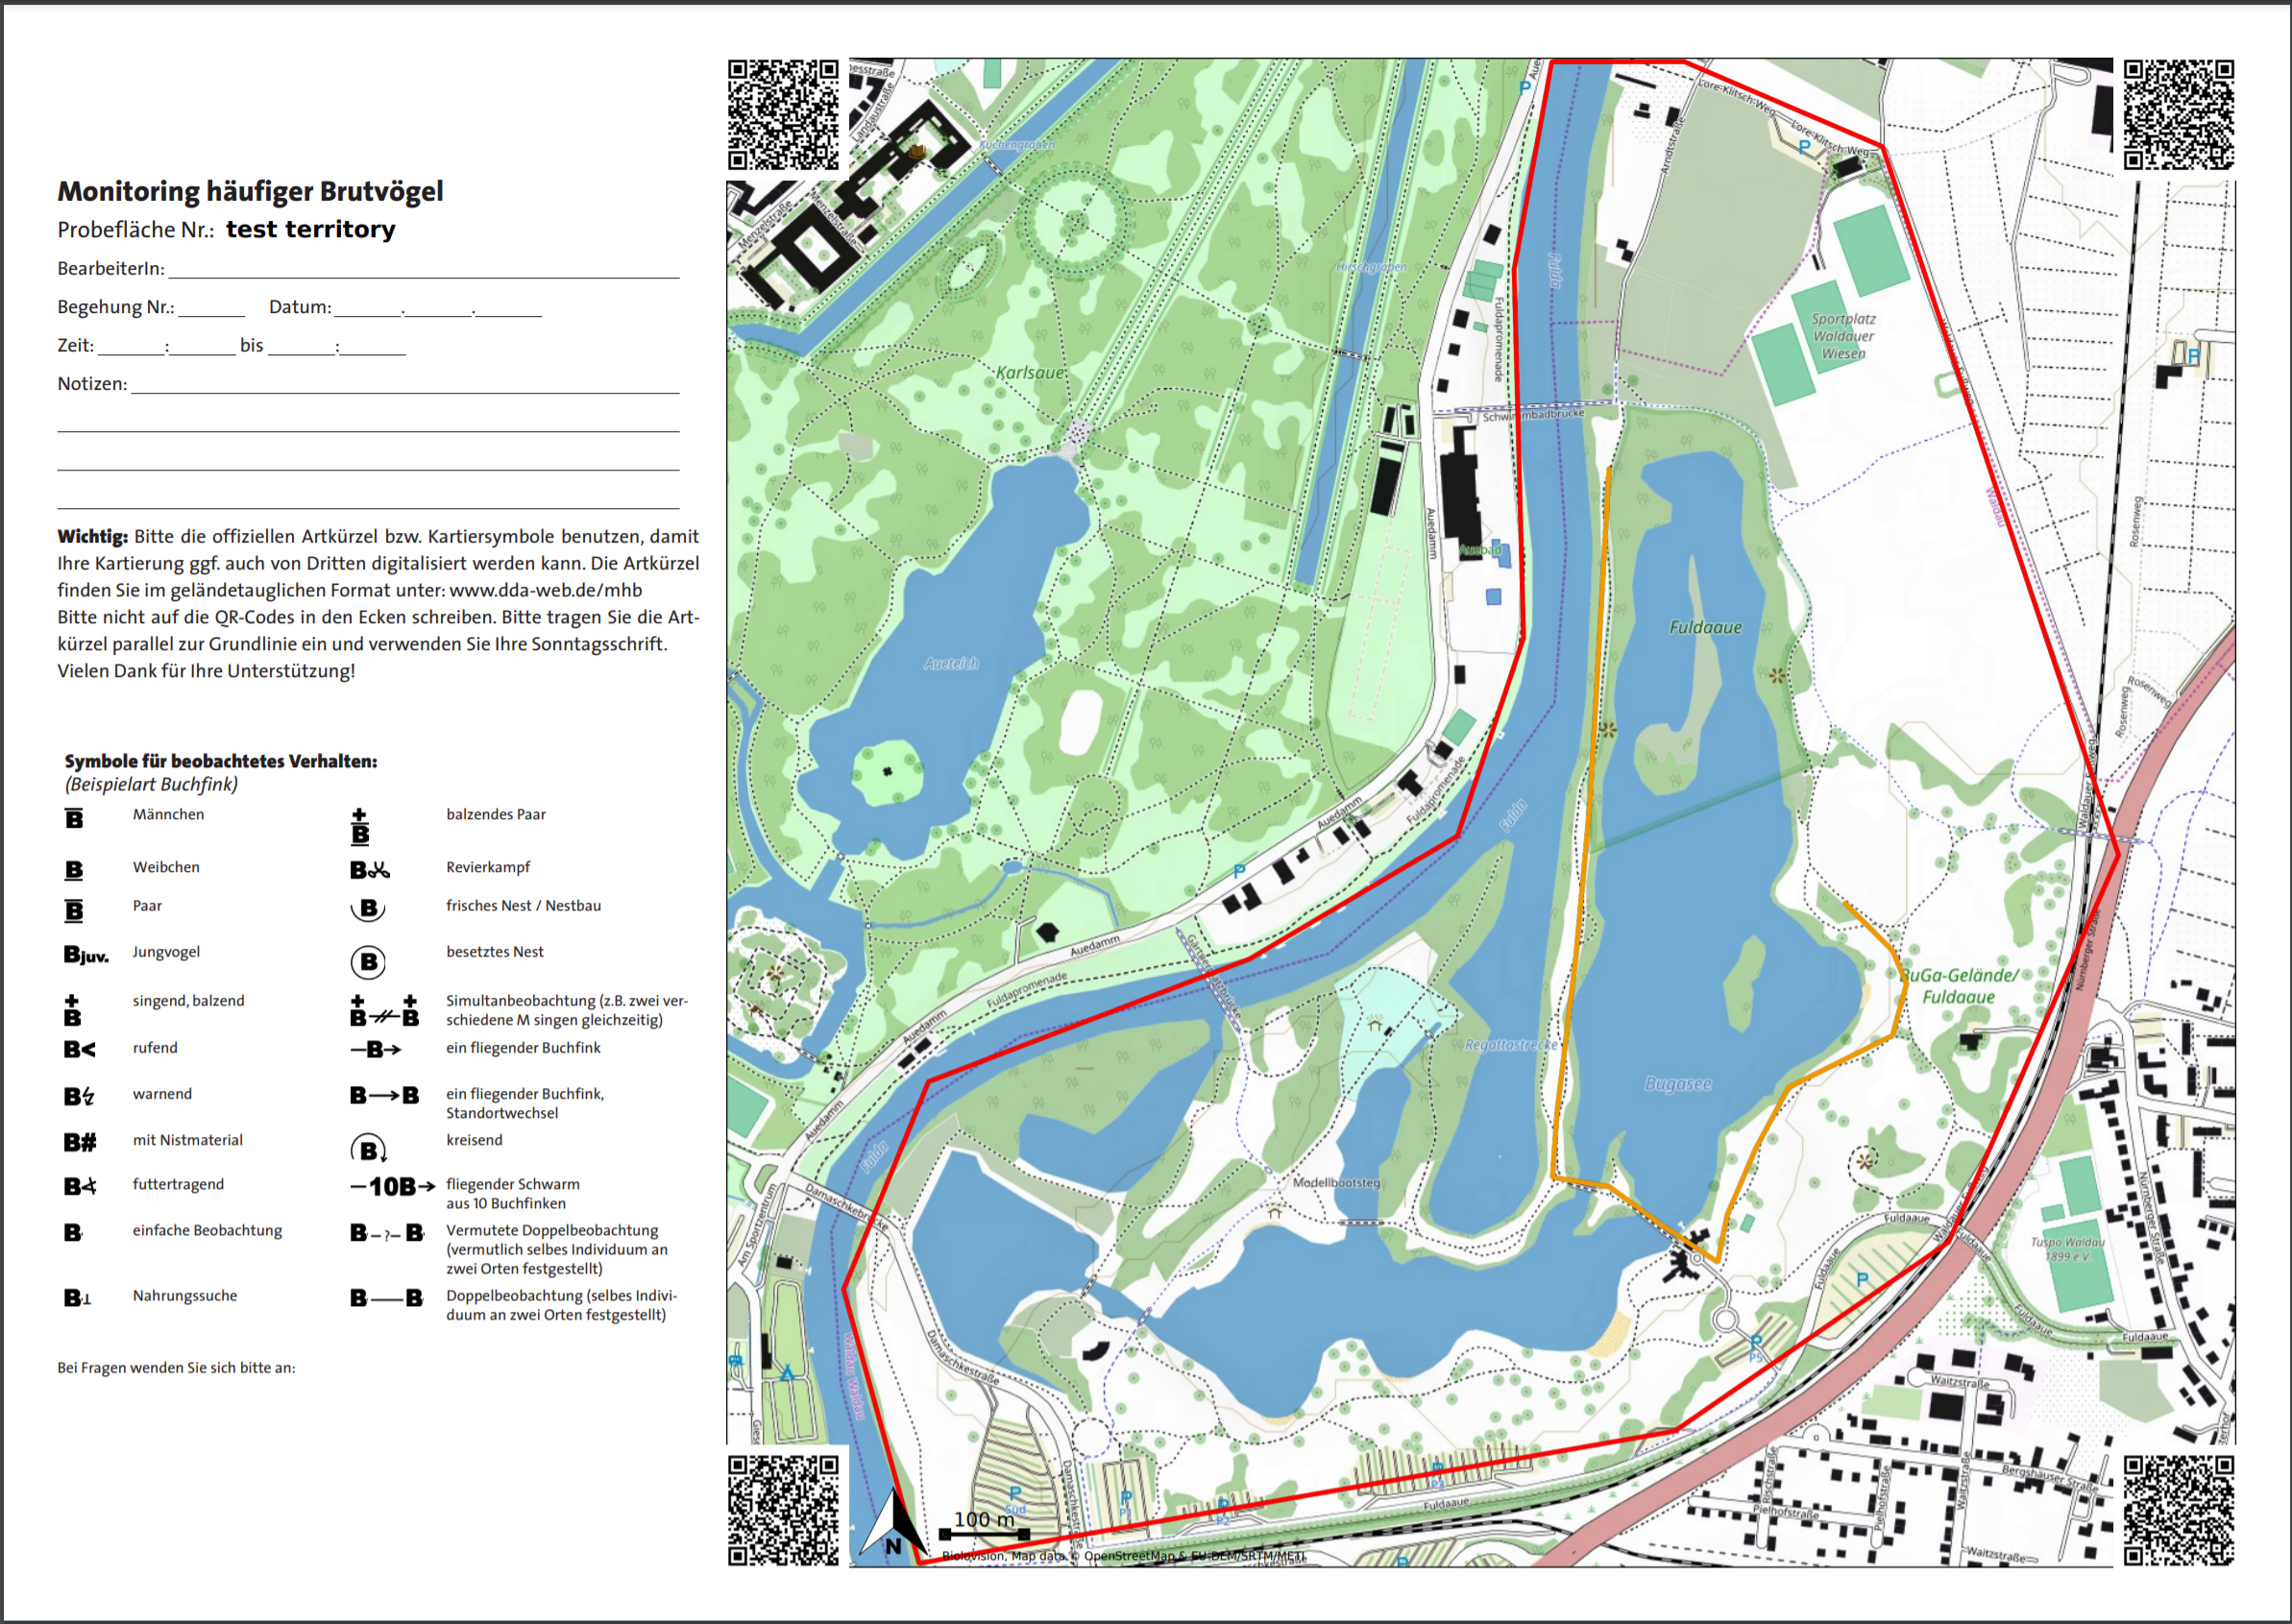 |
|||||
| Circle | RADIUS | Integer | 0 | Attach concentric cercles at RADIUS distance. | 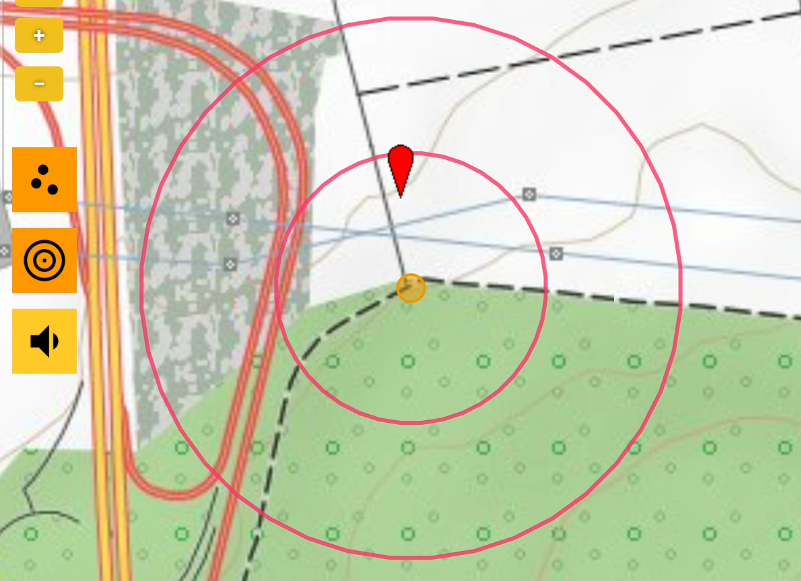 |
|||||
| Number of circles | RADIUS_CNT | Integer | 0 | Attach RADIUS_CNT (number) circles at RADIUS distance. | ||||||
| Warning out of circle | RADIUS_ALERT | Boolean | 1 | Show message when a record is placed outside the outermost circle. | ||||||
| SHOW_ESTIMATION | Boolean | 1 | Attach count precision options. If absent, count is precise. |  |
||||||
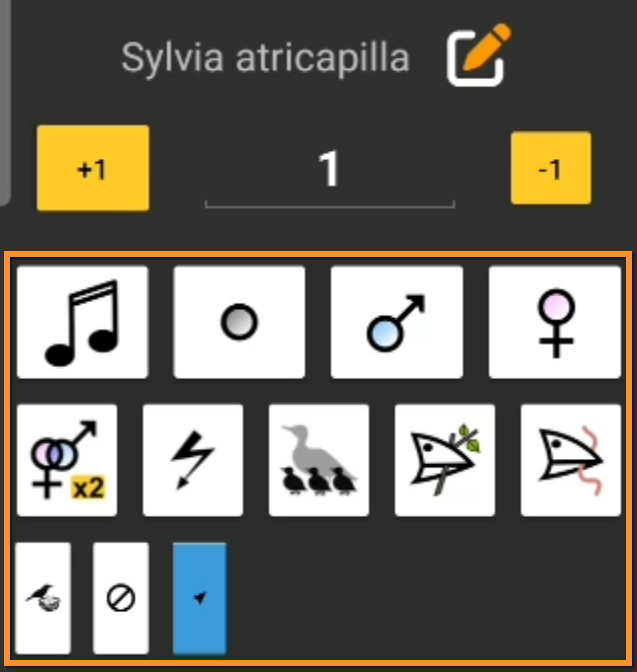
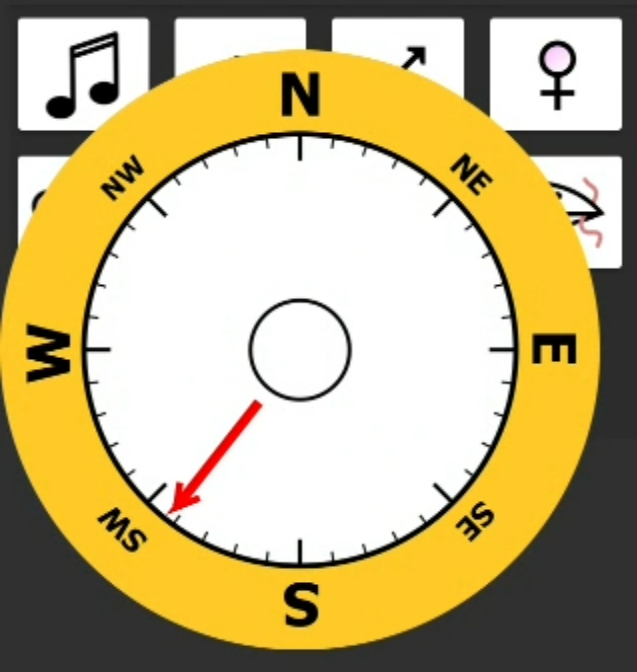
| Pre-defined keys | BUTTONS | json | - | Json file to attach buttons with age/sex information, atlas code and flight direction3 for entering data. |
|
|||||
| Use sum | USE_SUM | Boolean | 1 | Attach a button to add individuals without precise location. Only available for polygons and transects. |  |
|||||
| Automatic "non-precise" line | AUTOMATIC_UNPRECISE _SUM_SPECIES |
Boolean | 0 | To automatically add blank, non-precise "sum" lines for each species in a list. Only available for web interface. | ||||||
| Minimum number of points | NBRE_POINTS_MIN | Integer | 0 | Minimum number of points allowed on a protocol with point geometry. | ||||||
| Maximum number of points | NBRE_POINTS_MAX | Integer | 0 | Maximum number of points allowed on a protocols with point geometry. | ||||||
| Time at point | TIME_POINT | Integer (minute) | - | Define a time in minutes to restrict count at this point (NULL otherwise). Attaches a visual timer on protocols with restricted time. The phone vibrates when the time is over. |  |
|||||
| Taxa at point | TAXO_POINT | Integer | 1 (birds) | Taxonomic group to count at points. | ||||||
| Secondary taxa at point | ADDITIONAL_TAXO_POINT | Integer | - | Secondary taxonomic group to count at points. | ||||||
| Minimum number of transects | NBRE_TRANSECTS_MIN | Integer | 0 | Minimum number of transects allowed on a protocol with transect geometry. | ||||||
| Maximum number of transects | NBRE_TRANSECTS_MAX | Integer | 0 | Maximum number of transects allowed on a protocols with transect geometry. | ||||||
| Time at transect | TIME_TRANSECT | Integer (minute) | - | Define a time in minutes to restrict count at this transect (NULL otherwise). Attaches a visual timer on protocols with restricted time. The phone vibrates when the time is over. | ||||||
| Taxa at transect | TAXO_TRANSECT | Integer | 1 (birds) | Taxonomic group to count at transects. | ||||||
| Secondary taxa at transect | ADDITIONAL_TAXO_TRANSECT | Integer | - | Secondary taxonomic group to count at transects. | ||||||
| Minimum number of polygons | NBRE_POLYGONES_MIN | Integer | 0 | Minimum number of polygons allowed on a protocol with polygon geometry. | ||||||
| Maximum number of polygons | NBRE_POLYGONES_MAX | Integer | 0 | Maximum number of polygons allowed on a protocols with polygon geometry. | ||||||
| Time at polygon | TIME_POLYGONE | Integer (minute) | - | Define a time in minutes to restrict count at this polygon (NULL otherwise). Attaches a visual timer on protocols with restricted time. The phone vibrates when the time is over. | ||||||
| Taxa at polygon | TAXO_POLY | Integer | 1 (birds) | Taxonomic group to count at polygon. | ||||||
| Secondary taxa at polygon | ADDITIONAL_TAXO_POLY | Integer | - | Secondary taxonomic group to count at polygons. | ||||||
| Number of external limits | NBRE_BOUNDING_BOX_MAX | Integer | - | Defines number maximum of polygons the user can define (ie. one for birds on ground, one for flying birds). Only available in web interface. | ||||||
| Precise point | USE_PRECISE_POINTING | Boolean | 1 | Authorises precise position of observation. To use on web interface (mobile is always precise). | ||||||
| Number of surveys | NBRE_PASSAGE | Integer | - | Number of surveys during the defined period. It does not allow data after the defined number. | ||||||
| Project code | PROJECT_ID | Integer | - | Allows entering a project related to a protocol. By default PROJECT_ID is pre-selected. | ||||||
| Automatic mask | AUTO_HIDDEN | Boolean | - | Data belonging to a protocol are hidden automatically. | ||||||
| Boundary layer | OVERLAY_LAYER | Chain of characters (15) | - | Automatically retrieve underlaying perimeter when surface is predetermined. | ||||||
| Grid size | OVERLAY_GRID_SIZE | Integer | - | Automatically attach a grid on the map. | ||||||
| Detail can be provided | REQUIRE_DETAIL | Boolean | 1 | Make entering age and sex compulsory. | ||||||
| Set only by admin | ONLY_ADMIN_CREATE | Boolean | 0 | When active, only administrators can create a perimeter. | ||||||
| Right to create site | CREATE_ACCESS | ('basic', 'only_admin_create', 'need_validation') | 'basic' | Moe to create a new survey (everybody, only admins, everybody with authorisation, respectively). | ||||||
| Management of species list | DAILY_LIST_SPECIES | Boolean | 0 | When active, an admin can create a pre-defined list for a protocol. | ||||||
| Save button | SAVE_BUTTON_TYPE | ('partial_full', 'partial', 'full') | 'partial_full' | Attach button to indicate at the end of the list if it was complete or partial (attach both options, only partial, only full, respectivelly). |  |
|||||
| Simultaneous entry of multiple sites | SIMULTANEOUS_FORM | Boolean | 0 | Allows counting at two sites at the same time (ie. One site at each side of the road). Only available for polygons. | 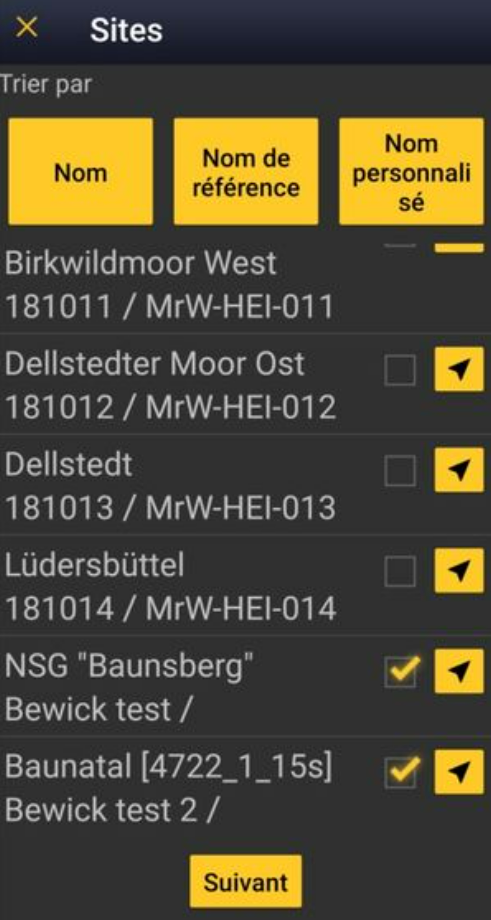 |
|||||
| DAILY_LIST_SPECIES_FILTER | Boolean | 0 | ||||||||
| Enable extended list | EXTENDED_SPECIES_LIST | Boolean | 0 | When active, provides at the end of the list two different pre-determined lists, the second one more extended. The user can choose according to available time. | 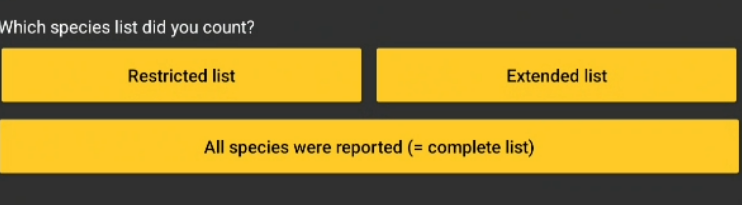 |
|||||
| Species list limitation | FIXED_SPECIES_LIST | Boolean | 0 | When active, a list of species is provided and user must choose species within the list. | ||||||
| Starting month | START_MONTH | Integer | 6th June | Month of first survey. | ||||||
| COLOR | Integer | Chain of characters (6) | ||||||||
| Default reproduction index | DEFAULT_ATLAS_CODE | Integer | 0 | To enter an atlas code automatically when entering a value. | ||||||
| Advanced mode | USE_ADVANCED | Boolean | 0 | To active "two input modes": one basic and one advanced. | ||||||
| Habitat input | HABITAT | ('none','stoc') | 'none' | For STOC protocols, an additional form is required. Only available at web interface. | ||||||
| Input method | FORM_USED | ('unique_detail','detail','distance','calling','section') | 'detail' | To define input interface (to develop further). | ||||||
| Read only | READ_ONLY | Boolean | 1 | To disable data entry. Ie. at the end of a survey, data remains available but does not accept new entries. | ||||||
| Encourage counting | POPUP_NO_VALUE | Boolean | 0 | To avoid 'not counted' data. A message encourages user to enter a precise count, not compulsory. | ||||||
| Allow empty form | ALLOW_EMPTY_FORM | Boolean | 1 | To allow registering empty list. Allows registering negative prospections. | ||||||
| Tablet interface | TWO_PANEL_MAP | Boolean | 0 | To activate tablet mode: horizontal view with form on the right and map on the left. Phone mode available sliding form onto the map. | ||||||
| Without web interface | NO_WEB_INTERFACE | Boolean | 0 | To deactivate data input through web interface. Only allows data through mobile. | ||||||
| Import suffix | ADD_IMPORT_SUFFIX | Boolean | 0 | When active, to add protocol suffix to name site. | ||||||
| Save at each stage | SAVE_LOOP | Boolean | 0 | To save at each entry to avoid data loss when ie. the protocol is long and/or complex. Only available in web interface. | ||||||
| Conflict with colony mode | CONFLICTING_WITH_COLONY | Boolean | 0 | To deactivate Colony mode, and avoid doble input when the protocol concern the same colonies. | ||||||
| Regular vibration | TIME_NOTIFICATION | integer | 0 | To indicate time. If greater than zero, phone vibrates regularly at TIME_NOTIFICATION minutes. | ||||||
| FILTER_ID_SPECIES | ||||||||||
| FILTER_STRICT | Boolean | 0 | ||||||||
| Default count | DEFAULT_COUNT | (", 'x', '1') | " | Number displayed by default in the input mask. Nothing, not counted or 1. | ||||||
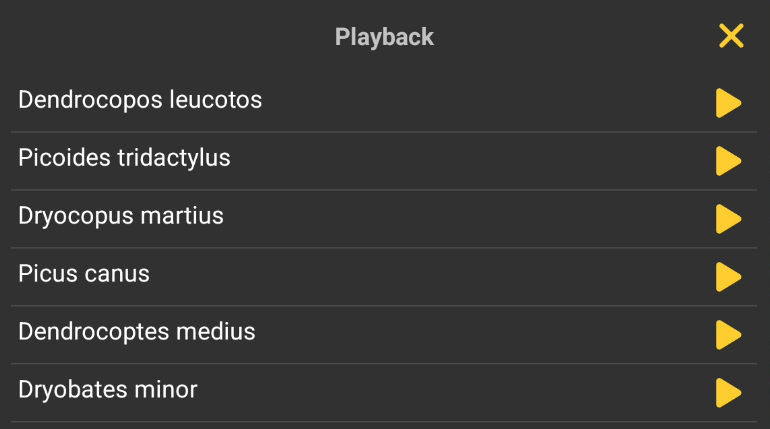
| Playback | USE_PLAYBACK | Boolean | 9 | To allow playback. Requires uploading files for each species at admin interface. |
|
|||||
| Shortcut list | USE_SHORTCUT | Boolean | 0 | To include a list of pre-determined shortcuts. | 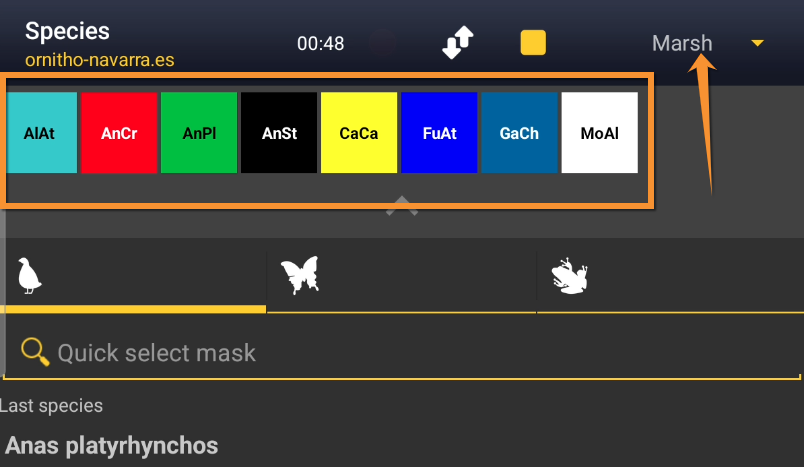 |
|||||
| Visible in participation interface | TAKE_PART_LISTING | Boolean | 0 | The protocol is active in the promotion interface. Volunteers can register. | ||||||
| Extended details | SHOW_EXTENDED_DETAILS | Boolean | 0 | To add additional details. | ||||||
| Additional geometry | NBRE_EXTRA_GEOMETRY_MAX | Integer | 0 | To authorise the attachment of additional geometries (ie. starting point). If greater than zero, equals maximum number of authorised geometries. | ||||||
| Default time length | TIME_POINT_DEFAULT | Integer | 0 | At web interface, to define a default time length for a protocol when several surveys take place in succession (ie. a series of points). To use in combination with "recopier les infos" to retrieve information from previous count. | ||||||
| Count type | COUNT_TYPES | json | {} | To define a different interface to input data. ie.["singing", "calling", "visual"] | ||||||
|
1Click on image, if available, to enlarge. |
||||||||||
Contents
- 5 Settings
- 5.1 Species list
5.2 Parameters describing the protocol
5.3 Parameters
5.4 Files for playback
5.5 Shortcuts group
5.6 Shortcuts
5.7 Import a shapefile
- 6 Import a shapefile
7 Check Data
8 Report
9 Map
Protocols
-
· Acoustic data
· Bee-eater
· Bewick's Swan
· Birds of prey
· Black Grouse protocol
· CBBS in Protected areas
· Cirl Bunting
· CoBiMo
· Corncrake
· Grey Partridge
· Jackdaw
· Meadow birds
· MHB & BDM (Monitoring of common breeding birds Monitoring of biodiversity in Switzerland)
· MF (Monitoring of breeding birds in wetlands)
· Other territory mapping
· Point count
· Private territory mapping
· Protocoled census
· Rock Ptarmigans protocol
· Rook
· Sand Martin
· SHOC
· STOC ONF
· Single nesting species
· SOCC
· STOC EPS
· STOC Montagne
· STOC Sites
· STOC Sites RNF
· VBS (Monitoring of breeding birds on military training areas)
· Waterbird census
· Woodcock monitoring
· Woodpeckers
· Woodpecker territory
Accessing protocols
Access all protocols functions through the Protocol panel or limited functions as if Submitting records.
Visit wiki section Web interface > Local portal > Protocols > Accessing protocols > Entering data for more details for more details on the second option.
To access the protocol panel:
· Go to Main menu > Administration
If you are an administrator, go to the administration section on the left hand column (see image Administration), and scroll down to Protocol administration. Open panel and select Protocol administration (see image below).

Protocol administration.
Or,
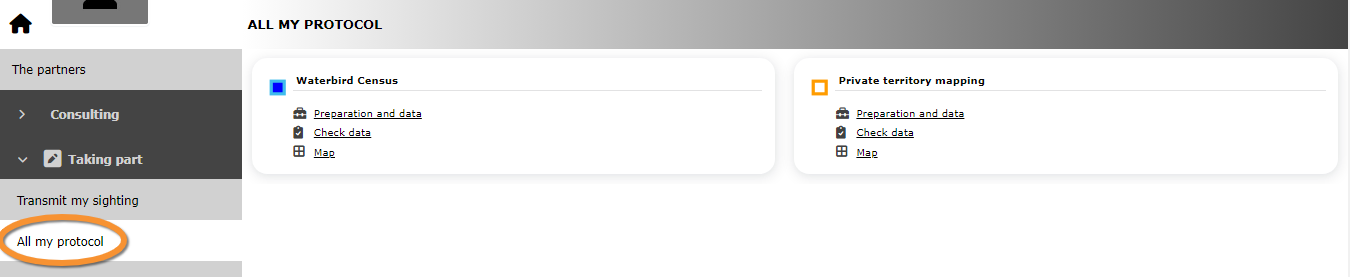
· Go to Main menu > Taking part > All my protocol
Go to Main menu > Taking part > All my protocols. You will see all protocols you have access to, either as an administrator or otherwise. Users with no administration rights can also follow this path to access protocols but they are no given all options within a protocol.

Admin protocol through All my protocol.
Administrators and users with appropriate rights may have additional ways to access certain protocol functions:
Modify protocol
Modify the protocol from
· Submitting records, as described in wiki section Web interface > Local portal > Protocols > Accessing protocols > Modify protocol.
· Protocol panel > Preparation and data, as described in Web interface > Local portal > Protocols > Accessing protocols > Modify protocol.
· Protocol panel > Sites. Only available to administrators. Go to wiki section Administration > Protocol management > Sites > Edit for details.
Create protocol
Create a new protocol from
· Submitting records, as described in wiki section Web interface > Local portal > Protocols > Accessing protocols > Create protocol.
· Protocol panel > Sites. Only available to administrators. Go to wiki section Administration > Protocol management > Sites > +NEW to see how to do it.
Access protocol panel:
- Through Menu > Take part > All my protocols.
- Through Menu > Administration > Protocol administration > Protocol administration.
Enter data:
- Through Protocol panel > Preparation and data > Add observations.
- Through Submitting records. See wiki section Web interface > Protocols > Accessing protocols > Entering data for details.
Modify protocol:
- Through Protocol panel > Preparation and data > Modify the protocol, or Protocol panel > Sites > Edit.
- Through Submitting records. See wiki section Web interface > Protocols > Accessing protocols >Modify protocol for details.
Create protocol:
- Through Protocol panel > Sites > +NEW.
- Through Submitting records. See wiki section Web interface > Protocols > Accessing protocols >Create protocol for details.
[Protocols management#Accessing protocols|[Top to Accessing protocols]]]
[#top|[Back to Protocols management]]]
Preparation and data

Protocols. Preparation and data.
Identical section to the one of Waterbird Census Protocol, we took as an example, available to registered users with rights. It allows printing maps and entering observations. See wiki section Web interface > Protocols > 'Protocol name' > Preparation and data for more information.
[Top to Preparation and data]
[Back to Protocols]
Sites
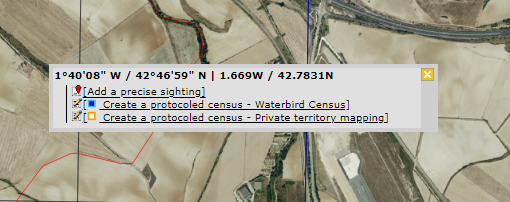
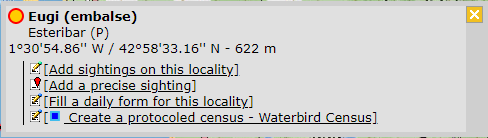
CREATE A NEW SITE:
1. Directly by Transmit my sightings map
or
through Menu > Administration > Protocol administration > 'Protocol name' > Sites > +NEW button
2. Select new site as if Submitting records
3. Choose Create a protocoled census -Name of the protocol
4. Name the new site
5. Draw geometry (polygon, dot, transect) or import shapefile
6. SAVE

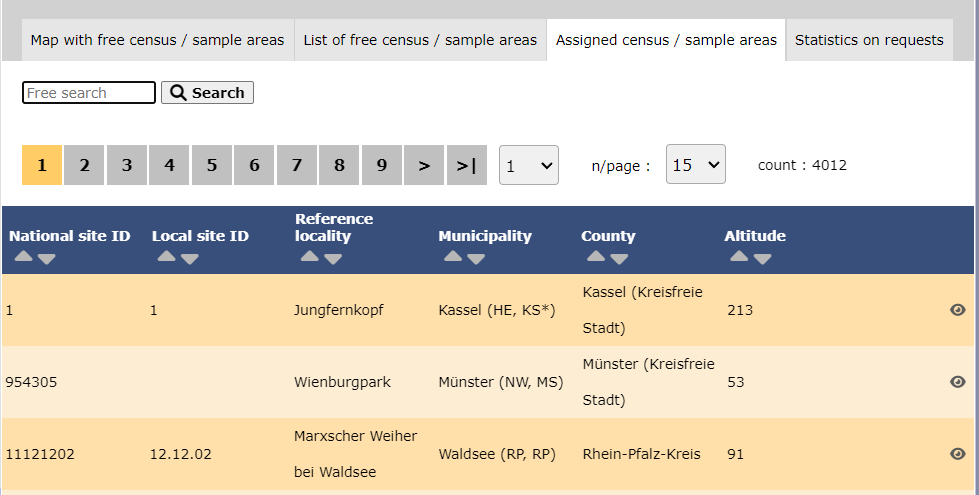
Protocols. Sites.
List of all existing sites allowing a protocoled data entry (here as an example, the Waterbird census). Use arrows under titles to alternate between ascending and descending order (see image as an example).

Protocols. Existing sites.
Reference name: Official name given to the study site. This is given by an administrator or user with special rights.
Custom name: A different name under which the same place may be also known, or a name easier for the user. This can be set by the user allowed for that site himself.
Reference locality: Name of the location all observations from the protocol will be associated to.
Municipality: Municipality the locality belongs to.
Altitude: Altitude associated to the locality.
- 1. Search
Reduce list by typing the name of a site, Locality, Municipality , or part of it, and click SEARCH.
When a filter is applied and you want to desactivate it, click on
DISPLAY ALL.
- 2. Search
Select page number and/or number of items per page.
- 3. Details
Click to see details of selected site.
- 4. Edit
Click to edit details of selected site.
- 5. New site
Create a new site.
- 1. Click + NEW under the list. Select the site as if entering an observation (see wiki section Web interface > Submitting records if necessary) and choose the new option: Create a protocoled census - 'Name of the Protocol' (here Waterbird census, see image below).
- 1. Click + NEW under the list. Select the site as if entering an observation (see wiki section Web interface > Submitting records if necessary) and choose the new option: Create a protocoled census - 'Name of the Protocol' (here Waterbird census, see image below).

Creating a new site for Waterbird census protocol.
- 2. Enter a name for the new site.
- 2. Enter a name for the new site.

Naming a new Waterbird census site.
Name of reference locality: Location under which all observations of the protocol will be associated to. It is created by the administrator when creating a new protocol site and cannot be changed afterwards.
Reference name: Type a name for the new site. It can be a real name or a code, and consist on letters, numbers or a combination of both.
Custom name: Type an additional name to the site if known. This name can be changed afterwards by the end user allocated to that site.
- 3. Either:
- · Draw polygon, transect or point as explained in wiki section Web interface > Geometry editor or,
- · Draw polygon, transect or point as explained in wiki section Web interface > Geometry editor or,
- 3. Either:
- · Import shapefile:
- · Import shapefile:

Importing a polygon shapefile.
1. Choose datum and
2. upload the file.
3. When done, click IMPORT.
- After a new polygon, transect or point is created, it is possible to export it as a shapefile to use in the future or modify. Click on the file icon under the Polygon (Point, Line or Bounding box) section (see image below, encircled). If necessary, modify it and IMPORT as explained above.
- After a new polygon, transect or point is created, it is possible to export it as a shapefile to use in the future or modify. Click on the file icon under the Polygon (Point, Line or Bounding box) section (see image below, encircled). If necessary, modify it and IMPORT as explained above.

Saving the shapefile of a newly created site.
USE THE POLYGON/TRANSECT/POINT/BOUNDING BOX FOR:
· draw or edit the site polygon on the map,
· import a polygon from a shapefile instead of drawing it manually,
· export the created polygon as a shapefile for later reuse or modification, and/or
· delete the polygon/site if needed (as long as no data are linked to it).
- 4. When the new site is ready you have three options:
- SAVE AND STAY to save the site and continue making changes, or
- SAVE AND ADD A RECORD to save and start entering observations or
- DELETE SITE if needed. Note: That option is only available as long no data are linked to that site.
- SAVE AND STAY to save the site and continue making changes, or
- 4. When the new site is ready you have three options:
- The new site is now created and saved (indicated at the top of the page). You have now the option to delete the newly created site if necessary (see image Deleting a newly created site). Otherwise, go anywhere in the page or start the whole process to create other sites without loosing the new one.
- The new site is now created and saved (indicated at the top of the page). You have now the option to delete the newly created site if necessary (see image Deleting a newly created site). Otherwise, go anywhere in the page or start the whole process to create other sites without loosing the new one.
- 6. Export sites
Click DOWNLOAD to export:
· a .txt file with the full list of existing sites, or
· a shapefile with geometry for all existing sites.
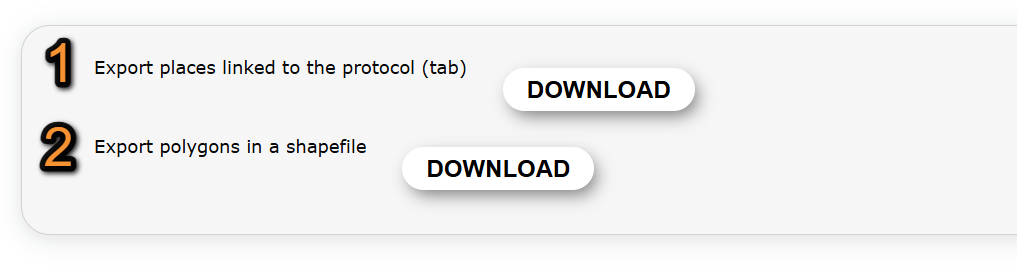
Export sites.
1. Download a list of existing files.
2. Download geometry of existing files.
[Top to Sites]
[Back to Protocols]
User/Site

Protocols. User/Site.
From the "Name of the protocol (for example Waterbird Census Protocol)" menu, select User / Site to assign users to study sites.
Access to sites
List of observers allowed to conduct "Name of the protocol (for example Waterbird Census Protocol)" and the site/s they are assigned to. Use arrows on columns to alternate between ascending and descending order (see image as an example).
To allow a user to conduct a protocoled census, visit wiki section Administration > Users administration > Admin users > Observers.

- 1. Search
Reduce list by typing the name of a site, user, or part of it, and click SEARCH.
When a filter is applied and you want to deactivate it, click on DISPLAY ALL to see the full list.
- 2. Page and items
Select page number and/or number of items per page. Count indicate the total of items found for the search.

Detail for choosing page, item/page
- 3. Details
See details of observers and their assigned site.

Protocols. User/site Details.
User name: Observer name, email address and local site user number.
Reference name: Name of site the observer has right to survey for the "Name of the protocol (here Waterbird Census Protocol)" .
Custom name: Additional name under which the site is also known.
8. BACK: Go back to main list.
4. EDIT: See Edit subsection below.
5. DELETE: Revoque observer's right to survey this site for the "Name of the protocol (here Waterbird Census Protocol)" .
- 4. Edit
Modify the user assigned to this site, or the site assigned to this user.

Protocols. Editing User/site.
10. Modify observer assigned to this site. Start typing the name of the new observer (a) and choose from the expandable panel (b).
11. Modify site assigned to the observer. Start typing the name of the new site (a) and choose from the expandable panel (b).
8. BACK: Go to previous screen without saving changes.
9. MODIFY: Save changes.
- 5. Delete
Revoque the user's right to survey this site for the "Name of the protocol (here Waterbird Census Protocol)" .
- 6. EXPORT
Export list as a .txt file.
- 7. + NEW
Grant rights to observer to conduct "Name of the protocol (here Waterbird Census Protocol)" census on designated sites.

Protocols. Adding new user to site.
10. Select observer to grant access to a certain site. Start typing the name of the new observer (a) and choose from the expandable panel (b).
11. Select site to be assigned to the observer. Start typing the name of the new site (a) and choose from the expandable panel (b).
8. BACK: Go to previous screen without saving changes.
12. ADD: Save new addition.
Administration users rights (Protocols)
List of users and administrators with access to the "Name of the protocol (here Waterbird Census Protocol)" . Use arrows on columns to alternate between ascending and descending order (see image as an example).

Users and administrators of protocol (in this example, Waterbird census protocol).
- 1. Search
Reduce list by typing the name of a right, a user, or part of it, and click SEARCH.
When a filter is applied, to deactivate it, click on DISPLAY ALL.
- 2. Search
Select page number and/or number of items per page.
- 3. Details
See the rights granted to the selected observer.

Protocols. Rights details.
Number: This is for Biolovision's internal use.
User name: Name, e-mail and local site user number of the user receiving the right.
Right granted: Right the selected user is granted to.
8. BACK: Go back to main list.
4. EDIT: See Edit subsection below.
5. DELETE: Revoque observer's right to survey this site for the "Name of the protocol (here Waterbird Census Protocol)" .
- 4. Edit
Modify the rights granted to an observer.

Protocols. Editing rights.
10. Modify observer assigned to this right. Start typing the name of the new observer (a) and choose from the expandable panel (b).
11. Modify rights assigned to the observer. Start typing the name of the new right (a) and choose from the expandable panel (b).
8. BACK: Go to previous screen without saving changes.
9. MODIFY: Save changes.
- 5. Delete
Revoque the user's right to survey this site for the "Name of the protocol (here Waterbird Census Protocol)" .
- 6. + NEW
Add a new right to an observer.

Protocols. Adding new right.
10. Select observer to grant a right. Start typing the name of the new observer (a) and choose from the expandable panel (b).
11. Select right to be assigned to the observer. Start typing the name of the new right (a) and choose from the expandable panel (b).
8. BACK: Go to previous screen without saving changes.
12. ADD: Save new addition.
- 7. Protocol administrators
List of administrators of "Name of the protocol (here Waterbird Census Protocol)" and their email addresses.
[Top to User/Sites]
[Back to Protocols]
Settings

Protocols. Settings.
Set protocol parameters.
Species list
Parametring a species list helps users to report all species of the protocol without forgetting any. It is faster for the user to enter records in the field because they only have to fill the number of individuals for mandatory species.
Please take time as an administrator to fill this section before the fieldwork season starts.
An extended list is useful if you want to add interesting but not mandatory species to a report.
List of species designated as part of a basic or an extended list. If no species are designated as part of any list, the section appears empty but users are still asked to indicate which list they are using. Use arrows under titles to alternate between ascending and descending order (see image as an example).

Protocols. Species list.
Species: list of species selected to survey.
Extended species list?: species belonging to an extended species list.
Order: order of appearance.
See Ending the list in NaturaList to know the difference between a basic, an extended and a complete list.
- 1. Search
Reduce list by typing the name of a species, or part of it, and click SEARCH.
When a filter is applied, to deactivate it, click on DISPLAY ALL to see the full list.
- 2. Page and items
Select page number and/or number of items per page. Count indicate the total of items found for the search.
Detail for choosing page, item/page
- 3. Details
See name of species, their assigned order in the list and to which type of list they belong.

Protocols. Details of Species list.
Species: species selected for details display or editing.
Extended species list?: Yes: species belong to extended species list / No: species belong to basic list.
See Ending the list to know the difference between a basic, an extended and a complete list.
Order: order of appearance.
7. BACK: Go to previous screen.
4. EDIT: See edit subsection below.
5. DELETE: Delete species from the list.
- 4. Edit
Modify details for the selected species.

Protocols. Editing species lists.
10. Species: Modify, if necessary, the name of the species (10a) and select from the expandable menu (10b).
11. Extended species list?: Choose if the species will be part of an extended list (YES) or a basic list (NO).
12. Order: Type the order in which the selected species will appear in the list.
13. BACK: Go back to previous screen without saving.
14. MODIFY: Save changes.
- 5. Delete
Delete the species from the list.
- 6. NEW
Add a new species to the list.

Protocols. Adding a new species to the list.
10. Species: Start typing the name, or part of the name, of the species (10a) and select from the expandable menu (10b).
11. Extended species list?: Choose if the species will be part of an extended list (YES) or a basic list (NO).
12. Order: Type the order in which the selected species will appear in the list.
13. BACK: Go back to previous screen without saving.
15. ADD: Add the list species to the list.
NOTE:
Even when no species are designated as a basic or an extended list (this section remains empty), users are still asked to indicate which list they follow.
We recommend to define these lists to avoid confusion and misunderstandings among users.
[Top to Settings]
[Back to Protocols]
Parameters describing the protocol
List of all parameters describing the protocol and their current status.
Use arrows under titles to alternate between ascending and descending order (see image as an example).

Protocol parameters. Settings.
- 1. Search
Select page number and/or number of items per page.
- 2. Active?
Indicates if the user will be asked to provide information about the corresponding parameter. The question will appear when filling the protocol but is not blocking if the user leave it empty.
- 3. Mandatory?
Indicates if it will be mandatory to provide information regarding this parameter. The question will appear when filling the protocol and have to be answered before going to the next step, a warning asking to fill it appears if not answered.
- 4. Order
Order in which the different parameters will appear at the beginning of the protocol.
- 5. Details
See details associated to the selected parameter.

Waterbird census protocol. Parameters display.
BACK: Go to previous screen.
EDIT: Edit. See corresponding subsection below.
- 6. Edit
Modify settings for the selected parameter.

Waterbirds census protocol. Editing parameter settings.
8. Select if the user will be asked to provide information about the corresponding parameter.
9. Select if it will be manatory to provide information regarding this parameter.
10. Type the order in which the parameter will appear at the beginning of the protocol.
BACK: Go back to the previous screen without saving changes.
MODIFY: Save changes to the parameter.
7. Parameters
Parameters are protocol dependent. Please refer to each individual protocol for details on each parameter.
Expand the table below to see all possible parameters and the protocols they appear at. Use arrows to alternate between ascending and descending order.
| Parameters | ||||||||||
|---|---|---|---|---|---|---|---|---|---|---|
| Parameter name | Description | Protocol | ||||||||
| Acoustic number | To indicate the acoustic number. | Acoustic data | ||||||||
| Acoustic number detail | To indicate what the acoustic number provided refers to. | Acoustic data | ||||||||
| Activity of the individual | To indicate the activity of the individual. | Acoustic data | ||||||||
| Additional observer(s) | To indicate if the user is accompanied by someone whose observations are also recorded. | Various: Waterbird census, Woodpeckers, Rook, Sand Martin, Corncrake, Jackdaw, Grey Partridge, Bee eater, CBBS, Woodpecker territory, SNSP, Cirl Bunting, CoBiMo, Birds of prey, Meadow birds |
||||||||
| Appearance of udders | To indicate the appearance of udders. | Biometric data | ||||||||
| Calcar | To enter information about the calcar. | Biometric data | ||||||||
| Capture method | To indicate how the animal was caught. | Biometric data | ||||||||
| Census not done | STOC EPS | |||||||||
| Chin pad (Plecotus) | To indicate the hair colour. | Biometric data | ||||||||
| Cloud cover | To indicate if there are clouds. | Various: SOCC, Waterbird census, STOC EPS, STOC Sites, STOC Montagne, STOC ONF, STOC Sites RNF, SHOC, SHOC Sites RNF |
||||||||
| Cm3 (mm) | To indicate the length of cm3. | Biometric data | ||||||||
| Color of oral glands | To indicate the colour of oral glands. | Biometric data | ||||||||
| Comment | To leave a comment. | All | ||||||||
| Conditions in general | To indicate about surveying conditions overall regarding weather and disturbances. The user may be asked to indicate on next section the reason if surveying conditions are not good. | Various: Waterbird census, Woodpeckers, Rook, Sand Martin, Corncrake, Jackdaw, Grey Partridge, Bee eater, Woodpecker territory, SNSP, Cirl Bunting, CoBiMo, Birds of prey, Meadow birds |
||||||||
| Conditions (notes) | To leave a note regarding conditions. | Various: Woodpeckers, Sand Martin, Corncrake, Jackdaw, Grey Partridge, Bee eater, CBBS, Woodpecker territory, SNSP, Cirl Bunting, CoBiMo, Birds of prey, Meadow birds |
||||||||
| Count method | To indicate if the survey takes place from the ground, the air, the water, a different way, or if it is unknown. | Waterbird census | ||||||||
| Count number | To indicate from the expandable menu the visit the data corresponds to. | Various: | ||||||||
| Count paid | To indicate if the count is paid for or not. | Waterbird census | ||||||||
| Count type | To indicate if it is a roost count or otherwise. | Various: Waterbird census, Rook, Sand Martin, Bee eater |
||||||||
| Counting mammals? | To indicate if besides the compulsory taxonomic group, mammals were also counted. | SOCC | ||||||||
| Coverage | To indicate how much of the designated survey area is covered in the survey. | Various: Waterbird census, Woodpeckers, Rook, Sand Martin, Corncrake, Grey Partridge, Bee eater, Woodpecker territory, SNSP, Cirl Bunting, Birds of prey |
||||||||
| Coverage (notes) | To add any comment about coverage. | Various: Bee eater, Woodpecker territory, SNSP, Cirl Bunting, Birds of prey |
||||||||
| Determination methods | To indicate the determination method used. | Acoustic data | ||||||||
| Drone used? | To indicate if drones were used during the survey. | Various: Rook, Sand Martin, Bee eater, SNSP, Birds of prey |
||||||||
| Ear | To enter information about the ear. | Biometric data | ||||||||
| Ear width (mm) | To indicate the width of the ear. | Biometric data | ||||||||
| Foot | To enter information about the foot. | Biometric data | ||||||||
| Foot hair (Plecotus) | To indicate the presence of hairs on the foot. | Biometric data | ||||||||
| Forearm (mm) | To indicate the length of the forearm. | Biometric data | ||||||||
| Fused wing cells (Pipistrellus) | To merge the information from wing cells. | Biometric data | ||||||||
| Habitat | STOC EPS, STOC Sites, STOC Montagne, STOC ONF, STOC Sites RNF, SHOC, SHOC Sites RNF, SHOC Sites | |||||||||
| Hair color | To indicate the hair colour. | Biometric data | ||||||||
| Hide all records from the public | To check if the user wants to keep their observations private. | All | ||||||||
| Ice | To indicate the percentage of water surface that is frozen. | Waterbird census | ||||||||
| Important changes (since last count?) | To indicate if there have been major changes since the last visit. | Various: Waterbird census, Woodpeckers, Rook, Sand Martin, Corncrake, Jackdaw, Grey Partridge, Bee eater, Woodpecker territory, SNSP, Cirl Bunting, CoBiMo, Birds of prey, Meadow birds |
||||||||
| Intact nests | Number of intact nests. This information will be asked when entering data. |
Various: Rook, Sand Martin, Bee eater |
||||||||
| Means of transport | STOC EPS, STOC Sites, STOC ONF, STOC Sites RNF | |||||||||
| Moving/Harvest | To indicate the surface that has been harvested or mown. | Corncrake, Meadow birds | ||||||||
| Nasal leaf length | To indicate the length of the nasal leaf. | Biometric data | ||||||||
| Nest location | To select the location of the nest. | Jackdaw | ||||||||
| Net / harp-trap detail | To add details on certain types of traps: Nets and harp-traps. | Biometric data | ||||||||
| Neutralised time | SOCC | |||||||||
| No species were seen | To check if the user did not detect any of the study species. | Waterbird census | ||||||||
| Number of canoes/kayaks | To enter number. | Waterbird census | ||||||||
| Number of fishing boats | To enter number. | Waterbird census | ||||||||
| Number of fishing boats | To enter number. | Waterbird census | ||||||||
| Number of motor boats | To enter number. | Waterbird census | ||||||||
| Number of nests occupied by other species | Number of nests occupied by species other than the ones counted in the current protocol. This information will be asked when entering data. |
Various: Rook, Sand Martin, Bee eater |
||||||||
| Number of persons on shore | To enter number. | Waterbird census | ||||||||
| Number of rowing boats | To enter number. | Waterbird census | ||||||||
| Number of sailing boats | To enter number. | Waterbird census | ||||||||
| Number of sports divers | To enter number. | Waterbird census | ||||||||
| Number of stand up paddlers | To enter number. | Waterbird census | ||||||||
| Number of surfers | To enter number. | Waterbird census | ||||||||
| Occupied nests | Number of occupied nests. This information will be asked when entering data. |
Various: Rook, Sand Martin, Jackdaw, Bee eater |
||||||||
| Optical equipment | To indicate which equipment is used for the survey. Only one option is possible. | Various: Waterbird census, Rook, Sand Martin, Grey Partridge, Bee eater |
||||||||
| Ossification level of the epiphyses at the joint of the phalanges | To indicate the level of ossification of the epiphyses at the joint of the phalanges. | Biometric data | ||||||||
| Playback | To check the species names for which playback will be played during the survey. | Woodpeckers | ||||||||
| Potential breeding pairs | To enter the number of breeding pairs. This information will be asked when entering data. |
Jackdaw | ||||||||
| Rain | To indicate if there are any rain. | Various SOCC, STOC EPS, STOC Sites, STOC Montagne, STOC ONF, STOC Sites RNF, SHOC, SHOC Sites RNF |
||||||||
| Reason(s) for moderate / bad conditions | To choose the reason for bad surveying conditions. Only one option is possible. | Various: Waterbird census, Rook, Sand Martin, Bee eater |
||||||||
| Size of the epididymis | To indicate the size of the epididymis. | Biometric data | ||||||||
| Size of oral glands. | To indicate the size of the oral glands. | Biometric data | ||||||||
| Social vocalisation type | To indicate the type of vocalisation. | Acoustic data | ||||||||
| Snow | Various: Waterbird census, STOC EPS, STOC Sites, STOC Montagne, STOC ONF, STOC Sites RNF, SHOC, SHOC Sites RNF |
|||||||||
| Snow/Snow coverage | To indicate the proportion of snow cover. | Various: Waterbird census, STOC EPS |
||||||||
| Sound played | The user should indicate if they used playback to detect the species. | Grey Partridge | ||||||||
| Suspected nests | Number of suspected nests. This information will be asked when entering data. |
Various: Rook, Sand Martin, Bee eater |
||||||||
| Tail | To enter information about the tail. | Biometric data | ||||||||
| Temperature | To indicate approximate temperature. | SOCC | ||||||||
| Temporary shallow water bodies | To indicate the frequency of water bodies. | Corncrake, Meadow birds | ||||||||
| Testicles size | To indicate the size of the testicles. | Biometric data | ||||||||
| Thumb | To enter information about the thumb. | Biometric data | ||||||||
| Tibia | To enter information about the tibia. | Biometric data | ||||||||
| Tragus | To enter information about the tragus. | Biometric data | ||||||||
| Tragus width (mm) | To indicate the width of the tragus. | Biometric data | ||||||||
| Vaginal tunic color | To indicate the colour of the vaginal tunic. | Biometric data | ||||||||
| Visibility | To indicate the approximate distance within which it is possible to identify species, or an overall description. | Various: SOCC, Waterbird census, STOC EPS, STOC Sites, STOC Montagne, STOC ONF, STOC Sites RNF, SHOC, SHOC Sites RNF |
||||||||
| Water level | To indicate the water level. | Various: Waterbird census, Rook, Sand Martin, Bee eater |
||||||||
| Waves | to indicate how the waves are. | Waterbird census | ||||||||
| Weight (g) | To indicate the weight of the animal. | Biometric data | ||||||||
| Wind | To indicate if there is any wind. | Various: SOCC, STOC EPS, STOC Sites, STOC Montagne, STOC ONF, STOC Sites RNF, SHOC, SHOC Sites RNF |
||||||||
| 1P3D | To enter information about 1P3D. | Biometric data | ||||||||
| 1P4D | To enter information about 1P4D. | Biometric data | ||||||||
| 1P5D | To enter information about 1P5D. | Biometric data | ||||||||
| 2nd finger | To enter information about the second finger. | Biometric data | ||||||||
| 2nd metacarpus | To enter information about the second metacarpus. | Biometric data | ||||||||
| 2P3D | To enter information about 2P3D. | Biometric data | ||||||||
| 2P4D | To enter information about 2P4D. | Biometric data | ||||||||
| 2P5D | To enter information about 2P5D. | Biometric data | ||||||||
| 3rd finger | To enter information about the third finger. | Biometric data | ||||||||
| 3rd metacarpus | To enter information about the third metacarpus. | Biometric data | ||||||||
| 4th finger | To enter information about the fourth finger. | Biometric data | ||||||||
| 4th metacarpus | To enter information about the fourth metacarpus. | Biometric data | ||||||||
| 5th finger | To enter information about the fifth finger. | Biometric data | ||||||||
| 5th metacarpus | To enter information about the fifth metacarpus. | Biometric data | ||||||||
Besides the optional parameters, a user may be asked:
- Comments
An optional comments field will appear in the Choosing date section and may be accompanied by other options depending on the protocol:
· Comment: a comment referring to a general observation,
· Additional observer: to name other observer/s participating in the census,
· Important changes: to note important changes from previous visits, like noise, pollution or construction work,
· Impacts: to record any impact taking place during the survey,
· Incidents: to report any incident that may have happened during the count.

Protocols. Example of Comment section.
- Hide all records from the public
The user will have the option of keeping records private by checking the appropriate cell. Administrators will always have access to private records (see image above).
- Record the trace
This option is only available when entering protocol data through NaturaList. By checking the appropriate cell the user can keep a record of their track.

Protocols. Record the trace.
- Point number
Choose from the expandable menu at which point you are entering data.
[Top to Settings]
[Back to Protocols]
Parameters
Shows the status of the Free area tool parameter for the "Name of the protocol (here Waterbird Census Protocol)" :
· YES: Free area tool is active.
· NO: Free area tool is inactive.
When active, it allows both users and administrators to see polygons that have not yet been assigned to an observer. Users can ask to be assigned to a site. See wiki section Web interace > Free area tool for details.

Protocols. Free area tool.
- 1. Details
See details of the free area tool.

Protocols. Free area tool details.
BACK: Go back to previous screen.
EDIT: Modify details. See subsection Edit below.
- 2. Edit
Edit details of the free area tool.

Protocols. Editing free area tool.
Change status if necessary and click:
· BACK to go to previous screen without saving changes, or
· MODIFY to save changes.
When the Free area tool is active, administrators have a few more options than regular users when accessing the Free area tool as a user:
· Assigned census/Sample area: list of assigned areas.
· Statistics on request: list of messages sent by observers.
[Top to Settings]
[Back to Protocols]
Files for playback

Protocols. Files for playback.
ADMIN_CONTENT_TEXT_NAME: Species name.
File name: Name of the file that contains the sound.
- 1. Search
Reduce list by typing the name of a species, or part of it, and click SEARCH. When a filter is applied, to deactivate it, click on DISPLAY ALL to see the full list.
- 2. Page and items
Select page number and/or number of items per page. Count indicate the total of items found for the search.
Detail for choosing page, item/page
- 3. Details
See name of species and the file name containing its playback.

Protocols. Playback details.
1. ADMIN_CONTENT_TEXT_NAME: Species name.
2. File name: Name of the file that contains the sound, and its extension.
BACK: Go to previous screen.
4. EDIT: See edit subsection below.
5. DELETE: Delete entry from the list.
- 4. Edit
Modify playback file or species name for the selected entry.

Protocols. Editing playback details.
7. ADMIN_CONTENT_TEXT_NAME: Change species name if necessary by typing the species name, or part of it, on the left (7a) and choosing from the expandable menu on the right (7b).
8. File name: Click on Choose file to select a different file for this species.
BACK: Go back to previous screen without saving.
MODIFY: Save changes.
- 5. Delete
Delete the entry from the list.
- 6. NEW
Add a new playback file to the list.

Protocols. Adding a new playback file.
7. ADMIN_CONTENT_TEXT_NAME: Select species by typing its name, or part of it, on the left (7a) and choosing from the expandable menu on the right (7b).
8. File name: Click on Choose file to select a playback file to upload for this species.
BACK: Go back to previous screen without saving.
ADD: Save entry to the list.
[Top to Settings]
[Back to Protocols]
Shortcuts group
List of existing shortcut groups for this protocol.

Protocols. Shortcuts groups.
- 1. Search
Reduce list by typing the name of the Shortcut group, or part of it, and click SEARCH.
When a filter is applied, to deactivate it, click on DISPLAY ALL to see the full list.
- 2. Page and items
Select page number and/or number of items per page. Count indicates the total amount of items found for the search.
Detail for choosing page, item/page
- 3. Details
See details for the selected group.

Protocols. Shortcuts groups details.
BACK: Go to previous screen.
4. EDIT: Modify details. Go to next section Edit.
5. DELETE: Delete the selected group.
- 4. Edit
Edit selected shortcut group.

Protocols. Editing shortcuts groups.
7. Shortcuts group name: Select the language from the tabs above (7a) and type or change the shortcut group name (7b) in the selected language.
BACK: Go to previous screen without saving.
MODIFY: Save changes.
- 5. Delete
Delete shortcuts group. You will be asked to confirm. Click YES to delete and NO to cancel.

Protocols. Delete confirmation.
- 6. NEW
Create a new shortcut group.

Protocols. Creating a new shortcuts group.
7. Shortcuts group name: Select the language from the tabs above (7a) and type the shortcut group name (7b) in the selected language. Change tab if necessary and repeat.
BACK: Go to previous screen without saving.
8. ADD: Save the nae group.
[Top to Settings]
[Back to Protocols]
Shortcuts
List of species for which a shortcut exists.

Protocols. Shortcuts.
Species: Name of species.
Shortcuts group: Name of the shortcuts group.
Color code: Colour associated to this species. User may change it in NaturaList afterwards.
Order: Order this species shortcut will appear in relation to other species shortcuts in the same group.
- 1. Search
Reduce list by typing the name of the group, or part of it, and click SEARCH. When a filter is applied, to deactivate it, click on DISPLAY ALL to see the full list.
- 2. Page and items
Select page number and/or number of items per page. Count indicates the total of items found for the search.
Detail for choosing page, item/page
- 3. Details
See details for the selected speies.

Protocols. Shortcuts details.
7. Species: Species name.
8. Shortcuts group: Shortcuts group the selected species belongs to.
9. Colour code: Colour assigned to the selected species.
10. Order: Order in which the selected species will appear on the shortcuts list in relation to other species on the same list.
BACK: Go to previous screen.
EDIT: Edit details. See section Edit below.
- 4. Edit
Edit selected shortcut group.

Protocols. Editing shortcuts.
7. Species: Change the species name if necessary by typing the species name, or part of it, on the left (7a) and select from the expandable menu on the right (7b).
8. Shortcuts group: Change the group the species belongs to by typing the name of the group, or part of it, on the left (8a) and select from the expandable menu on the right (8b).
9. Colour code: Change the colour to assign to the species. Click on the colour to open the clour panel and choose color by selecting on the bar (10a) and adjusting on the panel (10b), or by typing on the fields (10c). Users may change it in NaturaList afterwards.
10. Order: Change the order in which the selected species will appear on the shortcut list by typing its number on the field.
BACK: Go to previous screen.
MODIFY: Save changes.
- 5. Delete
Delete species shortcut from the group. You will be asked to confirm. Click YES to delete and NO to cancel.
Protocols. Delete confirmation.
- 6. NEW
Create a new species shortcut.

Protocols. Creating a new shortcut.
7. Species: Type the species name, or part of it, on the left (7a) and select from the expandable menu on the right (7b).
8. Shortcuts group: Type the name of the group the species will belong to, or part of it, on the left (8a) and select from the expandable menu on the right (8b).
9. Colour code: Select a colour to assign to the species. Click on the colour to open the clour panel and choose color by selecting on the bar (10a) and adjusting on the panel (10b), or by typing on the fields (10c). Users may change it in NaturaList afterwards.
10. Order: Type a number to indicate in which position this shortcut will appear in relation to other shortcuts in the same shortcuts group.
BACK: Go to previous screen without saving.
ADD: Add the new species to the list..
[Top to Settings]
[Back to Protocols]
Import a shapefile
Import a file of the survey area and/or see all imports.
1. Select shapefile by clicking on Choose file and selecting from your computer the shapefile to upload.
2. Select encoding and SRID from the expandable menu.
3. Click next to upload the select shapefile.

Protocols. Import a shapefile.
1. Select shapefile
2. Select encodinng and SRID
3. Upload file
4. Import history
4. Import history
List of all shapefles uploaded. See correspondence of colours below.
[Top to Settings]
[Back to Protocols]
Import a shapefile

Protocols. Import shapefile.
Direct link to All my protocols > "Name of protocol" > Import a shapefile.
[Top to Import a shapefile]
[Back to Protocols]
Check data

Protocols. Check data.
Visualise a summary of survey data.

Protocols. Check data.
- 1. Graphs
Scroll down to see all graphs:
- Number of censuses: number of censuses per year from last years to present.
- Census duration: total number of hours of survey per year, from last years to present.
- Average census time: average number of minutes per survey.
- Number of censuses: number of censuses per year from last years to present.
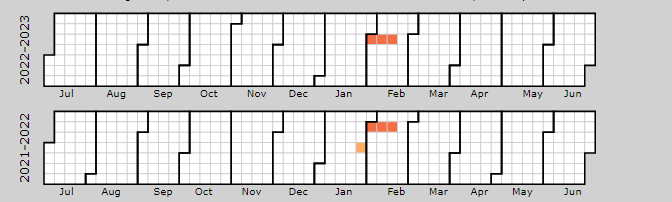
- 2. Site / Observer
Select a site and/or an observer from the expandable menu. Type the name, or part of it, if nedeed to reduce the list of options. If only a site is observed, you will see surveys from all observers; if only an observer is selected, you will see all sites the observer has access to. See image below as an example of its results.

Protocols. Check data by selecting site and/or observer.
Place pointer on any coloured square to display date of survey and number of species recorded. Click on any date to display a list of species recorded on a new window.
The color is linked to the number of species counted during the census.
White: = 0 specie
Red : =1 specie
Orange to Yellow to Green: 11 level of colors according the number of species between 1 to 20.
Green: = or >20 species
- 3. Period / Site
Select a count period and a region from the expandable menu to see surveys at the selected period and site. See image Waterbird census protocol. Check data by selecting site and/or observer as an example of results.
- 4. Sites without data
Select a count period and a region from the expandable menu. A list will show all sites without data for the selected period and observers assigned to each of the listed sites. Click on any observer's name to access their personal card. Check the e-mail cell (image below, A) to send a message to the observer/s at the site; or check check all on top (image below, B) to send a general message to all observers at all sites.
![]()
Protocols. E-mail observers of empty censuses.
A message template is shown below the list, along with the email addresses receiving this message (see image below). Change recepients by selecting a new study site from the list above. Send it as it is or type a message in the designated area to personalise it. When done, click SEND THE REQUESTS to send the message.

Protocols. Sending emails about empty sites.
5. Type message to personalise email.
6. Message recipients.
[Top to Check data]
[Back to Protocols]
Report

Protocols. Report.
Visualise pooled results from surveys.

Protocols. Filtering results.
- 1. Filter dates
Select the starting and ending date using the expandable calendar on the right or typing directly dd.mm.yyyy in the corresponding field.
- 2. Temporal aggregation
Select aggregating criteria from the expandable menu on the right. Options are:
- Day: Shows results per day. This is the default option.
- Pentad: Shows results in groups of five days.
- Week: Shows results per week.
- Decade: Shows results in groups of ten days.
- Month: Shows results per month.
- Year: Shows results per year.
- Day: Shows results per day. This is the default option.
- 3. Spatial aggregation
Select spatial aggregating criteria from the expandable menu on the right. Options are:
- Country: Results are grouped per area covered by the local portal. If the portal only covers part of the country, only this part is considered; if the local portal covers the whole country, all the country is considered.
- Canton: Cantons are country-specific administrative defined areas. Their official name differs from country to country: Kreis, province, district, commarca, county, and so on.
- Municipality: Municipality, like a canton, is an area administratively defined and country specific.
- Supersite: A supersite is a place that includes many other localities, and can only be used if it was previously created.
- Place: A place is a group of Localities (see below) linked together within the protocol. It is either represented on the map by a yellow dot or hidden. For example, in STOC EPS census, one may have different point counts in a square. Each of the points represents a Locality, but the square with all the points is a Place. Do the search accordingly. Note sometimes Place and Locality are the same. For example, in the Common breeding bird survey, a Locality represents a transect, and there is only one transect per square.
- Locality: A Locality is the exact location a survey takes place. It may represent a point, a transect or a polygon, depending on the study, and it is represented on the map as a dot.
- Country: Results are grouped per area covered by the local portal. If the portal only covers part of the country, only this part is considered; if the local portal covers the whole country, all the country is considered.
- 4. Visualisation
- SHOW: See results on screen, or
- EXPORT: Download results on an excel file.
- SHOW: See results on screen, or

Protocols. Report results.
2. Temporal aggregation: Show total numbers of individuals of the specie indicated under the first column (5) In this example, the aggregation is per week. Weeks with no data, remain empty. Use the horizontal bar at the bottom to scroll through all results.
3. Study site name: Results aggregated by place. In this example, by locality. All study sites at the selected locality appear separately. Use the vertical bar on the right to scroll through all results.
5. List of species: List of species registered at each site.
[Top to Report]
[Back to Protocols]
Map

Protocols. Map.
Map and statistics for the site.
Administrators have more functions than registered users (see user's Quick links), and can see all data in the site from all users.
For more information visit wiki section Web interface > Protocols > Map.